Este guia explica como integrar o MPS a um cliente iOS. Você pode integrar o MPS ao cliente iOS com base em um projeto nativo usando CocoaPods.
Desde 28 de junho de 2020, o mPaaS encerrou o suporte à baseline 10.1.32. Use a 10.1.68 ou a 10.1.60. Para atualizar a baseline da versão 10.1.32 para 10.1.68 ou 10.1.60, consulte o Guia de atualização do mPaaS 10.1.68 ou o Guia de atualização do mPaaS 10.1.60.
Pré-requisitos
Integre seu projeto ao mPaaS. Para mais informações, consulte Integração baseada em framework nativo usando Cocoapods.
Procedimento
Para usar o MPS, conclua as etapas a seguir.
-
Use o plugin do CocoaPods para adicionar o SDK do MPS.
No arquivo Podfile, use
mPaaS_pod "mPaaS_Push"para adicionar a dependência.Execute
pod installpara concluir a integração do SDK.
-
Configure o projeto.
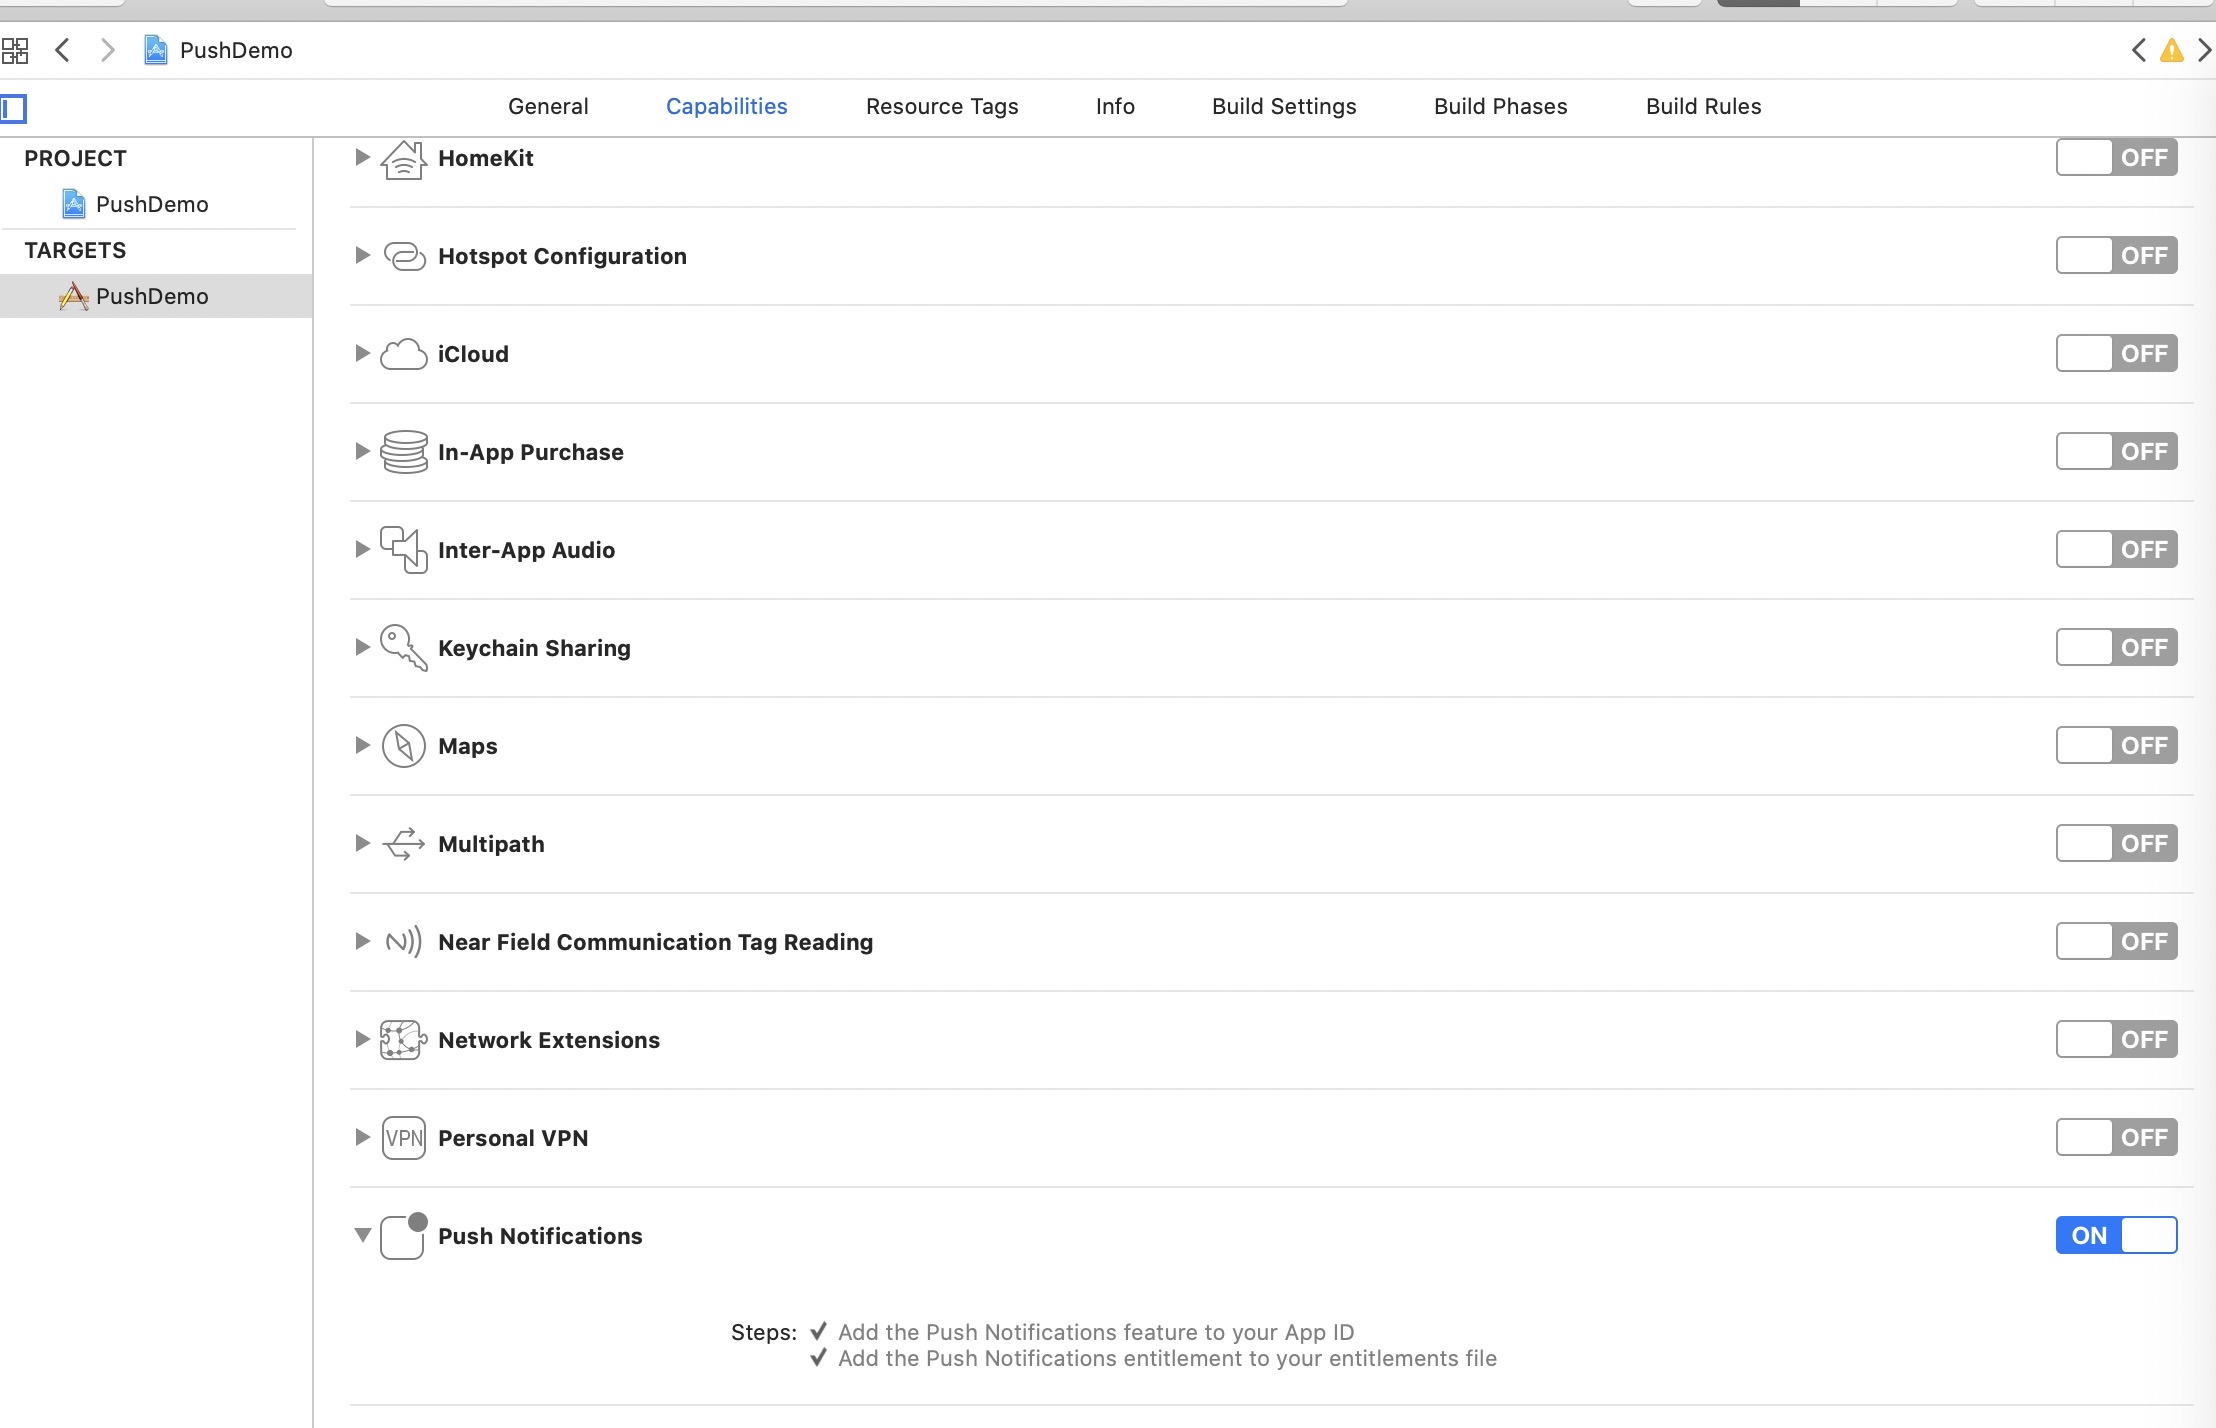
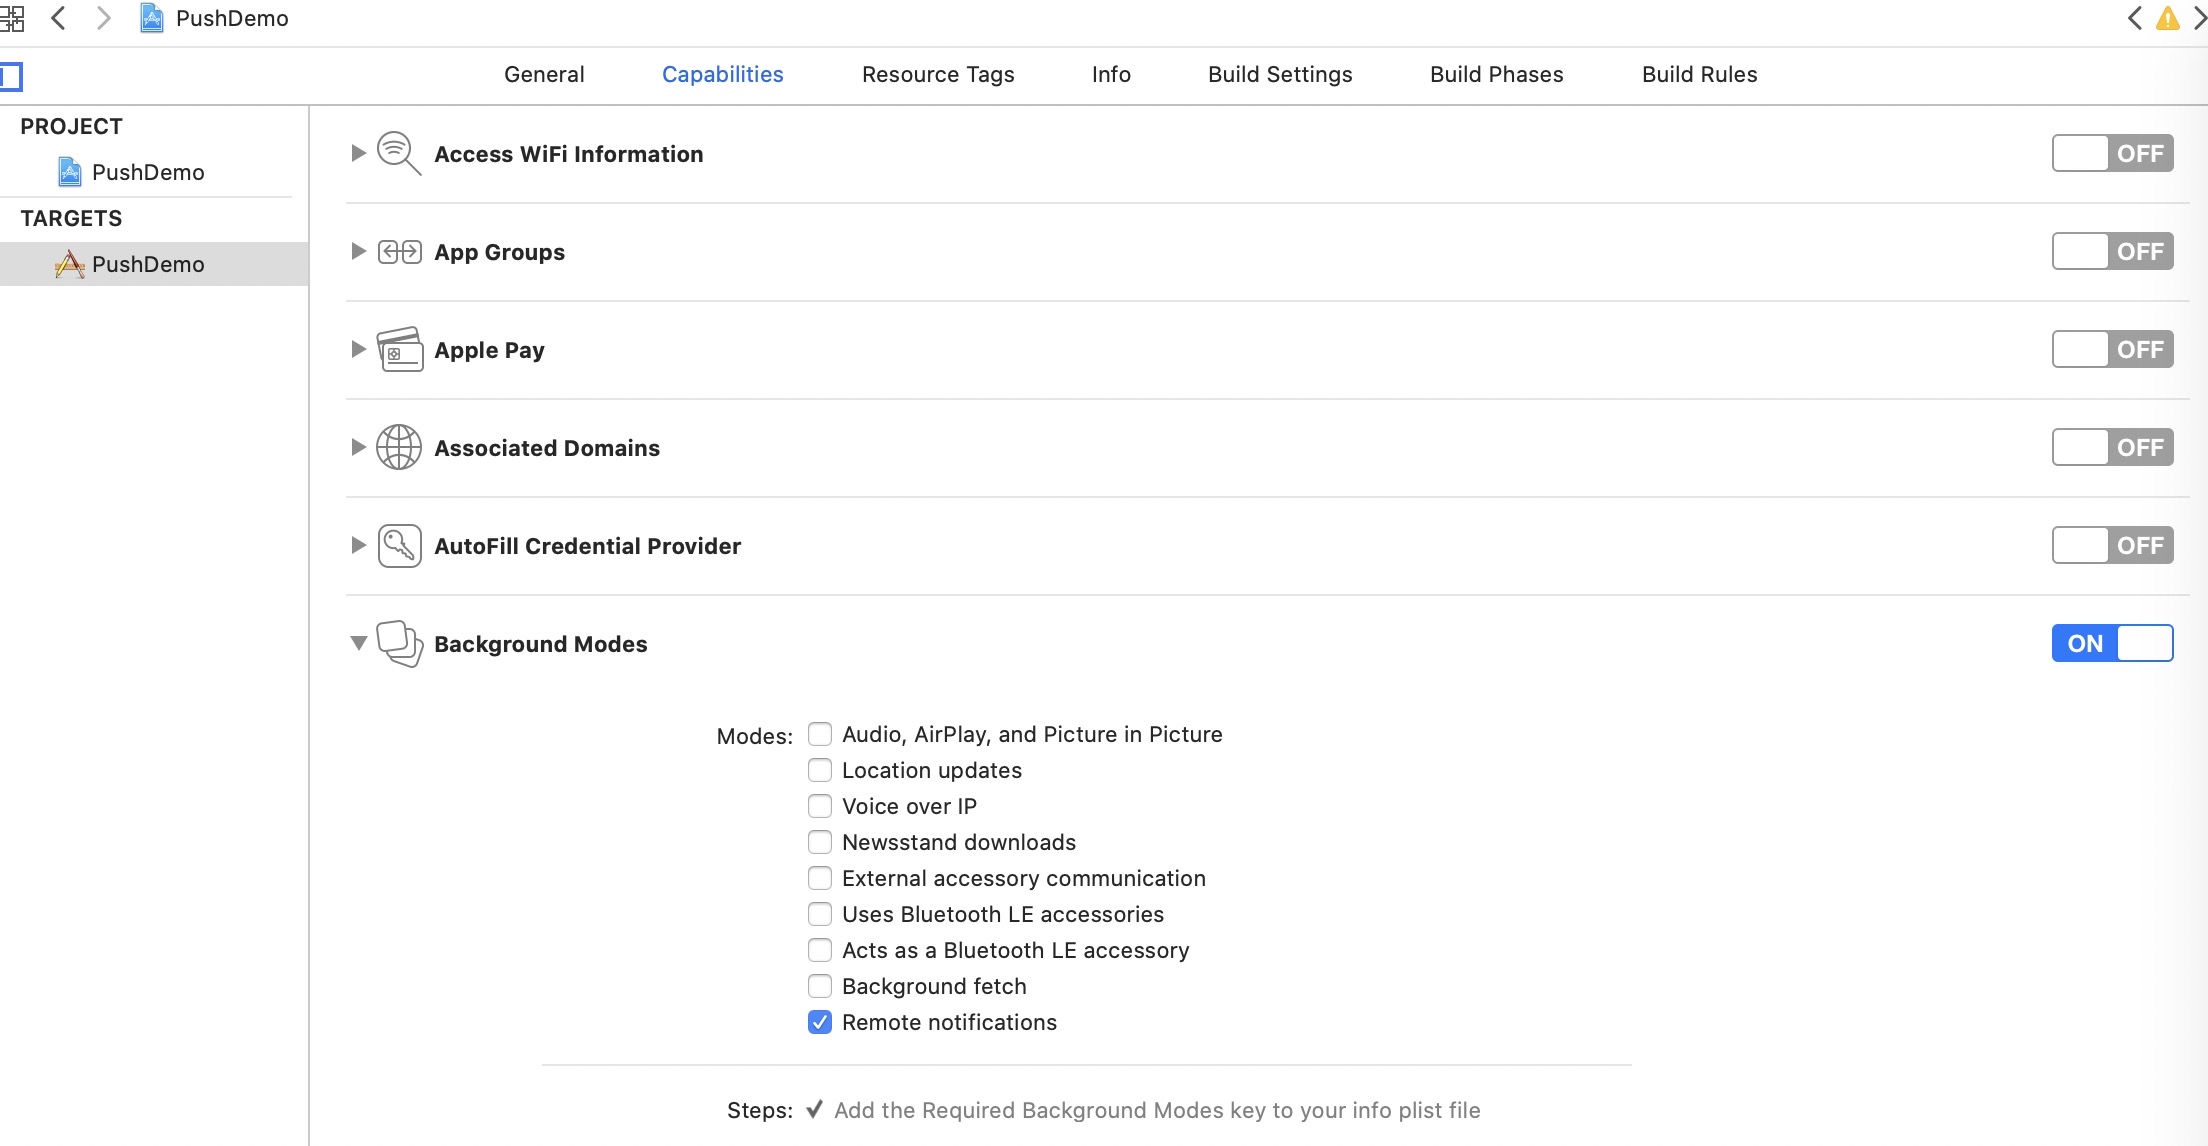
Ative os seguintes recursos no diretório TARGETS do seu projeto:
Capabilities > Push Notifications
Capabilities > Background Modes > Remote notifications
-
Use o SDK. Se você acessar o cliente iOS via CocoaPods com base em um projeto existente, conclua as operações abaixo.
-
(Opcional) Registre o token do dispositivo.
O SDK de push de mensagens solicita automaticamente o registro do deviceToken ao iniciar o aplicativo. Geralmente, não é necessário solicitar esse registro manualmente. No entanto, em casos especiais (como quando há controle de privacidade na inicialização que bloqueia todas as requisições de rede), acione o registro do deviceToken novamente após a autorização e o controle. O código de exemplo é o seguinte:
- (void)registerRemoteNotification { // Push notification registration if ([[[UIDevice currentDevice] systemVersion] floatValue] >= 10.0) {// 10.0+ UNUserNotificationCenter* center = [UNUserNotificationCenter currentNotificationCenter]; center.delegate = self; [center getNotificationSettingsWithCompletionHandler:^(UNNotificationSettings * _Nonnull settings) { [center requestAuthorizationWithOptions:(UNAuthorizationOptionAlert|UNAuthorizationOptionSound|UNAuthorizationOptionBadge) completionHandler:^(BOOL granted, NSError * _Nullable error) { // Enable or disable features based on authorization. if (granted) { dispatch_async(dispatch_get_main_queue(), ^{ [[UIApplication sharedApplication] registerForRemoteNotifications]; }); } }]; }]; } else {// 8.0,9.0 UIUserNotificationSettings *settings = [UIUserNotificationSettings settingsForTypes:(UIUserNotificationTypeBadge |UIUserNotificationTypeSound|UIUserNotificationTypeAlert) categories:nil]; [[UIApplication sharedApplication] registerUserNotificationSettings:settings]; [[UIApplication sharedApplication] registerForRemoteNotifications]; } } -
Obtenha o token do dispositivo e vincule-o ao ID de usuário.
O SDK de push de mensagens fornecido pelo mPaaS encapsula a lógica de registro no servidor APNs. Após o início do programa, o Push SDK se registra automaticamente nesse servidor. Obtenha o deviceToken emitido pelo APNs no método de callback de registro bem-sucedido e chame o método de interface do PushService para reportar o vínculo do userId ao núcleo de push móvel.
// import <PushService/PushService.h>
- (void)application:(UIApplication *)application didRegisterForRemoteNotificationsWithDeviceToken:(NSData *)deviceToken
{
    [[PushService sharedService] setDeviceToken:deviceToken];
    [[PushService sharedService] pushBindWithUserId:@"your userid(to be replaced)" completion:^(NSException *error) {
    }];

}
O SDK de push também fornece a API
- (void)pushUnBindWithUserId:(NSString *)userId completion:(void (^)(NSException *error))completion;para desvincular o token do dispositivo do ID de usuário do aplicativo. Por exemplo, chame a API de desvinculação após o usuário trocar de conta. -
Receba mensagens de push.
Quando o cliente recebe a mensagem enviada por push e o usuário clica para visualizá-la, o sistema inicia o aplicativo correspondente. Processe a lógica após o recebimento da mensagem de push no método de callback do
AppDelegate.-
Em versões do sistema anteriores ao iOS 10, use os seguintes métodos para processar mensagens da barra de notificação ou mensagens silenciosas:
// Cold start for push messages in system versions earlier than iOS 10 - (BOOL)application:(UIApplication *)application didFinishLaunchingWithOptions:(NSDictionary *)launchOptions { NSDictionary *userInfo = [launchOptions objectForKey: UIApplicationLaunchOptionsRemoteNotificationKey]; if ([[[UIDevice currentDevice] systemVersion] doubleValue] < 10.0) { // Cold start for push messages in system versions earlier than iOS 10 } return YES; } // When the app runs in the foreground, adopt the method of processing common push messages; when the app runs in the background or foreground, adopt the method of processing silent messages ; when the app version is earlier than iOS 10, adopt the method of processing notification bar messages -(void)application:(UIApplication *)application didReceiveRemoteNotification:(NSDictionary *)userInfo fetchCompletionHandler:(void (^)(UIBackgroundFetchResult result))completionHandler { // Process received messages } -
No iOS 10 ou superior, implemente os seguintes métodos delegate para escutar mensagens da barra de notificação:
  // Register UNUserNotificationCenter delegate
  if ([[[UIDevice currentDevice] systemVersion] doubleValue] >= 10.0) {
          UNUserNotificationCenter* center = [UNUserNotificationCenter currentNotificationCenter];
          center.delegate = self;
    }

   // Receive remote push messages when the app runs in the foreground
  - (void)userNotificationCenter:(UNUserNotificationCenter *)center willPresentNotification:(UNNotification *)notification withCompletionHandler:(void (^)(UNNotificationPresentationOptions options))completionHandler
  {
      NSDictionary *userInfo = notification.request.content.userInfo;

      if([notification.request.trigger isKindOfClass:[UNPushNotificationTrigger class]]) {
          // Receive remote push messages when the app runs in the foreground

      } else {
          // Receive local push messages when the app runs in the foreground

      }
      completionHandler(UNNotificationPresentationOptionNone);
  }

  // Receive remote push messages when the app runs in the background or uses cold start mode
  - (void)userNotificationCenter:(UNUserNotificationCenter *)center didReceiveNotificationResponse:(UNNotificationResponse *)response withCompletionHandler:(void(^)(void))completionHandler
  {
      NSDictionary *userInfo = response.notification.request.content.userInfo;

      if([response.notification.request.trigger isKindOfClass:[UNPushNotificationTrigger class]]) {
          // Receive remote push messages when the app runs in the background or uses cold start mode

      } else {
          // Receive local push messages when the app runs in the foreground

      }
      completionHandler();

  }
-
-
Calcule a taxa de abertura de mensagens.
Para contabilizar a taxa de abertura de mensagens no lado do cliente, chame a interface
pushOpenLogReportdoPushService(disponível nas versões 10.1.32 e superiores) para reportar o evento de abertura da mensagem quando o usuário abri-la no aplicativo. Após reportar o evento, visualize as estatísticas da taxa de abertura de mensagens na página Message Push > Overview no console do mPaaS./** * Enable the API for reporting push messages so that the message open rate can be calculated. * @param userInfo userInfo of a message * @return */ - (void)pushOpenLogReport:(NSDictionary *)userInfo;
-
-
Configure um certificado de push.
Para enviar mensagens pelo console MPS do mPaaS, configure um certificado de push APNs no console. Esse certificado deve corresponder à assinatura no cliente. Caso contrário, o cliente não receberá mensagens de push.
Para mais detalhes sobre a configuração, consulte Configurar um certificado de push iOS.
Próximas etapas
Após configurar um certificado APNs no console MPS do mPaaS, envie mensagens aos aplicativos na dimensão dispositivo. O MPS envia mensagens aos clientes pelo APNs da Apple. Para mais informações, consulte Processo de push para dispositivos Apple e Android fora da China.
Depois de reportar os IDs de usuário e o servidor vinculá-los aos tokens de dispositivo, envie mensagens aos aplicativos na dimensão usuário.
Exemplo de código
Clique aqui para baixar o exemplo de código.
Tópicos relacionados
Push de mensagens de Live Activity
O iOS introduziu um novo recurso na versão 16,1: Live Activity. Esse recurso exibe atividades em tempo real na tela de bloqueio, permitindo que os usuários acompanhem o progresso de diversas atividades diretamente dessa tela. No projeto principal, use o framework ActivityKit para iniciar, atualizar e encerrar as atividades em tempo real. Também é possível atualizar e encerrar essas atividades via push remoto. Na extensão de widget, use SwiftUI e WidgetKit para criar a interface da live activity. A função de atualização por push remoto da live activity não suporta certificados .p12, portanto, configure um certificado .p8.
Várias live activities podem ser abertas simultaneamente no mesmo projeto, e cada uma possui tokens diferentes.
Acessar o cliente
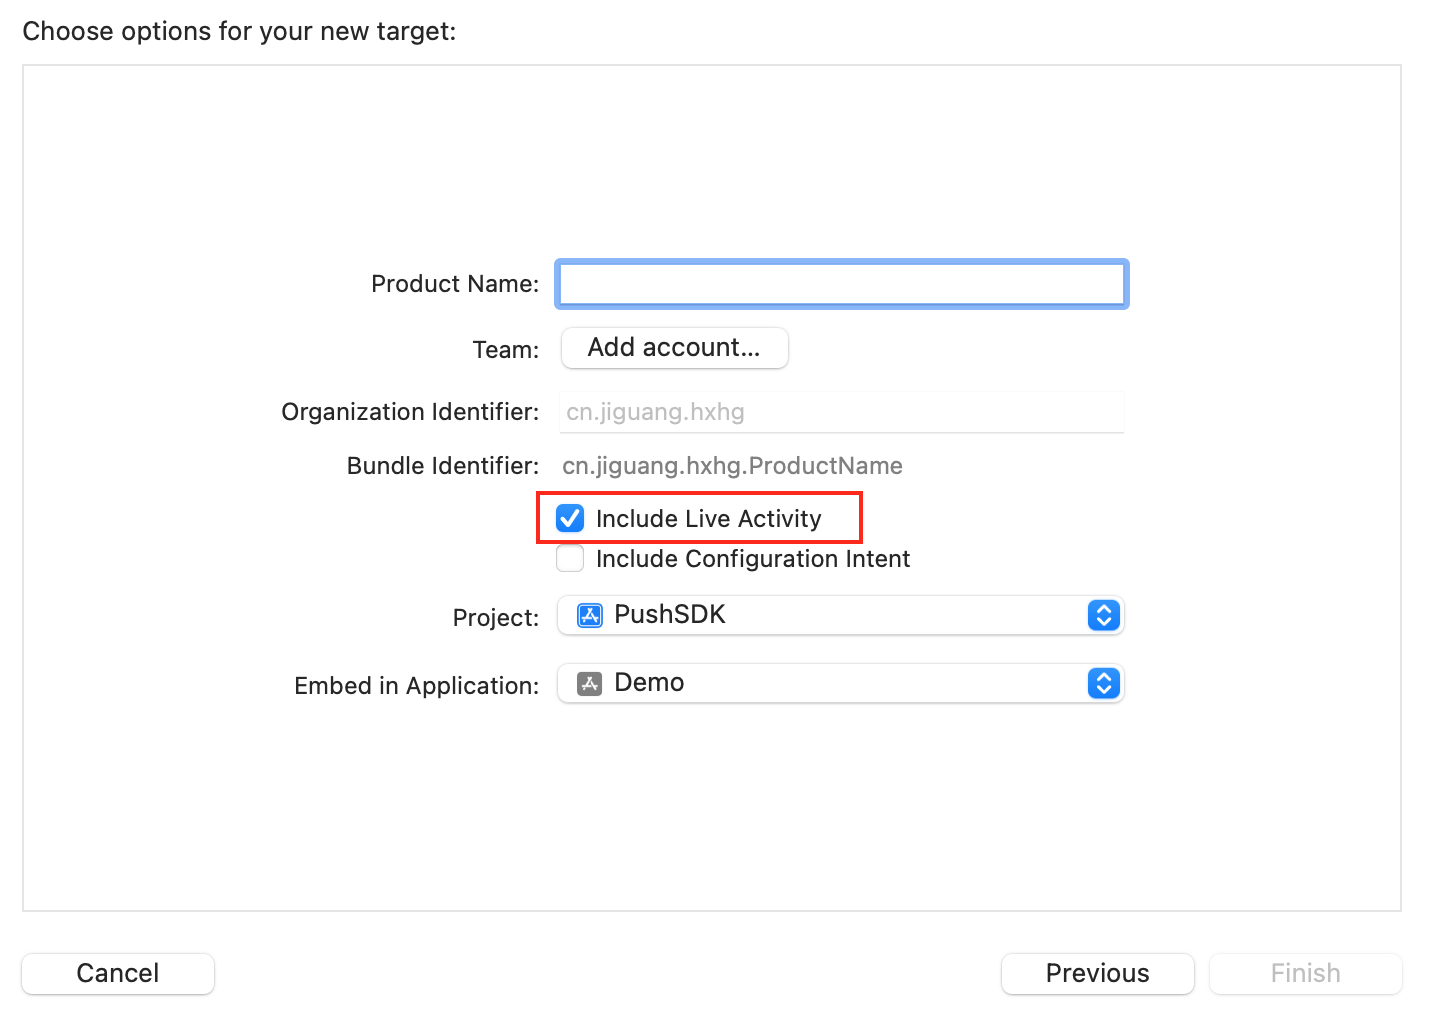
Configurar o projeto com suporte a Live Activity
Adicione um par chave-valor no arquivo
Info.plistdo projeto principal. A chave éNSSupportsLiveActivitiese o valor éYES.
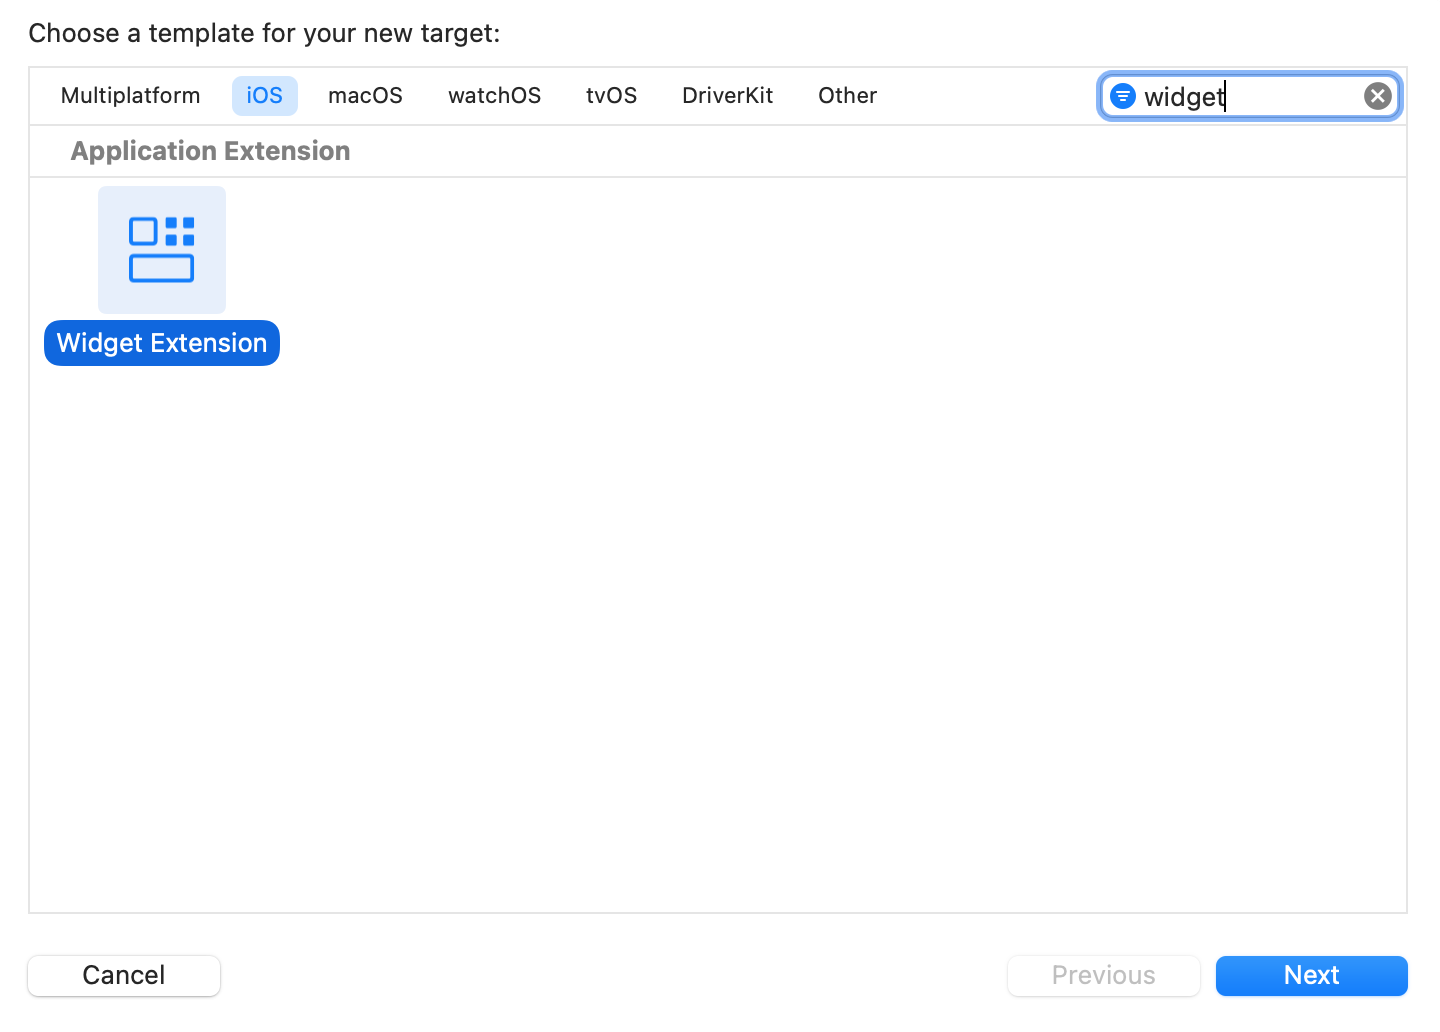
Crie uma nova Widget Extension. Se ela já existir no projeto, pule esta etapa.
Acessar o cliente via código
-
Crie o modelo.
Crie um novo arquivo swift no código do projeto principal e defina
ActivityAttributese Activity.ContentState nele. O código abaixo é apenas um exemplo; escreva-o conforme sua necessidade de negócio real.import SwiftUI import ActivityKit struct PizzaDeliveryAttributes: ActivityAttributes { public typealias PizzaDeliveryStatus = ContentState public struct ContentState: Codable, Hashable { var driverName: String var estimatedDeliveryTime: ClosedRange<Date> init(driverName: String, estimatedDeliveryTime: ClosedRange<Date>) { self.driverName = driverName self.estimatedDeliveryTime = estimatedDeliveryTime } init(from decoder: Decoder) throws { let container: KeyedDecodingContainer<PizzaDeliveryAttributes.ContentState.CodingKeys> = try decoder.container(keyedBy: PizzaDeliveryAttributes.ContentState.CodingKeys.self) self.driverName = try container.decode(String.self, forKey: PizzaDeliveryAttributes.ContentState.CodingKeys.driverName) if let deliveryTime = try? container.decode(TimeInterval.self, forKey: PizzaDeliveryAttributes.ContentState.CodingKeys.estimatedDeliveryTime) { self.estimatedDeliveryTime = Date()...Date().addingTimeInterval(deliveryTime * 60) } else if let deliveryTime = try? container.decode(String.self, forKey: PizzaDeliveryAttributes.ContentState.CodingKeys.estimatedDeliveryTime) { self.estimatedDeliveryTime = Date()...Date().addingTimeInterval(TimeInterval.init(deliveryTime)! * 60) } else { self.estimatedDeliveryTime = try container.decode(ClosedRange<Date>.self, forKey: PizzaDeliveryAttributes.ContentState.CodingKeys.estimatedDeliveryTime) } } } var numberOfPizzas: Int var totalAmount: String }Selecione tanto o target do projeto principal quanto a Activity.
O sistema processa as mensagens de push recebidas e os desenvolvedores não podem interceptá-las.
O
ContentStatecontém dados que podem ser atualizados dinamicamente. Ao enviar notificações de Live Activity, os nomes e tipos dos parâmetros atualizados dinamicamente devem corresponder aos configurados noContentState.Se alguns dados precisarem de processamento, sobrescreva o método
decoderdoActivityAttributes.ContentState.
-
Crie a interface.
Crie interfaces ativas e em tempo real nas Widget Extensions. Crie o Widget e retorne uma
Activity Configuration. Desenvolva a UI específica conforme o seu próprio negócio.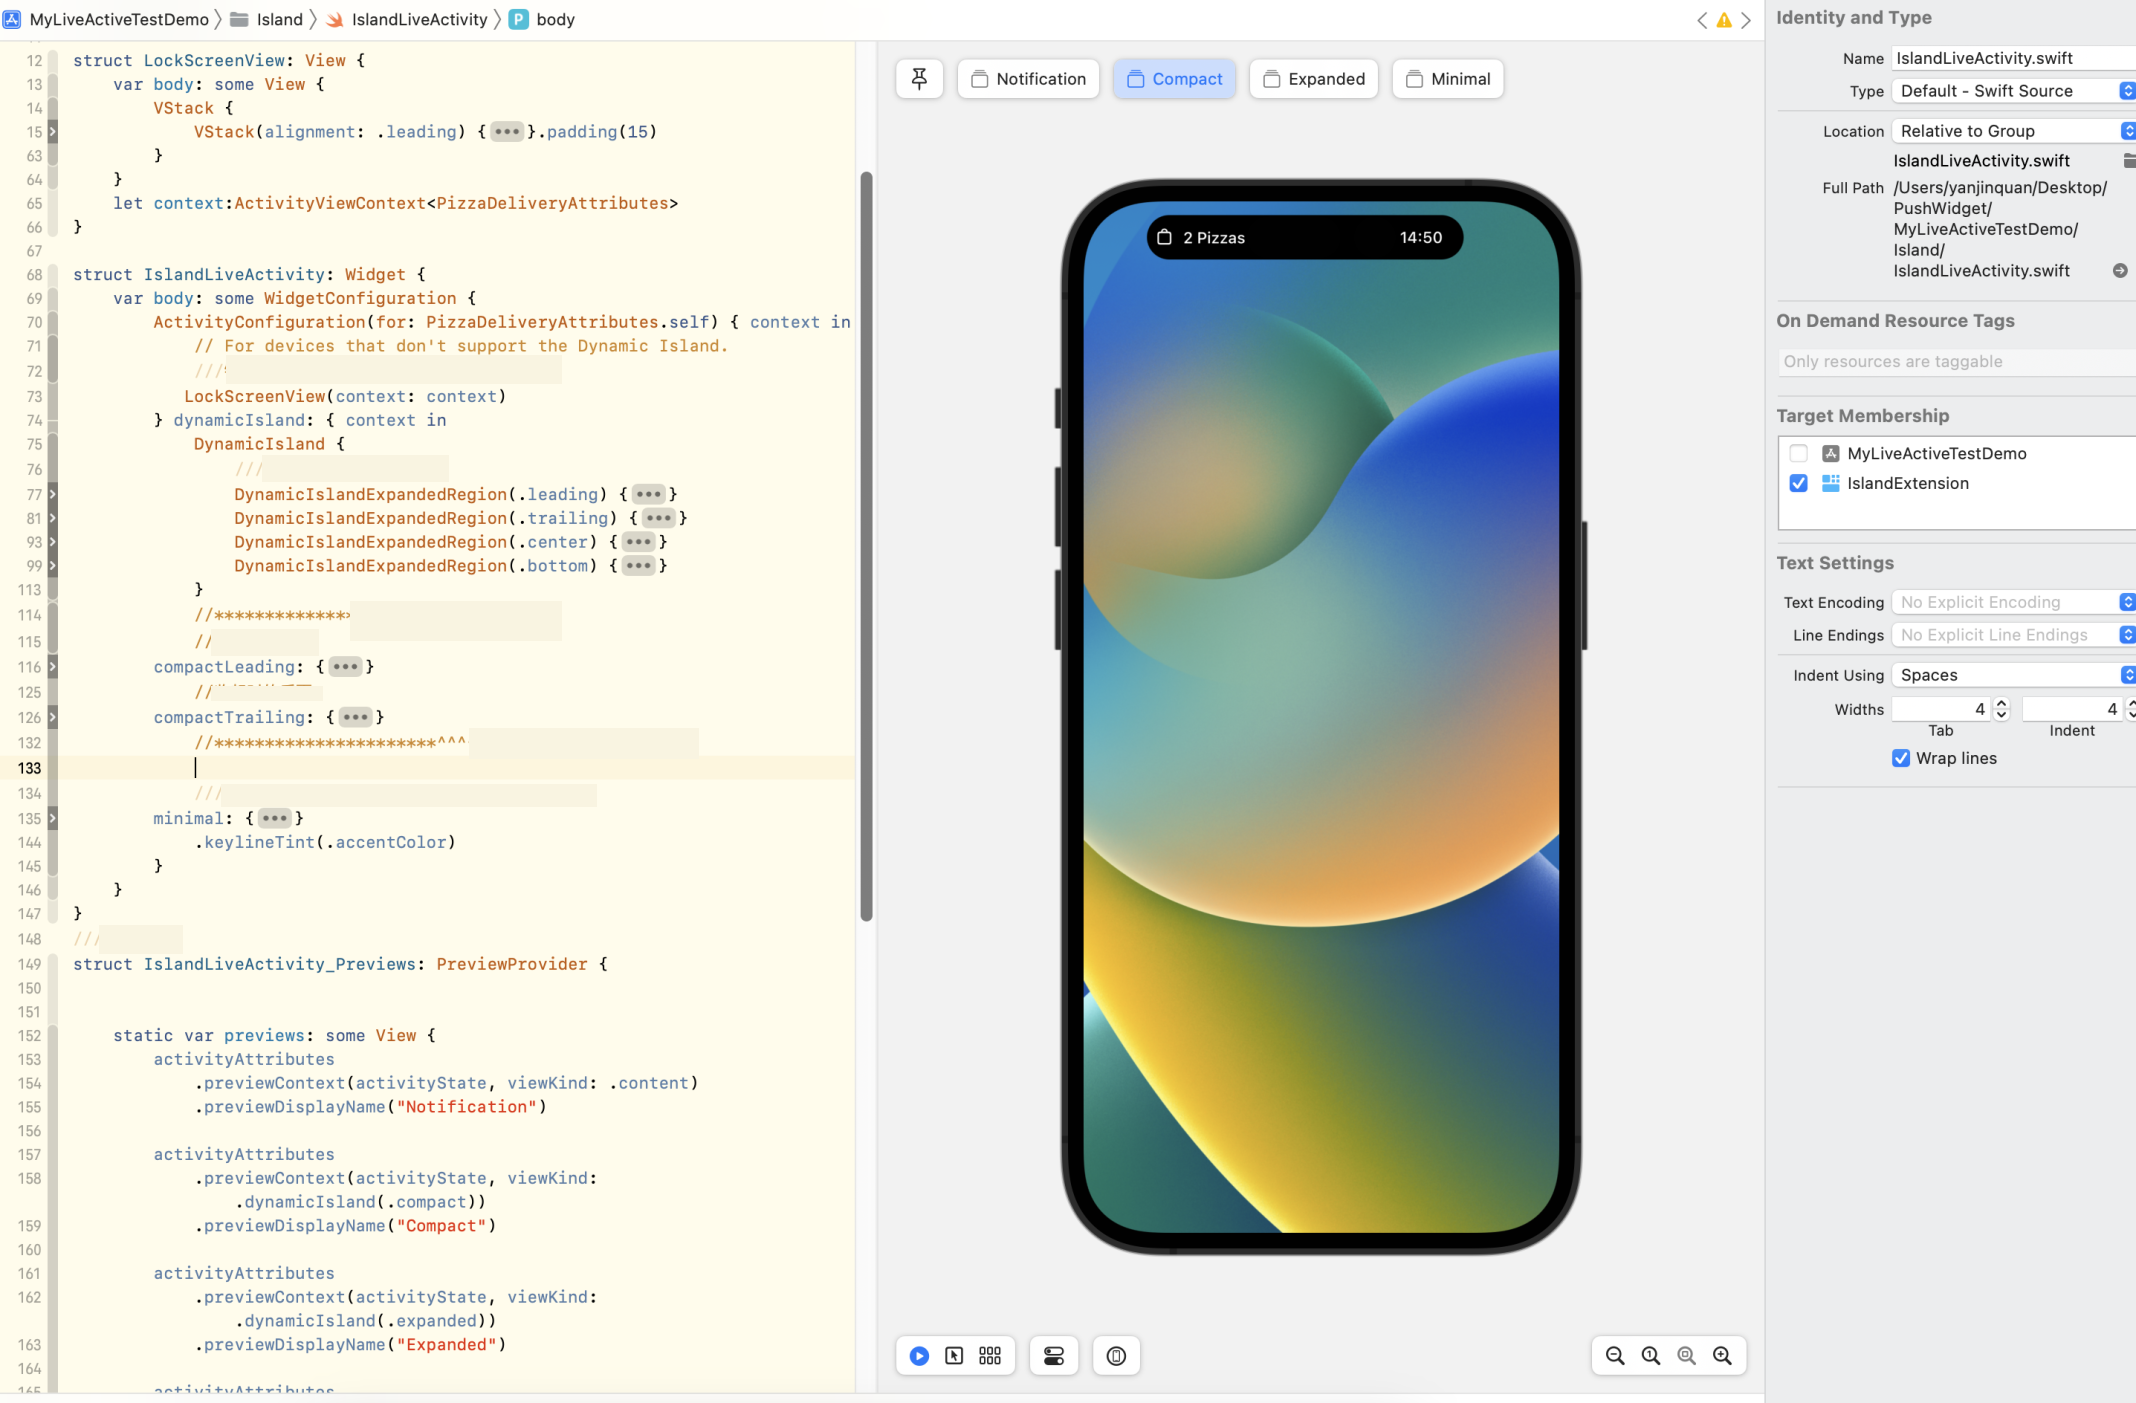
-
Use o WidgetBundle.
Se o aplicativo alvo suportar tanto widgets quanto live activities, use um WidgetBundle.
import WidgetKit import SwiftUI @main structIslandBundle: WidgetBundle { varbody: someWidget { Island() IslandLiveActivity() } } -
Inicie a live activity.
func startDeliveryPizza() { let pizzaDeliveryAttributes = PizzaDeliveryAttributes(numberOfPizzas: 1, totalAmount:"$99") let initialContentState = PizzaDeliveryAttributes.PizzaDeliveryStatus(driverName: "TIM", estimatedDeliveryTime: Date()...Date().addingTimeInterval(15 * 60)) do { let deliveryActivity = try Activity<PizzaDeliveryAttributes>.request( attributes: pizzaDeliveryAttributes, contentState: initialContentState, pushType: .token) } catch (let error) { print("Error requesting pizza delivery Live Activity \(error.localizedDescription)") } } -
Envie o Token.
Após iniciar a live activity com sucesso, obtenha o Token de push da live activity retornado pelo sistema pelo método
pushTokenUpdates. Chame o métodoliveActivityBindWithActivityId:pushToken:filter:completion:do PushService para enviá-lo. Ao enviar o Token, inclua também o identificador da live activity. Esse identificador é necessário durante o envio de pushes para live activities, pois o servidor o utiliza para confirmar o destino do push. Personalize o identificador desta live activity. Diferentes live activities possuem IDs distintos (IDs iguais causam problemas no push). Para a mesma live activity, não altere o ID quando o Token for atualizado.NotaO ActivityKit é um framework em linguagem swift e não suporta chamadas OC diretas. Ao usar a API do framework, faça a chamada no arquivo swift. Como o MPPushSDK é em linguagem OC, quando o swift chama OC, crie um arquivo de ponte. Importe
#import <MPPushSDK/MPPushSDK.h>nesse arquivo de ponte.let liveactivityId = UserDefaults.standard.string(forKey: "pushTokenUpdates_id") ?? "defloutliveactivityId" Task { for await tokenData in deliveryActivity.pushTokenUpdates { let newToken = tokenData.map { String(format: "%02x", $0) }.joined() PushService.shared().liveActivityBind(withActivityId: liveactivityId, pushToken: newToken, filter: .call) { excpt in guard let excpt = excpt else { ///Submitted successfully return } if "callRepeat" == excpt.reason { ///Repeated call, please ignore print("pushTokenUpdates_id-Repeated calls") } else { ///Submit failed } } } }Após o envio bem-sucedido, envie as atualizações por push usando a identificação das live activities.
NotaComo o
pushTokenUpdatesdo iPhone é chamado duas vezes simultaneamente, no cenário de múltiplas live activities, opushTokenUpdatesda live activity anterior será reativado quando uma nova for criada. Por isso, o SDK fornece uma função de filtragem, controlada pelo parâmetro filter:Quando o filter é
MPPushServiceLiveActivityFilterAbandon, o SDK descarta automaticamente chamadas repetidas sem gerar callback.Quando o filter é
MPPushServiceLiveActivityFilterCall, o SDK filtra automaticamente essa requisição e retorna um callback de falha (callRepeat). Nesse caso,error.reasonserá@"callRepeat"; ignore-o.Quando o filter é
MPPushServiceLiveActivityFilterReRefuse, nenhuma filtragem ocorre dentro do SDK. Quando o mesmo activityId e pushToken forem chamados repetidamente e o envio falhar, o reenvio por parte do cliente não será considerado a mesma chamada.
A definição de
MPPushServiceLiveActivityFilterTypeé a seguinte:typedef NS_ENUM(NSInteger, MPPushServiceLiveActivityFilterType){ MPPushServiceLiveActivityFilterAbandon,//Abandon it directly without any callback MPPushServiceLiveActivityFilterCall,//Filter out this request and give a callback for failure(callRepeat) MPPushServiceLiveActivityFilterRefuse//No filtering };