すべてのプロダクト
Search
ドキュメントセンター

Security Center:クロスアカウントの緊急脆弱性スキャンの自動化

最終更新日:Jun 24, 2026

Python スクリプトを使用して、すべての Resource Directory (RD) メンバーアカウントに対し、Cloud Security Center の緊急脆弱性スキャンを一括でトリガーします。このスクリプトは ModifyEmgVulSubmit API を呼び出し、RD を通じてアカウントを自動検出するため、手動でのアカウントリストの管理が不要になります。

背景情報

あなたの組織では、RD の配下で 150 のメンバーアカウントを管理しています。 polkit pkexec にローカル権限昇格の脆弱性 (CVE-2021-4034) が発見され、セキュリティチームは直ちにすべてのアカウントにわたる影響範囲 (ブラスト半径) を評価する必要があります。

手動でのアプローチには、いくつかの問題があります。

  • 手動対応の遅さ: 150 のアカウントに 1 つずつログインするには数時間かかり、対応が完了する前に封じ込めの機会を逃す可能性があります。

  • カバレッジのギャップ: 手作業でメンテナンスされているアカウントリストでは、新しく追加された RD メンバーを見逃しがちです。

  • 自動化の落とし穴: API スロットリングなしで並行スクリプトを実行すると、レート制限に達し、一括処理が失敗する原因となります。

  • 可視性の断片化: スキャン結果は個々のアカウントに分散し、組織全体の脆弱性ステータスを単一ペインのビューで確認できません。

ソリューション概要

ローカルマシン上の Python スクリプトが RD からすべてのメンバーアカウントを取得し、Cloud Security Center API を通じて緊急脆弱性スキャンタスクを送信します。スキャン完了後、Agentic SOC ダッシュボードで結果を確認します。

image

このスクリプトは RAM ユーザーのアクセスキーで認証し、DescribeEmgVulItem を呼び出して脆弱性名を検証します。その後、RD の ListAccounts API を使用してすべてのメンバーアカウントを検出し、各アカウントに対して ModifyEmgVulSubmit を呼び出してスキャンタスクを送信します。結果は Agentic SOC を経由して SLS に集約され、集中監視が可能になります。

操作手順

ステップ 1: 環境と権限の設定

  1. 以下の前提条件を確認します。

    • エンタープライズ検証済みで管理者権限を持つ Alibaba Cloud アカウント。

    • Resource Directory の有効化

    • すべての RD メンバーアカウントで Cloud Security Center (Advanced edition 以上) が有効化されており、Agentic SOC のログ集約が設定済みであること (アクセス設定)。

    • ローカルに Python 3.6 以降がインストール済みであること。

  2. RAM ユーザーを作成 (例: VulnScanner) し、以下の権限を付与します。

    • AliyunYundunSASFullAccess (必須): Cloud Security Center のスキャン API へのアクセスを許可します。このトピックでは、迅速な検証のためにシステムポリシーを使用します。本番環境では、ModifyEmgVulSubmit と DescribeEmgVulItem の権限のみを付与するカスタムポリシーを作成してください。

    • AliyunResourceDirectoryReadOnlyAccess (推奨): すべての RD メンバーアカウントの自動検出を有効にします。これがない場合、設定ファイルにアカウント ID を手動でリストアップする必要があります。

  3. OpenAPI アクセスを有効にし、アクセスキーを保存します。これはステップ 3: スキャンの実行で必要になります。

    重要

    スクリプトの実行に、ご自身の Alibaba Cloud アカウント (ルートアカウント) のアクセスキーを絶対に使用しないでください。常に上記で作成した専用の RAM ユーザーのアクセスキーを使用し、認証情報の漏洩リスクを最小限に抑えるために定期的にローテーションしてください。

ステップ 2: スクリプトのダウンロードとスキャンパラメータの設定

  1. 以下の 3 つのファイルを作業ディレクトリにダウンロードします。

    • scan_manager.py: メインスクリプト。アカウントを反復処理し、それぞれに対してスキャン API を呼び出します。

    • config.ini: 設定ファイル。サービスエンドポイント、対象の脆弱性、スキャンパラメータを指定します。

    • requirements.txt: 必要な Python ライブラリ。

    scan_manager.py

    # -*- coding: utf-8 -*-
    # クロスアカウントの緊急脆弱性一括スキャンスクリプト
    import os
    import sys
    import time
    import configparser
    from typing import List, Dict
    
    from alibabacloud_credentials.client import Client as CredentialClient
    from alibabacloud_sas20181203 import models as sas_20181203_models
    from alibabacloud_sas20181203.client import Client as Sas20181203Client
    from alibabacloud_tea_openapi import models as open_api_models
    from alibabacloud_tea_util import models as util_models
    from alibabacloud_tea_util.client import Client as UtilClient
    
    # --- Resource Directory クライアントをインポート ---
    from alibabacloud_resourcemanager20200331 import models as resourcemanager_20200331_models
    from alibabacloud_resourcemanager20200331.client import Client as ResourceManager20200331Client
    
    
    class Sample:
        def __init__(self):
            pass
    
        @staticmethod
        def create_client(endpoint: str) -> Sas20181203Client:
            credential = CredentialClient()
            config = open_api_models.Config(
                credential=credential
            )
            config.endpoint = endpoint
            return Sas20181203Client(config)
    
        @staticmethod
        def resolve_vul_names(client: Sas20181203Client, target_names: List[str]) -> Dict[str, str]:
            """DescribeEmgVulItem API を使用して、コンソールの表示名を API が要求する内部名に解決します。
    
            コンソールの「緊急脆弱性」ページにある脆弱性名を DescribeEmgVulItem の VulName パラメーターとして渡し、
            レスポンスから Name フィールドを抽出して、後続の ModifyEmgVulSubmit の呼び出しに使用します。
    
            Args:
                client: Cloud Security Center のクライアント。
                target_names: 設定ファイルからの脆弱性名のリスト (コンソール表示名)。
    
            Returns:
                キーが API 脆弱性名 (ModifyEmgVulSubmit用)、値が表示名 (ログ出力用) の辞書。
            """
            runtime = util_models.RuntimeOptions()
    
            resolved: Dict[str, str] = {}
            for target in target_names:
                try:
                    request = sas_20181203_models.DescribeEmgVulItemRequest(
                        vul_name=target
                    )
                    response = client.describe_emg_vul_item_with_options(request, runtime)
                    vul_items = response.body.grouped_vul_items or []
    
                    if vul_items:
                        vul_name = vul_items[0].name
                        resolved[vul_name] = target
                        print(f"  ✅ '{target}' → {vul_name}")
                    else:
                        print(f"  ⚠️ No matching emergency vulnerability found: '{target}'")
                except Exception as e:
                    print(f"  ❌ Failed to query vulnerability '{target}': {e}")
    
            return resolved
    
        @staticmethod
        def main(args: List[str]) -> None:
            # --- config.ini ファイルから設定を読み込み ---
            config = configparser.ConfigParser(delimiters=('=',))
            # 文字化けを防ぐために UTF-8 エンコーディングでファイルを読み込みます。
            config.read('config.ini', encoding='utf-8')
    
            try:
                # スキャン設定を読み込み
                endpoint = config.get('scan_config', 'endpoint')
                scan_targets_str = config.get('scan_config', 'scan_targets')
                target_names = [name.strip() for name in scan_targets_str.split(',') if name.strip()]
                account_ids_str = config.get('scan_config', 'member_uids')
                account_ids = [uid.strip() for uid in account_ids_str.split(',') if uid.strip()]
                max_qps = config.getint('scan_config', 'max_qps')
    
            except (configparser.NoSectionError, configparser.NoOptionError) as e:
                print(f"❌ Error reading configuration file 'config.ini': {e}")
                print("Please make sure the config.ini file exists and contains the [scan_config] section with all required keys.")
                sys.exit(1)
    
            # --- アセット自動検出ロジック ---
            # 設定ファイルで member_uids が空の場合、Resource Directory からリストを自動取得しようと試みます。
            if not account_ids:
                print("ℹ️ 'member_uids' is empty, attempting to auto-discover member accounts from Resource Directory...")
                try:
                    # Resource Manager の汎用エンドポイント。
                    rm_endpoint = 'resourcemanager.aliyuncs.com'
    
                    # Resource Directory クライアントを作成。
                    credential = CredentialClient()
                    rm_config = open_api_models.Config(credential=credential, endpoint=rm_endpoint)
                    rm_client = ResourceManager20200331Client(rm_config)
    
                    all_accounts = []
                    page_number = 1
                    while True:
                        list_accounts_request = resourcemanager_20200331_models.ListAccountsRequest(
                            page_number=page_number,
                            page_size=100  # リクエスト数を減らすために最大の PageSize を使用。
                        )
                        # ListAccounts API を呼び出し、ループでページネーションを処理。
                        response = rm_client.list_accounts(list_accounts_request)
                        if response.body.accounts and response.body.accounts.account:
                            current_page_accounts = response.body.accounts.account
                            all_accounts.extend(current_page_accounts)
                            # 返されたレコード数が PageSize より少ない場合は、最後のページです。
                            if len(current_page_accounts) < 100:
                                break
                            page_number += 1
                        else:
                            break  # これ以上のアカウントはありません
    
                    # レスポンスからアカウント ID を抽出。
                    account_ids = [acc.account_id for acc in all_accounts]
    
                    if account_ids:
                        print(f"✅ Successfully discovered {len(account_ids)} member accounts from Resource Directory.")
                    else:
                        print("⚠️ Failed to discover any member accounts from Resource Directory. Check your permissions or the status of Resource Directory.")
                except Exception as e:
                    print(f"❌ Failed to auto-discover accounts from Resource Directory: {e}")
                    print("   Make sure the RAM user has the 'AliyunResourceDirectoryReadOnlyAccess' permission, or manually configure 'member_uids' in config.ini.")
                    # 自動検出が失敗し、手動設定も提供されていない場合は終了。
                        sys.exit(1)
            # --- 設定読み込みの終了 ---
    
            client = Sample.create_client(endpoint)
            runtime = util_models.RuntimeOptions()
    
            # --- API を使用して脆弱性名を解決 ---
            print("Querying the list of emergency vulnerabilities...")
            vul_map = Sample.resolve_vul_names(client, target_names)
    
            if not vul_map:
                print("⚠️ No matching vulnerabilities found. Exiting program.")
                return
    
            vul_names = list(vul_map.keys())
            print(f"✅ Successfully matched {len(vul_names)} vulnerabilities")
    
            total_tasks = len(vul_names) * len(account_ids)
            if total_tasks == 0:
                print("⚠️  No vulnerabilities or accounts found in config.ini to process. Exiting program.")
                return
    
            print(f"Starting to process {len(vul_names)} vulnerabilities × {len(account_ids)} accounts = {total_tasks} scan tasks")
            print(f"QPS is throttled at {max_qps}. Estimated time to completion: {total_tasks / max_qps:.1f} seconds")
    
            success_count = 0
            failure_count = 0
            start_time = time.time()
            last_request_time = 0
            MIN_INTERVAL = 1.0 / max_qps
            request_count = 0
    
            for name in vul_names:
                for account_id in account_ids:
                    request_count += 1
    
                    # QPS スロットリング
                    current_time = time.time()
                    elapsed_since_last = current_time - last_request_time
                    if elapsed_since_last < MIN_INTERVAL:
                        time.sleep(MIN_INTERVAL - elapsed_since_last)
                    last_request_time = time.time()
    
                    display_name = vul_map.get(name, name)
    
                    try:
                        modify_emg_vul_submit_request = sas_20181203_models.ModifyEmgVulSubmitRequest(
                            name=name,
                            user_agreement='yes',
                            resource_directory_account_id=account_id
                        )
    
                        client.modify_emg_vul_submit_with_options(modify_emg_vul_submit_request, runtime)
                        success_count += 1
                        elapsed_time = time.time() - start_time
                        avg_qps = request_count / elapsed_time if elapsed_time > 0 else 0
    
                        print(f"✅ [{request_count}/{total_tasks}] Success: Vulnerability='{display_name}', Account ID={account_id} "
                              f"(Current avg QPS: {avg_qps:.1f})")
    
                    except Exception as error:
                        failure_count += 1
                        print(f"❌ [{request_count}/{total_tasks}] Failure: Vulnerability='{display_name}', Account ID={account_id}")
    
                        error_message = getattr(error, 'message', str(error))
                        print(f"   Error message: {error_message}")
                        recommend_message = getattr(error, 'data', {}).get('Recommend')
                        if recommend_message:
                            print(f"   Diagnostic suggestion: {recommend_message}")
    
                        error_str = str(error).lower()
                        if 'throttling' in error_str or 'qps' in error_str:
                            print("   ⚠️  API throttling detected. Automatically increasing wait time...")
                            time.sleep(2)
    
            total_time = time.time() - start_time
            final_qps = request_count / total_time if total_time > 0 else 0
    
            print(f"\n{'=' * 50}")
            print(f"Processing complete! Total time: {total_time:.1f} seconds")
            print(f"Success: {success_count}, Failures: {failure_count}, Total: {total_tasks}")
            print(f"Actual avg QPS: {final_qps:.1f} (Target QPS: {max_qps})")
            print(f"{'=' * 50}")
    
    
    if __name__ == '__main__':
        Sample.main(sys.argv[1:])
        

    config.ini

    [scan_config]
    # Cloud Security Center のサービスエンドポイント。アセットが所在するリージョンに基づいて変更する必要があります。
    # たとえば、中国 (上海) リージョンのエンドポイントは tds.cn-shanghai.aliyuncs.com です。
    endpoint = tds.cn-shanghai.aliyuncs.com
    
    # API リクエストのレート制限、単位は秒間クエリ数 (QPS) です。デフォルト値は 6 です。
    max_qps = 6
    
    # カンマで区切られたメンバーアカウント ID のリスト。
    # RAM ユーザーが Resource Directory の読み取り権限を持っている場合は、これを空のままにします。スクリプトが自動的にリストを取得します。
    member_uids =
    
    # スキャン対象の緊急脆弱性の名前をカンマで区切って指定します。
    # Cloud Security Center コンソールの「緊急脆弱性」ページから名前を直接コピーできます。
    # 起動時に、スクリプトは DescribeEmgVulItem API を使用してこれらの名前をスキャン API が要求する形式に解決します。
    scan_targets = polkit pkexec Local Privilege Escalation Vulnerability (CVE-2021-4034)

    requirements.txt

    alibabacloud_sas20181203
    alibabacloud_resourcemanager20200331
    alibabacloud_credentials
  2. config.ini を開き、以下のパラメータを設定します。

    • endpoint: アセットが所在するリージョンの Cloud Security Center サービスエンドポイント。スクリプトは 1 回の実行で 1 つのリージョンを対象とします。アセットが複数のリージョンにまたがる場合は、リージョンごとに個別に実行してください。

    • scan_targets: スキャンする緊急脆弱性名をカンマ区切りで指定します。コンソールの [Urgent Vulnerability] ページから名前を直接コピーしてください。起動時に、スクリプトは DescribeEmgVulItem を呼び出して表示名を内部 API 名に解決します。

    • max_qps: QPS での最大 API リクエストレート。デフォルトは 6 で、ほとんどのシナリオで十分です。アカウント数が多く、より高いレートが必要な場合は、Quota Center でクォータの引き上げを申請してください。

    • member_uids: スキャン対象のメンバーアカウント ID をカンマ区切りで指定します。RAM ユーザーが RD の読み取り権限を持っている場合は、空のままにしてください。スクリプトがすべてのアカウントを自動的に検出します。

ステップ 3: スキャンの実行

  1. (ステップ 1 で作成した) RAM ユーザーのアクセスキーを環境変数としてエクスポートします。

    export ALIBABA_CLOUD_ACCESS_KEY_ID="YOUR_ACCESSKEY_ID"
    export ALIBABA_CLOUD_ACCESS_KEY_SECRET="YOUR_ACCESSKEY_SECRET"
  2. 依存関係をインストールします。

    pip3 install -r requirements.txt
  3. スキャンスクリプトを実行します。

    python3 scan_manager.py

    スクリプトは進行状況をリアルタイムで出力します。出力例:

    Querying the list of emergency vulnerabilities...
    ✅ 'polkit pkexec Local Privilege Escalation Vulnerability (CVE-2021-4034)' → emg_cve-2021-4034:EMG:AVD-2021-4034
    ✅ Successfully matched 1 vulnerability
    
    ℹ️ 'member_uids' is empty, attempting to auto-discover member accounts from Resource Directory...
    ✅ Successfully discovered 150 member accounts from Resource Directory.
    
    Starting to process 1 vulnerability × 150 accounts = 150 scan tasks
    QPS is throttled at 6. Estimated time to completion: 25.0 seconds
    
    ✅ [1/150] Success: Vulnerability='polkit pkexec Local Privilege Escalation Vulnerability (CVE-2021-4034)', Account ID=198XXXXXXXXXXX13 (Current avg QPS: 5.8)
    ✅ [2/150] Success: Vulnerability='polkit pkexec Local Privilege Escalation Vulnerability (CVE-2021-4034)', Account ID=142XXXXXXXXXXX84 (Current avg QPS: 5.9)
    ✅ [3/150] Success: Vulnerability='polkit pkexec Local Privilege Escalation Vulnerability (CVE-2021-4034)', Account ID=188XXXXXXXXXXX97 (Current avg QPS: 5.7)
    ...
    ✅ [150/150] Success: Vulnerability='polkit pkexec Local Privilege Escalation Vulnerability (CVE-2021-4034)', Account ID=156XXXXXXXXXXX62 (Current avg QPS: 5.9)
    
    ==================================================
    Processing complete! Total time: 25.8 seconds
    Success: 150, Failures: 0, Total: 150
    Actual avg QPS: 5.8 (Target QPS: 6)
    ==================================================
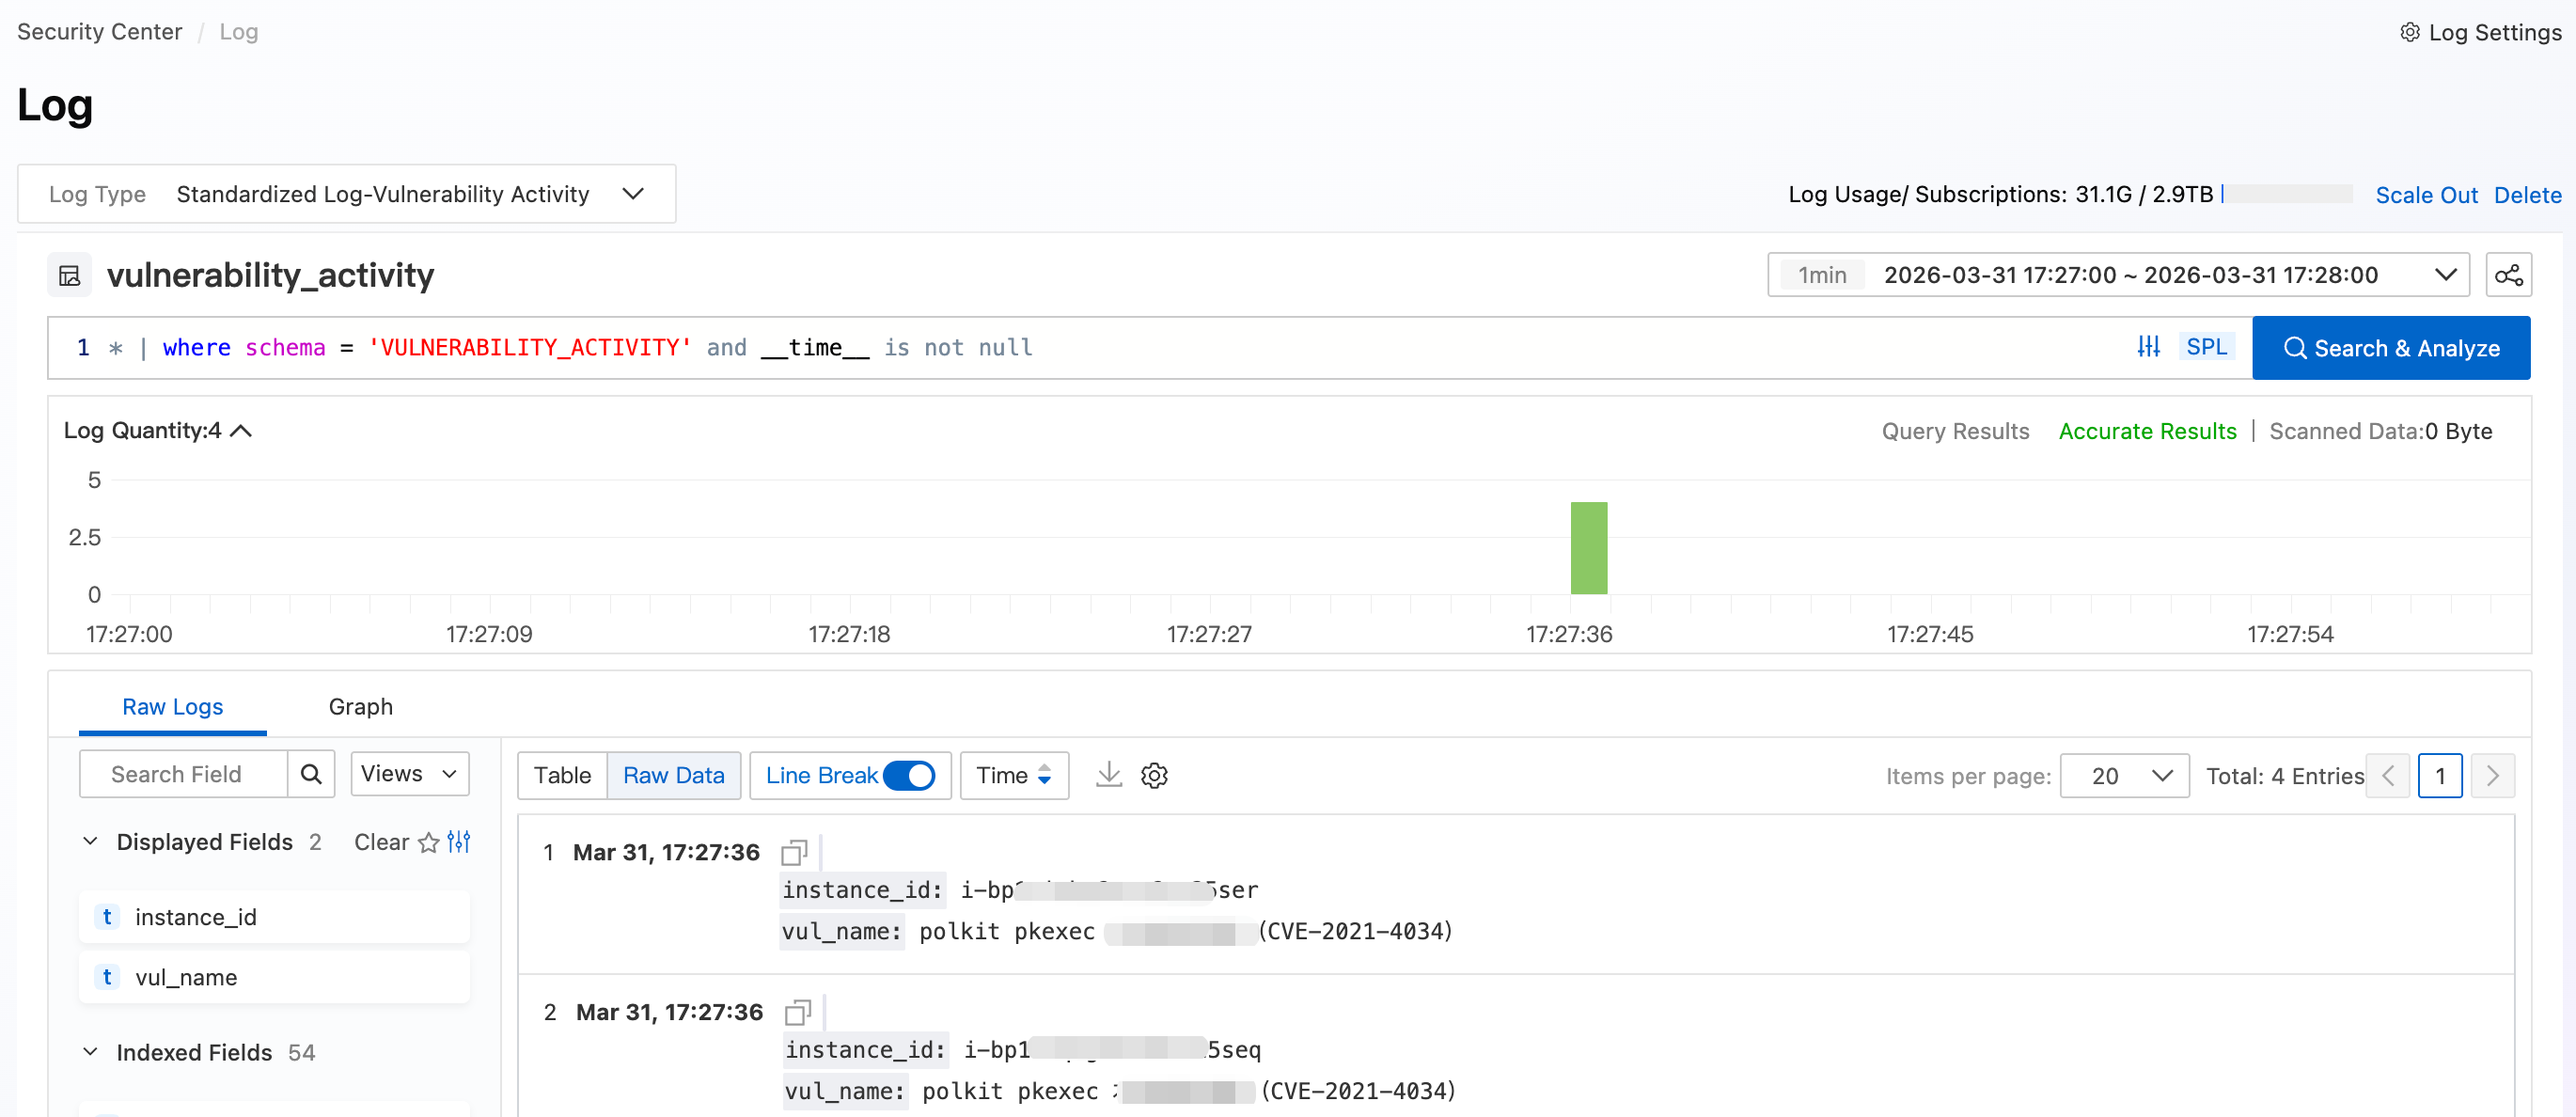
ステップ 4: スキャン結果の表示

RAM ユーザーとして Cloud Security Center コンソール にログインします。左側メニューで、[Agentic SOC] > Log を選択します。Logstore リストから Standardized Log > [Vulnerability Activity] を選択します。スキャンを実行した時間範囲を設定し、[Search & Analyze] をクリックします。

image

重要

緊急脆弱性はスキャンのみをサポートしており、自動修復はサポートしていません。これらの脆弱性はサーバーにインストールされたソフトウェアで検出されます。脆弱性の詳細に記載されている修復アドバイスに従って、影響を受けるソフトウェアを手動でアップグレードまたは再設定してください。

本番環境向けのベストプラクティス

定期的なスキャンの設定

脆弱性情報が公開された後にのみスクリプトを実行するのではなく、定期的に実行するようにスケジュールすることで、新しい脆弱性を自動的に検出します。

  • crontab ジョブまたは Windows タスクスケジューラを使用して、スクリプトを毎日実行します。

  • 専用サーバーを維持する必要がないように、スクリプトを時間ベースのトリガーを持つ Function Compute (FC) 関数としてデプロイします。

アクセスキー管理の強化

  • 定期的なローテーション: キーが侵害された場合の影響を限定するために、RAM ユーザーのアクセスキーを 90 日ごとにローテーションします。

  • インスタンス RAM ロールの使用: スクリプトを ECS インスタンスで実行する場合は、環境変数にアクセスキーをエクスポートする代わりに、インスタンス RAM ロールを割り当てます。

  • ソース IP の制限: RAM ポリシーに IP 条件を追加して、API コールが運用ネットワークからのみ受け入れられるようにします。

よくある質問

スキャンは正常に送信されたが、Agentic SOC の脆弱性ログにレコードが表示されない

  • ログ収集が有効になっていない: Agentic SOC で、Log ページの [Vulnerability Activity] 収集トグルが有効になっていることを確認してください。

  • スキャンがまだ進行中: ModifyEmgVulSubmit はスキャンタスクを送信するだけで、実際のスキャンは非同期で実行され、アセット数によっては数分から数十分かかることがあります。

  • 脆弱性が検出されなかった: 脆弱性ログには、検出された脆弱性のみが記録されます。メンバーアカウントのアセットが影響を受けていない場合、エントリは生成されません。確認するには、メンバーアカウントにログインし、[Risk Governance] > [Vulnerabilities] > [Urgent Vulnerability] を確認してください。

  • マルチアカウントログが集約されていない: メンバーアカウントのログは、Agentic SOC を通じて管理アカウントに集約される必要があります。すべてのメンバーアカウントで Cloud Security Center が有効になっており、集中型マルチアカウントオンボーディングが完了していることを確認してください。

"No matching emergency vulnerability found" というエラーで脆弱性名の解決が失敗する

config.iniscan_targets に記載されている名前が、Cloud Security Center コンソールの [Urgent Vulnerability] ページと、括弧やスペースを含めて完全に一致していることを確認してください。エラーを避けるために、コンソールから直接名前をコピーしてください。

名前が正しいにもかかわらず解決に失敗する場合、その脆弱性は緊急対応期間を過ぎており、DescribeEmgVulItem を通じて利用できなくなっている可能性があります。