Database Backup Service (DBS) menyediakan fitur untuk database MariaDB, seperti pemulihan tabel tunggal, backup jarak jauh, dan arsip jangka panjang. Topik ini menjelaskan cara menggunakan DBS untuk mencadangkan instans ApsaraDB RDS for MariaDB.
Buat jadwal cadangan
Untuk informasi selengkapnya, lihat Buat jadwal cadangan.
-
Saat membeli jadwal cadangan, pilih MariaDB sebagai Jenis Sumber Data dan logical backup sebagai Metode Cadangan.
-
Untuk mengetahui granularitas cadangan dan pemulihan yang disediakan DBS untuk database MariaDB, lihat Jenis database dan fitur yang didukung.
Konfigurasikan jadwal cadangan
Topik ini menggunakan jadwal cadangan ApsaraDB RDS for MariaDB sebagai contoh.
-
Masuk ke konsol Data Management Service (DMS) 5.0.
-
Pada bilah navigasi atas, pilih .
CatatanJika Anda menggunakan konsol DMS dalam mode simple, arahkan pointer ke ikon
 di pojok kiri atas konsol DMS dan pilih .
 -
Temukan jadwal cadangan yang ingin Anda konfigurasikan dan klik Configure Backup Schedule pada kolom Actions.

-
Pada halaman Configure Backup Source and Destination, konfigurasikan sumber dan tujuan cadangan, lalu klik Next.
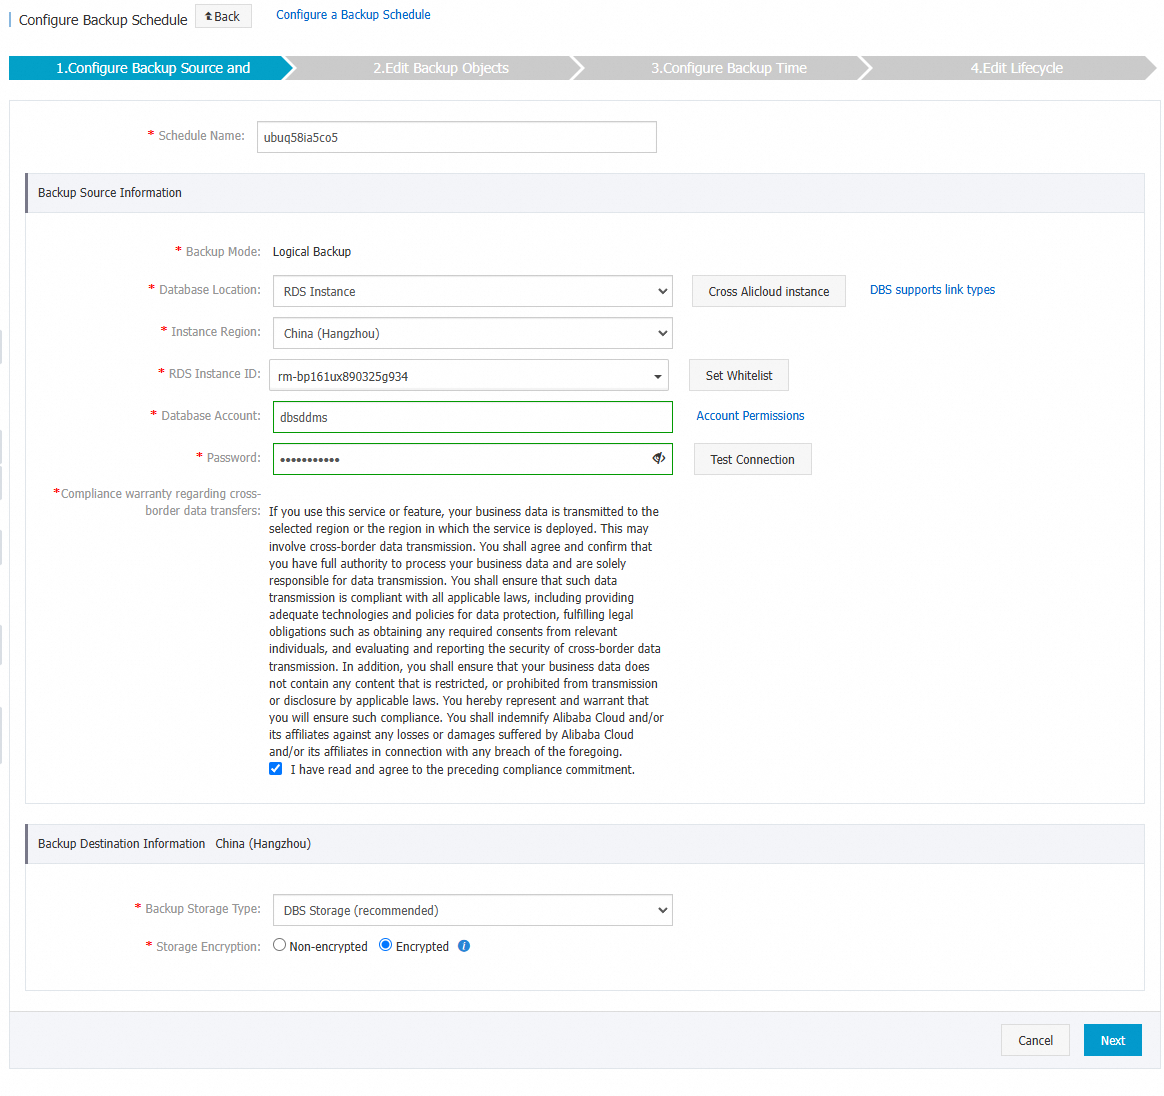
Tabel 1. Pengaturan database
Bagian
Parameter
Deskripsi
N/A
Schedule name
Nama jadwal cadangan. DBS secara otomatis menghasilkan nama jadwal cadangan. Kami menyarankan Anda memberikan nama deskriptif yang mudah dikenali. Nama jadwal cadangan tidak perlu unik.
Backup Source Information
Backup method
Metode yang digunakan untuk mencadangkan data. Secara default, metode cadangan yang Anda pilih saat membeli jadwal cadangan akan digunakan. Pada contoh ini, Logical Backup digunakan.
Database location
RDS Instance
实例地区
选择源数据库实例的地域。
Catatan该参数仅在选择RDS Instance、PolarDB、ECS-Hosted Database、No public network IP: Port's self-built database (accessed through the database gateway)时显示。
RDS instance ID
Pilih ID instans RDS sumber.
Database account
Username akun yang digunakan untuk terhubung ke database yang ingin Anda cadangkan. Akun tersebut harus memiliki izin untuk mencadangkan database. Untuk informasi selengkapnya, lihat Izin akun.
CatatanUntuk database ApsaraDB RDS, diperlukan izin read-only untuk cadangan, dan izin baca-tulis untuk cadangan dan pemulihan.
Password
Password akun yang digunakan untuk terhubung ke database yang ingin Anda cadangkan.
Setelah memasukkan username dan password akun database, klik Test Connection di sebelah password untuk memeriksa apakah informasi database yang ingin Anda cadangkan valid. Jika parameter yang ditentukan valid, pesan Test Passed akan ditampilkan. Jika muncul pesan Test Failed, klik Check di sebelah Test Failed. Perbarui informasi database yang ingin Anda cadangkan berdasarkan hasil pemeriksaan.
Data cross-border compliance commitment
Baca dan pilih komitmen kepatuhan.
Backup Destination Information
Backup storage type
Jenis penyimpanan untuk data cadangan Anda. Nilai yang valid:
-
DBS built-in storage (Direkomendasikan): Anda tidak perlu membuat storage space. DBS secara otomatis menyimpan data Anda di penyimpanan bawaannya. Anda dikenai biaya berdasarkan jumlah data yang disimpan. Untuk informasi penagihan lebih lanjut, lihat Item yang dapat ditagih (DMS).
-
OSS For User: Anda harus terlebih dahulu membuat bucket di konsol Object Storage Service (OSS). Untuk informasi selengkapnya, lihat Buat bucket.
Catatan-
Contoh ini menggunakan DBS built-in storage. Jika Anda memilih user OSS, Anda juga harus mengonfigurasi parameter Object Storage OSS Bucket Name. Hanya kelas penyimpanan OSS Standard yang didukung.
-
Jika Anda memiliki volume data yang besar untuk disimpan, kami menyarankan Anda membeli paket penyimpanan DBS subscription untuk mengimbangi biaya penyimpanan bawaan DBS. Paket penyimpanan DBS lebih hemat biaya dibandingkan metode penagihan pay-as-you-go.
Storage encryption
Pilih metode enkripsi penyimpanan. Nilai yang valid:
-
Encrypted (Direkomendasikan): Mengenkripsi data yang disimpan menggunakan algoritma AES-256 standar industri.
OSS menyediakan fitur enkripsi sisi server. Saat Anda mengunggah objek, OSS mengenkripsi objek yang diterima lalu menyimpan objek terenkripsi tersebut. Saat Anda mengunduh objek, OSS secara otomatis mendekripsinya dan mengembalikan objek asli kepada Anda. Untuk informasi selengkapnya, lihat Enkripsi sisi server.
-
Non-encrypted: Menonaktifkan enkripsi untuk data yang disimpan.
-
-
Pada halaman Edit Backup Objects, pindahkan database atau tabel yang ingin Anda cadangkan dari daftar objek database sumber ke daftar Selected, lalu klik Next.
Catatan-
logical backup: Anda dapat memilih database dan tabel tertentu untuk cadangan penuh. Bergantung pada jenis database, Anda dapat memilih seluruh database atau tabel individual. Beberapa jenis database juga mendukung cadangan inkremental. Cadangan inkremental mencakup semua data inkremental dan tidak membedakan antara database atau tabel.
-
Anda dapat mengklik Select All untuk mencadangkan seluruh database. Objek dan granularitas cadangan yang didukung bervariasi berdasarkan jenis database. Untuk informasi selengkapnya, lihat Jenis database dan fitur yang didukung.
-
Secara default, jadwal cadangan tidak mencadangkan database yang dibuat setelah jadwal dikonfigurasi. Untuk mencadangkan database baru, Anda harus menambahkannya ke konfigurasi cadangan. Untuk informasi selengkapnya, lihat Ubah objek cadangan.
-
-
physical backup: Anda hanya dapat mencadangkan seluruh instans database.
-
-
Pada halaman Configure Backup Time, konfigurasikan waktu cadangan dan pengaturan lainnya, lalu klik Next.
Parameter
Description
Full backup frequency
Pilih Periodic Backup atau Single Backup.
CatatanJika Anda perlu memulihkan incremental data, kami menyarankan memilih Periodic Backup dan melakukan setidaknya satu full backup per minggu. Jika tidak, pemulihan database mungkin memerlukan replay sejumlah besar binlog, yang dapat meningkatkan Recovery Time Objective (RTO) dan risiko kegagalan.
Full backup recurrence
Parameter ini wajib diisi jika Anda mengatur Full backup frequency ke Periodic Backup. Pilih hari dalam seminggu untuk menjalankan backup. Anda harus memilih minimal satu hari.
Full backup start time
Parameter ini wajib diisi jika Anda mengatur Full backup frequency ke Periodic Backup. Pilih waktu mulai untuk backup, misalnya 01:00. Kami menyarankan menjadwalkan backup pada jam sepi.
CatatanJika full backup sebelumnya masih berlangsung pada waktu mulai yang dijadwalkan, task backup saat ini akan dilewati.
Incremental backup
Pilih apakah akan mengaktifkan incremental backup. Saat mengaktifkan parameter ini, pastikan database target telah mengaktifkan Binlog.
-
RDS MariaDB:Untuk melihat atau mengaktifkan Binlog, lihat MariaDB backup settings.
-
MariaDB self-hosted:Jalankan
SHOW VARIABLES LIKE 'log_bin';untuk memeriksa status pengaktifan Binlog. Nilailog_binbernilaiONberartiBinlogtelah diaktifkan, sedangkan jika bernilaiOFFberartiBinlogdalam keadaan nonaktif.
CatatanParameter ini hanya ditampilkan ketika parameter 全量备份频率 diatur ke Periodic Backup.
Maximum concurrent threads for full backup
Jumlah maksimum thread konkuren untuk full backup. Anda dapat menyesuaikan parameter ini untuk mengontrol kecepatan backup. Misalnya, mengurangi jumlah thread dapat mengurangi dampak terhadap database Anda.
Backup network speed limit
Batas lebar pita jaringan. Satuan: MB/s. Anda dapat mengatur batas ini sesuai kebutuhan bisnis Anda. Nilai default 0 berarti lebar pita jaringan tidak dibatasi.
CatatanParameter ini hanya ditampilkan saat melakukan backup database MySQL.
-
-
Pada langkah Edit Lifecycle, konfigurasikan siklus hidup untuk data cadangan penuh di bagian Konfigurasi Siklus Hidup Cadangan Data Penuh.
CatatanJika Anda mengatur parameter Incremental Backup ke Enable pada Langkah 6, Anda harus mengonfigurasi siklus hidup untuk data cadangan inkremental.
-
Setelah konfigurasi selesai, klik Precheck di pojok kanan bawah halaman.
-
Pada kotak dialog Precheck, setelah precheck berhasil, klik Start Task.
Catatan-
Saat Status jadwal cadangan berubah menjadi Running, konfigurasi telah selesai.
-
Jika terjadi error, segera lakukan troubleshooting dan perbaiki masalah tersebut. Untuk informasi selengkapnya, lihat Cara memperbaiki jadwal cadangan DBS yang abnormal. Jika masalah tetap berlanjut, hubungi dukungan dengan bergabung ke grup dukungan pengguna DBS di DingTalk (ID Grup: 35585947).
-
Pulihkan data
-
Masuk ke konsol Data Management Service (DMS) 5.0.
-
Pada bilah navigasi atas, pilih .
CatatanJika Anda menggunakan konsol DMS dalam mode simple, arahkan pointer ke ikon
di pojok kiri atas konsol DMS dan pilih . -
Pada halaman Backup Schedules, temukan jadwal cadangan yang ingin Anda gunakan dan klik Manage pada kolom Actions.
-
Pada halaman Configure Task, klik Restore Database di pojok kanan atas.
-
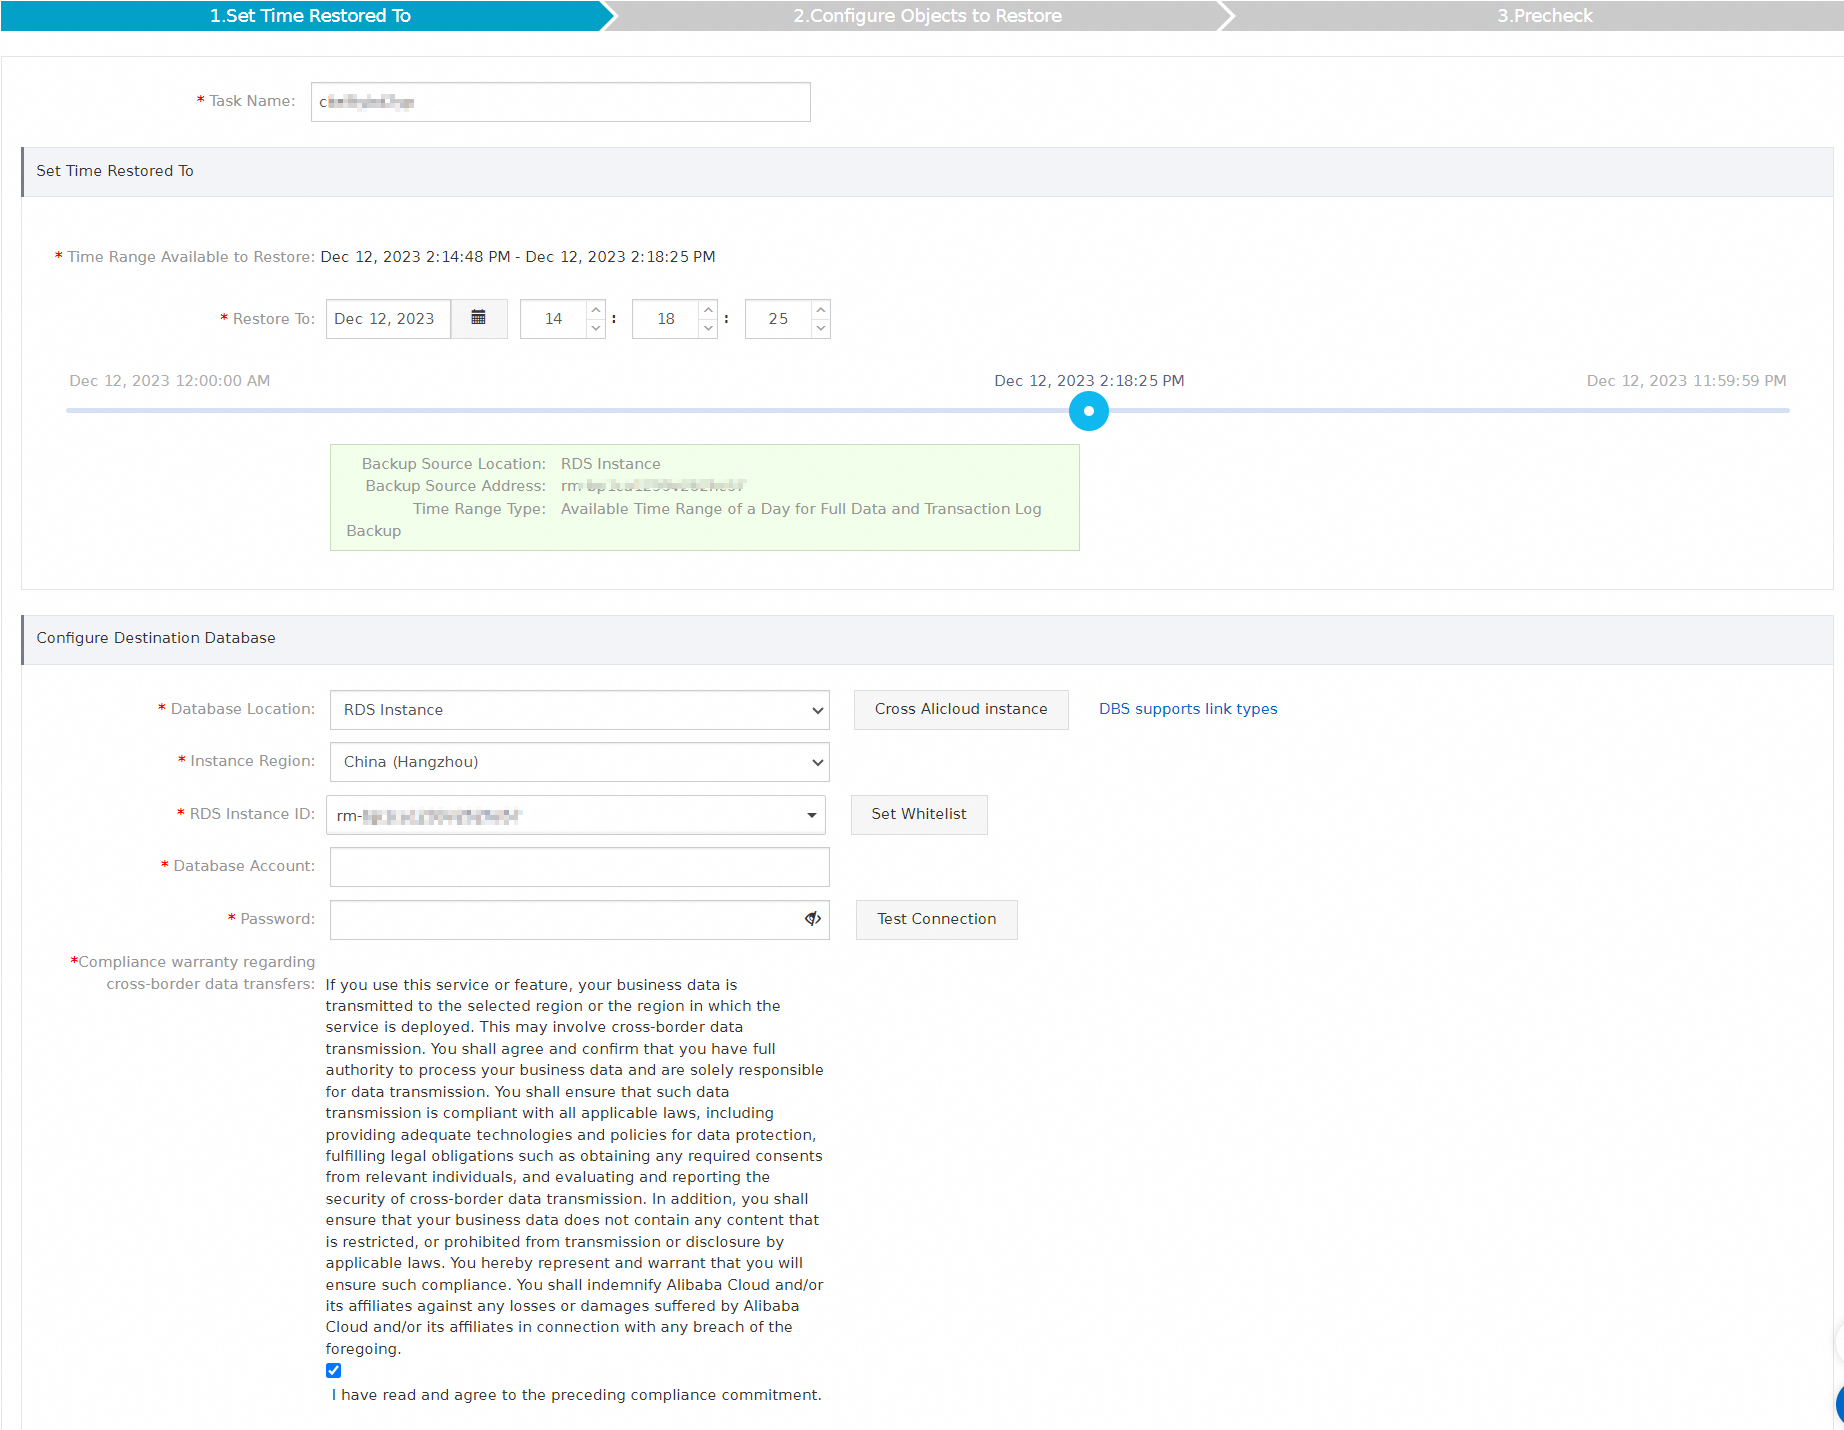
Pada halaman Configure recovery point, konfigurasikan titik pemulihan dan database tujuan, lalu klik Next.
Bagian
Parameter
Deskripsi
N/A
Task Name
DBS secara otomatis menghasilkan nama task. Kami menyarankan menggunakan nama yang deskriptif agar mudah diidentifikasi. Nama tersebut tidak perlu unik.
Set Time Restored To
Time range available for restore
Ini adalah rentang waktu yang tersedia untuk pemulihan data, mulai dari set cadangan penuh paling awal hingga yang paling baru.
Selected recovery point
Pilih titik waktu untuk pemulihan. Waktu yang dipilih harus berada dalam Time range available for restore.
CatatanJika cadangan log inkremental diaktifkan, Anda dapat memulihkan data ke titik waktu apa pun setelah pencadangan dibuat. Jika cadangan inkremental dinonaktifkan, Anda hanya dapat memulihkan ke waktu set cadangan penuh. Untuk informasi selengkapnya, lihat Enable or disable incremental log backup.
Restore destination database
Database location
Contoh ini memulihkan cadangan ke RDS instance yang telah ada sebelumnya. Pastikan database tujuan sedang Berjalan. DBS juga mendukung pemulihan ke lokasi database berikut:
-
User-Created Database with Public IP Address <IP Address:Port Number>
-
ECS-Hosted Database
-
Express Connect DB/VPN Gateway/Intelligent Gateway
-
No public network IP: Port's self-built database (accessed through the database gateway)
Instance region
Pilih Wilayah tempat instans tujuan berada.
RDS instance ID
Pilih ID instans RDS tujuan.
Masukkan akun database dengan izin menulis untuk instans tujuan.
Password
Masukkan password untuk akun database tersebut.
Data cross-border compliance commitment
Baca dan setujui komitmen kepatuhan dengan memilih kotak centang.
-
-
Pada halaman Configure Objects to Restore, konfigurasikan pengaturan berikut lalu klik Precheck.
Parameter
Deskripsi
Conflict handling
Secara default, Conflict handling diatur ke Rename Object with the Same Name. Misalnya, jika tabel bernama
job_infosudah ada di tujuan, tabel yang dipulihkan akan diubah namanya menjadijob_info_dbs_<RestoreTaskID>_<Timestamp>.Objects to restore
Pilih database atau tabel yang akan dipulihkan dari daftar Source Database Objects dan pindahkan ke bagian Selected Database Objects.
CatatanBeberapa database mendukung pemulihan pada tingkat tabel atau database, yang mengurangi jumlah data yang perlu dipulihkan dan mempersingkat Recovery Time Objective (RTO). Untuk detail granularitas pemulihan yang didukung, lihat Jenis database dan fitur yang didukung.
-
Pada kotak dialog Precheck, setelah pesan Precheck Passed muncul, klik Start Task.
Anda dapat melihat progres pemulihan database pada tab Restore Tasks.
CatatanWaktu pemulihan tergantung pada spesifikasi jadwal cadangan dan ukuran database. Spesifikasi yang lebih tinggi menghasilkan pemulihan yang lebih cepat. Untuk informasi selengkapnya, lihat Uji performa cadangan logis dan cadangan fisik.
Operasi terkait
-
Untuk mengubah sumber cadangan atau objek cadangan, atau memodifikasi kebijakan cadangan seperti waktu cadangan dan kebijakan retensi, lihat Kelola jadwal cadangan.
-
Untuk mengetahui potensi biaya yang terkait dengan jadwal cadangan Anda, lihat FAQ Penagihan.
-
Jika Anda tidak perlu menggunakan jadwal cadangan sementara waktu, Anda dapat menjeda jadwal tersebut untuk menghemat biaya. Untuk informasi selengkapnya, lihat Jeda atau restart jadwal cadangan.