You can use an SSL-VPN connection to securely access private cloud resources over the Internet. For example, in a remote work scenario, a client can use SSL-VPN to securely access private resources such as an OA system or a file server. This topic shows you how to connect a client to an Elastic Compute Service (ECS) instance to get started with SSL-VPN.
This topic provides configuration instructions for clients running Windows, Linux, Android, and macOS. For iOS devices, see Connect an iOS device to a VPC.
Use case
As shown in the following figure, assume you have deployed an ECS instance in the cloud and want to establish a private connection between your local client and the ECS instance. To do this, deploy and configure an SSL-VPN gateway in the VPC that contains the ECS instance to establish a connection between your client and the VPC.

Before you begin, plan your network CIDR blocks and IP addresses. This example uses the following network plan:
VPC:
Region: China (Hangzhou)
CIDR block: 10.0.0.0/16
vSwitch 1, located in Zone J, with the CIDR block 10.0.0.0/24
vSwitch 2, located in Zone K, with the CIDR block 10.0.1.0/24
ECS: The IP address is 10.0.0.1. The operating system is Alibaba Cloud Linux 3.2104 LTS 64-bit.
Client CIDR block: 192.168.0.0/16.
After the connection is established, the VPN gateway assigns an IP address from this CIDR block to the client's virtual network interface. This CIDR block must not overlap with the client's existing local network CIDR block.
If you plan your own resources, make sure that the following conditions are met:
In regions where a VPC supports multiple zones, the VPC must contain vSwitches in at least two different zones for high availability. If this requirement is not met, first create a vSwitch.
The planned client CIDR block must not overlap with the vSwitch CIDR blocks or any local client routes. Overlapping CIDR blocks can cause a route conflict.
Step 1: Configure the SSL-VPN gateway
First, deploy an SSL-VPN gateway in the VPC where you want to connect clients.
Create a VPN gateway
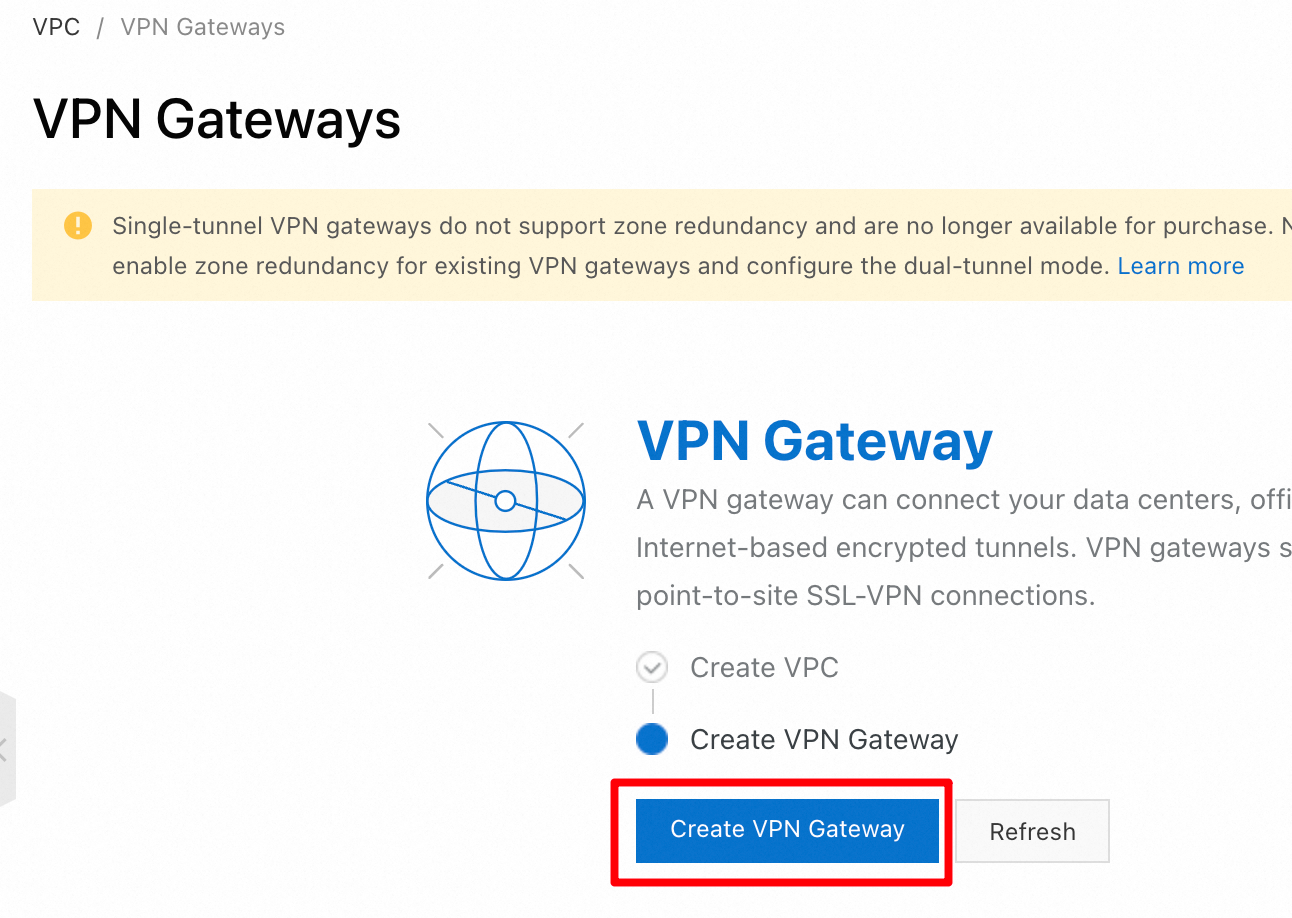
Log on to the VPN Gateway console. On the VPN Gateways page, click Create VPN Gateway.
On the VPN Gateway purchase page, configure the following parameters, keep the default values for the other parameters, and then click Buy Now and complete the payment.
Name: VPN Gateway 1.
Region: China (Hangzhou).
Gateway Type: Standard.
VPC: Select the VPC to which the client will connect.
VSwitch: vSwitch 1.
vSwitch 2: vSwitch 2.
Maximum Bandwidth: 10 Mbit/s.
Traffic: By default, the VPN Gateway is pay-by-traffic. For more information, see SSL-VPN billing.
IPsec-VPN: Disabled.
SSL-VPN: Enabled.
SSL Connections: 5.
Duration: By default, the VPN Gateway is billed on an hourly basis.
Service-linked Role: Create the service-linked role. (If this parameter shows Created, the role has already been created for your account.)
Return to the VPN Gateway console. You can view the VPN gateway that you created.
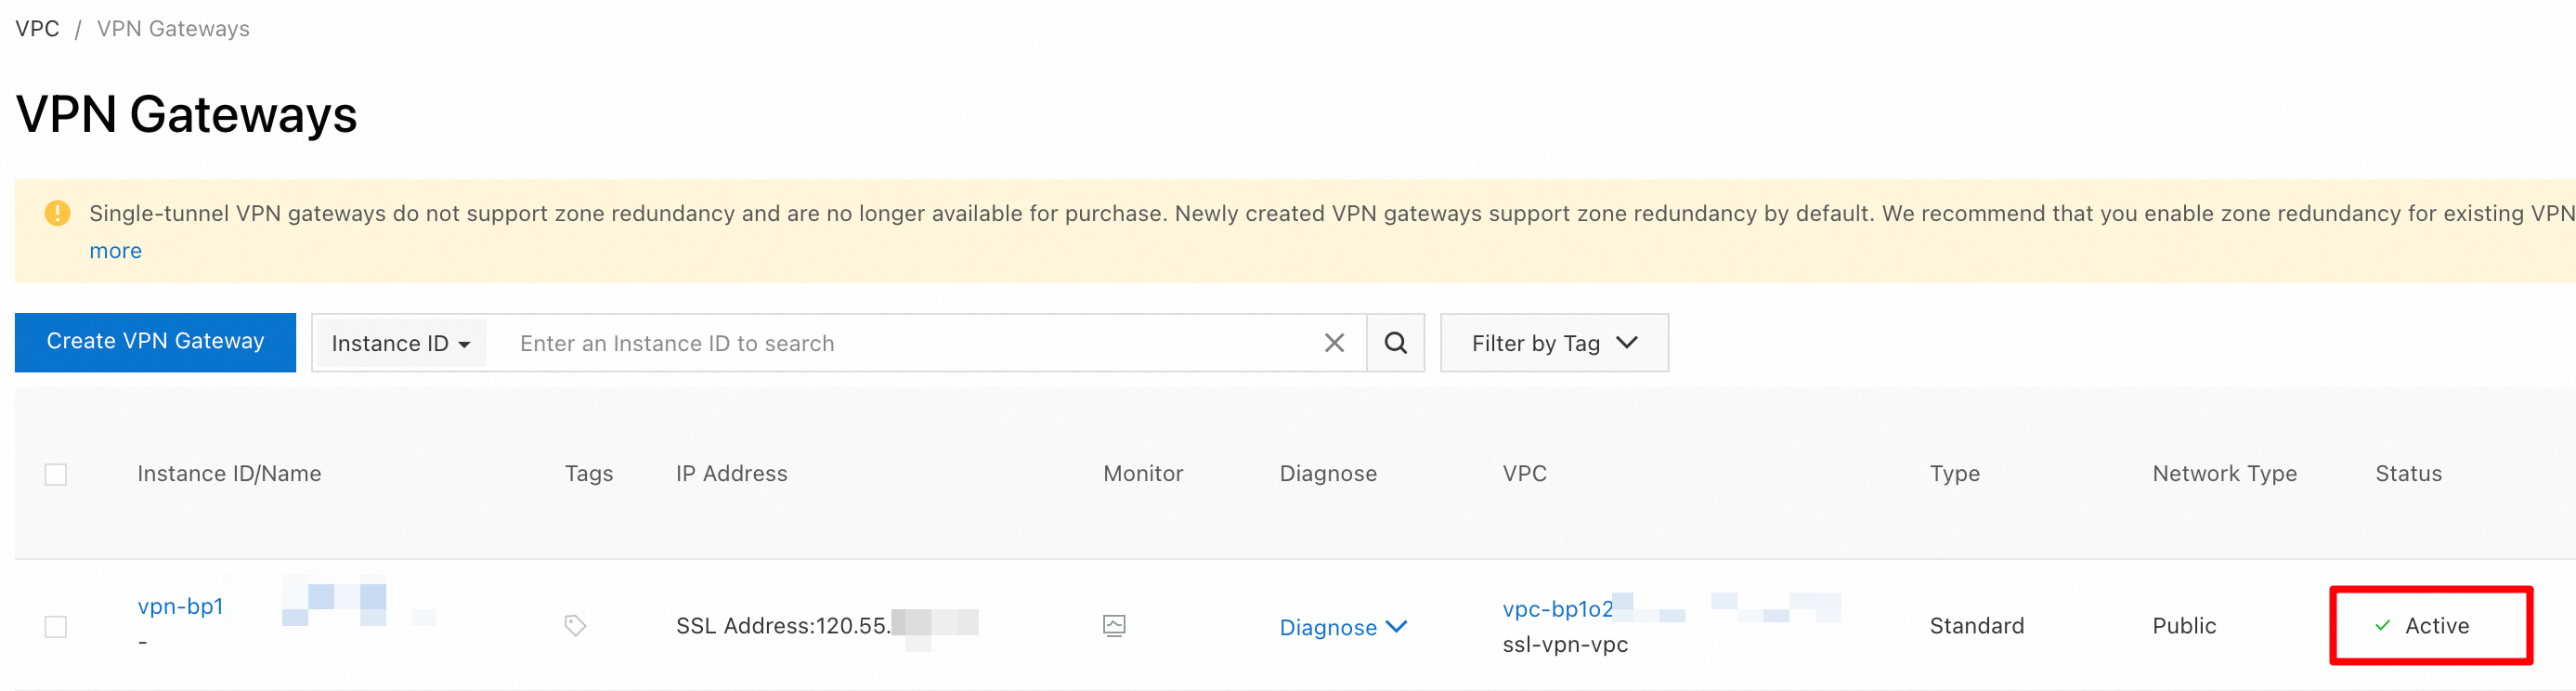
The new VPN gateway is in the Preparing state. After about 1 to 5 minutes, the state changes to Active. The Active state indicates that the VPN gateway is initialized and ready for use.
Create an SSL server
An SSL server controls which networks and resources clients can access.
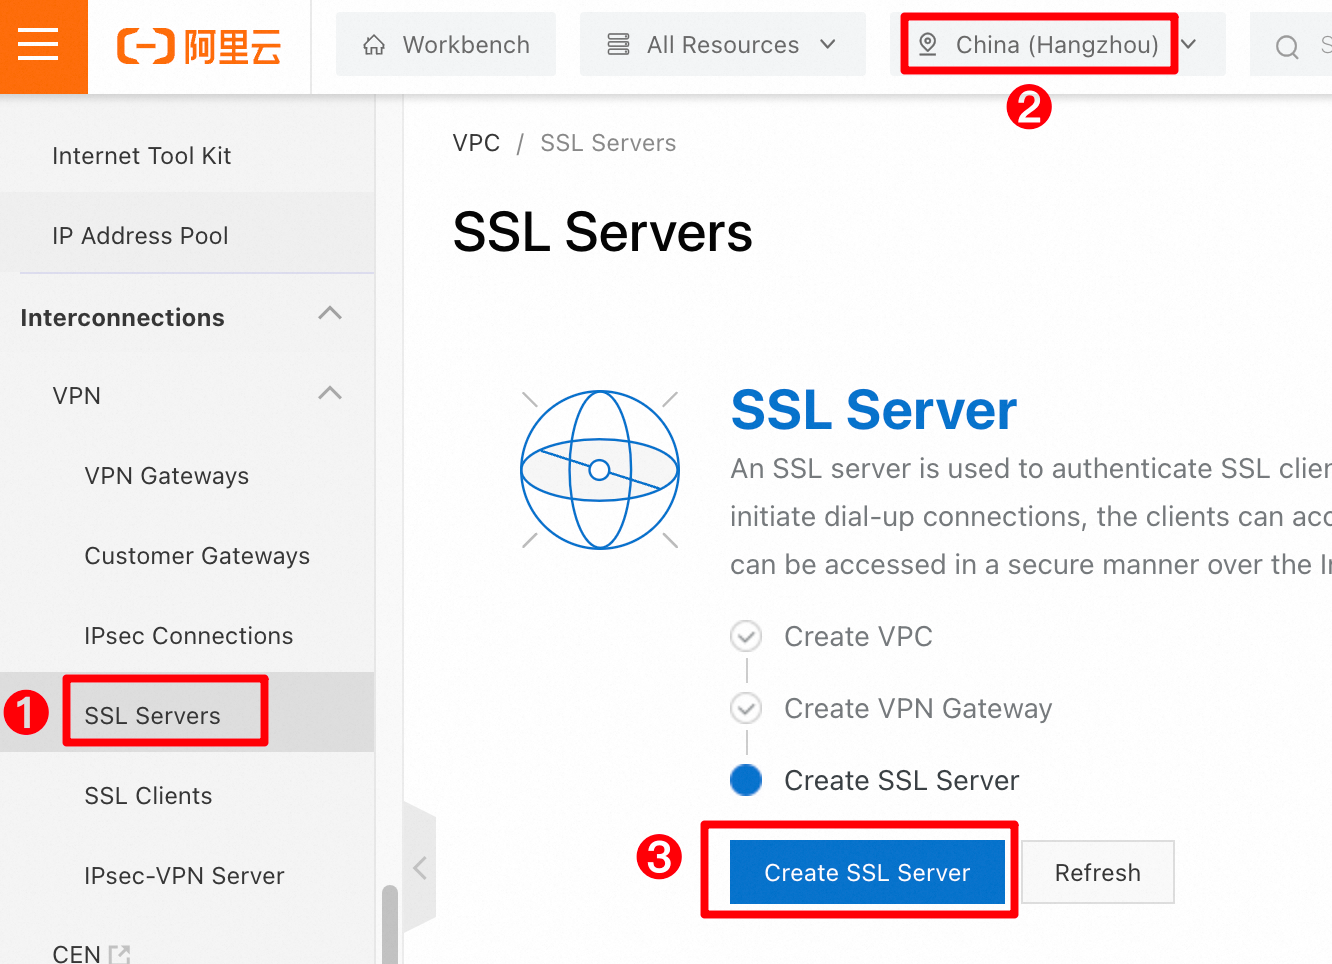
In the left-side navigation pane, choose . In the top menu bar, select the China (Hangzhou) region. On the SSL Server page, click Create SSL Server.
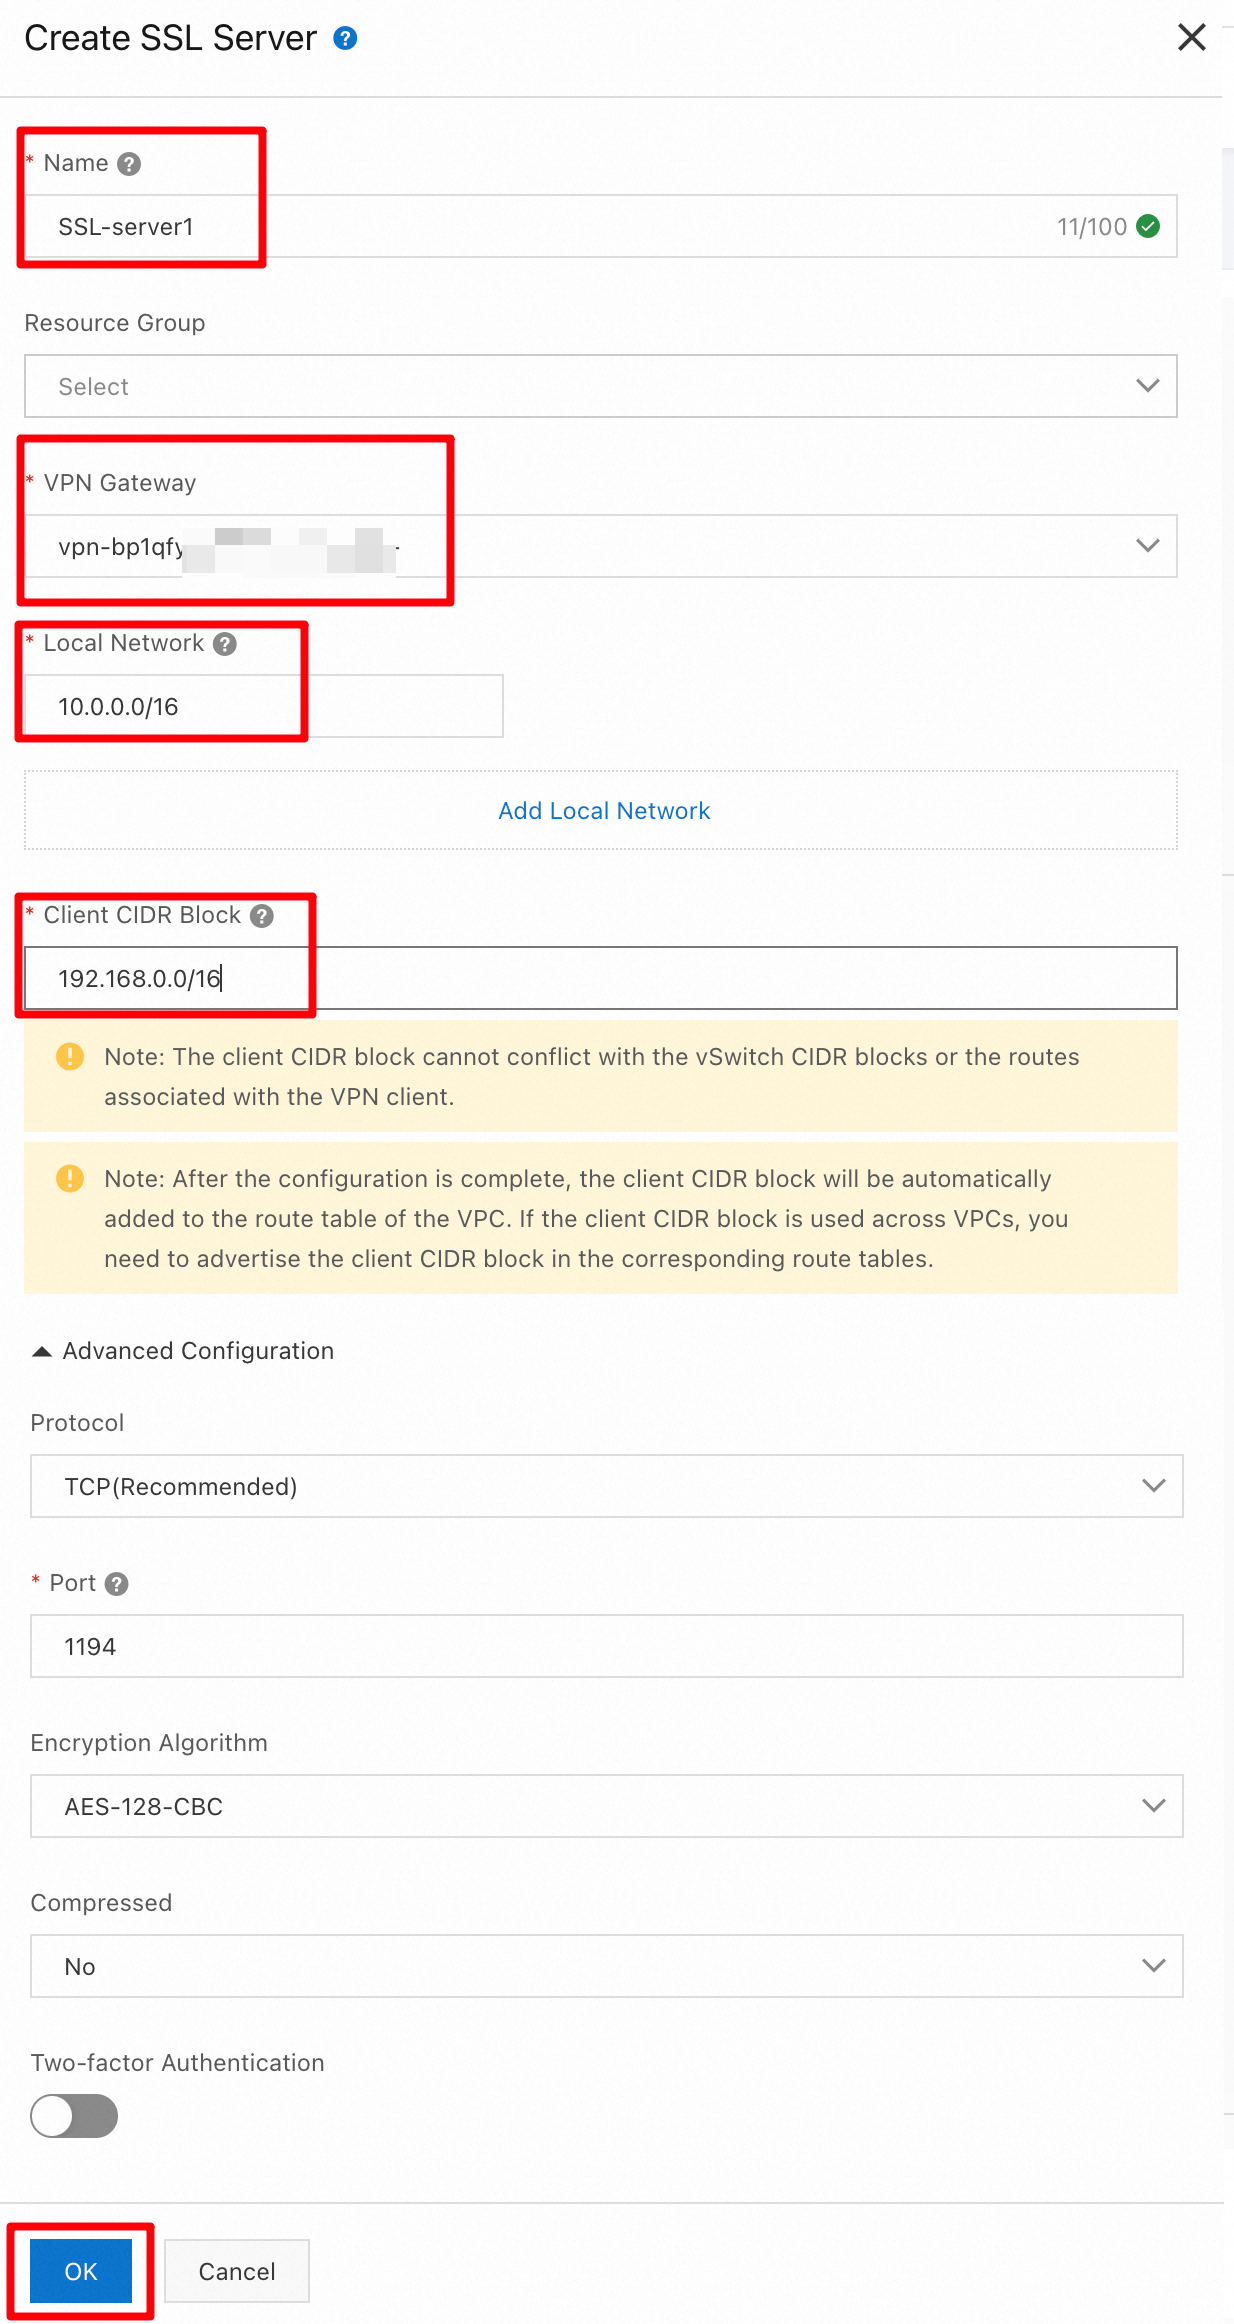
In the Create SSL Server panel, configure the following parameters, keep the default values for the other parameters, and then click OK.
Name: SSL Server 1
VPN Gateway: Select VPN Gateway 1 that you created in the previous step.
Local Network: Enter the VPC CIDR block 10.0.0.0/16.
Client CIDR Block: Enter 192.168.0.0/16.
NoteLocal Network: The destination CIDR block that the client accesses through the SSL-VPN connection.
Client CIDR Block: The CIDR block from which IP addresses are allocated to the client's virtual network interface. This CIDR block must not overlap with the client's existing local network CIDR block.
Create an SSL client and download the certificate
SSL clients manage client certificates. Each client requires a unique certificate that provides client authentication and data encryption. You must download the certificate and then import it to your client.
In the left-side navigation pane, choose . In the top menu bar, confirm that the region is China (Hangzhou). On the SSL Client page, click Create SSL Client.
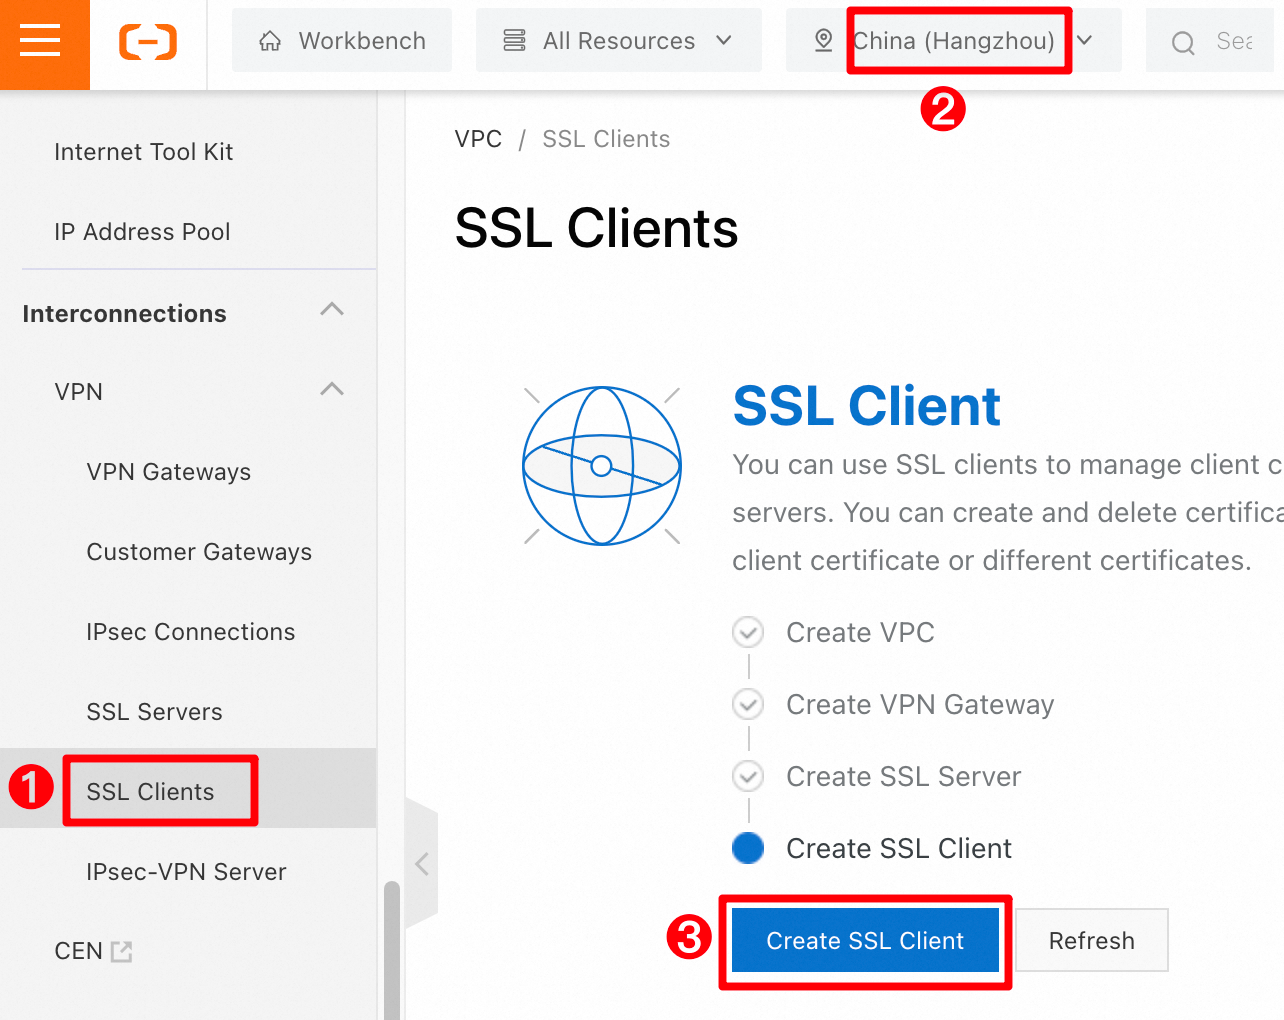
In the Create SSL Client panel, enter
SSL Client 1for Name, selectSSL Server 1for SSL Server, and then click OK.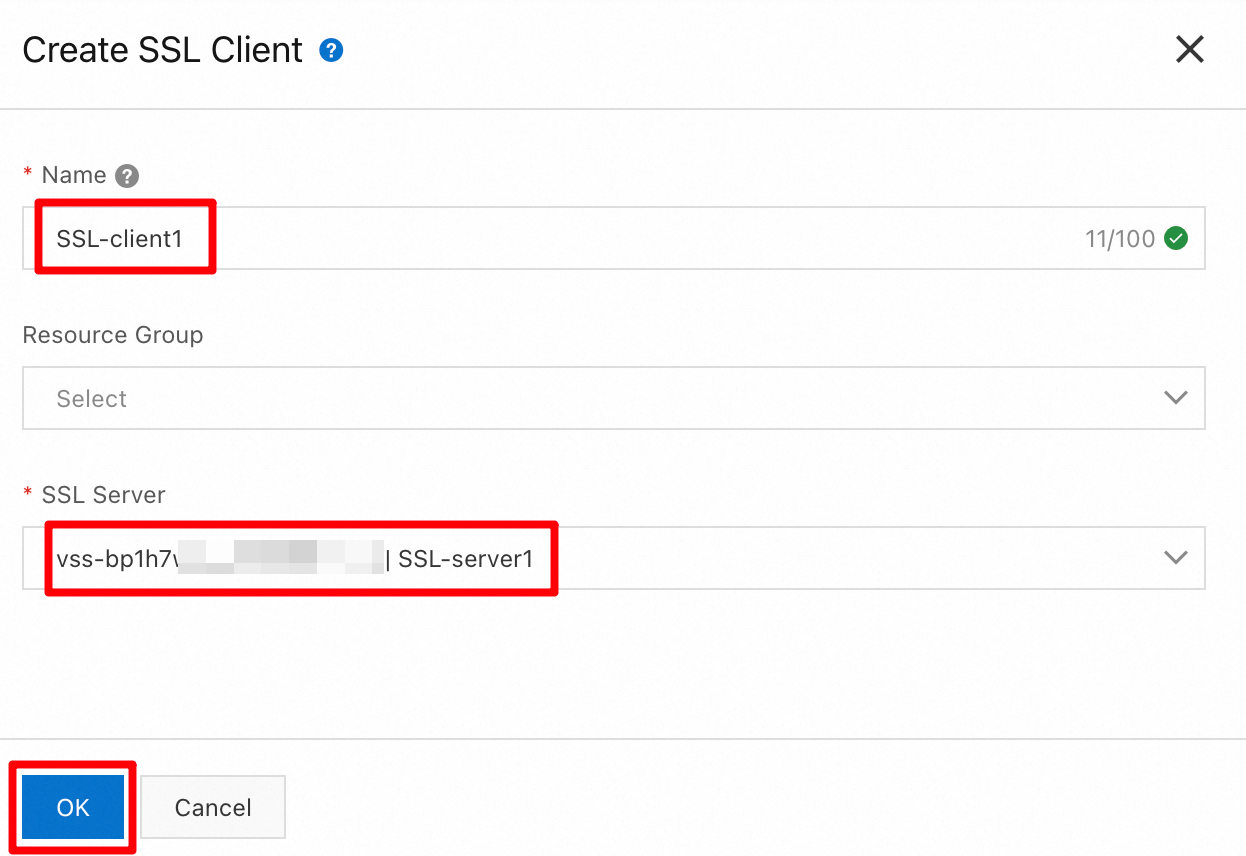
On the SSL Client page, find the SSL client that you created and click Download Certificate in the Actions column.

Step 2: Configure the client
Select the configuration method that corresponds to your client's operating system.
Windows client
Download the OpenVPN client for your Windows version and follow the on-screen instructions to complete the installation:
Windows 64-bit system (Intel/AMD): OpenVPN client (Windows 64-bit).
Windows ARM64 system: OpenVPN client (Windows ARM64).
If the webpage fails to open, contact your account manager or an Alibaba Cloud support engineer.
Unzip the downloaded SSL client certificate package and copy all the extracted files to the OpenVPN configuration directory.
Default path:
C:\Program Files\OpenVPN\configNote: If you changed the installation path, copy the files to the
configfolder in your actual installation directory.

Open the
config.ovpnfile with a text editor and add the following line to the end of the file:disable-dco.The Data Channel Offload (DCO) feature introduced in OpenVPN 2.6 has compatibility issues on some Windows systems, such as specific versions of Windows 10/11. This configuration disables DCO to resolve connection issues on some devices.

Right-click the OpenVPN icon in the system tray in the lower-right corner of your desktop, and then click Connect.

The connection is successful if the status is Connected and an IP address is assigned.

Linux client
Run the following command to install the OpenVPN client and create the
confdirectory.CentOS
yum install -y openvpn
mkdir -p /etc/openvpn/conf
Ubuntu
apt-get update
apt-get install -y openvpn
mkdir -p /etc/openvpn/conf
Unzip the downloaded SSL client certificate package and copy the files to the /etc/openvpn/conf/ directory.

Go to the /etc/openvpn/conf/ directory and run the following command to establish the VPN connection.
openvpn --config /etc/openvpn/conf/config.ovpn --daemon
Android client
Download and install the OpenVPN client for Android.If the webpage fails to open, contact your account manager or an Alibaba Cloud support engineer.
This example uses an Android 9.0 device with OpenVPN client v3.0.5.
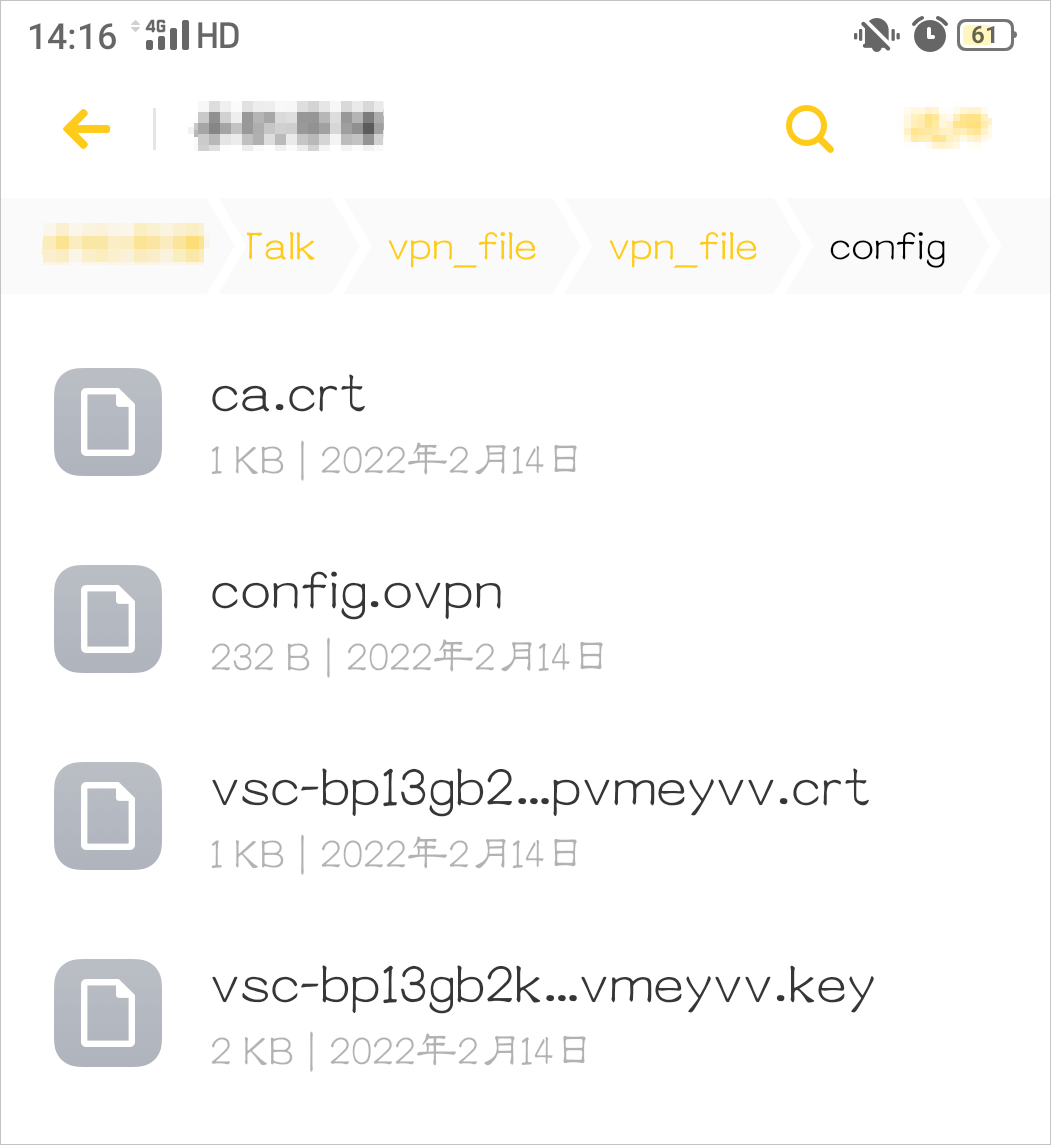
Transfer the downloaded SSL client certificate package to the Android device and unzip it.
NoteIf your Android device does not have an unzip utility, you can unzip the certificate package on a computer and then transfer the extracted files to your Android device.
Make sure that all extracted files are in the same folder, as shown in the following figure.
Open the OpenVPN client, import the
config.ovpnfile, and add the VPN connection.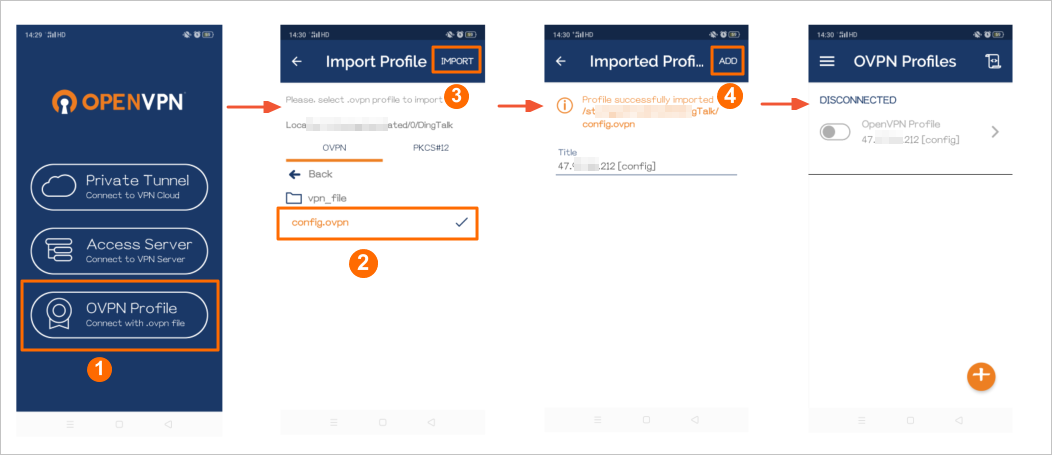
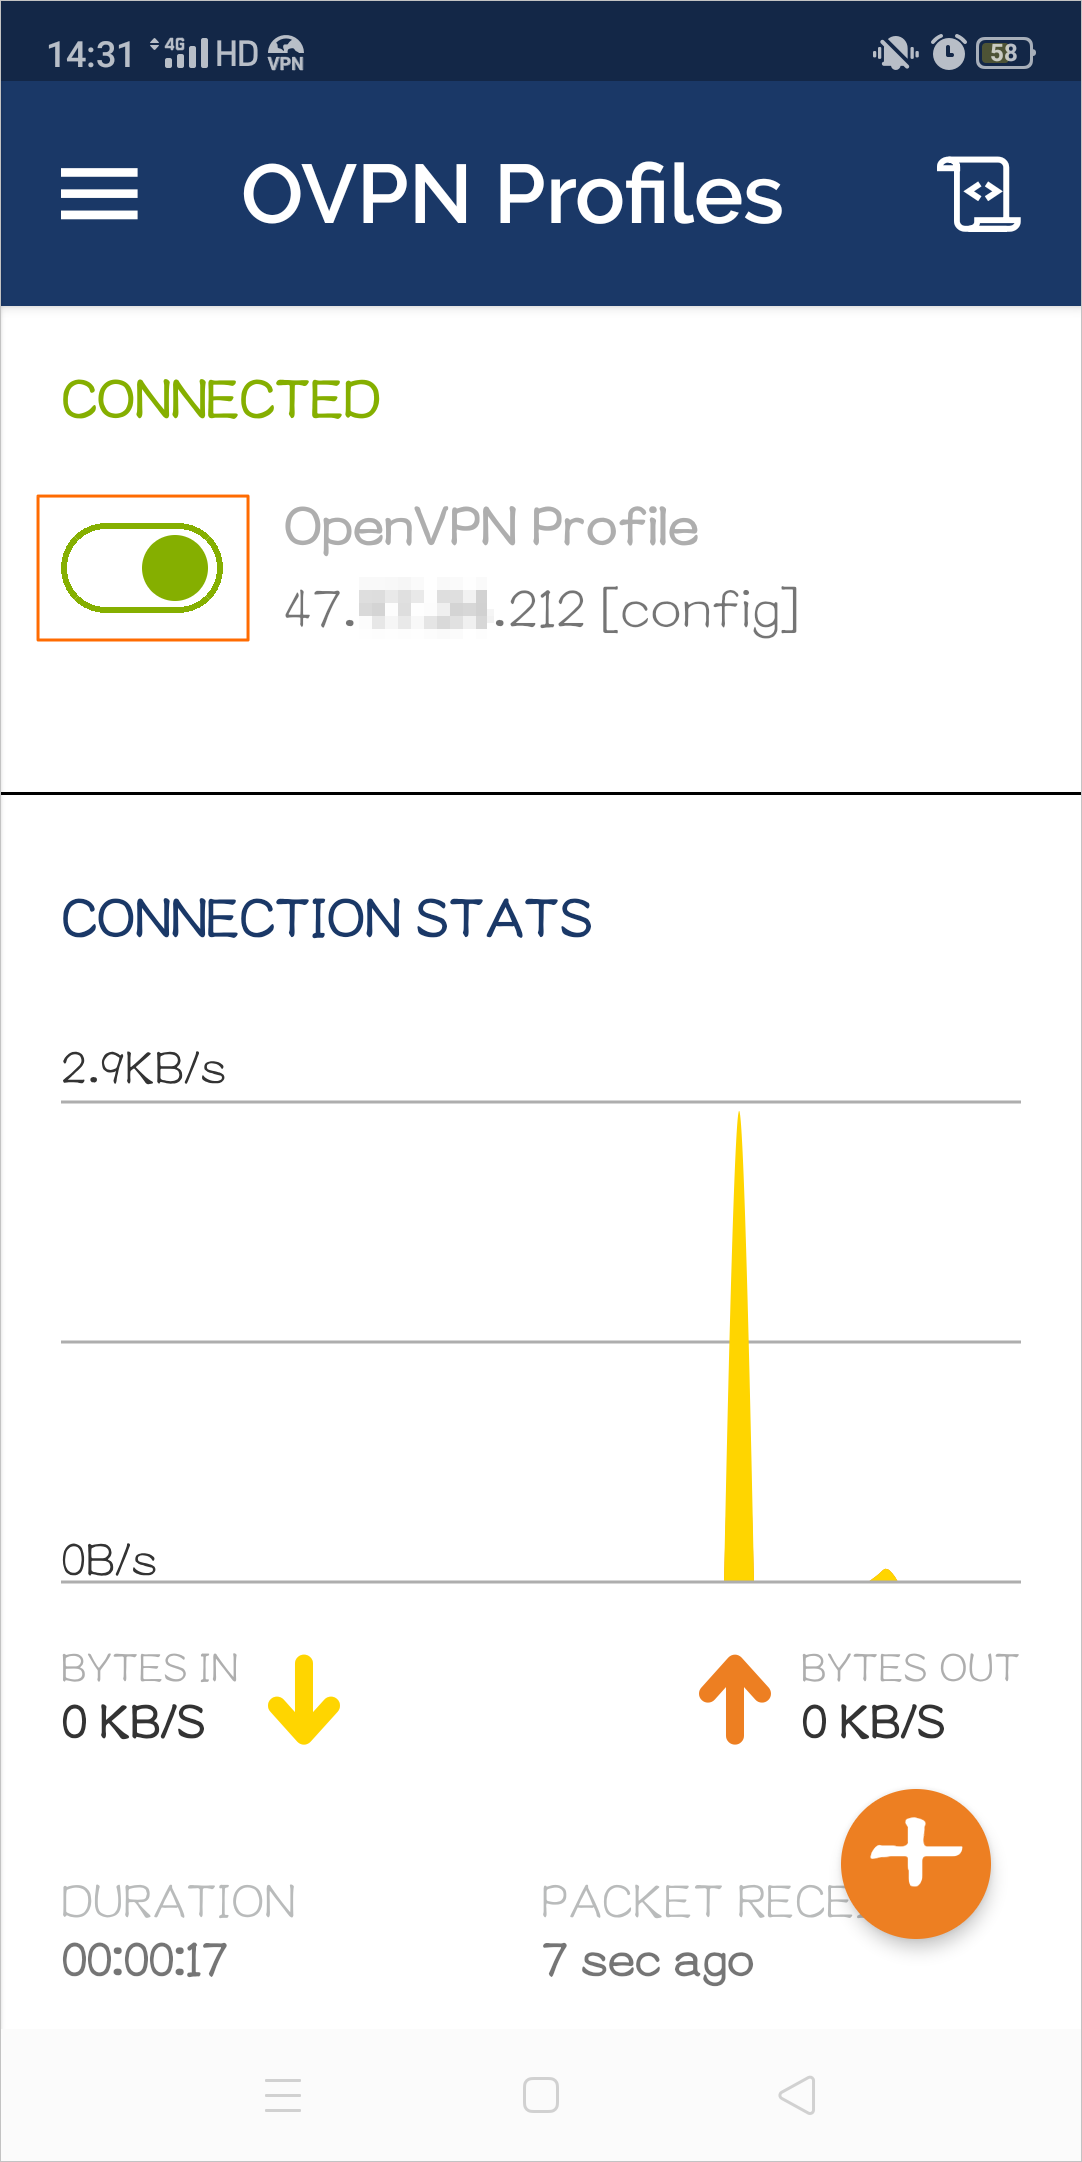
Step
Description
①
Select the OVPN Profile connection method.
②
Find the
config.ovpnfile in the storage directory.③
Tap IMPORT to import the
config.ovpnfile.④
The system automatically reads the information from the
config.ovpnfile and displays the public IP address of the VPN gateway. Tap ADD to add the VPN connection.Tap the toggle button to enable the VPN connection.
macOS client (GUI)
Go to the Tunnelblick Releases page, find version
Tunnelblick 4.0.1 (build 5971), and download the.dmgfile from the Assets panel.If the webpage fails to open, contact your account manager or an Alibaba Cloud support engineer.
Install the Tunnelblick software.
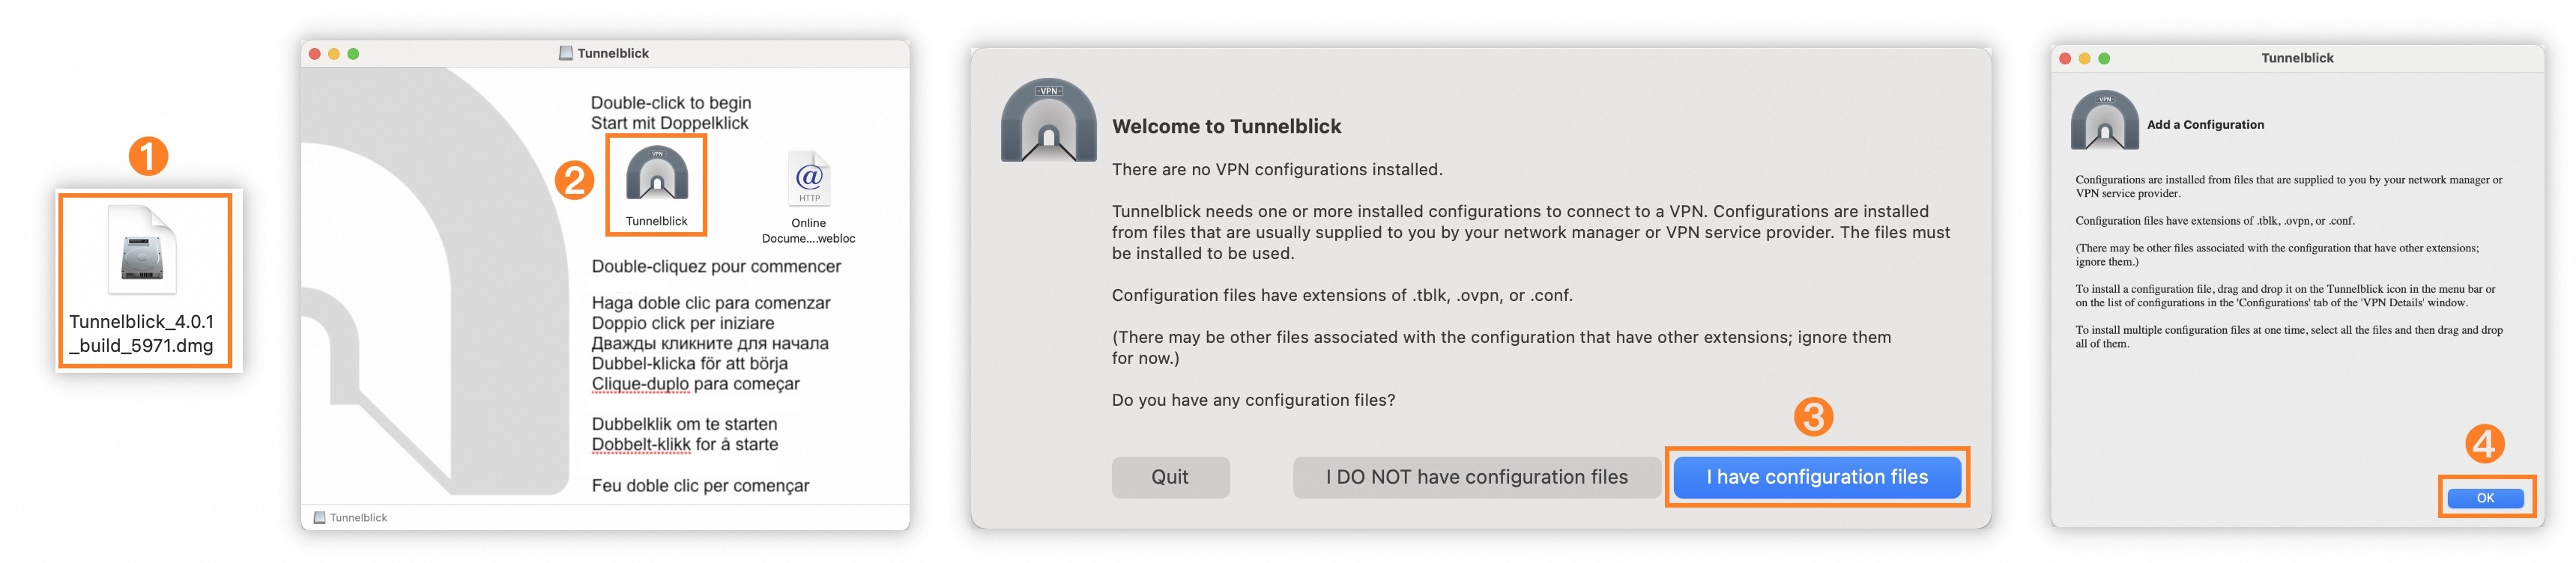
Step
Description
①
Double-click the downloaded Tunnelblick installation package.
②
Double-click the Tunnelblick icon.
③
Select I have configuration files.
④
Click OK.
To establish the VPN connection, first unzip the downloaded SSL client certificate package. Then, drag the extracted
config.ovpnfile to the Configurations panel.

Step | Description |
① | Click the Tunnelblick icon in Launchpad to open the Tunnelblick application. |
② | Drag the extracted |
③ | Select Only Me. |
④ | Click Connect. |
macOS client (CLI)
Open the Terminal app. If your client does not have Homebrew installed, run the following command to install it.
NoteThe Homebrew installation script contains the
sudocommand, which will prompt you to enter your administrator password. When "Press RETURN/ENTER to continue..." appears, press Enter to proceed./bin/bash -c "$(curl -fsSL https://raw.githubusercontent.com/Homebrew/install/HEAD/install.sh)"
Run the following command to install the OpenVPN client.
brew install openvpn
Unzip the downloaded SSL client certificate package and copy the files to the configuration directory.
Back up the /opt/homebrew/etc/openvpn directory.
cp -r /opt/homebrew/etc/openvpn /opt/homebrew/etc/openvpn_bakRun the following command to delete the current OpenVPN configuration files.
rm /opt/homebrew/etc/openvpn/*Run the following command to copy the downloaded SSL client certificate package to the configuration directory.
cp /path/to/certs.zip /opt/homebrew/etc/openvpn/Note/path/to/certs.zipis the path to the SSL client certificate package that you downloaded. Typically, it is in the Downloads directory of the current user, for example,/Users/example/Downloads/certs.zip.
Run the following commands to unzip the certificate package.
cd /opt/homebrew/etc/openvpn/
unzip /opt/homebrew/etc/openvpn/certs.zip
Choose how to run the client.
Run in the foreground
Run the following command to start the client process and establish the VPN connection:
sudo /opt/homebrew/opt/openvpn/sbin/openvpn --config /opt/homebrew/etc/openvpn/config.ovpnAfter you run this command, the process remains in the foreground. To disconnect, press
Ctrl+Cto terminate the command.Run in the background
To run the VPN client as a background service that starts automatically at boot, run these commands:
cp config.ovpn openvpn.conf
sudo brew services start openvpn
To stop the service, run the following command:
sudo brew services stop openvpn
Step 3: Test the connection
Before testing, make sure that the security group rules for the ECS instance allow ICMP traffic. For more information, see View security group rules and Add a security group rule.
On your client, ping the IP address of the ECS instance:
ping 10.0.0.1
A response indicates a successful connection.
Install Nginx on the ECS instance. The following commands use an ECS instance with Alibaba Cloud Linux 3.2104 LTS 64-bit as an example:
yum install -y nginx
systemctl start nginx.service
Allow traffic on TCP port 80 in the security group of the ECS instance. For more information, see View security group rules and Add a security group rule.
On your device, open a web browser and enter the private IP address of the ECS instance,
10.0.0.1, in the address bar. Accessing the Nginx welcome page indicates a successful connection.
FAQ
For more questions, see SSL-VPN connections FAQ.
How can I troubleshoot a failed SSL-VPN connection from my client?
Verify that your device has a stable Internet connection.
If the Internet connection is working, the issue is likely related to the client certificate configuration.
Why can't I ping my ECS instance after establishing an SSL-VPN connection?
This typically means that ICMP traffic (used by the ping command) is being blocked by a firewall. The most common cause is the security group associated with your ECS instance. To resolve this, add an inbound rule to the security group that allows ICMP traffic from your client's CIDR block. For detailed instructions, see Query security group rules and Add a security group rule.
How do I troubleshoot not being able to access a specific port on my ECS instance, even though I can ping it?
Make sure that the service port on the ECS instance is in the listening state. The following example shows how to check port 80 on a Linux instance:

Make sure that the firewall on the ECS instance's operating system allows traffic to the port. The following example shows how to allow traffic to port 80 in iptables:
iptables -I INPUT -p 80 -j ACCEPTMake sure that the security group associated with the ECS instance allows traffic to the port. For more information, see Query security group rules and Add a security group rule.
Why can't my ECS instance ping my client, even though the client can ping the ECS?
This issue usually occurs because the client's operating system firewall is blocking the ping request. You can allow the request in the client's firewall settings.
How do I disconnect an OpenVPN session from the command line on Linux or macOS?
Open the command line, run the following command to search for the OpenVPN process, and then record the process ID.
ps aux | grep openvpnRun the following command to stop the OpenVPN process.
kill -9 <process ID>
What is the correct way to connect to SSL-VPN on a Mac with an Apple Silicon (M1) chip?
Use the macOS client (GUI) to establish the VPN connection.
How can I configure OpenVPN to start automatically on system boot in Linux?
Edit the /etc/rc.local file and add the commands.
# Open the /etc/rc.local file in edit mode.
vim /etc/rc.local
# Press the i key to enter edit mode, and then add the following commands to the /etc/rc.local file.
cd /etc/openvpn/conf/
openvpn --config /etc/openvpn/conf/config.ovpn --daemon
# Press the Esc key to exit edit mode, and then enter the following command to save the file and exit.
:wq
Grant execute permissions on the /etc/rc.local file.
chmod +x /etc/rc.local