IP Address Manager (IPAM) automates CIDR block assignment and conflict detection when you create virtual private clouds (VPCs). Without it, manually coordinating address ranges across teams and environments risks overlaps that are costly to fix after deployment.
This tutorial walks through a common enterprise scenario: a company with multiple business departments that each require isolated VPCs for production and testing. You will create an IPAM pool hierarchy, then use it to allocate a CIDR block automatically when creating VPC1 in the production environment.
Prerequisites
Before you begin, ensure that you have:
An Alibaba Cloud account with permissions to create VPC and IPAM resources
Access to the IPAM console and the VPC console
How it works
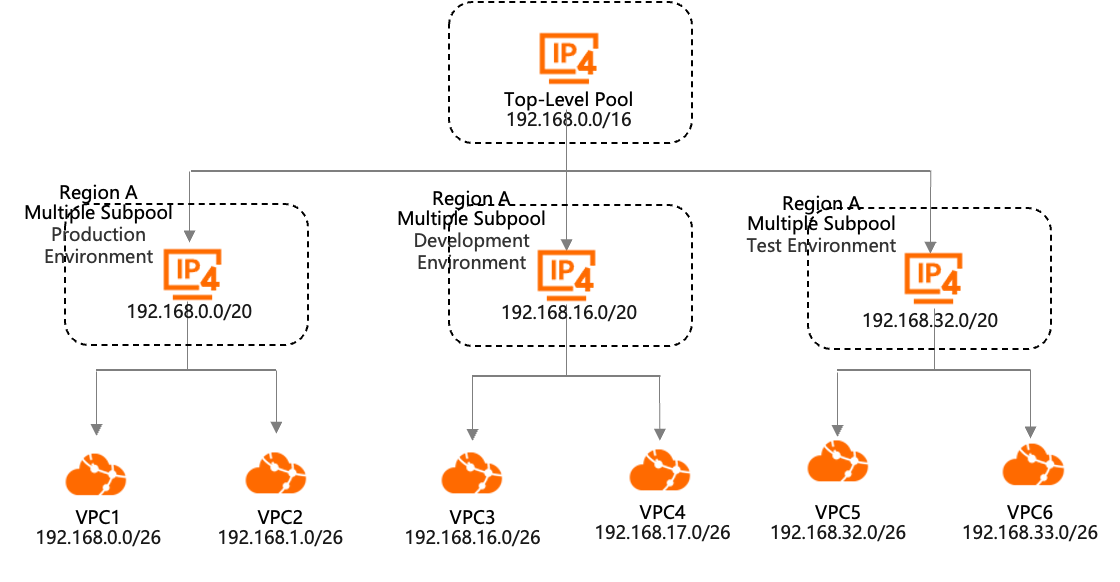
IPAM organizes address space in a hierarchy:
IPAM — the top-level container that defines the effective regions where address management applies.
Top-level pool — holds the full CIDR block available for your organization (for example,
192.168.0.0/16).Subpool — a slice of the top-level pool assigned to a specific environment or department (for example,
192.168.0.0/20for production).VPC — allocated a CIDR block from a subpool at creation time.
In this tutorial, the production subpool holds 192.168.0.0/20 (4,096 addresses). VPC1 receives a /26 block (64 addresses) from that subpool, consuming 1.6% of the pool.
Step 1: Create an IPAM
Log on to the IPAM console. In the top navigation bar, select the region where you want to create the IPAM.
On the IPAM page, click Create IPAM and set the Effective Region. Keep other parameters at their defaults, or adjust them as needed.
Select at least one effective region. The region where the IPAM is hosted must be included and cannot be removed after the IPAM is created.
In the Create IPAM dialog box, set the Name (for example, IPAM) and select the Operating Region (for example, China (Beijing)).
Step 2: Create a top-level pool
In the left-side navigation pane, click IPAM Pool.
On the IPAM Pool page, click Create IPAM Pool and configure the parameters below. Keep other parameters at their defaults. For the full parameter reference, see Create and manage IPAM pools.
Parameter
Description
IPAM Scope
Only private IPAM scopes are supported.
CIDR Range
Select IPAM to create a top-level pool.
Effective Region
Must fall within the effective region of the IPAM. Cannot be changed after creation.
Automatically Import Discovered Resource
When enabled, IPAM continuously scans for VPCs through resource discovery and automatically imports any unallocated resources within this pool's CIDR range.
Provision CIDR Block
Click Add CIDR Block to add one or more CIDRs. Only IPv4 is supported. For this tutorial, add
192.168.0.0/16.Allocate Rule
Set Minimum Mask Length, Default Mask Length, and Maximum Mask Length for resources allocated from this pool.
In this example, set Name to
IPAM-Pool, select China (Beijing) for Effective Region, set Provisioned CIDRs to192.168.0.0/16, select/16for Minimum Mask Length, and select/32for Maximum Mask Length.
Step 3: Create a subpool
On the IPAM Pool page, click Create IPAM Pool and configure the parameters below to create a subpool for the production environment. Keep other parameters at their defaults. For the full parameter reference, see Create and manage IPAM pools.
Parameter
Description
IPAM Scope
Only private IPAM scopes are supported.
CIDR Range
Select IPAM Pool to create a subpool, then select the top-level pool created in Step 2 as the Source IPAM Pool.
Effective Region
Inherited from the parent pool automatically. No separate configuration is needed.
Automatically Import Discovered Resource
When enabled, IPAM continuously scans for VPCs through resource discovery and automatically imports any unallocated resources within this subpool's CIDR range.
Provision CIDR Block
Click Add CIDR Block. Only IPv4 is supported. For this tutorial, add
192.168.0.0/20.Allocate Rule
Set Minimum Mask Length, Default Mask Length, and Maximum Mask Length for resources allocated from this subpool.
Configure sub-pool parameters: set Name to
IPAM-Pool-Sub. In Allocation Rule, set Minimum Mask Length to/20(4,096 IPs) and Maximum Mask Length to/32(1 IP).After creation, the pool hierarchy looks like this:
The pool list contains the top-level pool (CIDR:
192.168.0.0/16) and its sub-pool (CIDR:192.168.0.0/20). Both pools are in Available status under the private IPAM scope.
Step 4: Create VPC1 and allocate a CIDR block
Log on to the VPC console.
In the top navigation bar, select the region set as the Effective Region of the subpool.
On the VPC page, click Create VPC and configure the parameters below, then click OK. For the full parameter reference, see Create and manage a VPC.
Parameter
Description
IPv4 CIDR Block
Select IPv4 CIDR block allocated by IPAM.
IPv4 Pool
Select the subpool created in Step 3.
IPv4 Mask
After you specify the IPv4 mask, the system allocates the first available CIDR block that meets the allocation rules. Alternatively, specify a CIDR block from the provisioned ranges in the subpool.
IPv4 CIDR Block (vSwitch)
Must fall within the IPv4 CIDR block allocated by IPAM.
Example configuration values:
Region: China (Beijing)
VPC name: VPC1
IPv4 Netmask: /26 (64 IPs), system auto-assigns CIDR 192.168.16.0/26
vSwitch name: vSwitch1
Zone: Beijing Zone F
vSwitch IPv4 CIDR: 192.168.16.0/27 (32 IPs)
After the VPC is created, open the Details tab of the subpool to review address usage.
The subpool CIDR is
192.168.0.0/20, which provides 4,096 addresses. With a/26network mask, 64 addresses are allocated to VPC1, equal to 1.6% of the pool (64 / 4,096 = 1.6%).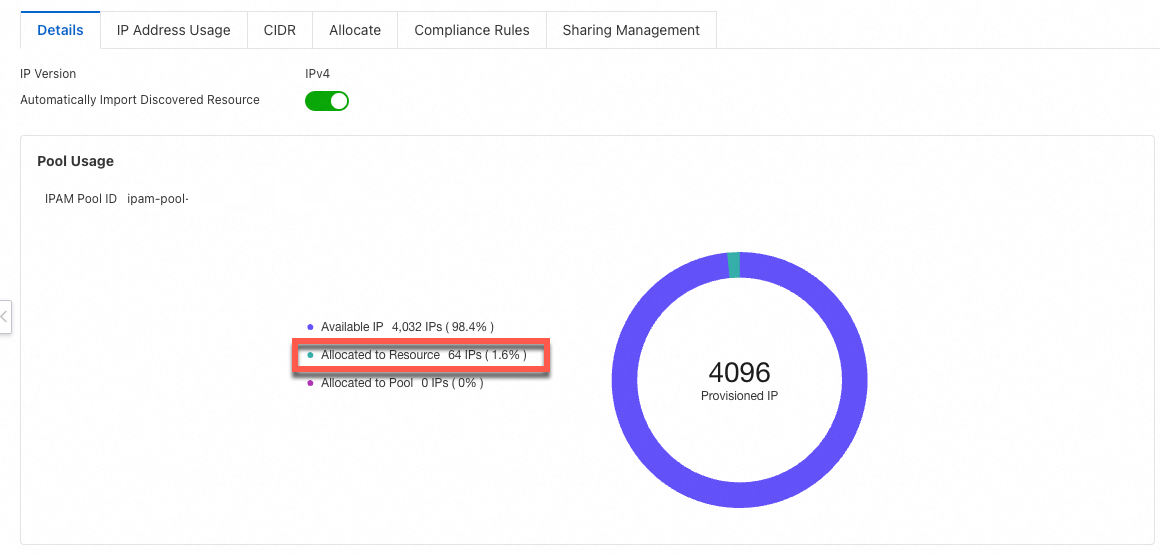
Open the Allocate tab to view the specific addresses assigned to VPC1.
What's next
For IPAM features, limits, and billing details, see IP Address Manager (IPAM).
For CIDR block planning strategies that scale across regions and departments, see Address planning.