ApsaraVideo VOD Workflow 2.0 integrates with the caption removal feature of Intelligent Media Services (IMS) to intelligently detect and remove video captions. This feature uses smart padding to restore a clean video frame, automating the process and supporting post-production. This topic describes how to use the caption removal feature in a workflow.
This feature is available in the following regions:
China (Shanghai), China (Beijing), Singapore, and US (Silicon Valley).
Prerequisites
To use the caption erasure node in a workflow, you must activate ApsaraVideo VOD and Intelligent Media Services separately.
Benefits
The caption removal feature offers a Premium Edition:
Premium Edition (Recommended): This edition provides seamless removal. It resolves issues such as mosaic and shadow artifacts to produce a more natural-looking video. Enable this edition using the
ModelIdparameter. For more information, see The ModelId parameter.The Premium Edition uses an advanced algorithm. However, it processes videos more slowly and costs more than the Basic Edition. Select an edition based on your requirements.
Instructions
Step 1: Configure a caption removal workflow in the console
You can create workflows only in the ApsaraVideo VOD console.
Log on to the ApsaraVideo VOD console.
In the navigation pane on the left, choose Configuration Management > Media Processing > Workflows to go to the workflow management page.
Click Add Workflow Template and enter a workflow name.
On the workflow editing page, click the + icon to the right of the Start node to add a caption removal node.
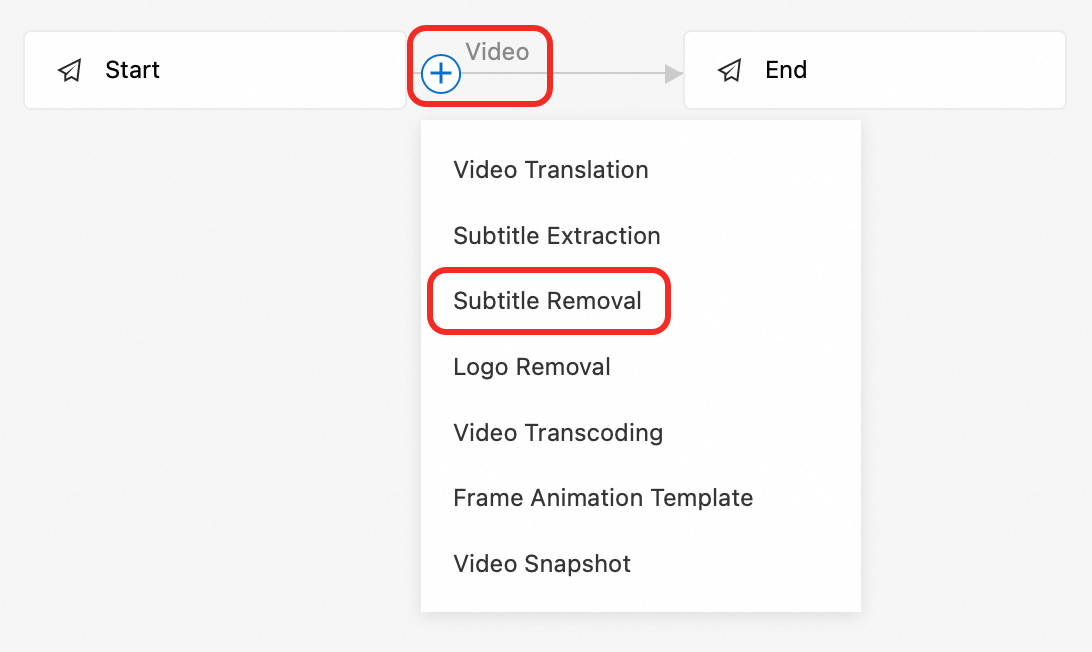
In the panel on the right, configure the parameters as prompted:

Node Name: A custom name for the caption removal node.
Sample Material: A sample video used to configure caption parameters. This video is not processed by the workflow. Supported formats include MP4, WebM, MOV, and M3U8.
Detection Area: The default area is the bottom quarter of the video. You can also manually select a custom area.
Algorithm Edition: Supports Basic Edition and Premium Edition.
Premium Edition (Recommended): Supports seamless removal for multiple time ranges. It produces a more natural-looking video and effectively eliminates residual mosaics and shadows. Enable the premium features by setting the
ModelIdparameter. For more information, see The ModelId parameter.Basic Edition: This edition may leave residual artifacts, such as mosaic shadows, after removal. The restoration quality is average.
Time Range: Set a custom start and end time.
NoteThe start time and end time must be specified in pairs.
The start time cannot be later than the end time.
If either the start time or end time is left empty, the entry is considered invalid. If an entry is invalid, the workflow processes the entire video by default.
The Premium Edition supports up to five time ranges. The Basic Edition supports only one.
After you complete the configuration, click OK and submit the workflow template to generate a workflow ID. Record the ID to specify the workflow for later uploads.

Step 2: Trigger the workflow
Use the created workflow to process videos. You can start a task during or after a video upload.
Trigger a workflow in the console
Initiate during video upload
Log on to the ApsaraVideo VOD console.
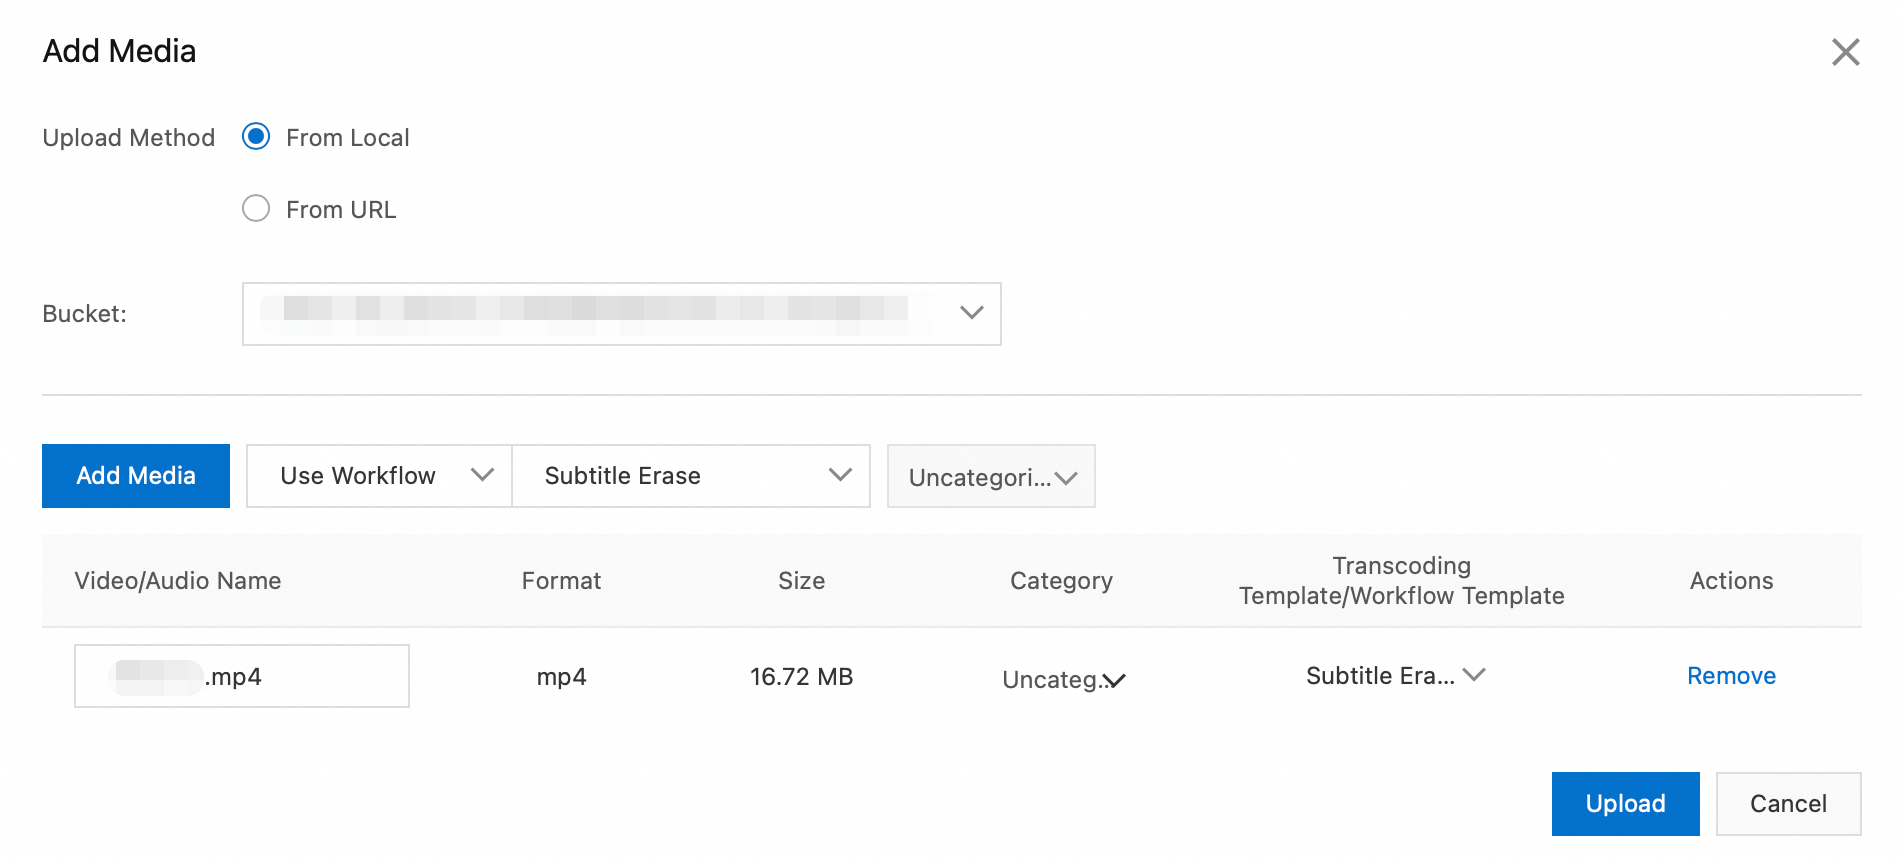
In the navigation pane on the left, choose Media Files > Audio/Video, and then click Upload Audio/Video.
On the Upload Audio/Video page, click Add Audio/Video, select an upload method and storage address, select Use Workflow, and then specify the workflow that you created.
Initiate after video upload
Log on to the ApsaraVideo VOD console.
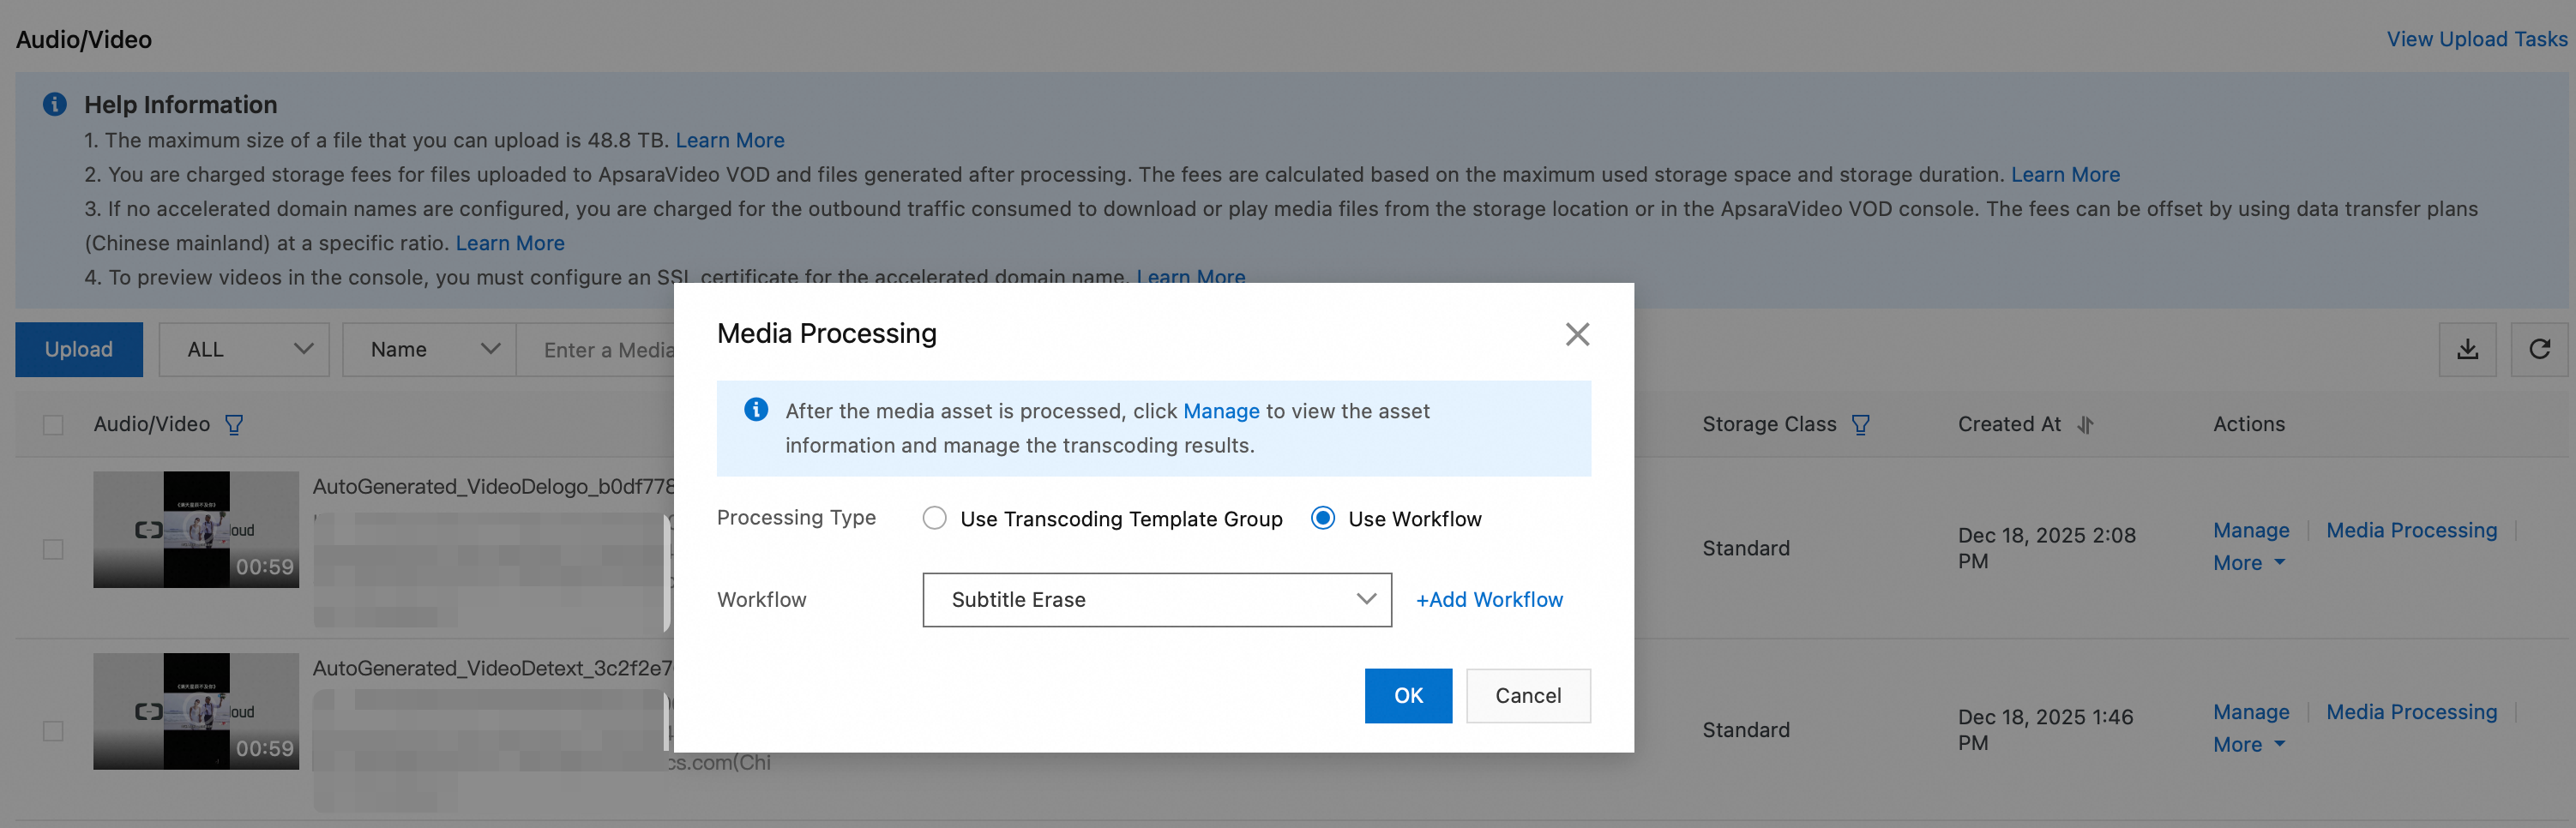
In the navigation pane on the left, choose Media Files > Audio/Video to go to the audio/video list page.
In the Actions column of the target audio or video, click Processing. Select Process with Workflow, and then select the workflow that you created in the previous step.
Trigger a workflow using OpenAPI
Initiate during video upload
The CreateUploadVideo operation obtains an upload URL and credentials and creates basic media asset information. It does not upload the file. You must implement the upload logic. For a complete example of how to upload a file using an API operation, see Upload media files using the ApsaraVideo VOD API.
When you call the CreateUploadVideo or UploadMediaByURL operation to upload an audio or video file, set the
WorkflowIdparameter to the ID of the workflow that you created. After the upload is complete, ApsaraVideo VOD automatically processes the file according to the specified workflow.
Initiate after video upload
Call the SubmitWorkflowJob operation. Set the WorkflowId parameter to the ID of the workflow that you created. This action immediately starts the workflow to process the audio or video file.
Step 3: Query results
Query results in the ApsaraVideo VOD console
Log on to the ApsaraVideo VOD console.
In the navigation pane on the left, choose Media Files > Audio/Video to go to the audio/video list page.
On the audio/video list page, find the video that is generated by the workflow. You can filter videos by source video name, creation time, and other criteria.
Query results in the Intelligent Media Services console
Log on to the Intelligent Media Services console.
In the navigation pane on the left, choose VOD Media Processing > Task Management, and then click the Intelligent Removal tab.
On the Intelligent Removal tab, find the removal task that is generated by the workflow. You can filter tasks by name, creation time, and other criteria.
When the task status is Success, click View to view the details:
Basic parameters and configuration of the removal task.
Clear the video input.
Clears the video's output information and output file.
Query results using workflow task callbacks
Configure HTTP or Message Service (MNS) callbacks.
When the workflow task is complete, the system triggers a WorkflowTaskFinished event and pushes the complete results through the configured HTTP or MNS callback. The key fields are described as follows:
Status: The overall status of the task (SucceedorFailed).ActivityResults: A JSON string that contains execution details for each node, such asVideoTranslation, where theResultfield includes key information from the translation output, such as theMediaIdandJobId.TaskInput: The original input media information, such as theMediaID and filename.
Parse
ActivityResultsfrom the callback message body to extract theMediaIdof the resulting video. You can use this ID for playback or distribution.
Query results using OpenAPI
Call the QueryIProductionJob operation to query the task result. Pass the JobId of the removal task. You can obtain this JobId from the ActivityResults.Result.JobId field in the workflow task callback. The operation returns the detailed status and output of the removal job.
JobId: The ID of the job that is returned when the workflow calls the SubmitIProductionJob operation to submit the caption removal task.
Example response:
{
  "RequestId": "****20b48fb04483915d4f2cd8ac****",
  "JobId": "****20b48fb04483915d4f2cd8ac****",
  "FunctionName": "VideoDetext",
  "Input": {
    "Type": "OSS",
    "Media": "oss://example-bucket/input.mp4"
  },
  "Output": {
    "Type": "OSS",
    "Media": "oss://example-bucket/output.mp4",
    "OutputUrl": "http://example-bucket.oss-cn-shanghai.aliyuncs.com/output.mp4"
  },
  "Status": "Success",
  "CreateTime": "2024-09-24T06:17:09Z",
  "FinishTime": "2024-09-24T06:17:31Z",
  "OutputFiles": ["output.mp4"],
  "OutputUrls": ["http://example-bucket.oss-cn-shanghai.aliyuncs.com/output.mp4"],
  "Result": {}
}A
StatusofSuccessindicates that the caption removal is complete.You can access the processed video using the URL in the
OutputUrlsfield.