Bills itemize your monthly spending on Alibaba Cloud for reconciliation and payment. View them in the Billing and Cost console.
Alibaba Cloud bill
Your Alibaba Cloud bill summarizes your spending for a calendar month. It includes your billing details, outstanding balance, billing cycle, and resource usage.
Alibaba Cloud provides the following types of billing information. While the current month's bill is updated in real time, the final bill is not available until the following month.
|
Type |
Description |
Generation time |
Link |
|
Monthly bill |
View the total amount payable for the month. You can export a spending summary PDF for reconciliation, settlement. |
12:00 on the 3rd of the following month |
|
|
Billing details |
View detailed charges for each resource for cost verification and analysis. You can export the details as a CSV file. |
12:00 on the 3rd of the following month |
|
|
Split bill |
Split bills by department or project for internal cost allocation and budget management. This information is for internal use only and cannot be used for settlement. |
12:00 on the 4th of the following month |
The new Cost Management console is currently available by invitation to select users. The console automatically redirects you to your assigned version. You can switch to the other version from within the console.
Bills
-
A primary account has access to bills by default.
-
A RAM user requires the
AliyunBSSReadOnlyAccess(read-only access to Billing Management) permission.
Monthly bills
Previous console
Go to User Center - Overview of Monthly Bill to view a summary of your spending by billing month. You can also switch accounts to view spending summaries for associated financial sub-accounts.
The page displays the following information:
-
The monthly bill for the selected account, which is the billing data used for settlement with Alibaba Cloud.
-
Spending trends for the last six months and product spending distribution by billing period for the selected account.
New console
Go to the Overview of Monthly Bill page to view a summary of your bill, including key fields such as Tax-inclusive Payable Amount, Paid Amount, and OutStanding Amount.
-
Tax-inclusive Payable Amount: The final amount that you must pay for your cloud resources for the month, after all applicable discounts, subscription deductions (such as savings plans), and coupon deductions are applied.
-
Paid Amount: The amount that you have paid. This is the sum of payments made with cash, vouchers, and stored-value cards.
-
OutStanding Amount: The unsettled amount. The formula is: OutStanding Amount = Tax-inclusive Payable Amount - Paid Amount.
The status of the bill for the current month is Being billed. For previous months, if there is an outstanding balance after the bill is generated, the status is Not fully settled. After the bill is fully paid, the status changes to Cleared.
On the Monthly Bill Overview page, you can switch between different dimensions to view summary data, including By Product, By Resource Purchase Account, By Organization (for enterprise accounts only), By Service Entity, and By The Status Of Hit Discounts.
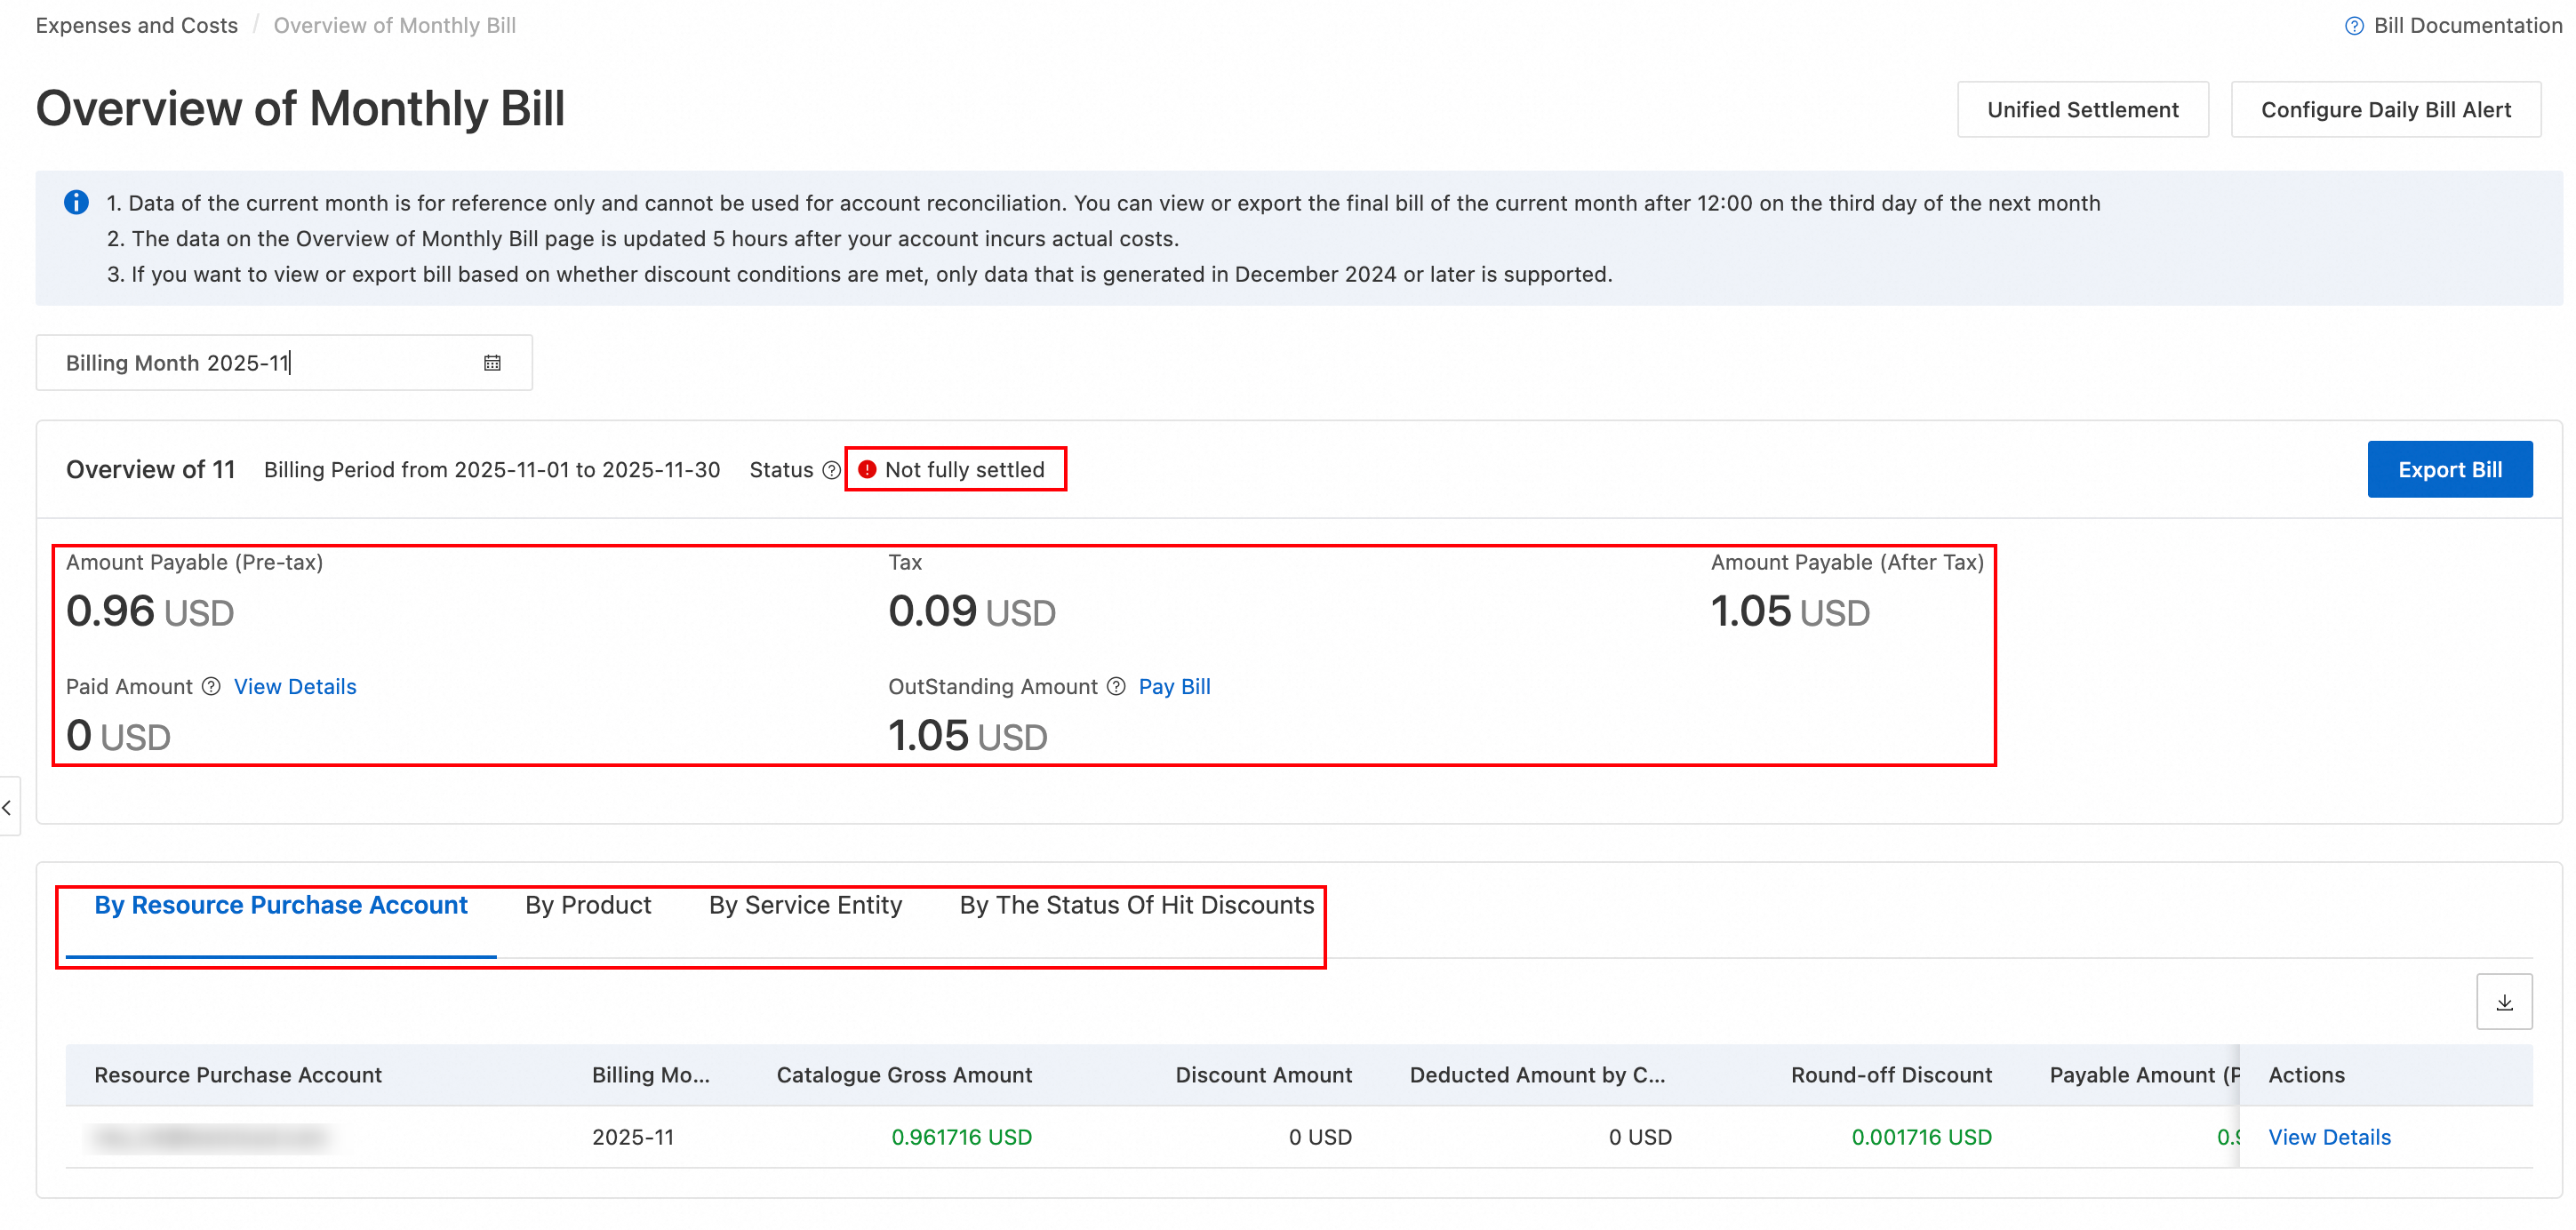
On the Monthly Bill Overview page, click Export Bill in the upper-right corner to export a Monthly Bill in PDF or a Cost Summary in CSV.
Billing details
Previous console
The Bill Details page displays your spending information, including billable items, unit prices, usage, and deductions for resource plans. You can adjust the aggregation items and statistical period, then filter and export the data as needed.
Data is updated on a T+1 basis and includes unbilled, accumulating pay-as-you-go data for the current month.
You can filter and view data by the following dimensions:
-
Resource group: Filter by a configured resource group.
-
Instance Name/Instance ID: Search for billing details of a resource by its instance name or instance ID.
-
Aggregation Item: Query billing details by billable item, instance, product, account, or cost center.
-
Statistical Period: Query billing details by billing cycle, day, or line item.
If you are logged in with a primary financial account, you can filter by account to view the data of financial management sub-accounts.
New console
The Bill Details page lists detailed charges for each billable item (such as instance, storage, and traffic) for each billing cycle. You can also group the data by instance for analysis.
You can click the  icon in the upper-right corner of the list to customize the displayed columns.
To view which cloud products incurred costs each day, set Bill Generation Date or Statistical Period to Day, then check the Tax-inclusive Payable Amount column in the billing details.
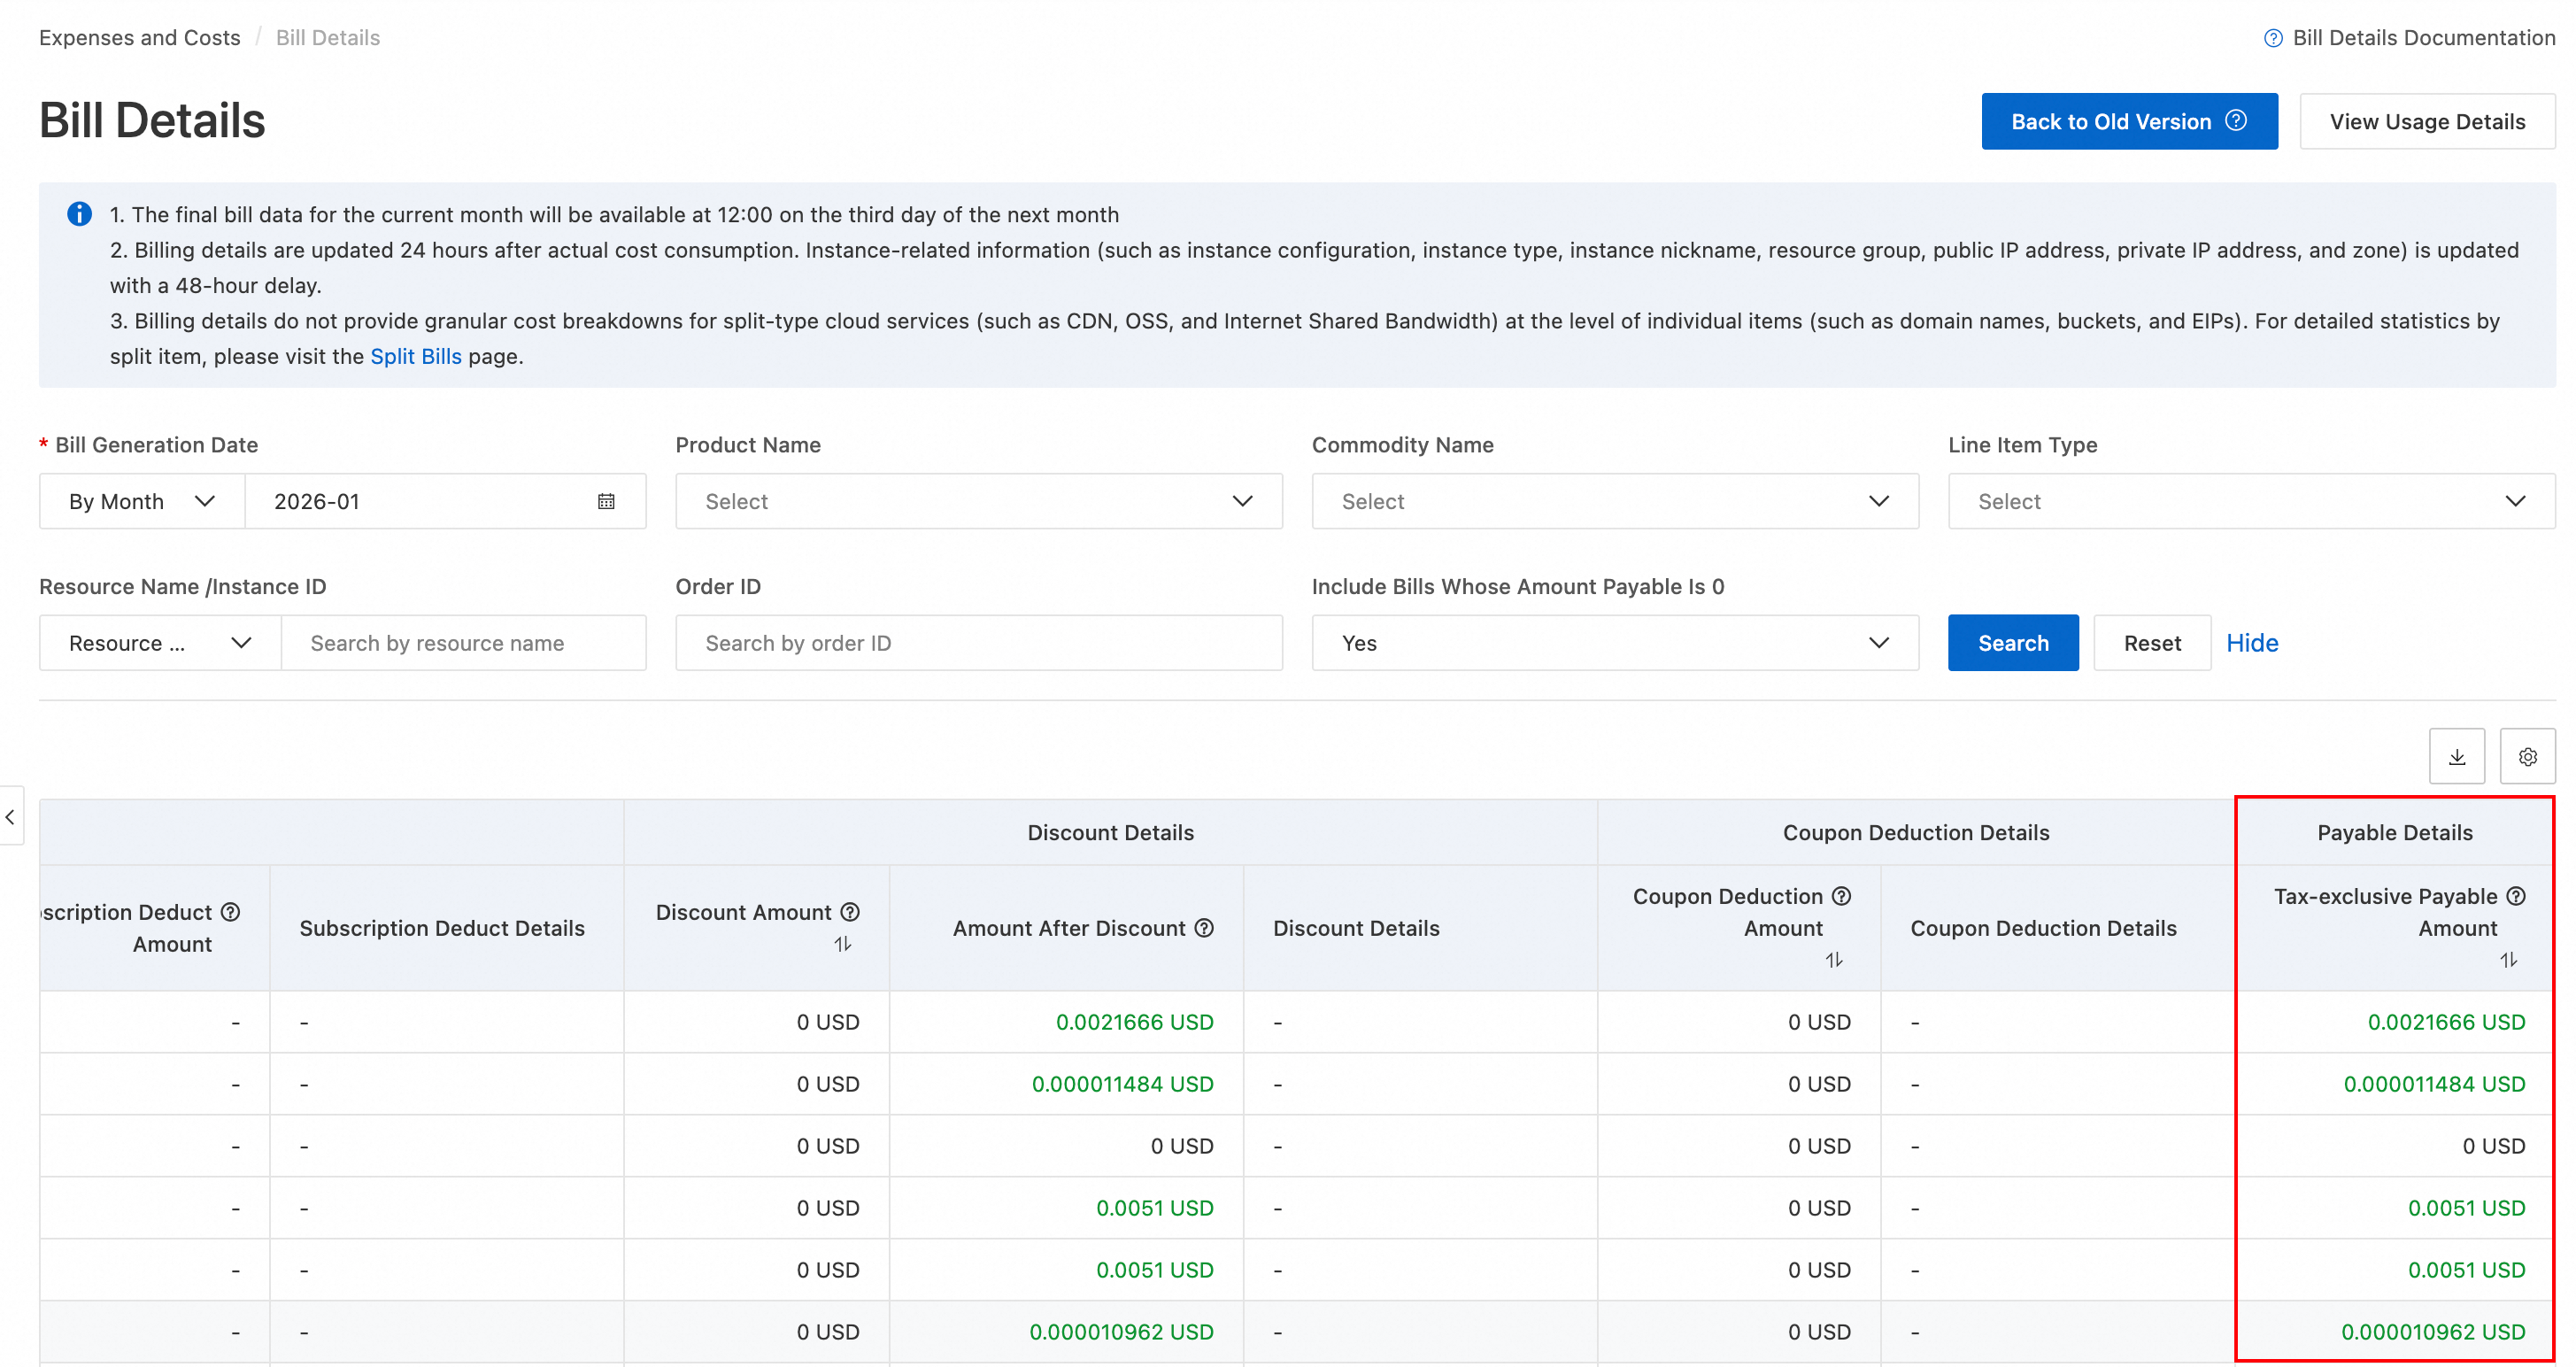
Click the  button on the right to export the billing details. You can export data for the most recent 18 months.
Split bill details
Previous console
The Split Bill feature reallocates cloud resource costs based on management requirements. It breaks down costs to a finer granularity, such as by instance or bucket, or aggregates costs based on dimensions like cost center and tag. This serves as a reference for internal billing and cost allocation.
To use the Split Bill feature for the first time, you must activate it on the Split Bill page. This feature is free of charge. After you activate it, you can view the split bill data on the next day.
-
Custom analysis: Filter data by criteria such as billing period, product, instance ID/name, and split item ID/name. You can view data by billing period, day, or line item.
-
Customize columns: Click the Customize Column Options button in the upper-right corner of the report to select and save the columns to display. This setting affects only the columns displayed in the console and does not affect the exported report.
-
Export split bill: Click the Export Billing Overview (CSV) button to export the Current List or All Content. Download the exported file from the Export Records page.
New console
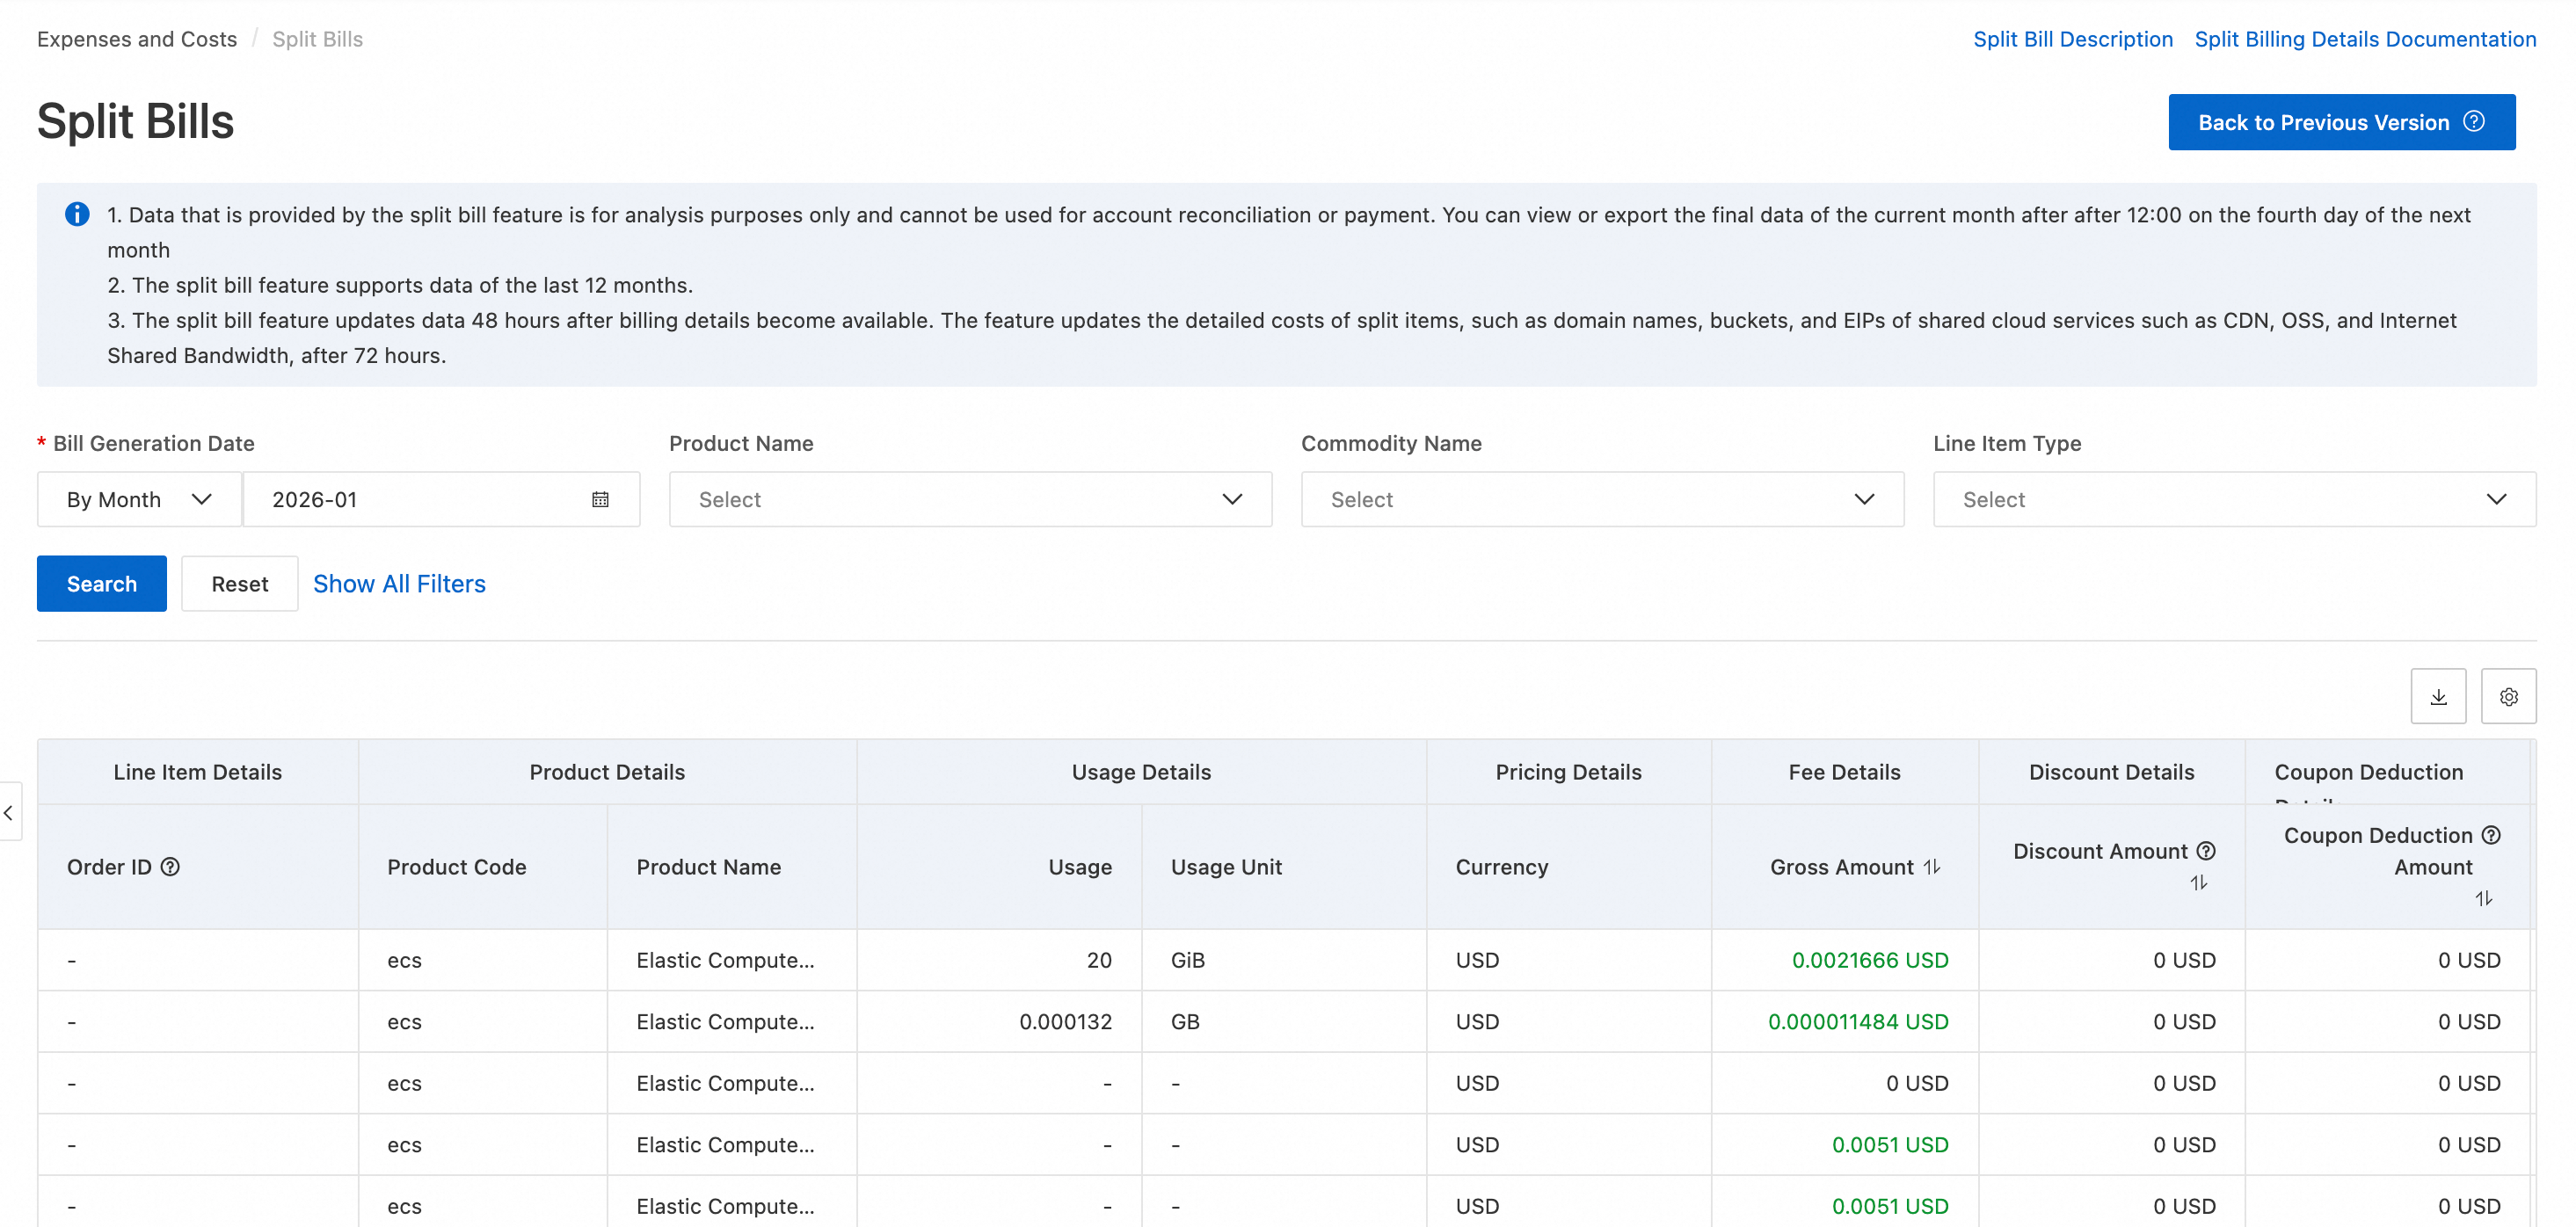
The Split Bill feature reallocates cloud resource costs based on management requirements. It breaks down costs to a finer granularity, such as by instance or bucket, or aggregates costs based on dimensions like cost center and tag. This serves as a reference for internal billing and cost allocation.
To use the Split Bill feature for the first time, you must activate it. Go to the Split Bill page and click Activate Now. This feature is free of charge. After you activate it, you can view the split bill data on the next day.
-
Custom analysis: Customize analysis dimensions based on filter criteria such as product, item, and time.
-
Customize columns: Click the
 icon in the upper-right corner of the report to customize and save the displayed columns. This setting affects only the columns displayed in the console and does not affect the exported report.
 -
Export split bill details: Click the
 icon in the upper-right corner of the report to export it. Download the exported file from the Export Records page.
The filter criteria also include Instance/Split Item. The data table includes columns such as Usage, Usage Unit, list price, discount amount, amount after discount, coupon deduction amount, Tax-inclusive Payable Amount, voucher deduction amount, and pricing currency.
If you need to subscribe to billing data for delivery to OSS or MaxCompute, see Export and subscribe to bills.
Bill reconciliation
Legacy console
When you reconcile your cloud resource bill on the Bill Details page, use the following formula to calculate the Amount Payable (Before Tax):
Amount Payable (Before Tax) = list price - discount amount - coupon deduction - Savings Plans Deduction (List Price).
-
list price: The original cost of usage, calculated based on the standard rate. It is also known as the catalog price.
-
discount amount: The discount from contractual agreements or official promotions.
-
coupon deduction: The amount deducted by a coupon.
-
Savings Plans Deduction (List Price): The total list price of pay-as-you-go cloud resources covered by Savings Plans.
After calculating the Overview of Monthly Bill, verify the Amount Payable (Payment Currency) on the Overview of Monthly Bill page. This amount is typically less than or equal to the calculated pre-tax amount due to a View Details that truncates values from the 3rd to the 10th decimal place. To confirm the exact amount, click View Details for the relevant entry on the Overview of Monthly Bill page.
New console
Use your bill to verify your purchased resources, discounts, coupons, and amount payable.
Verify purchased resources
Verify that the products or resources listed on your bill match your actual purchases. Log in to the console to view your resource distribution. Pay special attention to usage differences across regions to ensure billing accuracy.
On the Bill Details page, use the resource or Commodity information to identify the specific cloud resource that incurred the charges.
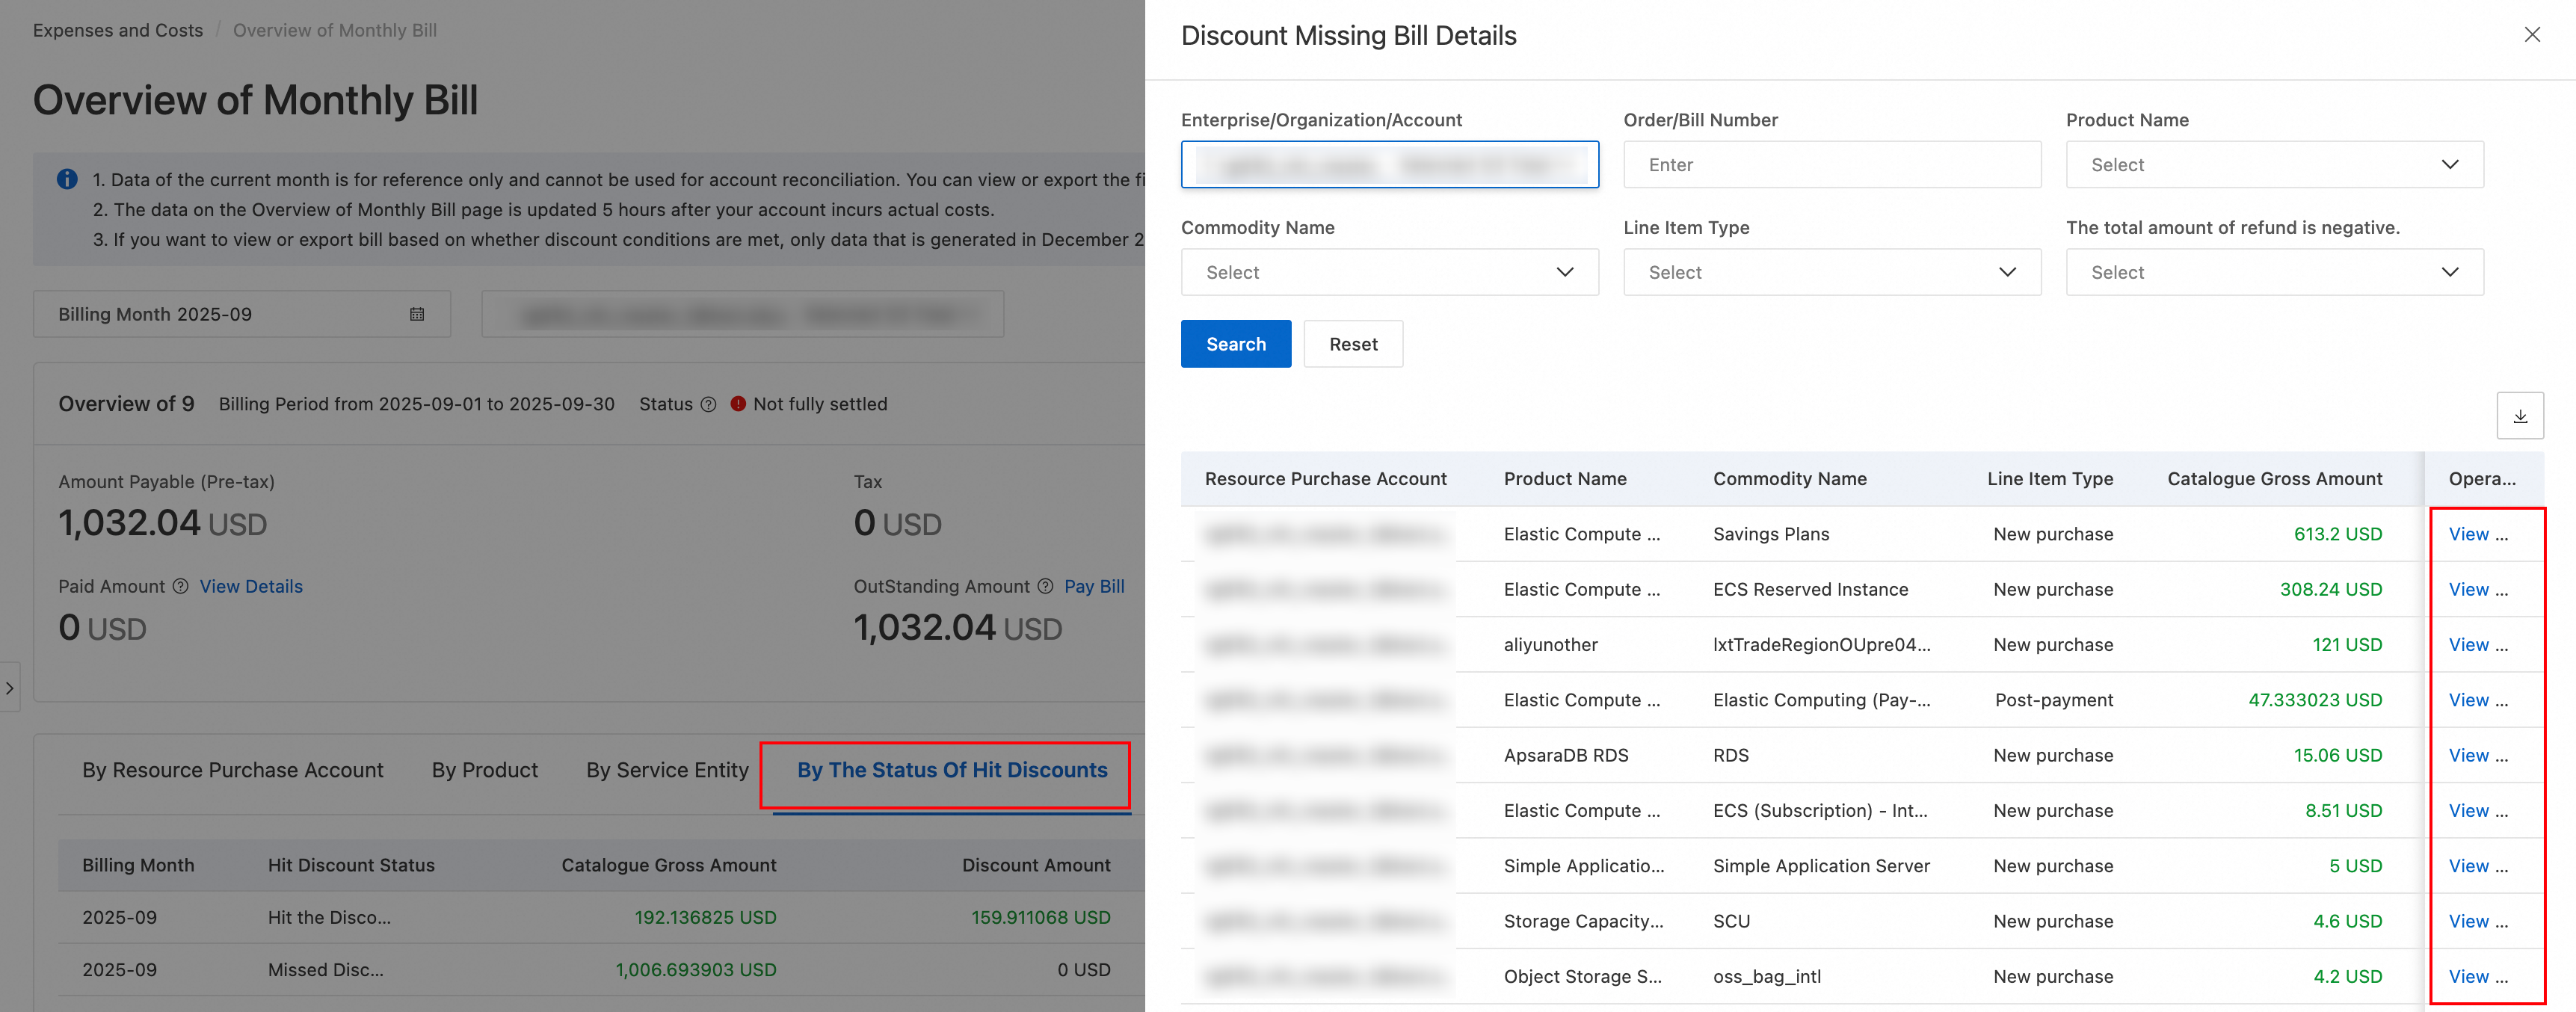
Verify discounts
-
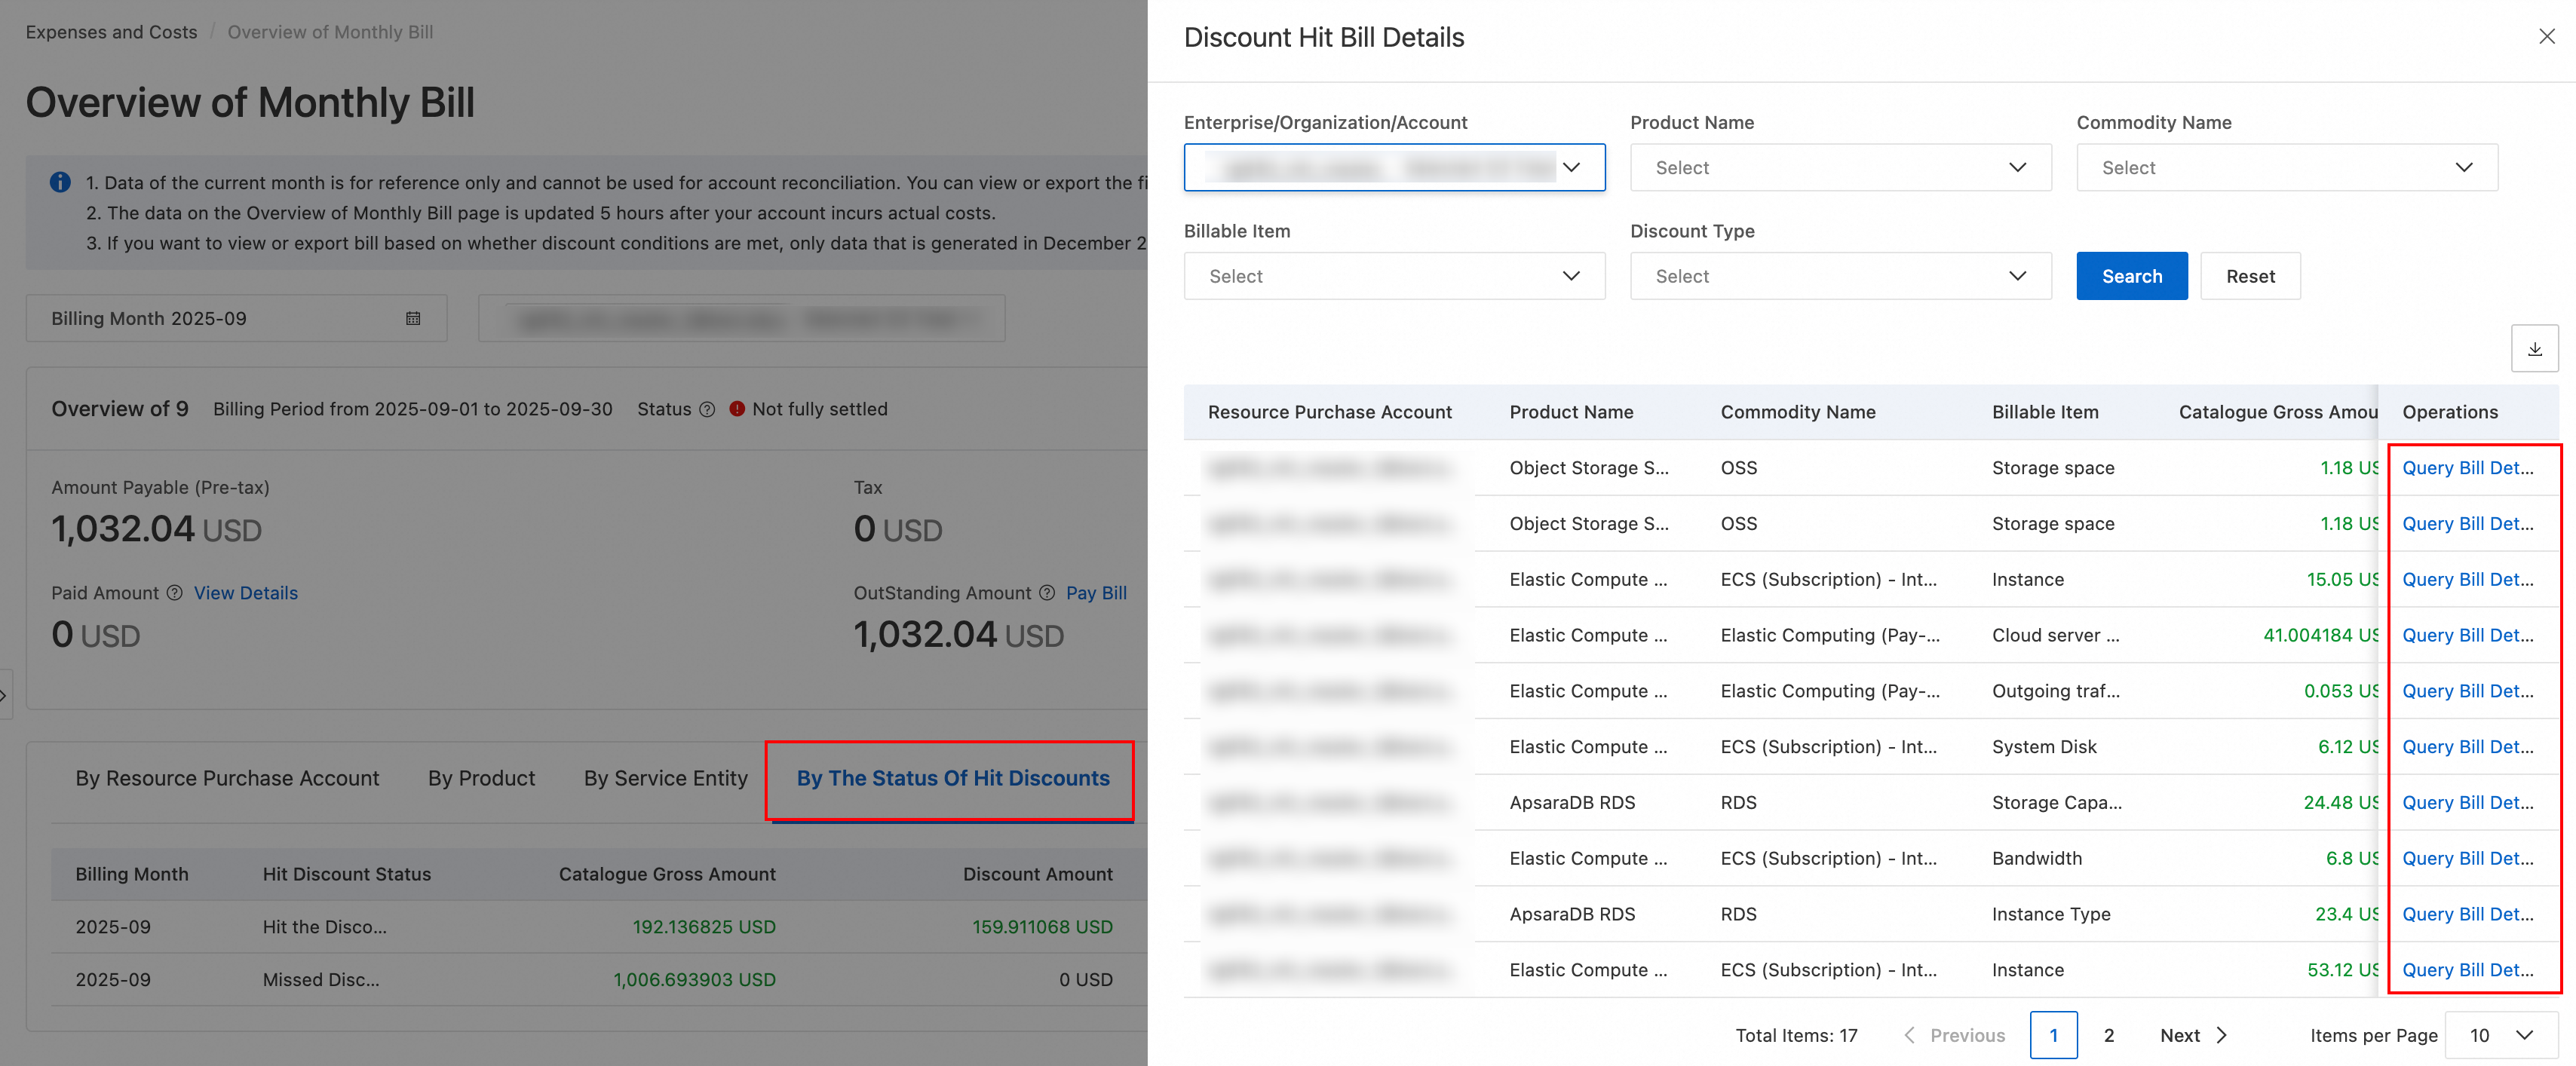
On the Overview of Monthly Bill page, switch to the By The Status Of Hit Discounts tab to check for discounts applied that month.
-
Click View Details to view the Hit the Discount overview.
-
On the Hit the Discount page, review the discount details.
In the Actions column of the Applied Discount Bill Details panel, click Query Detailed Bill to view the detailed bill for the corresponding resource.
-
On the Missed Discount page, click View Details to open the Discount Reconciliation page, where you can View Cause.
Verify coupon usage
On the Bill Details page, check the Deducted by Coupon field to view the total deduction amount.
Verify the amount payable
After verifying that your resources, discounts, and coupon usage are correct, use the following formula to calculate the final amount payable:
amount payable = total list price - subscription deduction (Savings Plans deduction) - discount amount - coupon deduction - rounding adjustment
Pay bills
Legacy console
We recommend paying your monthly bill by wire transfer.
On the Account Overview page, enable automatic payment. Then, initiate a wire transfer to the bank account listed on your monthly bill. When Alibaba Cloud receives the funds, they are automatically applied to your outstanding monthly bills, starting with the oldest, until all bills are paid or the funds are depleted.
If automatic payment is disabled, you must manually pay your monthly bills once the wire transfer is received. Follow these steps:
-
Go to Payment Details and click the Unpaid tab. Select an unpaid monthly bill to view its details.
-
After you confirm the bill details, click Pay.
-
Enter the amount to pay, select a payment method, and then click Pay.
New console
Your monthly bill is generated at 12:00 on the 2nd of the following month. After the bill is generated, you can pay it in the following ways:
-
Automatic payment: If you have enabled automatic payment (which is on by default for individual users) and have sufficient credit in your account, the system automatically pays any outstanding bill. No manual action is required.
-
Manual payment: If you have insufficient credit, go to the Overview of Monthly Bill page. Click Pay Bill next to OutStanding Amount and select Top-up & Remittance (payments are automatically applied once funds arrive).
-
You cannot pay a bill that is currently being generated.
-
In a multi-account scenario, a management account can transfer funds to a member account with an outstanding bill. To do so, navigate to Overview of Monthly Bill → Pay Bill → Transfer. Once the funds arrive, the system automatically pays the bill.
Configure billing alerts
If you use the new console, you can configure a High-Spending Alert for your subscribed pay-as-you-go products to prevent unexpected overspending:
-
In the Message Center, ensure that you have configured a recipient for Account Balance Message notifications.
-
Log on to the console and choose Billing > Overview of Monthly Bill.
-
In the upper-right corner of the Overview of Monthly Bill page, click Configure Daily Bill Alert.
-
On the settings page, select an Alerting Commodity, enter a Threshold, and click Add.
After you enable this feature, the system sends a daily SMS notification if a product's daily bill exceeds the specified threshold. You can configure alerts for up to 20 products. For monthly-billed products, the system sends a single notification after the bill is generated at the beginning of the following month.