You can configure multiple websites on an Elastic Compute Service (ECS) instance to reduce operational costs and simplify website management tasks, such as updating software, configuring security settings, and backing up data. This configuration also lets you flexibly adjust resource allocation as website requirements change. This topic describes how to use Nginx to build multiple websites on a Linux ECS instance.
Prerequisites
An ECS instance with a public IP address has been created and an LNMP stack has been deployed. For more information, see Deploy an LNMP stack or (To be determined) Deploy an LNMP stack using Docker.
This tutorial provides a one-click deployment solution for configuring multiple websites using Nginx. You can run the code to deploy the environment directly. Run with one click
Create test websites
Connect to the ECS instance on which the LNMP stack is deployed.
For more information, see Connect to a Linux instance using Workbench.
Run the following command to navigate to the configured website root directory.
cd /usr/share/nginx/htmlRun the following commands to create two test folders.
These folders are used to store the project code for the test websites.
sudo mkdir Testpage-1
sudo mkdir Testpage-2
Configure the Testpage-1 website.
Run the following command to navigate to the Testpage-1 folder.
cd /usr/share/nginx/html/Testpage-1/Run the following command to create and edit the
index.htmlfile.sudo vim index.htmlPress the
ikey to enter edit mode, and then add the following content.Test page 1After you finish editing, press the
Esckey, enter:wq, and then press the Enter key to save the file and exit.
Configure the
Testpage-2website.Run the following command to navigate to the
Testpage-2folder.cd /usr/share/nginx/html/Testpage-2/Run the following command to create and edit the
index.htmlfile.sudo vim index.htmlPress the
ikey to enter edit mode, and then add the following content.Test page 2After you finish editing, press the
Esckey, enter:wq, and then press the Enter key to save the file and exit.
Configure Nginx
Run the following command to view the
nginx.confconfiguration file.cat /etc/nginx/nginx.confIn the
http{}module, check theincludeconfiguration.In this example, the configuration is shown in the following figure.
include /etc/nginx/conf.d/*.conf;indicates that Nginx loads site information from all.conffiles in this path.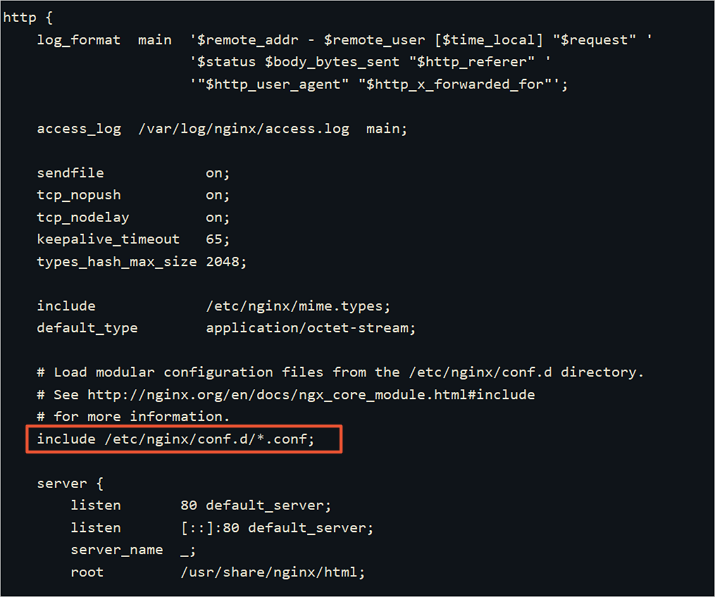
Run the following command to navigate to the
/etc/nginx/conf.dpath.cd /etc/nginx/conf.dCreate and configure the Nginx configuration file for the
Testpage-1website.Run the following command to create and edit the configuration file.
sudo vim Testpage1.confPress the
ikey to enter edit mode, and then add the following content.Replace the server domain name and project path parameters as indicated in the comments.
server {
    listen       80;
    server_name  testpage1.com;    # This is a test domain name. Replace it with your actual server domain name.

    #charset koi8-r;
    access_log  /var/log/nginx/b.access.log  main;

    location / {
        root   /usr/share/nginx/html;    # This is the test website path. Replace it with your actual project code path.
        index  index.html index.htm;
    }

    #error_page  404              /404.html;

    error_page   500 502 503 504  /50x.html;
    location = /50x.html {
        root   /usr/share/nginx/html;
    }
}
After you finish editing, press the
Esckey, enter:wq, and then press the Enter key to save the file and exit.
Create and configure the Nginx configuration file for the
Testpage-2website.Run the following command to create and edit the configuration file.
sudo vim Testpage2.confPress the
ikey to enter edit mode, and then add the following content.In the comments, replace the parameters for the server domain name and project path.
server {
    listen       80;
    server_name  testpage2.com;    # This is a test domain name. Replace it with your actual server domain name.

    #charset koi8-r;
    access_log  /var/log/nginx/b.access.log  main;

    location / {
        root   /usr/share/nginx/html;    # This is the test website path. Replace it with your actual project code path.
        index  index.html index.htm;
    }

    #error_page  404              /404.html;

    error_page   500 502 503 504  /50x.html;
    location = /50x.html {
        root   /usr/share/nginx/html;
    }
}
After you finish editing, press the
Esckey, enter:wq, and press Enter to save the file and exit.
Run the following command to restart the Nginx service.
sudo systemctl restart nginx
Verify the results
On your local host, open a browser and access the two test websites.
Access
http://<Public IP address of the ECS instance>/Testpage-1to view the content of theTestpage-1website as shown in the following figure.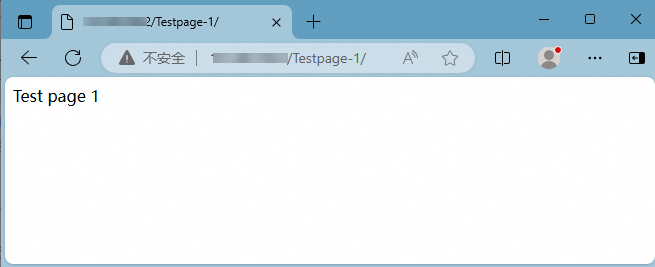
Access
http://<Public IP address of the ECS instance>/Testpage-2to view the content of theTestpage-2website as shown in the following figure.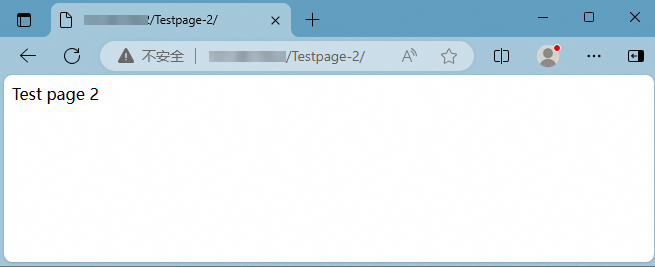
Multiple websites are now built. In a real-world scenario, you only need to ensure that the project paths are correctly configured in the configuration files to enable access to the websites.
What to do next
To make your website publicly accessible, use a domain name. This allows users to access your website more easily and securely. If you have a domain name or want to register one for your site, follow these steps.
Register a domain name.
For more information, see Register a domain name.
Complete the ICP filing.
If your domain name points to a website hosted on an Alibaba Cloud server in the Chinese mainland, you must complete an ICP filing. For more information, see ICP filing process.
Resolve the domain name.
Domain name resolution is required to access your website using its domain name. To point a domain name to the public IP address of an instance, see Add a website resolution record.
References
If you want to deploy multiple websites on a Windows instance, see Use IIS to configure multiple websites.