If an exception occurs or an incorrect operation is performed on a Tablestore instance, you can restore the backup data to the Tablestore instance or another Tablestore instance that resides in the same region. This topic describes how to create a Tablestore restore job by using Cloud Backup.
Prerequisites
Data is backed up and the backup data can be used to restore resources.
Procedure
Go to the Create Restore Job panel.
Log on to the Tablestore console.
In the left-side navigation pane, click Data Backup.
On the Data Backup page, select the region in which the resources that you want to restore reside.
The system automatically obtains the instance list in the selected region.
Find the instance that you want to restore and click Restore in the Actions column.
Configure the restoration settings.
Configure the parameters for restoring data.
Parameter
Description
Recoverable Tables
The name of the table that you want to restore. Select a table from the Recoverable Tables drop-down list. The drop-down list displays only the tables that you select when you create the backup plan. You can run a restore job to restore the data and search indexes of only one table.
NoteIf you specify a destination table name that does not exist, the restore job creates a table based on the table that was backed up.
Recoverable Time Point
The time range in which available backups are created. Select a time range from the Recoverable Time Point drop-down list. The drop-down list displays time ranges based on the scheduled execution time that you specify for the backup plan.
Choose Recovery Point
The point in time to which you want to restore data. You can drag the timeline slider to specify a point in time.
Modify the parameters in the Restore Options section based on your business requirements. By default, the system regenerates an auto-increment primary key column and restores search indexes after the restore job is run.
Parameter
Description
Regenerate Auto-increment Columns
Specifies whether to regenerate an auto-increment primary key column during restoration when the source table has an auto-increment primary key column. By default, Regenerate Auto-increment Columns is turned on and cannot be turned off.
ImportantIf the source table does not have an auto-incremental primary key column, this parameter does not take effect.
When you restore a table that contains an auto-increment primary key column, you can only rebuild the auto-increment primary key column and restore only the putRow operation. In incremental backup, Cloud Backup ignores the updateRow and deleteRow operations on a source table that has an auto-increment primary key column. If you restore the source table on which you perform multiple putRow operations on the same row in which the value of each primary key column except for the auto-increment primary key column is the same, the value of the auto-increment primary key column is regenerated, and a new row of data is created for each putRow operation.
Restore Search Indexes
Specifies whether to restore the search indexes that are created for the source table. By default, Restore Search Indexes is turned on. If you do not want to restore the search indexes that are created for the source table, turn off Restore Search Indexes.
ImportantIf no search index is created for the source table when the source table is backed up, this parameter does not take effect.
Click Next.
Configure the destination Tablestore instance to which you want to restore data.
Select a destination Tablestore instance from the Restore to Database drop-down list.
The drop-down list displays all Tablestore instances that belong to your Alibaba Cloud account in the selected region. You can restore the data of the source Tablestore instance to another Tablestore instance in the same region within the same Alibaba Cloud account.
The system automatically generates a new name for the table to which data is restored. You can modify the table name based on your business requirements.
ImportantA restore job overwrites the rows that have the same primary key in the destination table. Other rows are not affected.
Click OK.
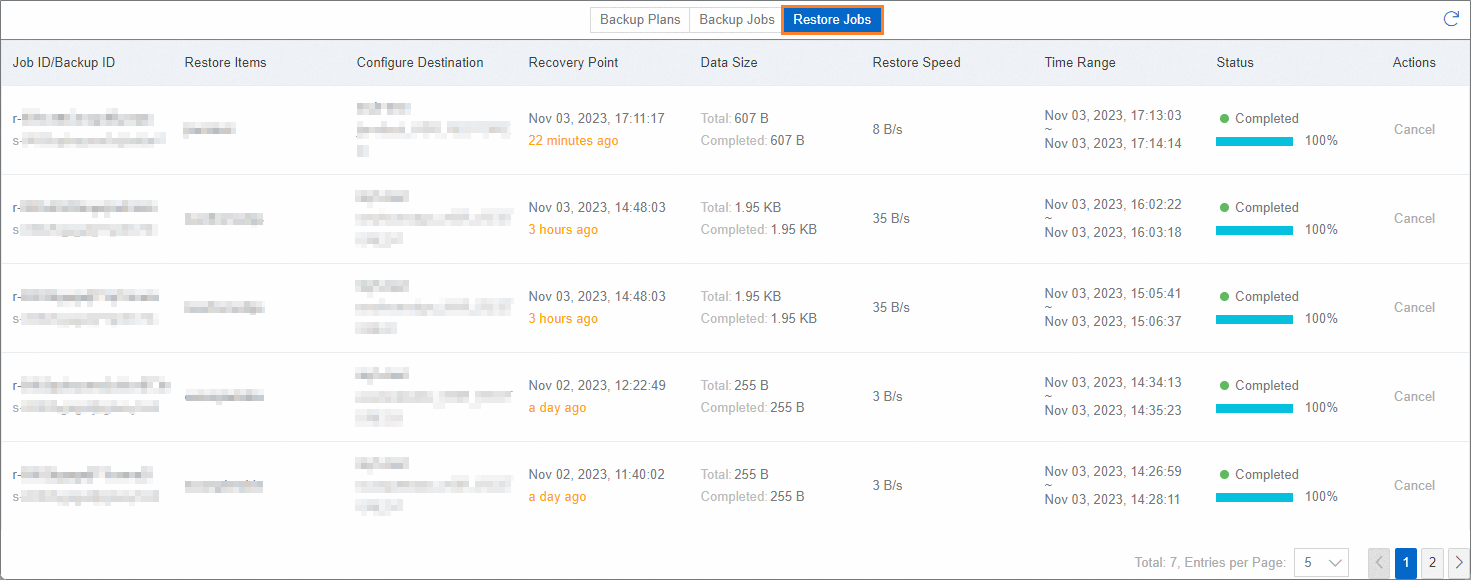
After a restore job is created, you can view the job progress in the Status column on the Restore Jobs tab. If the value of the Status column of the restore job changes to Completed and the progress is 100%, the data is restored.
To cancel an ongoing restore job, click Cancel in the Actions column of the restore job, and then click Ok in the message that appears.
Verify the restoration results
View the configurations and data of the restored table in the Tablestore console.
Log on to the Tablestore console.
In the upper part of the Overview page, select a region.
Click the name of the Tablestore instance to which data is restored.
On the Instance Details tab, click the name of the restored table on the Tables tab.
Check the information about the restored table.
On the Basic Information tab, view the basic information, primary key columns, and predefined columns of the table.
NoteIf the configurations of table properties or predefined columns do not meet your business requirements, you can manually modify the configurations.
On the Query Data tab, check whether the required data is restored to the table.