This topic describes how to use Smart Access Gateway (SAG) to connect an office outside the Chinese mainland to Alibaba Cloud.
Background information
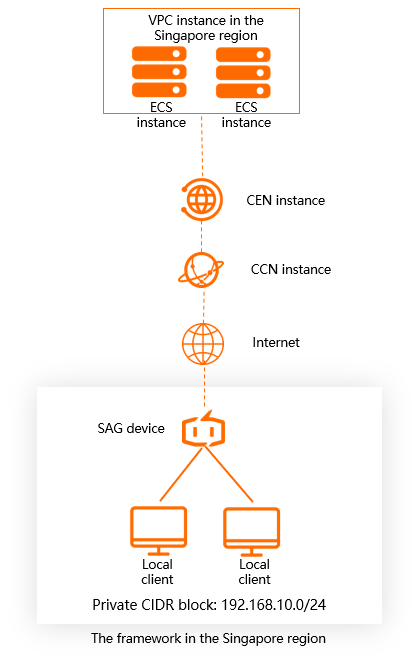
A company has an office in Singapore and the company wants to connect the clients in the office to Alibaba Cloud, as shown in the following figure.
The following table describes how network resources are allocated in this example.
Resource | Description | Capacity |
SAG devices | SAG-100WM | 1 |
SAG bandwidth | In the Singapore (Singapore) region | 2 Mbit/s |
Cloud Enterprise Network (CEN) instances | Default edition | 1 |
Cloud Connect Network (CCN) instances | In the Singapore (Singapore) region | 1 |
Virtual private clouds (VPCs) | In the Singapore (Singapore) region | 1 |
Elastic Compute Service (ECS) instances | In the Singapore (Singapore) region | 2 |
Prerequisites
A VPC is deployed in the Singapore (Singapore) region. For more information, see Create and manage a VPC.
A CEN instance is created and associated with the VPC. For more information, see Create a VPC connection.
An SAG device is prepared.
You cannot purchase SAG devices in the SAG console in areas outside the Chinese mainland. To purchase SAG devices in areas outside the Chinese mainland, contact your account manager.
Procedure

Step 1: Purchase bandwidth for the SAG device
After you purchase an SAG device, you can purchase bandwidth for the SAG device in the SAG console. After you purchase bandwidth, Alibaba Cloud creates an SAG instance to facilitate device management.
- Log on to the SAG console.
- In the top navigation bar, select the region.
- On the Smart Access Gateway page, choose .
On the buy page, configure the parameters and click Buy Now. The following table describes the parameters.
Parameter
Description
Smart Access Gateway Device
Area
Select the area where you want to use the SAG device. In this example, Singapore (Singapore) is selected.
NoteIf the area that you want to select is not listed on the buy page, we recommend that you select the nearest area.
For example, if you want to use SAG devices in Thailand which is not listed on the buy page, you can select China (Hong Kong).
Device Spec
Select the model of the SAG device that you want to purchase. In this example, SAG-100WM is selected.
Have SAG Devices Already
In this example, Yes is selected in this example.
Quantity
Skip this parameter. In this example, the default value is used.
Smart Access Gateway Bandwidth
Area
Select the area where you want to use the bandwidth resources. This area is the same as the Area that you specify for the SAG device.
Instance Name
Specify a name for the SAG instance. In this example, test123 is used.
Peak Bandwidth
Specify the maximum bandwidth that the SAG device can reach. Unit: Mbit/s. In this example, the default value is used.
Subscription Duration
Select a subscription duration. In this example, the default value is used.
In the Confirm Order step, confirm the information and click Confirm Purchase.
In the Shipping Address dialog box, enter the recipient information and click Buy Now.
NoteYou must provide the address of the recipient before you can complete the payment. The console does not record this information.
In the Pay step, select a payment method and complete the payment.
Step 2: Configure the SAG device
After you purchase an SAG device, you must configure the device and connect it to your on-premises network.
Connect the SAG device to your on-premises network.
After you receive the SAG device, check whether you have received all the accessories in the purchase order.
After you start the SAG device, connect the wide area network (WAN) port to the modem and connect the local area network (LAN) port to the client.
In this example, the client in the Singapore (Singapore) region is directly connected to the SAG device. The default gateway configurations are used. For more information about how to change the WAN and LAN ports, see Configure SAG-100WM in the web console.
- Log on to the SAG console.
In the top navigation bar, select the Singapore (Singapore) region. In the left-side navigation pane, click Smart Access Gateway.
Activate the SAG device.
On the Smart Access Gateway page, find the SAG device that you want to activate and choose
 > Activate in the Actions column.
 In the Activate message, click OK.
Associate the SAG device with the SAG instance.
You can associate SAG devices with SAG instances to facilitate device management and configurations.
Use one of the following methods to open the Device Management tab.
On the Smart Access Gateway page, click the ID of the SAG instance that you want to manage. On the details page, click the Device Management tab.
On the Smart Access Gateway page, find the SAG instance that you want to manage and choose
> Device Management in the Actions column.
On the Device Management tab, enter the serial number of the device and click Add Device.
Configure routes.
On the Smart Access Gateway page, find the SAG instance that you want to manage and click Network Configuration in the Actions column.
On the Method to Synchronize with On-premises Routes tab, select Static Routing and click Add Static Route.
Enter the CIDR block used by the office and click OK.
In this example, 192.168.10.0/24 is used. Therefore, the IP addresses of clients are allocated from 192.168.10.0/24.
Step 3: Establish network communication
After you configure the SAG device, you must create network connections to allow the clients in the office to communicate with the VPC.
- Log on to the SAG console.
In the top navigation bar, select Singapore (Singapore).
Associate the SAG instance with the CCN instance.
In the left-side navigation pane, click CCN.
On the CCN page, click Create CCN Instance.
In the Create CCN Instance panel, enter a name for the CCN instance and click OK.
In the left-side navigation pane, choose .
On the Smart Access Gateway page, find the SAG instance that you want to manage and click Network Configuration in the Actions column.
Click the Network Instance Details tab, and then click Attach Network.
Configure the parameters and click OK.
Network Type: In this example, Cloud Connect Network is selected.
Resource Group: Default Resource Group is selected in this example.
Network Instance: In this example, the CCN instance created in the preceding step is selected.
Attach the CCN instance to a CEN instance.
In the left-side navigation pane, click CCN.
Find the CCN instance and click Bind CEN Instance in the Actions column.
In the Bind CEN Instance pane that appears, select the CEN instance that you want to attach and click OK.
After the CCN instance is attached to the CEN instance, SAG devices associated with the CCN instance can communicate with VPCs that are attached to the CEN.
Configure a security group.
Log on to the ECS console.
In the top navigation bar, select a resource group and the Singapore region. In the left-side navigation pane, click Instances.
Find the ECS instance that you want to manage and choose in the Actions column.
Find the security group that you want to manage and click Add Rules in the Actions column.
NoteIf you do not create a security group when you create an ECS instance, a default security group is created. If you want to add an ECS instance to a custom security group, you can create a custom security group. For more information, see Create a security group.
Create a security group rule that allows access from the on-premises network of the office to the VPC. For more information, see Add a security group rule.
Set Authorization Object to the CIDR block of the private network. In this example, 192.168.10.0/24 is used.
Step 4: Test network connectivity
After you complete the preceding steps, you can run the ping command to test the network connectivity between the office and the ECS instance. If an echo reply packet is returned, it indicates that the on-premises network of the office is connected to Alibaba Cloud.
ping<The IP address of the ECS instance in the VPC>