Quick UDP Internet Connection (QUIC) is a network protocol that can accelerate access from clients, especially in scenarios where network connections are weak, or connections are frequently switched between Wi-Fi and cellular networks. QUIC can achieve connection multiplexing without reconnections, accelerate access, and secure data transfer.
Introduction to QUIC
QUIC provides the same level of security as SSL, and supports connection multiplexing. In scenarios of weak connections, high network latency, and high packet loss rate, QUIC ensures service availability. QUIC can implement different congestion control algorithms at the application layer regardless of the operating system or kernel. Compared with TCP, QUIC supports flexible adjustments based on service requirements. QUIC is a suitable alternative when TCP optimization encounters bottlenecks.
As short videos and live streaming services become more popular, streaming platforms require high bandwidth and low network latency to meet business requirements. QUIC can minimize network latency, reduce video buffering, accelerate the delivery of audio and video content, and secure data transfer.
Supported QUIC protocol types
Application Load Balancer (ALB) supports gQUIC and iQUIC. HTTP/3 is an application-layer protocol based on iQUIC. HTTP/3 uses iQUIC to implement multiplexing, congestion control, loss detection, and retransmission. HTTP/3 supports faster connection establishment and eliminates head-of-line blocking issues.
ALB supports gQUIC versions Q46, Q43, and Q39 and HTTP/3 (h3).
How HTTP version negotiation works
If an HTTPS listener has QUIC upgrade enabled, ALB advertises HTTP/3 and gQUIC to clients. HTTP/3 has a higher priority than gQUIC. Therefore, clients that use HTTP/3 have a higher priority when establishing connections with ALB.
If a client fails to establish a connection with ALB over HTTP/3, HTTPS or HTTP/2 is used to establish a connection.
If a client establishes a connection with ALB over HTTP/3, the client uses cookies related to HTTP/3.
ALB can initiate connections to clients regardless of whether QUIC upgrade is enabled.
ALB uses the Alt-Svc HTTP response header to advertise supported protocols to clients. The following sample code provides an example:
Alt-Svc : h3=":$quic_port"; ma=3600,quic=":$quic_port"; v="46,43,39"; ma=3600After you enable QUIC upgrade for a listener, a client may use HTTPS or HTTP/2 instead of HTTP/3 in the following scenarios:
The HTTP/3 version supported by the client is not compatible with the HTTP/3 version supported by ALB.
ALB detects UDP traffic congestion or rate limiting that prevents HTTP/3 from taking effect.
The client does not support HTTP/3. Therefore, it does not initiate HTTP/3 negotiations.
Client requirements
If you use Google Chrome, you can directly initiate a QUIC request to ALB.
Before you use Google Chrome to access a QUIC listener, make sure that your browser supports the QUIC version used by ALB.
The latest gQUIC version supported by ALB is Q46, which is compatible with Google Chrome 74 to 81.
The latest HTTP/3 version supported by ALB is h3, which is compatible with Google Chrome 87 and later.
If you use other clients, such as a self-developed application, the client must be integrated with a network library that supports QUIC, such as the LSQUIC Client, Cronet, ngtcp2, and quiche libraries.
Sample scenario
When you use Google Chrome to access ALB, ALB forwards the requests to a backend server based on the domain name example.com that is associated with the listener. The listener that is used to distribute requests varies in the following scenarios:
If an HTTPS listener and a QUIC listener are configured, the QUIC listener is used. If you access
example.comfrom the browser, the QUIC listener of ALB distributes the request to the default backend server group RS1.If the QUIC listener is unavailable, the HTTPS listener automatically takes over. If you access
example.comfrom the browser, the HTTPS listener of ALB distributes the request to the default backend server group RS1.
Prerequisites
An ALB instance is created. For more information, see Create an ALB instance.
A server group named RS1 is created. For more information, see Create and manage a server group.
An Elastic Compute Service (ECS) instance named ECS01 is added to the server group RS1. An NGINX video service is hosted on ECS01.
An SSL certificate is deployed on the ALB instance. The certificate is associated with the domain name
example.com.
Step 1: Create a QUIC listener
- Log on to the ALB console.
In the top navigation bar, select the region where the ALB instance is deployed.
On the Instances page, click the ID of the ALB instance that you want to manage. On the Listener tab, click Create Listener.
On the Configure Listener wizard page, set the parameters and click Next.
Refer to the following table to set the key parameters that are relevant to this topic and use the default values or modify the values as needed for the other parameters.
Parameter
Description
Listener Protocol
Select a listener protocol.
In this example, QUIC is selected.
Listener Port
Select the port on which the ALB instance listens. The ALB instance listens on the port and forwards requests to backend servers.
Valid values: 1 to 65535.
NoteOn the same ALB instance, the ports of listeners that use the same protocol must be unique. HTTP listeners and HTTPS listeners must use different ports.
In the Configure SSL Certificate step, select a server certificate and click Next.
In the Select Server Group step, select Server Type, select a server group, view the backend servers, and then click Next.
In the Configuration Review step, confirm the configurations and click Submit.
Step 2: Create an HTTPS listener
When you create an HTTPS listener, enable QUIC upgrade and associate the QUIC listener that you created with the HTTPS listener.
On the Instances page, find the ALB instance for which you created a QUIC listener in Step 1 and click its ID.
On the Instance Details tab, click the Listener tab and click Create Listener.
In the Configure Listener step, set the following parameters and click Next.
Refer to the following table to set the key parameters that are relevant to this topic and use the default values or modify the values as needed for the other parameters.
Parameter
Description
Listener Protocol
Select a listener protocol.
In this example, HTTPS is selected.
Listener Port
Enter the port on which the ALB instance listens. The ALB instance listens on the port and forwards requests to backend servers. In this example, port 443 is used. In most cases, port 80 is used for HTTP and port 443 is used for HTTPS.
Valid values: 1 to 65535.
NoteThe ports on which an ALB instance listens must be unique.
Advanced Settings
You can click Modify next to Advanced Settings to configure the advanced settings.
QUIC Update
Specify whether to enable QUIC upgrade. To use this feature, you must select a QUIC listener from the Associated QUIC Listeners drop-down list.
If no QUIC listener is created, click Create Listener to create one. For more information, see Add a QUIC listener.
ALB supports iQUIC and gQUIC. For more information, see How HTTP version negotiation works.
In the Configure SSL Certificate step, select a server certificate and click Next.
NoteTo configure TLS security policies, click Modify next to Advanced Settings.
In the Select Server Group step, select Server Type, select a server group, view the backend servers, and then click Next.
In the Configuration Review step, confirm the configurations and click Submit.
Step 3: Create a CNAME record
Use a CNAME record to map the domain name example.com to the publicdomain name of ALB.
Log on to the ALB console.
In the top navigation bar, select a region.
Find the ALB instance that you want to manage and copy its domain name.
Create a CNAME record as follows:
NoteIf your domain name is not registered by using Alibaba Cloud Domains, you must add your domain name to Alibaba Cloud DNS before you can configure a DNS record. For more information, see Manage domain names.
Log on to the Alibaba Cloud DNS console.
On the Authoritative DNS Resolution page, find your domain name and click DNS Settings in the Actions column.
On the DNS Settings tab of the domain name details page, click Add DNS Record.
In the Add DNS Record panel, configure the parameters and click OK. The following table describes the parameters.
Parameter
Description
Record Type
Select CNAME from the drop-down list.
Hostname
Enter the prefix of the domain name.
DNS Request Source
Select Default.
Record Value
Enter the CNAME, which is the domain name of the ALB instance.
TTL Period
Select a time-to-live (TTL) value for the CNAME record to be cached on the DNS server. In this example, the default value is used.
NoteAfter you create a CNAME record, it immediately takes effect. After you modify a record, the record takes effect based on the TTL of the record. By default, the TTL is 10 minutes.
If the CNAME record that you want to create conflicts with an existing record, we recommend that you specify another domain name. For more information, see Rules for conflicting DNS records.
Step 4: Verify the result
In this example, a Windows client is used. Enter example.com in the browser to access the ALB instance. In this example, an NGINX video service is deployed on ECS01 in the server group RS1.
If an HTTPS listener and a QUIC listener are configured, and you enter
example.comin the browser and pressF12, the protocol of the current web page is displayed as HTTP/3. The response time is 93 milliseconds.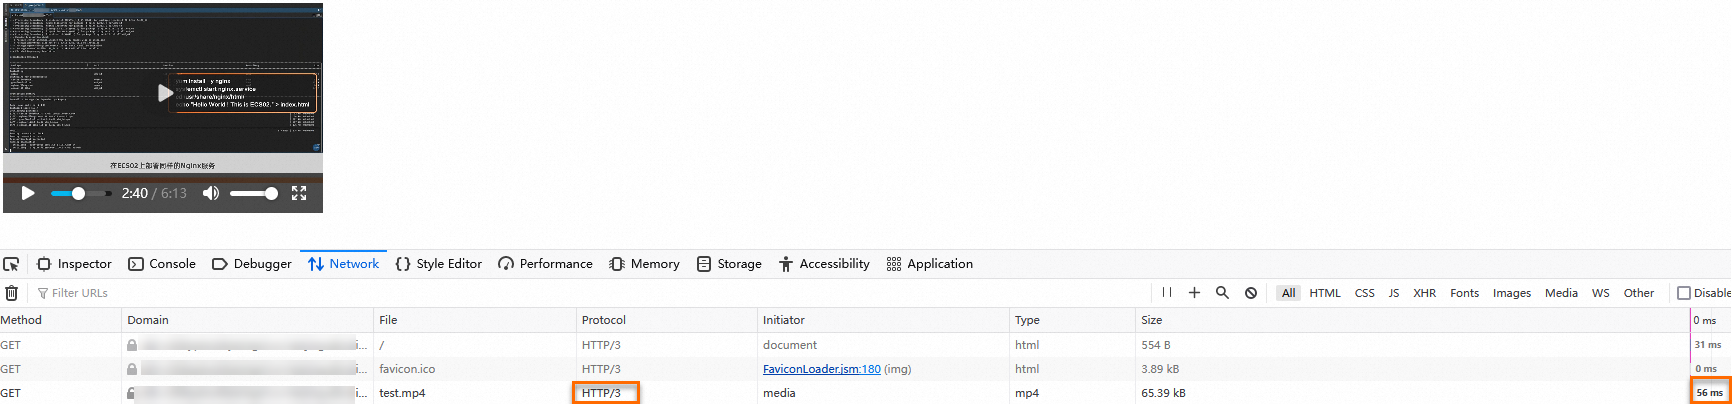
If the QUIC listener is unavailable, and you enter
example.comin the browser and pressF12, the protocol of the current web page is displayed as HTTP/2. The response time is 148 milliseconds.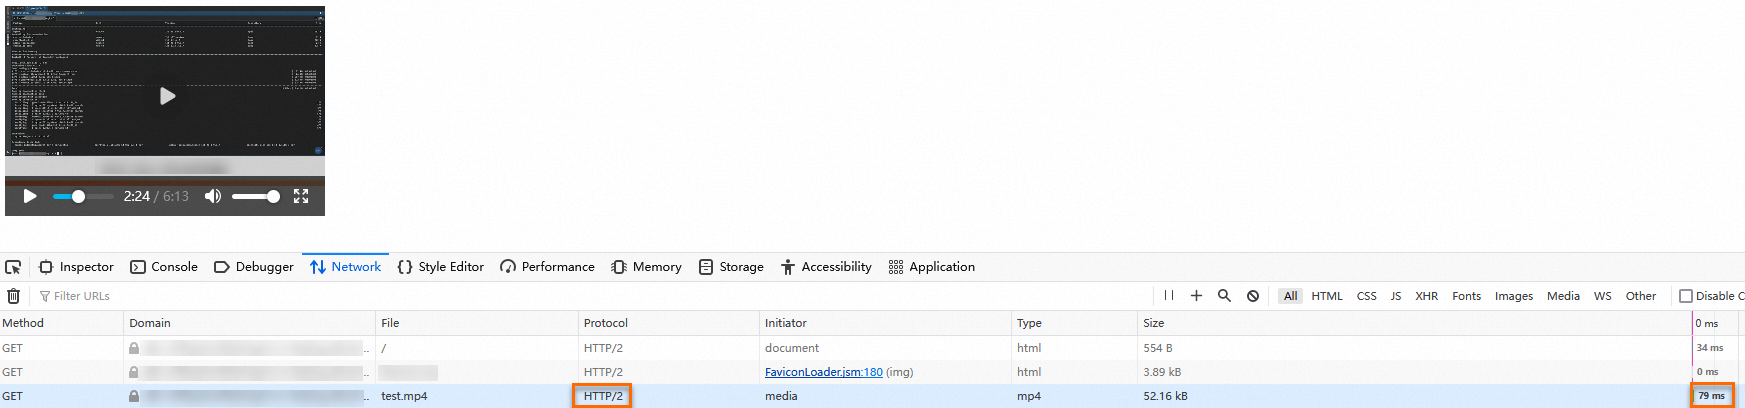
The results show that HTTP/3 accelerates client access to the video service.