Application Load Balancer (ALB) supports AScript, which allows you to create scripts to flexibly customize features. When the standard ALB configurations cannot meet your business requirements, you can use AScript to precisely control and adjust traffic management policies. This topic describes how to use AScript in untrusted request identification, authentication customization, request header customization, and response header customization scenarios.
What is AScript?
AScript can run custom scripts at different positions to process requests. You can use AScript to customize traffic management policies based on your business requirements. This mechanism allows you to manage business logic in a fine-grained manner because you can run custom scripts at specified positions to process requests and responses.
AScript makes ALB programmable. It helps you improve service performance and user experience in complex business environments. AScript is applicable to content delivery, security hardening, and performance improvement. It increases the intelligence of ALB while supporting personalized customization.
Key features
Service isolation: AScript isolates scripts of different features and requirements.
Control over script pipelines: AScript runs scripts based on specified scripts priorities and match conditions.
Execution at specified positions: AScript runs scripts at specified positions.
Before inbound forwarding rules: You can run scripts before inbound forwarding rules are applied to preprocess the requested path, such as rewriting URIs, adding URI prefixes, and converting file suffixes to lowercase.
After inbound forwarding rules: You can run scripts after the standard forwarding rules are applied to further process requests, such as rewriting filenames and file types.
Before outbound forwarding rules: You can run scripts to process responses, such as modifying HTTP headers or response bodies, before the responses are returned to clients, .
After outbound forwarding rules: You can run scripts to customize listeners to better fit your traffic monitoring requirements.
Limits
Only standard and WAF-enabled ALB instances support AScript. Basic ALB instances do not support AScript.
By default, AScript supports 25 lines of code free of charge. If you add more lines, you are charged for the overages. For more information about the billing rules, see Billing rules.
Prerequisites
A standard or WAF-enabled Internet-facing ALB instance is created, and a server group is created for the ALB instance. For more information, see Create and manage ALB instances and Create and manage a server group.
An HTTP listener is created for the ALB instance and is associated with the server group. For more information, see Add an HTTP listener.
Two Elastic Compute Service (ECS) instances (ECS01 and ECS02) are added to the server group, and applications are deployed on ECS01 and ECS02.
A domain name is registered, and an Internet content provider (ICP) number is obtained for the domain name. For more information, see Register a domain name on Alibaba Cloud and ICP filing process.
Examples
AScript provides powerful customization capabilities in various scenarios. AScript is an efficient tool for customizing traffic forwarding rules, authentication, request headers, and response headers. It extends ALB features, improves the performance of ALB, and makes ALB easier to use. The following scenarios describe how to use AScript to customize features.
Scenario 1: Identify untrusted requests
A company created an ALB instance in a region of Alibaba Cloud, and untrusted requests frequently occur. A large number of malicious requests and unidentified requests significantly increase the loads on backend servers. As a result, the response speed of applications is reduced and user experience is user experience is degraded.
The company configures the ALB instance to block malicious and unidentified requests. Although ALB supports forwarding rules that route traffic based on domain names and URLs, ALB requires deeper user behavior analysis, such as detection for the HTTP_User_Agent header. The request identification capability of ALB is coarse-grained. To resolve this issue, the company uses AScript to improve the request identification capability of ALB.
AScript supports customization, which allows you to configure fine-grained processing policies for ALB and enable ALB to match and analyze the User-Agent (UA) header in requests. In this scenario, the company can use custom scripts to configure ALB to run logical analytics on the UA header to identify malicious and untrusted behavior, such as bots and automation scripts. If a request is identified as untrusted, AScript returns an error message, which can be customized by you. This minimizes security risks and improves service stability and data security.
The following example shows how to use AScript to define the following business logic: When a request is sent to ALB, ALB checks whether the request meets the following requirements based on the script configured by the company:
The request is sent from the host
example.com.The URI of the request starts with
/order/create.The UA header of the HTTP request does not contain the
trustedstring.
If the request meets the preceding requirements, AScript sets the HTTP status code to 403 and returns the following response message: The order data is abnormal. Otherwise, ALB forwards the request to the backend service.

Procedure
Step 1: Create a custom script by using AScript
Log on to the ALB console.
On the Instances page, click the ID of the ALB instance that you want to manage.
On the Listener tab, click the ID of the listener that you want to manage.
On the Forwarding Rules tab, click the Inbound Forwarding Rules tab, and then click Add Script Before Forwarding Rule Is Applied.
NoteOn the Outbound Forwarding Rules tab, only Add Script Before Forwarding Rule Is Applied is available.
On the Add Script page, configure a script and click OK. The following table describes the parameters.
Parameter
Description
Name
Enter a name for the script.
Script Code
Enter the code of the script. In this example, the following code is used:
if and(eq($host,'example.com'),eq(get(split($request_uri, '?'),1),'/order/create')){ if not(match_re($http_user_agent,'.*trusted.*')){ exit(403,'{"code":10063,"msg":"The order data is abnormal","data":{}}') } }Run Script At
Specify the position at which you want to execute the script. After the script is created, you cannot change the position at which the script is executed. In this example, the scripts is executed Not Executed.
Status
Specify whether you want to enable the script. Scripts are enabled by default. In this example, the default setting is used.
Advanced Settings
In this example, no advanced settings are used.
Step 2: Configure a DNS record
Copy the domain name of the ALB instance and perform the following operations to add a CNAME record that maps your custom domain name to the domain name of the ALB instance.
Log on to the Alibaba Cloud DNS console.
On the Public Zone page, click Add Zone.
In the Add Zone dialog box, enter the domain name of your host and click OK.
ImportantBefore you can add a CNAME record, you must use a TXT record to verify the ownership of your domain name.
Find the domain names that you want to manage and click Settings in the Actions column.
On the Settings page, click Add Record.
In the Add Record panel, configure the parameters and click OK. The following table describes the parameters.
Parameter
Description
Record Type
Select CNAME from the drop-down list.
Hostname
Enter the prefix of your domain name.
DNS Query Source
Select Default.
Record Value
Enter the CNAME, which is the domain name of the ALB instance.
TTL
Select a time-to-live (TTL) value for the CNAME record to be cached on the DNS server. In this example, the default value is used.
Step 3: Verify the result
Test forwarding of trusted requests
Use a client that has Internet access.
Visit
http://<Domain name>from a browser. The result shows that the browser can access the backend service. Refresh the browser multiple times. The result shows that requests are distributed between ECS01 and ECS02.Open the command-line interface (CLI) on the client and run the following command multiple times. The result shows that responses are returned by ECS01 and ECS02.
curl http://<Domain name>
Test forwarding of untrusted requests
Run the following command. If the response contains
{"code":10063,"msg":"The order data is abnormal","data":{}}, the script configured by using AScript takes effect.curl -v -H "Host:example.com" -H "User-Agent:suspicious test" http://<Domain name>/order/create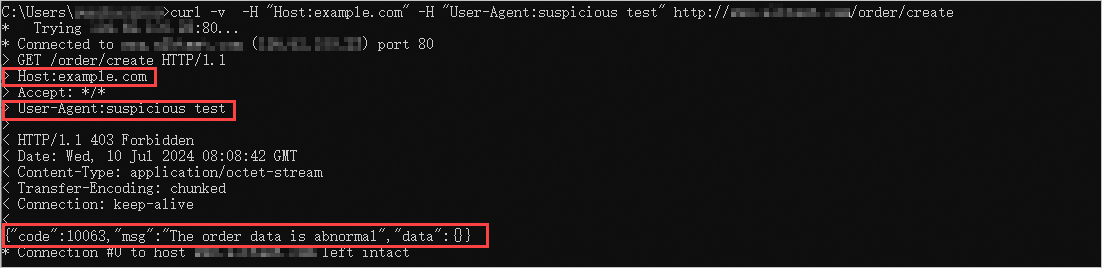
Scenario: Custom authentication
A company created an ALB instance in a region of Alibaba Cloud, and the server group of the ALB instance contains multiple backend servers on which applications are deployed. The following issue persists: Users have to log on to each application that they want to access. This issue degrades user experience and increases the complexity of management. To resolve this issue, the company wants to use single sign-on (SSO), which allows users to use a single set of credential to log on to all applications.
The company uses AScript to customize an SSO scheme. The company uses AScript to create a custom script. The script enables ALB to perform detailed checks and operations on the Authorization and Cookie headers in requests so that the SSO token in the Cookie header can be used as a universal credential. In addition, AScript can write detailed log data to the response headers to facilitate debugging and tracing on the authentication process. Programmable logging extends the features of transitional load balancers and greatly improves system security.
The following example shows how to use AScript to define the following business logic: When a request is sent to ALB, ALB checks whether the request carries the Authorization header based on the script configured by the company.
If the request carries the Authorization header, the length and scenarios of the Authorization header is recorded in the log.
If the request does not carry the Authorization header, ALB checks whether the Cookie header contains an SSO token (SSO_token).
If the Cookie header contains (SSO_token), ALB writes SSO_token to the Authorization header as a Bearer token and records the scenario.
If the Cookie header does not contain SSO_token, ALB only records the scenario.

Procedure
Step 1: Create a custom script by using AScript
Log on to the ALB console.
On the Instances page, click the ID of the ALB instance that you want to manage.
On the Listener tab, click the ID of the listener that you want to manage.
On the Forwarding Rules tab, click the Inbound Forwarding Rules tab, and then click Add Script Before Forwarding Rule Is Applied.
NoteOn the Outbound Forwarding Rule tab, only Add Script Before Forwarding Rule Is Applied is available.
On the Add Script page, configure a script and click OK. The following table describes the parameters.
Parameter
Description
Name
Enter a name for the script.
Script Code
Enter the code of the script. In this example, the following code is used:
def is_missing(val){
    if val{
        return or(null(val),le(len(val),1))
    }else{
        return true
    }
}
def log_on_rsp_header(key, msg) {
    add_rsp_header(concat('ascript-log_', key), msg)
}

if $http_authorization {
    log_on_rsp_header('authorization', concat('len=', len($http_authorization)))
}
if $cookie_sso_token {
    log_on_rsp_header('sso_token', concat('len=', len($cookie_sso_token)))
}

if is_missing($http_authorization) {
    if not(is_missing($cookie_sso_token)) {
       add_req_header('authorization', concat('Bearer ',$cookie_sso_token))
       add_rsp_header('ascript-log', 'use sso_token as authorization in request header')
    } else {
       add_rsp_header('ascript-log', 'authorization is missing and cookie sso_token is missing too')
    }
} else {
    log_on_rsp_header('miss-authorization', 'val = false')
}
Run Script At
Specify the position at which you want to execute the script. After the script is created, you cannot change the position at which the script is executed. In this example, the scripts is executed before the inbound forwarding rule is applied.
Status
Specify whether you want to enable the script. Scripts are enabled by default. In this example, the default setting is used.
Advanced Settings
In this example, no advanced settings are used.
Step 2: Configure a DNS record
Copy the domain name of the ALB instance and perform the following operations to add a CNAME record that maps your custom domain name to the domain name of the ALB instance.
Log on to the Alibaba Cloud DNS console.
On the Authoritative DNS Resolution page, click Add Domain Name.
In the Add Domain Name dialog box, enter the domain name of your host and click OK.
ImportantBefore you can add a CNAME record, you must use a TXT record to verify the ownership of your domain name.
Find the domain names that you want to manage and click DNS Settings in the Actions column.
On the DNS Settings page, click Add DNS Record.
In the Add DNS Record panel, configure the parameters and click OK. The following table describes the parameters.
Parameter
Description
Record Type
Select CNAME from the drop-down list.
Hostname
Enter the prefix of your domain name.
DNS Request Source
Select Default.
Record Value
Enter the CNAME, which is the domain name of the ALB instance.
TTL
Select a time-to-live (TTL) value for the CNAME record to be cached on the DNS server. In this example, the default value is used.
Step 3: Verify the result
Test request forwarding
Use a client that has Internet access. Open the command-line interface (CLI) on the client and run the following command. The request does not carry the
Authorizationheader and the Cookie header does not containSSO_token. As a result, the response header outputs the following log entry:authorization is missing and cookie sso_token is missing too.curl -v http://<Domain name>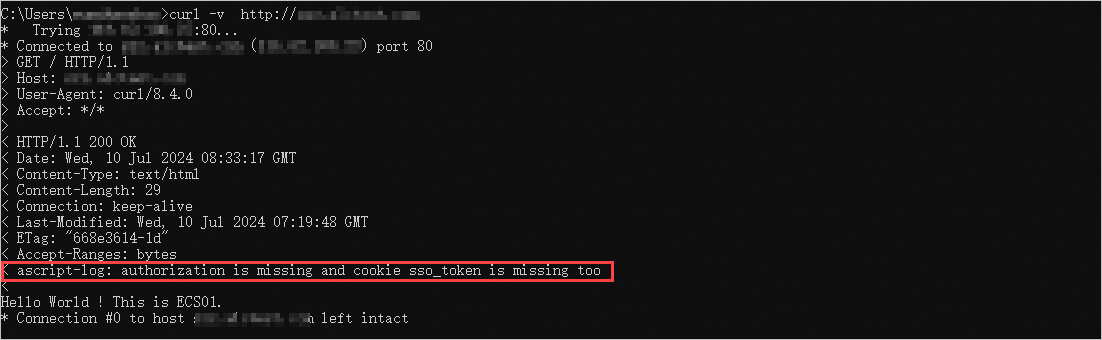
Send a request whose Cookie header contains
SSO_token.Run the following command to add
SSO_tokento the Cookie header. The result shows that the response header outputs the following log entries:ascript-log_sso_token: len=13anduse sso_token as authorization in request header.curl -v -b "sso_token=ah$sgdj#sgava" http://<Domain name>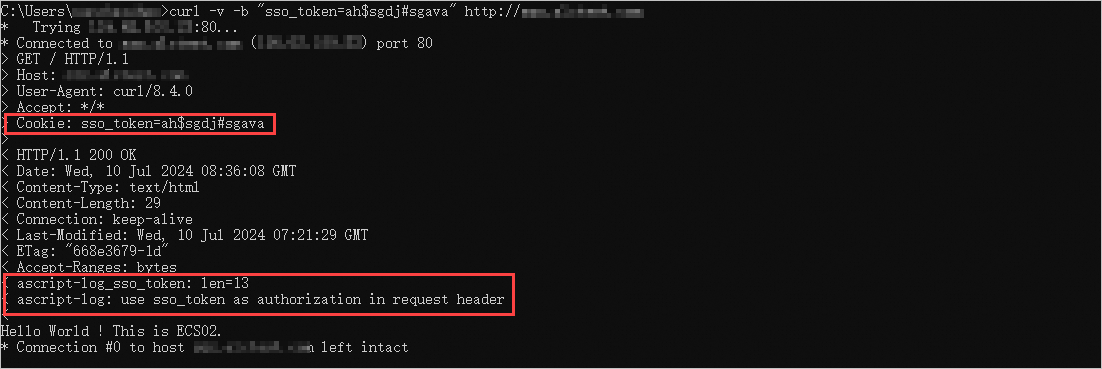
Send a request that carries the
Authorizationheader.Run the following command to add the
Authorizationheader. The result shows that the response header outputs the following log entries:ascript-log_authorization: len=20andascript-log_miss-authorization: val = false.curl -v -H "authorization: Bearer ah$sgdj#sgava" http://<Domain name>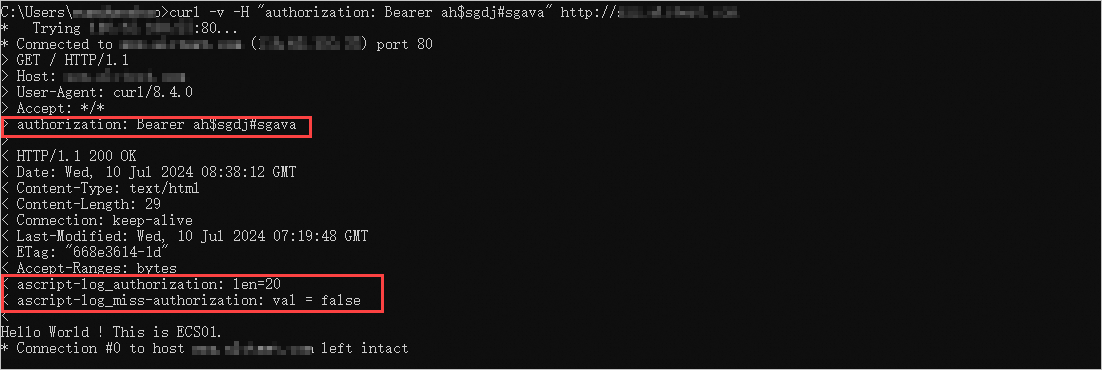
The preceding tests show that AScript can be used to customize the credential content and format, replace the credential, and enhance the credential. You can use AScript to create authentication rules based on your business requirements.
Scenario 3: Enable access control based on request and response headers
A company created an ALB instance in a region of Alibaba Cloud, and the server group of the ALB instance contains multiple backend servers on which applications are deployed. As business develops, the company needs to support cross-origin resource sharing (CORS). Frontend applications from different domain names need to access resources and services managed on specific servers. By default, cross-region requests are blocked by the same-origin policy and users cannot load resources. This degrades user experience and reduces service smoothness. In addition, the company wants to use cross-region policies for different request headers.
The standard forwarding policies of ALB cannot meet such complicated requirements because each forwarding rule supports only one cross-region policy for one request header. To resolve this issue, the company uses AScript to customize cross-region policies.
The company uses AScript to implement the following features:
Check whether the request carries a trusted CORS header.
Identify the request source based on the Origin or Referer header to check whether the request is from a trusted origin.
Dynamically add the Access-Control-Allow-Origin and other shared CORS response headers to allow cross-origin requests from trusted origins.
Enable finer-grained access control, such as limiting available HTTP headers and frame options.
The following example shows how to use AScript to define the following business logic: When a request is sent to ALB, ALB checks whether the request is from a trusted origin, such as example.com, example.org, or test.com, based on the script configured by the company. If the request is from a trusted origin, ALB dynamically adds CORS response headers to the request to allow the request.

Procedure
Step 1: Create a custom script by using AScript
Log on to the ALB console.
On the Instances page, click the ID of the ALB instance that you want to manage.
On the Listener tab, click the ID of the listener that you want to manage.
On the Forwarding Rules tab, click the Inbound Forwarding Rules tab and then click Add Script Before Forwarding Rule Is Applied.
NoteOn the Outbound Forwarding Rule tab, only Add Script Before Forwarding Rule Is Applied is available.
On the Add Script page, configure a script and click OK. The following table describes the parameters.
Parameter
Description
Name
Enter a name for the script.
Script Code
Enter the code of the script. In this example, the following code is used:
h = $http_origin if not(h) { h = $http_referer } pcs = capture_re(h, '^(.*?)(\.example\.com|\.example\.org|\.test\.com)(:\d+)?') sec1 = get(pcs, 1) sec2 = get(pcs, 2) sec3 = get(pcs, 3) if (sec2) { add_rsp_header('cross-origin-resource-policy', 'cross-origin') add_rsp_header('access-control-allow-methods', 'GET,PUT,POST,DELETE,UPDATE,OPTIONS') add_rsp_header('access-control-allow-credentials', 'true') add_rsp_header('access-control-allow-headers', 'Cookie,Set-Cookie,DNT,X-Mx-ReqToken,Keep-Alive,User-Agent,X-Requested-With,If-Modified-Since,Cache-Control,Content-Type,Authorization,Host,Origin,csrf-token-fe1a2a3s12,xhrFields') if not(sec3) { add_rsp_header('access-control-allow-origin', concat(sec1, sec2)) add_rsp_header('x-frame-options', concat('ALLOW-FROM ', sec1, sec2)) } else { add_rsp_header('access-control-allow-origin', concat(sec1, sec2, sec3)) } }Run Script At
Specify the position at which you want to execute the script. After the script is created, you cannot change the position at which the script is executed. In this example, the scripts is executed before the inbound forwarding rule is applied.
Status
Specify whether you want to enable the script. Scripts are enabled by default. In this example, the default setting is used.
Advanced Settings
In this example, no advanced settings are used.
Step 2: Configure a DNS record
Copy the domain name of the ALB instance and perform the following operations to add a CNAME record that maps your custom domain name to the domain name of the ALB instance.
Log on to the Alibaba Cloud DNS console.
On the Authoritative DNS Resolution page, click Add Domain Name.
In the Add Domain Name dialog box, enter the domain name of your host and click OK.
ImportantBefore you can add a CNAME record, you must use a TXT record to verify the ownership of your domain name.
Find the domain names that you want to manage and click DNS Settings in the Actions column.
On the DNS Settings page, click Add DNS Record.
In the Add DNS Record panel, configure the parameters and click OK. The following table describes the parameters.
Parameter
Description
Record Type
Select CNAME from the drop-down list.
Hostname
Enter the prefix of your domain name.
DNS Request Source
Select Default.
Record Value
Enter the CNAME, which is the domain name of the ALB instance.
TTL
Select a time-to-live (TTL) value for the CNAME record to be cached on the DNS server. In this example, the default value is used.
Step 3: Verify the result
Send a request from a untrusted origin.
Use a client that has Internet access. Open the command-line interface (CLI) on the client and run the following command. Set the request origin to
http://www.example.cn. The result shows that theAccess-Control-Allow-Originresponse header or other CORS response headers are not added to the request.curl -H "Origin: http://www.example.cn" -v http://<Domain name>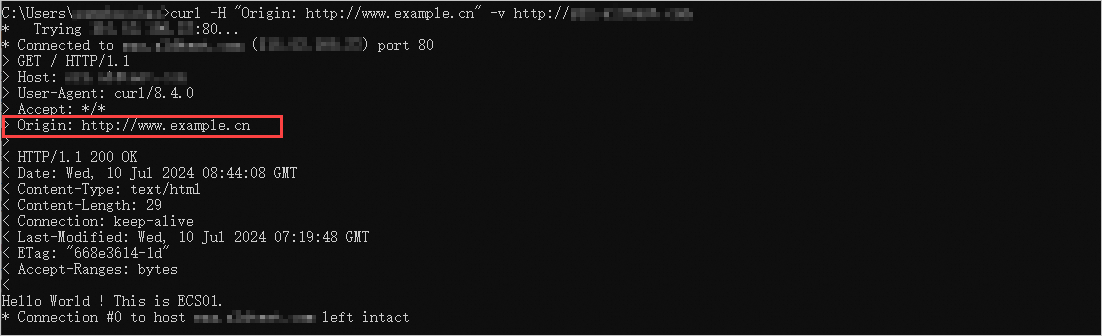
Send a request from a trusted origin.
Run the following command to set the request origin to
http://www.example.com. The result shows that CORS response headers are added to the request.curl -H "Origin: http://example.com" -v http://<Domain name>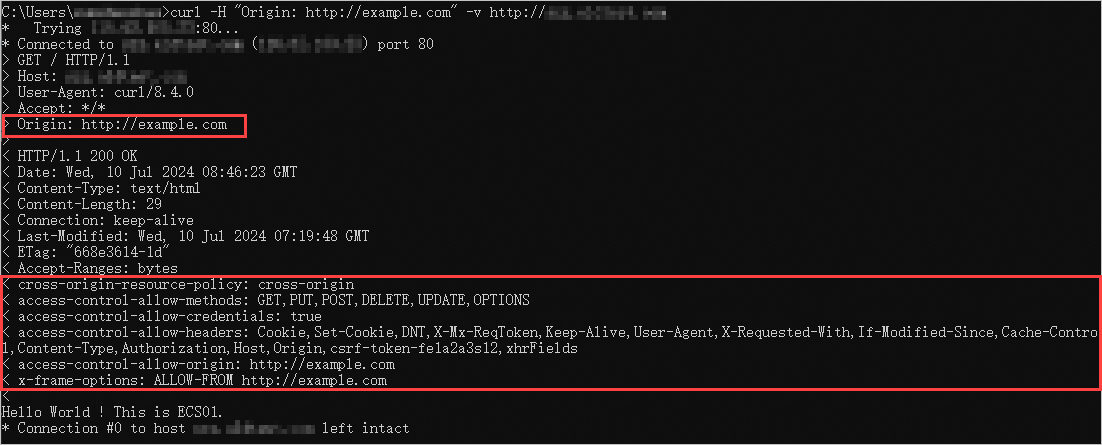
Reference
For more information about AScript, see AScript overview.
For more information about the use scenarios of AScript, see AScript common scenarios.
For more information about the syntax of AScript, see AScript syntax.
For more information about the built-in variables of AScript, see AScript built-in variables.
For more information about the built-in functions of AScript, see AScript built-in functions.