Application Load Balancer (ALB) can forward IPv6 network requests. This topic describes how to enable IPv6 support for a server group that is associated with a dual-stack ALB instance. This enables the ALB instance to use both IPv4 and IPv6 ECS instances as backend servers. Clients on IPv6 networks can then use the ALB instance to access IPv4 and IPv6 services on the backend servers.
Scenario
This topic uses the following scenario as an example. A company wants to use an ALB instance to forward requests from IPv6 clients. This enables clients on the Internet to access the IPv4 and IPv6 services deployed in a VPC. This requires creating ECS instances with IPv4 and IPv6 addresses, a dual-stack ALB instance in the VPC, and a server group with IPv6 support enabled. Once configured, the ALB instance routes requests from IPv6 clients to the IPv4 and IPv6 services on the backend ECS instances.

Limits
For information about the regions that support dual-stack ALB instances, see Regions that support dual-stack ALB instances.
To use the dual-stack feature, you must enable IPv6 for the vSwitches in the zones used by the VPC.
A dual-stack ALB instance can forward requests from both IPv4 and IPv6 clients to IPv4 and IPv6 backend services. For more information, see ALB instance overview.
You cannot upgrade an existing IPv4 instance to a dual-stack instance. You can only create new dual-stack instances.
A server group with IPv6 support can only be used with listeners or forwarding rules of a dual-stack ALB instance.
Prerequisites
You have created VPC1 in the China (Shanghai) region, and created vSwitch VSW1 in Zone E and vSwitch VSW2 in Zone G. You have also enabled an IPv6 CIDR block for VPC1, and enabled IPv6 for both VSW1 and VSW2. After you enable an IPv6 CIDR block for a VPC, the system automatically creates an IPv6 gateway for you.
If you plan to deploy an upgraded ALB instance in VSW1 and VSW2, take note of the following: An upgraded ALB instance reserves three IP addresses from each specified vSwitch. One IP address serves as a virtual IP (VIP) to provide services, and the other two serve as local IP addresses to communicate with backend servers. If a vSwitch lacks sufficient available IP addresses, instance creation fails. Make sure that VSW1 and VSW2 have sufficient IP addresses. This limitation does not apply to non-upgraded ALB instances.
NoteTo ensure the elasticity of an upgraded ALB instance, reserve at least eight available IP addresses in each vSwitch it uses.
If you use access control policies (such as iptables) on backend servers, add rules to allow traffic from the CIDR blocks of the vSwitches that the ALB instance uses.
You have registered a domain name and completed ICP filing for it.
Step 1: Create and configure ECS instances
Log on to the VPC console.
In the left-side navigation pane, click vSwitch.
In the top navigation bar, select the region where your vSwitch is deployed. This topic uses China (Shanghai) as an example.
On the vSwitch page, find the target vSwitch, and choose in the Actions column.
On the Custom Launch tab of the ECS page, create two ECS instances. Name the IPv4 instance ECS01 and the IPv6 instance ECS02. The security group associated with both instances must allow traffic on port 80. For more information, see Create an instance by using the wizard.
Remotely connect to the ECS01 and ECS02 instances. For more information, see Connection methods.
Run the following commands on ECS01 to deploy an NGINX service:
yum install -y nginx
systemctl start nginx.service
cd /usr/share/nginx/html/
echo "Hello World ! this is ipv4 rs." > index.html
Run the following commands on ECS02 to deploy an NGINX service:
yum install -y nginx
systemctl start nginx.service
cd /usr/share/nginx/html/
echo "Hello World ! this is ipv6 rs." > index.html
Configure an IPv6 address for the ECS02 instance. For more information, see IPv6 communication.
NoteYou can skip this step if your ECS02 instance uses the Alibaba Cloud Linux 3.2104 LTS 64-bit image and you selected Assign IPv6 Address Free of Charge in the IPv6 section when you created the instance.
Remotely connect to the ECS02 instance in the VPC.
Configure the IPv6 address.
Run the
ip addr | grep inet6orifconfig | grep inet6command.If the output resembles the following figure, an IPv6 address is already configured, and you can skip the following steps.

If the output does not contain information about inet6, the IPv6 service is not enabled for the instance. You must first enable the IPv6 service.
If the output contains inet6-related information, this indicates that the ECS02 instance has successfully enabled the IPv6 service and recognized an IPv6 address. Continue to configure the IPv6 address.
Step 2: Configure the IPv6 security group rule
Configure an IPv6 security group rule for the ECS02 instance to allow inbound requests from IPv6 clients.
Log on to the ECS console.
In the left-side navigation pane, choose .
In the top navigation bar, select the region where the target security group is deployed. This topic uses China (Shanghai) as an example.
On the Security Groups page, find the target security group and click Manage Rules in the Actions column.
On the details page of the security group, on the Rules tab, click the Inbound tab.
Click Add Rule, configure an IPv6 security group rule with the following settings, and then click Save.
Parameter
Description
Action
The rule's action. Select Allow.
Priority
The priority of the security group rule. A smaller value indicates a higher priority. Valid values: 1 to 100.
This topic uses the default value 1.
Protocol type
The protocol type for which inbound traffic is allowed. This topic uses All ICMP - IPv6.
Source
The source IPv6 CIDR block.
This topic uses ::/0, which allows access from all IPv6 addresses.
NoteThis source is for demonstration purposes only. For security, we recommend that you allow traffic only from specific IPv6 CIDR blocks.
Destination
The range of destination ports to which inbound traffic is allowed.
If you set Protocol Type to All ICMP - IPv6, the destination port range is automatically set to All/-1/-1 and cannot be modified.
Description
Enter a custom description for the rule.
Step 3: Create an ALB instance
Log on to the ALB console.
On the Instances page, click Create ALB.
On the buy page, configure the following parameters, click Buy Now, and complete the payment as prompted.
This section describes only the required parameters. Use the default values for other parameters. For more information, see Create an ALB instance.
Parameter
Description
Region
The region where you want to create the ALB instance. This topic uses China (Shanghai) as an example.
Network Type
The network type of the instance. The system assigns a private or public IP address based on your selection. This topic uses Public.
NoteSelecting Public for Network Type applies only to IPv4. By default, the network type for IPv6 is private. This topic uses an Internet-facing IPv6 address. To change the network type for IPv6 to Internet-facing, perform Step 4.
VPC
The VPC where you want to deploy the instance.
NoteMake sure that IPv6 is enabled for the selected VPC.
Zone ID
Select at least two zones. This topic uses Shanghai Zone E and Shanghai Zone G.
Select a vSwitch in each selected zone. This topic uses VSW1 in Zone E and VSW2 in Zone G.
IP Version
The IP version of the instance. This topic uses Dual-stack.
Edition (Instance Fee)
The edition of the instance. This topic uses Standard.
Instance Name
Enter a custom name for the instance.
Service-linked Role
When you create an ALB instance for the first time, click Create Service-linked Role to create a service-linked role named AliyunServiceRoleForAlb. This role is granted the AliyunServiceRolePolicyForAlb permissions to allow the ALB instance to access other cloud resources. For more information, see System policies for ALB.
After you create a public dual-stack ALB instance, a public IPv6 address is required. Perform the following steps to change the IPv6 address of the ALB instance to a public address. For more information, see Protocol Version.
Return to the Instances page, find the target ALB instance, and click the instance ID.
On the Instance Details tab, in the Basic Information section, find Network. Then, click Change Network Type next to IPv6: Private.
In the Change Network Type dialog box, click OK.
After the change is complete, the network type for IPv6 changes to Internet.
Step 4: Create a server group
In the left-side navigation pane, choose .
On the Server Groups page, click Create Server Group.
In the Create Server Group dialog box, configure the following parameters and click Create.
This section describes only the required parameters. Use the default values for other parameters. For more information, see Create and manage a server group.
Parameter
Description
Server Group Type
The type of server group. This topic uses Server Type.
Server Group Name
Enter a custom name for the server group.
VPC
Select the VPC. Only servers in the selected VPC can be added to this server group.
NoteMake sure that you select the same VPC where the ALB instance was created, and ensure that IPv6 is enabled for the VPC.
Backend Server Protocol
The backend protocol. This topic uses HTTP.
Scheduling Algorithm
The scheduling algorithm. This topic uses Weighted Round-robin.
IPv6
Specifies whether to enable IPv6 support. For this tutorial, you must select Enable IPv6.
Session Persistence
Specifies whether to enable session persistence. This topic uses the default setting, which is disabled.
Health Check
Specifies whether to enable health checks. This topic uses the enabled state.
Health Check Settings
After you enable health checks, you can click Edit to configure additional settings.
On the Server Group page, find the target server group and click its ID.
Click the Backend Servers tab and then click Add Backend Server.
On the Add Backend Server panel, select the ECS01 and ECS02 instances that you created. In the IP Address column, select the IPv4 address for ECS01 and the IPv6 address for ECS02. Then, click Next.
On the Ports/Weights step of the wizard, set the port and weight for the ECS01 and ECS02 instances, and then click OK.
This topic sets the port to 80 and uses the default weight of 100 for both instances.
Step 5: Configure a listener
On the Instances page, find the target instance and click its ID.
Click the Listener tab and then click Create Listener.
In the Configure Listener wizard, configure the following parameters and click Next.
This section describes only the required parameters. Use the default values for other parameters. For more information about how to configure a listener, see Add an HTTP listener.
Parameter
Description
Select Listener Protocol
The protocol for the listener. This topic uses HTTP.
Listener Port
The frontend port used to receive requests and forward them to backend servers. This topic uses port 80.
Listener Name
Enter a custom name for the listener.
Advanced Settings
This topic uses the default settings. You can click Modify to change them.
In the Server Group configuration wizard, select a Server Type and the target server group under Server Type, view the backend server information, and then click Next.
In the Confirm step, review the configurations and click Submit.
Click OK to return to the Listener tab. Check the Health Check Status column for the listener. A status of Healthy indicates that the backend servers ECS01 and ECS02 can process requests from the ALB instance.
Step 6: Configure domain resolution
In a production environment, map your domain to the ALB instance's DNS name by creating a CNAME record.
In the left-side navigation pane, choose .
On the Instances page, copy the domain name of the ALB instance.
Perform the following steps to create a CNAME record:
NoteIf your domain name is not registered by using Alibaba Cloud Domains, you must add your domain name to Alibaba Cloud DNS before you can configure a DNS record. For more information, see Manage domain names.
Log on to the Alibaba Cloud DNS console.
On the Authoritative DNS Resolution page, find your domain name and click Settings in the Operations column.
On the Settings tab of the domain name details page, click Add Record.
In the Add Record panel, configure the parameters and click OK. The following table describes the parameters.
Parameter
Description
Record Type
Select CNAME from the drop-down list.
Hostname
Enter the prefix of the domain name. In this example, @ is entered.
NoteIf you use a root domain name, enter
@.Query Source
Select Default.
Record Value
Enter the CNAME, which is the domain name of the ALB instance.
TTL
Select a time-to-live (TTL) value for the CNAME record to be cached on the DNS server. In this example, the default value is used.
Step 7: Test the connectivity
Before testing connectivity, make sure your client supports IPv6. You can visit http://test-ipv6.com/ in your browser to check if your client has IPv6 support.
Use a client that can access IPv6 networks to test the connectivity to the ECS01 and ECS02 servers.
Open a command-line terminal on your client.
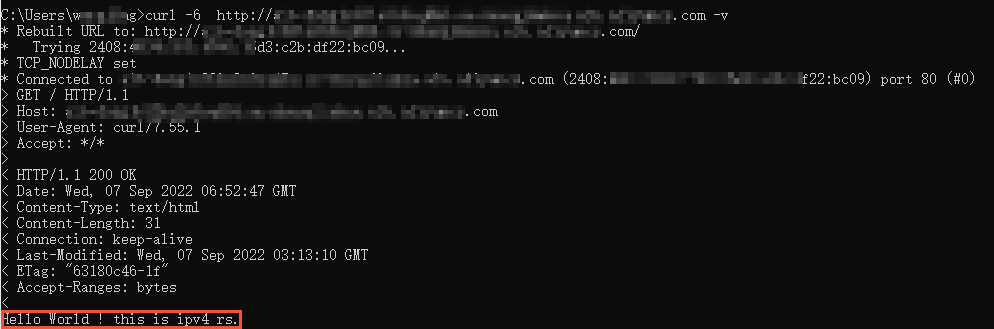
Run the following command multiple times to confirm that the ALB instance is load balancing requests to the IPv4 and IPv6 ECS instances in a round-robin manner.
curl -6 http://<your_domain_name> -vIf you receive a response similar to the one shown below, it indicates that the IPv6 client can access the IPv4 ECS instance.
If you receive a response similar to the one shown below, it indicates that the IPv6 client can access the IPv6 ECS instance.
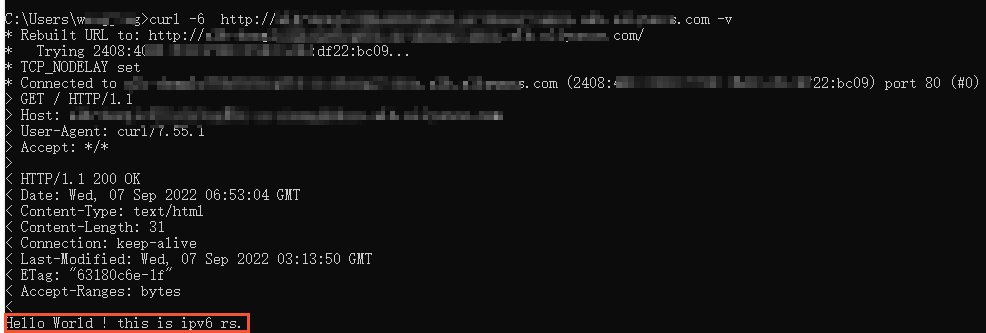
The results confirm that the ALB instance routes requests from an IPv6 client to the IPv4 and IPv6 services in the VPC in a round-robin manner.
Release resources
Release the ECS instances, security groups, and other resources.
Delete the ECS01 instance and its security group:
Log on to the ECS console. In the region list, select the region where the instance is located. Find the ECS01 instance, click the
 icon in the Actions column, and select Release. Then, follow the on-screen instructions to release the instance.
Log on to the ECS console and go to the Security Groups page. In the region list, select the region where the security group is located. Select the custom security group for ECS01 and click Delete.
Follow the steps above to delete the ECS02 instance and its associated security group.
Delete the DNS record:
Delete the DNS record that you created. For more information, see Delete a DNS record.
Release the ALB resources:
Log on to the ALB console. In the region list, select the region where the instance is located. Find the target instance, click the
icon in the Actions column, and select Release.Remove the backend servers. For more information, see Create and manage a server group.
Delete the server group. For more information, see Create and manage a server group.
Release the VPC resources:
Log on to the VPC console and select the region where the VPC is located.
Click Delete in the Actions column of the target VPC. The system checks for any remaining resources. You must release all dependent resources before you can delete the VPC and its vSwitches.
Related documents
For an overview of the use cases and components of ALB, see What is Application Load Balancer?
To learn about the features of ALB, see Features.
To view ALB quotas and learn how to request an increase, see Quotas and limits.
For information about the regions that support ALB, see ALB-supported regions and zones.
For details on ALB billing methods, billable items, and pricing, see ALB billing overview.