Very Secure FTP Daemon (vsftpd) is a lightweight FTP server for Linux. This topic walks you through installing and configuring vsftpd on a Linux-based Simple Application Server, then verifying the connection using FileZilla.
FTP transmits data—including credentials—in plaintext. For production workloads that require encryption, consider SFTP or FTPS instead. This guide covers vsftpd for use cases where FTP is a specific requirement.
Prerequisites
Before you begin, ensure that you have:
A Linux-based Simple Application Server. See Create a simple application server
A password set for the server. See Set or reset the password of a server
FileZilla installed on your local machine. Download it from filezilla-project.org
FTP connection and authentication modes
FTP operates in two connection modes:
Active mode: The client sends its port information to the server, and the server initiates the data connection.
Passive mode: The server opens a port and sends the port information to the client, which then initiates the connection. This guide configures passive mode, which works better through firewalls and NAT.
FTP supports three authentication modes:
| Mode | Security | Description |
|---|---|---|
| Anonymous user mode | Lowest | No username or password required. Suitable only for public file transfers. Avoid in production. |
| Local user mode | Medium | Authenticates against local Linux users. Covered in this guide. |
| Virtual user mode | Highest | Uses virtual users isolated from the system. Requires professional configuration. |
This guide covers local user mode (recommended) and anonymous user mode.
Step 1: Install vsftpd
Check whether vsftpd is already installed. Some servers deployed with application images include vsftpd pre-installed—reinstalling it may cause conflicts.
vsftpd -vIf the output shows a version number, vsftpd is already installed:
vsftpd: version 3.0.2If vsftpd is already installed, get the FTP credentials from your application image documentation, then skip to Step 3: Open firewall ports.
Install vsftpd. This example uses CentOS 7. For other distributions, see Build an FTP site on an ECS instance.
sudo yum install -y vsftpdA success message confirms the installation.
Enable vsftpd to start automatically on boot:
sudo systemctl enable vsftpd.serviceStart vsftpd:
sudo systemctl start vsftpd.serviceNoteIf the service fails to start with the error
Job for vsftpd.service failed because the control process exited with error code, port 21 may already be in use. Runlsof -i:21to identify the process, then runkill -9 <PID>to stop it before restarting vsftpd.Verify vsftpd is running:
sudo netstat -antup | grep ftpIf the FTP service port appears in the output, vsftpd is running.
Step 2: Configure the access mode
Choose one of the following modes. Local user mode is recommended for better security.
Local user mode (recommended)
Create a dedicated Linux user for FTP access. This example uses
ftptest.sudo adduser ftptestSet a password for the user:
sudo passwd ftptestFollow the prompts to enter and confirm the password.
Create the FTP directory:
sudo mkdir /var/ftp/testAssign ownership of the directory to
ftptest:sudo chown -R ftptest:ftptest /var/ftp/testBack up the vsftpd configuration file before editing:
sudo cp /etc/vsftpd/vsftpd.conf /etc/vsftpd/vsftpd.conf.bakOpen the configuration file for editing:
NoteIf you installed vsftpd with
apt install vsftpd, the configuration file is at/etc/vsftpd.confinstead.sudo vim /etc/vsftpd/vsftpd.confPress
ito enter edit mode.Update the following parameters. Make sure none of these lines are commented out with
#, and avoid trailing spaces—extra spaces cause vsftpd to fail on restart./etc/vsftpd/vsftpd.conf# Disable anonymous login anonymous_enable=NO # Allow local users to log in local_enable=YES # Listen on IPv4 listen=YESComment out the IPv6 listener by adding
#at the start of the line:#listen_ipv6=YESAdd the following parameters at the end of the file. Replace
39.105.xx.xxwith your server's public IP address./etc/vsftpd/vsftpd.conf# Set the home directory for local users after login local_root=/var/ftp/test # Restrict users to their home directory chroot_local_user=YES # Enable a list of users exempt from the chroot restriction chroot_list_enable=YES # Path to the exemption list file chroot_list_file=/etc/vsftpd/chroot_list # Enable passive mode pasv_enable=YES allow_writeable_chroot=YES # Public IP address of the server pasv_address=39.105.xx.xx # Passive mode port range (high-numbered ports reduce exposure) pasv_min_port=50000 pasv_max_port=50010Press
Esc, then type:wqand pressEnterto save and close.Create the chroot exemption list file. Users listed here are not confined to the home directory. The file is required even if it is empty.
sudo vim /etc/vsftpd/chroot_listPress
ito enter edit mode. Add any exempt usernames, one per line (leave the file blank if no exemptions are needed). PressEsc, then type:wqand pressEnterto save and close.Stop the system firewall. vsftpd manages port access through the Simple Application Server firewall configured in Step 3.
sudo systemctl stop firewalldEnable password authentication in the SSH configuration:
sudo vi /etc/ssh/sshd_configFind
PasswordAuthenticationat the end of the file and set it toyes. PressEsc, then type:wq!and pressEnterto save and close.Restart vsftpd to apply all changes:
sudo systemctl restart vsftpd.service
Anonymous user mode
Anonymous mode allows anyone to connect without a password. Use this only for public file transfers in non-production environments.
Open the vsftpd configuration file:
NoteIf you installed vsftpd with
apt install vsftpd, the configuration file is at/etc/vsftpd.confinstead.sudo vim /etc/vsftpd/vsftpd.confPress
ito enter edit mode.Set the following parameters. The exact defaults vary by Linux distribution—verify that both values are
YESafter editing. Make sure none of these lines are commented out with#, and avoid trailing spaces./etc/vsftpd/vsftpd.confanonymous_enable=YES anon_upload_enable=YES listen=YES listen_ipv6=NOAdd the following parameters at the end of the file. Replace
39.105.xx.xxwith your server's public IP address./etc/vsftpd/vsftpd.conf# Enable passive mode pasv_enable=YES # Passive mode port range pasv_min_port=50000 pasv_max_port=50010 # Public IP address of the server pasv_address=39.105.xx.xxPress
Esc, then type:wqand pressEnterto save and close.Grant write permissions on the default FTP directory (
/var/ftp/pub):sudo chmod o+w /var/ftp/pub/Restart vsftpd:
sudo systemctl restart vsftpd.service
Step 3: Open firewall ports
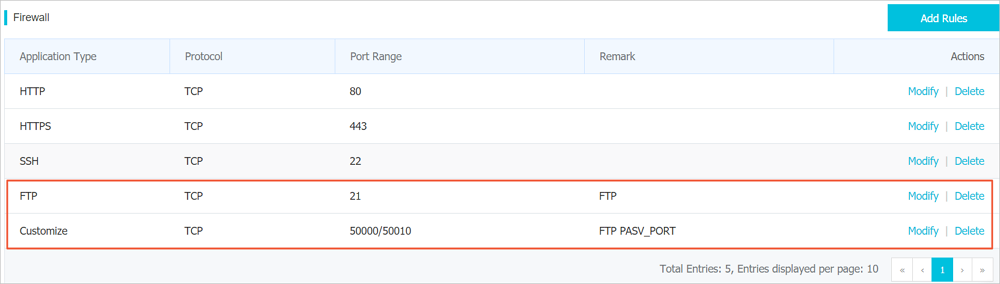
Add inbound rules in the Simple Application Server firewall to allow FTP traffic. Passive mode requires port 21 and the passive port range. See Manage a firewall for instructions.
| Application type | Protocol | Port range |
|---|---|---|
| FTP | TCP | 21 |
| Custom | TCP | pasv_min_port–pasv_max_port (example: 50000/50010) |
After adding the rules, they appear on the Firewall page:
Step 4: Verify the FTP connection
Use FileZilla to confirm the FTP server is accessible.
This example uses FileZilla 3.64.0. The interface may differ in other versions.
Open FileZilla.
Go to File > Site Manager.
Click New site (N) in the lower-left corner of the Site Manager dialog.
Enter a name for the new site and configure the connection:
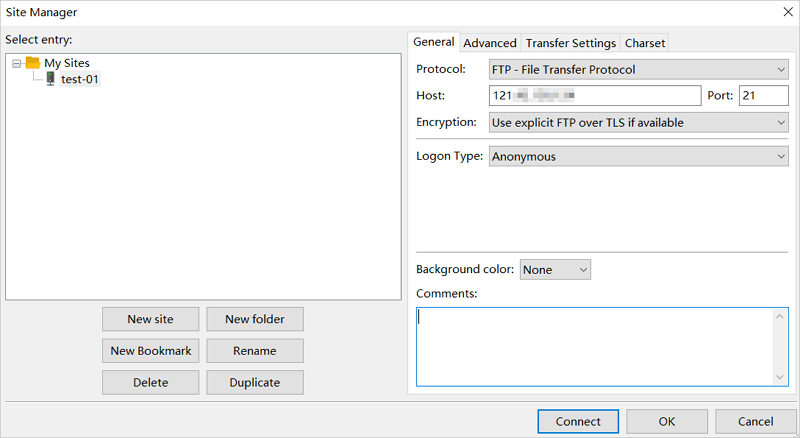
Parameter Value Name A custom site name. Example: test-01.Protocol FTP Host Public IP address of the server (example: 121.43.XX.XX)Port 21 Logon type Anonymous (for anonymous mode) or Normal (for local user mode) For local user mode, set Logon type to Normal and enter the FTP username and password.
Click Connect.
After connecting, use FileZilla to upload, download, or delete files. The interface is divided into four sections:
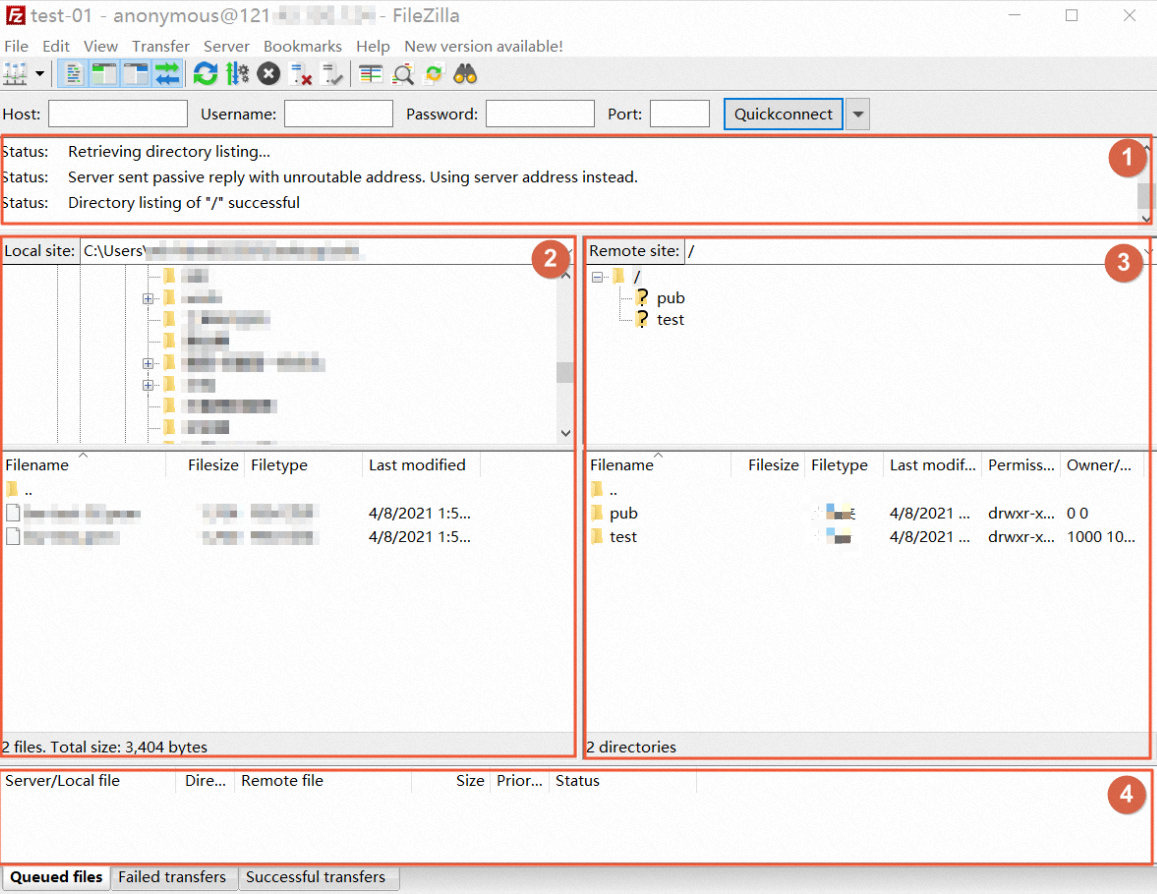
| Section | Description |
|---|---|
| ① | Connection status, commands, and task results |
| ② | Local machine: directory and file listing |
| ③ | Remote server: FTP directory listing. In anonymous mode, the default directory is /pub. |
| ④ | Transfer queue and task logs |
vsftpd configuration reference
The /etc/vsftpd directory contains three key files:
/etc/vsftpd/vsftpd.conf: the main configuration file/etc/vsftpd/ftpusers: users in this file are denied FTP access (blacklist)/etc/vsftpd/user_list: users in this file are allowed FTP access (whitelist)
Login control parameters
| Parameter | Description |
|---|---|
anonymous_enable=YES | Accept anonymous users |
no_anon_password=YES | Skip password prompt for anonymous users |
anon_root= | Home directory for anonymous users |
local_enable=YES | Accept local users |
local_root= | Home directory for local users |
Permission parameters
| Parameter | Description |
|---|---|
write_enable=YES | Allow all users to upload files |
local_umask=022 | File permission mask for local user uploads |
file_open_mode=0666 | Apply umask to uploaded file permissions |
anon_upload_enable=NO | Allow anonymous users to upload files |
anon_mkdir_write_enable=NO | Allow anonymous users to create directories |
anon_other_write_enable=NO | Allow anonymous users to modify or delete files |
chown_username=lightwiter | Owner assigned to files uploaded by anonymous users |