Cloudreve is an open source cloud storage system that lets you host your own file management platform. With Cloudreve deployed on a Simple Application Server, you can manage file synchronization, file sharing, remote download, and team collaboration across platforms and devices.
This topic walks you through creating a server with the Cloudreve application image, signing in to the Cloudreve web interface, and performing common tasks such as uploading files, sharing files, using remote download, and configuring storage policies.
Estimated time: Approximately 15 minutes.
For more information about Cloudreve, visit the official Cloudreve website.
The Cloudreve application image is based on Alibaba Cloud Linux 3.2104 64-bit and has NGINX, Aria2, and MariaDB pre-installed. Alibaba Cloud updates the Cloudreve application image from time to time. The image information on the Simple Application Server buy page takes precedence.
Prerequisites
Before you begin, make sure you have the following:
An Alibaba Cloud account. If you do not have one, sign up for an Alibaba Cloud account.
(Optional) A registered domain name, if you want to access Cloudreve through a custom domain instead of a public IP address. For more information, see Register a domain name on Alibaba Cloud.
Step 1: Create a cloud storage system server
If you already have a simple application server, you can reset it to use the Cloudreve application image. Select the Cloudreve application image when you reset the server. Resetting the server deletes all system disk data. Back up your data before you reset. For more information, see Reset a simple application server.
Go to the Servers page in the Simple Application Server console.
In the middle of the page, click Create Server.
On the Simple Application Server page, configure the following parameters.
| Parameter | Example | Description |
|---|---|---|
| Image | Application Images: Cloudreve, Version: Cloudreve 3.8.3 | On the Application Images tab, click Cloudreve.  |
| Region | Singapore | Select a region close to your users to reduce network latency. You cannot change the region after the server is created. Important Simple application servers outside the Chinese mainland, such as China (Hong Kong) and Singapore, use international bandwidth. Accessing these servers from inside the Chinese mainland may result in high network latency. Select the region closest to your users. For more information, see Regions and network connectivity. |
| Purchase Settings | Quantity: 1, Duration: 1 Month | Quantity: The number of servers. Default: 1. Duration: The subscription duration. Default: 1 month. Monthly subscription: 1 month, 3 months, or 6 months. Yearly subscription: 1 year, 2 years, or 3 years. The Auto-renewal feature is enabled by default to prevent service interruption. If you forget to renew, the server will be released, which may affect your business. For more information, see Renew a server. Monthly subscription: The renewal cycle is 1 month. Yearly subscription: The renewal cycle is 1 year. |
Click Buy Now and follow the instructions to complete the payment.
When the server status changes to Running, the server is ready.

Step 2: Sign in to the Cloudreve cloud storage system
To sign in, first retrieve your administrator credentials from the console, and then use them to access the Cloudreve web interface.
Obtain the Cloudreve sign-in information
On the Servers page, click the Server ID in the server card to go to the Server Overview page.
Click the Application Details tab. In the Cloudreve Information section, find the home address, administrator account, and administrator password.
NoteOn the Application Details tab, you can also view the usage procedure for Cloudreve and the installation paths of Cloudreve, MariaDB, and Aria2.
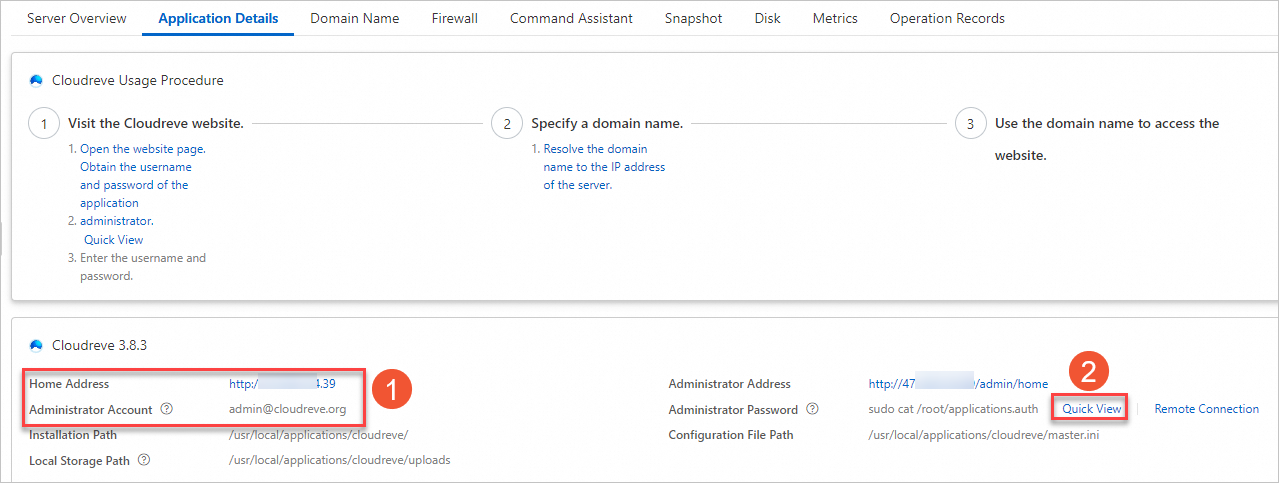
In section 1 of the figure, find the administrator account
admin@cloudreve.organd the home addresshttp://118.178.XX.XXof the cloud storage system.In section 2 of the figure, click Quick View. In the Quick View dialog box, obtain the administrator password.

Sign in to the Cloudreve web interface
In the address bar of a browser on your local computer, enter the home address
http://118.178.XX.XXof the Cloudreve cloud storage system.On the sign-in page, enter the administrator account and administrator password, and then click Sign In. You are directed to the home page of the cloud storage system.
ImportantTo prevent data leaks, change the default password as soon as possible.

Step 3: Use the Cloudreve cloud storage system
After you sign in, you can upload and download files, share files, use remote download, and configure storage policies. For more information about Cloudreve, visit the official Cloudreve documentation.
Upload and download files
Upload files to the Cloudreve cloud storage system
On the Cloudreve page, drag a file from your local computer to the page, or right-click a blank area and click Upload Files.

Download files to your local computer
On the Cloudreve page, right-click the file and click Download in the pop-up menu. Follow the instructions to download the file.

Share files
Before you can share files, you must set the site URL so that share links work correctly.
Set the site URL
Click your profile in the upper-right corner of the page and then click Dashboard.

In the Confirm site URL dialog box, click Change it.
NoteIf you have already changed the site URL, the Confirm site URL dialog box does not appear.

In the upper-right corner of the page, click the
 icon to return to the home page.
Create and send a share link
On the Cloudreve page, right-click the file that you want to share and click Create Share Link in the menu that appears.

In the Create Share Link dialog box, configure the sharing settings and then click Create share link.

In the Create share link dialog box, copy the share link.

Share the link with others. They can use it to access and download the file.
Remote download files
The remote download feature uses the server to download files on your behalf. You can shut down your computer during the download because the server handles the process independently. Remote download supports resumable transfers and concurrent downloads with multiple tasks and threads, which saves time and improves efficiency.
After you enable the remote download feature, you can create download tasks using magnet links, HTTP/HTTPS URLs, or torrent files. The server downloads the files and saves them to your Cloudreve cloud storage system. For more information, see Remote download.
Enable remote download
By default, remote download is enabled for the Admin user group.
On the Cloudreve page, click your profile in the upper-right corner and then click Dashboard in the pop-up menu. You are directed to the Dashboard page.

In the left-side navigation pane, click Groups.
Click
 for the target user group and enable Remote download.Note
On the Edit User page, you can also set parameters such as Initial storage quota and Max download speed.


Click Save.
In the upper-right corner of the page, click the
icon to return to the home page.
Create a remote download task
On the Cloudreve page, click Remote Download in the left-side navigation pane.

In the lower-right corner of the page, click the
 icon.
icon.In the New remote download task dialog box, follow the instructions to create a remote download task.

Set a storage policy
If you have a large number of files and the system disk does not have enough space, you can store files in Alibaba Cloud OSS. For more information, see What is OSS? The following example shows how to store files from the Cloudreve cloud storage system to Alibaba Cloud OSS.
Create an OSS bucket
Create a bucket in the same region as your cloud storage system server. For more information, see Create a bucket.
Select Standard or IA for the bucket storage class.
Add an Alibaba Cloud OSS storage policy
Click your profile in the upper-right corner of the page and then click Dashboard.
In the left-side navigation pane, click Storage Policy.
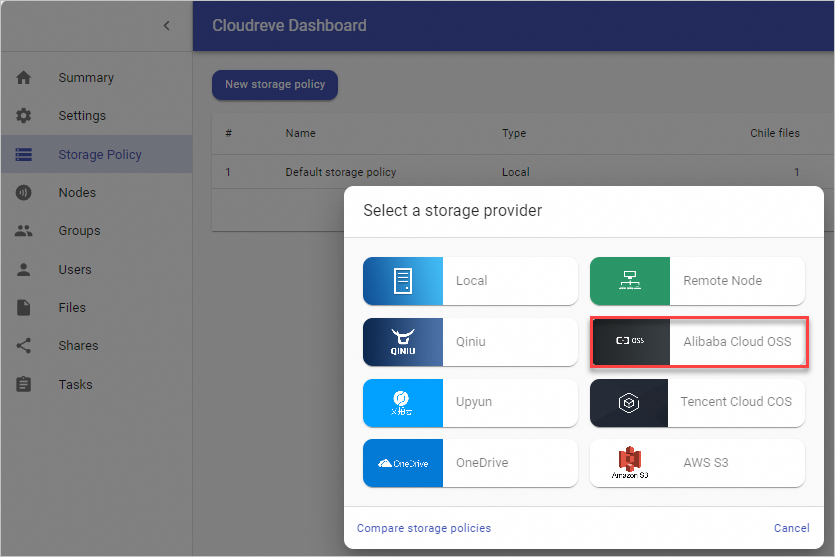
In the upper-left corner of the page, click New storage policy.
In the Select a storage provider dialog box, click Alibaba Cloud OSS.
Follow the instructions to add an Alibaba Cloud OSS storage policy.

Click Next. When you configure the cross-origin resource sharing (CORS) policy, click Let Cloudreve Help Me Set It Up.
Attach the storage policy to a user group
In the left-side navigation pane, click Groups.
Click
for the target user group to select the storage policy.NoteOn the Edit User page, you can also set parameters such as Initial storage quota and Max download speed.

Click Save.
In the upper-right corner of the page, click the
icon to return to the home page.
Verify the storage policy
Upload a file. For more information, see Upload and download files.

View the files stored in the
uploadsfolder in the OSS bucket. For more information, see List objects.
What to do next
Register and resolve domain names
Accessing Cloudreve through a public IP address can compromise server security. To improve security, configure a domain name for your Cloudreve instance. If you have a domain name or want to register one, follow these steps:
Register a domain name.
For more information, see Register a domain name on Alibaba Cloud.
Apply for an Internet Content Provider (ICP) filing for the domain name.
An ICP filing is required if you use the domain name for a Cloudreve cloud storage system on a server in the Chinese mainland. For information about the ICP filing process, see ICP filing process.
Resolve the domain name to the public IP address of your simple application server.
Domain name resolution is required to access your cloud storage system through a domain name. For more information, see Get started with Alibaba DNS.
Enable HTTPS
If you have bound a domain name to your server, you can enable HTTPS to secure data in transit. HTTPS provides authentication and encrypted data transmission, which prevents data tampering and information leakage. For more information, see Deploy SSL certificates.