When a security alert fires, every minute of manual triage increases your exposure. Automated response rules in Agentic SOC close that gap: each rule defines a trigger condition and one or more actions, and the system runs those actions the moment a matching alert or event arrives—no manual intervention required. This shortens mean time to respond (MTTR) and lets your security team focus on complex threat analysis instead of routine triage.
Common use cases:
Block a malicious IP address the moment a WAF alert is generated, before the attack escalates.
Assign an owner and raise the risk level automatically when multiple alerts aggregate into a high-severity security event.
Suppress repeated alert notifications for known-safe IPs by adding them to a whitelist automatically.
How it works
Every incoming alert or event passes through a four-step pipeline:
Data entry — Security Center ingests alerts from cloud products such as WAF and AEGIS, then aggregates related alerts into security events.
Rule matching — The response engine evaluates all enabled rules against the Trigger and Filter Condition you configure.
Action execution — When a rule matches, the system runs all configured actions in sequence, subject to the Silence Rule policy.
Result logging — All automated actions are recorded in the Response Center for auditing and tracking.
Key concepts
| Concept | Description |
|---|---|
| Entity | The target of a response action. An entity is key information extracted from an alert or event: an IP address, a file MD5 hash, or a process name. |
| Playbook | A predefined, automated workflow. When a rule matches, the system runs the playbook to perform complex response operations on the entity. |
| Predefined rule | A built-in response policy provided by the system. Enable it directly from the product page. You can view its configuration but cannot edit or delete it. |
| Custom rule | A rule you create to match your business needs, with flexible trigger and action configuration. |
Create an automated response rule
After you create and enable a rule, Agentic SOC matches it against new security events. When a match occurs, the system runs the configured actions automatically.
Prerequisites
Before you begin, make sure you have:
Access to the Security Center console with permissions to configure Agentic SOC
A published playbook (predefined or custom) if your rule will use Run Playbook
Step 1: Open Response Orchestration
Go to the Security Center console - Agentic SOC - Response Orchestration. In the upper-left corner, select the region where your assets are located: Chinese Mainland or Outside Chinese Mainland.
Step 2: Start rule creation
On the Automatic Response Rule tab, click Create Rule.
To create a rule quickly, select an existing predefined or custom rule and click Copy in the Actions column.
Step 3: Configure basic information
Rule Name — Use a name that reflects the scenario, object, and action. For example: MiningProgram_Process_AutoTerminate.
Trigger — Select a trigger method based on when you want the rule to fire.
| Trigger method | When it fires | Supported actions |
|---|---|---|
| Alert Trigger | Immediately when a single alert is generated | Run Playbook and Add Alert to Whitelist only |
| Event Occurrence | The first time multiple alerts aggregate into a security event | All event-level actions and playbook runs |
| Event Update | When a new alert is associated with an existing event, updating its occurrence time | All event-level actions and playbook runs |
Step 4: Set filter conditions
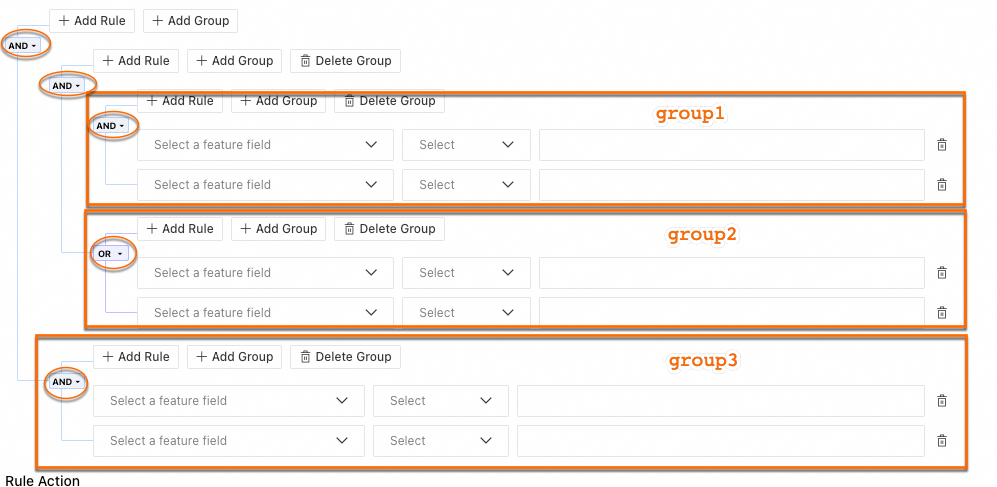
Filter conditions define the field values that must match for the rule to fire. The available fields depend on the Trigger you selected. Click Add Condition or Add Group to build your logic.
Condition logic:
Within a group — Set multiple conditions with AND or OR logic.
Between groups — Set multiple condition groups with AND or OR logic.
For example, if you have three groups with the relationship group1 AND group2 OR group3:
group1uses AND logic internally.group2uses OR logic internally.group3uses AND logic internally.
Supported conditions:
| Condition | Description |
|---|---|
= | Equals |
<> | Does not equal |
contains | String contains |
not contains | String does not contain |
in | Is in a list of values. Separate multiple values with commas, for example: condi1,condi2 |
not in | Is not in a list of values. Separate multiple values with commas, for example: condi1,condi2 |
is null | Is an empty string. "", null, and NULL are all treated as empty strings |
is not null | Is not an empty string |
regexp | Matches a regular expression |
not regexp | Does not match a regular expression |
in ip dataset | Is in the IP dataset |
not in ip dataset | Is not in the IP dataset. Configure the dataset in Agentic SOC > Agentic SOC > Integration Center > Observation List before selecting it |
in dataset | Is in the dataset |
not in dataset | Is not in the dataset |
Step 5: Configure rule actions
In the Rule Action area, click Add to configure one or more actions. When the rule fires, Agentic SOC runs all actions sequentially against the matched entity.
If you add multiple rule actions, all of them run in sequence every time the rule fires.
Action availability by trigger:
| Action | Alert Trigger | Event Occurrence / Event Update |
|---|---|---|
| Run Playbook | Yes | Yes |
| Add Alert to Whitelist | Yes | No |
| Change Incident Status | No | Yes |
| Change Risk Level | No | Yes |
| Use Recommend Playbook | No | Yes |
| Modify Owner | No | Yes |
| Add event tag | No | Yes |
| Delete event tag | No | Yes |
Action details:
Run Playbook — Runs the selected playbook automatically when the rule fires.
Supports Predefined Playbook and published Custom Playbook.
Only playbooks whose Start node is configured with a specific output parameter type can be linked to a rule. Supported entity types: IP entity, file entity, process entity, container entity, domain name entity, host entity, and security alert.
Parameter Description Entity (such as malicious IP or malicious process) Defaults to Automatically Obtain and cannot be changed. Agentic SOC pulls entity information from the logs of the incoming alert or event. Destination Account The Alibaba Cloud account that runs the playbook. Select System automatic acquisition to use the account identified in the entity object, or Custom to specify the current Alibaba Cloud UID (root account) or a member account managed by multi-account security management. Effect The validity period for IP playbook actions. For example, if the playbook blocks an IP for 7 days, the IP is automatically unblocked after 7 days. If it adds an IP to a whitelist for 7 days, the IP is automatically released after 7 days. If it monitors an IP for 7 days, monitoring stops after 7 days. Add Alert to Whitelist — Suppresses further notifications for matching alerts.
For a Cloud Workload Protection Platform (CWPP) alert, the status is automatically updated to Automatically Add to Whitelist.
For an Agentic SOC alert, the Add to Whitelist field is updated to Yes.
Alerts that match this whitelist rule are no longer associated with an event.
Use Recommend Playbook — The system recommends a predefined playbook based on the alert and entity information. For example, for an IP entity extracted from a WAF alert, the system recommends the playbook for blocking IP addresses in WAF. View all built-in playbooks on the Predefined Playbook tab.
Change Incident Status — Automatically adjusts the event status when the rule fires.
Change Risk Level — Automatically adjusts the event's risk level when the rule fires.
Modify Owner — Assigns an owner to the event automatically. The assignment is recorded in the Activity Log on the Response Activity tab of the event details page.
Add event tag / Delete event tag — Automatically adds or removes specified tags from an event for easier categorization and filtering.
Rule execution order and the Silence Rule:
Order — When multiple rules fire on the same event, actions run in the sequence defined by Order. The system executes all rule actions sequentially, and the last action overwrites the results of previous ones.
Silence Rule — For the same entity, the same playbook runs at most once per minute.
Step 6: Enable the rule
A rule is disabled by default after creation. On the rule list page, click the ![]() icon in the Enabling Status column to enable it.
icon in the Enabling Status column to enable it.
View processing records
After enabling a rule, check its execution results in any of the following places:
Disposal Center — Go to Agentic SOC > Disposal Center to view processing details.
Playbook details — Open the playbook details page to view historical execution records.
Playbook Execution Records — Go to Agentic SOC > SOAR > Playbook Execution Records to see all playbook executions.
Apply in production
Test before using high-risk actions. Before enabling rules that block IP addresses or delete files, validate the trigger logic using a low-risk action. Confirm that the rule fires on the expected events before switching to the high-risk action.
Plan rule order to avoid conflicts. When multiple rules act on the same event, the system executes actions sequentially and the last action overwrites earlier ones. Review your rule order whenever rules modify the same event fields.
Use regular expressions carefully. In Filter Condition, inefficient regexp patterns can affect rule matching performance at scale.
FAQ
Why didn't my rule fire?
Check these four things in order:
Rule status — Confirm the rule is enabled on the rule list page.
Filter conditions — Try relaxing the conditions or temporarily replacing the action with a harmless one like Add event tag to verify whether the rule matches.
Field values — Confirm that the actual field values in the alert or event exactly match what you set in the filter conditions. Watch for spaces and case differences.
Silence Rule — If the rule fired recently for the same entity and playbook, the Silence Rule may be suppressing it. The same playbook runs at most once per minute per entity.
My playbook execution failed. How do I troubleshoot it?
Start with the execution logs. Go to Response Center or the Historical Execution Records page for the playbook to find the error details. Then check:
Account permissions — Confirm that the destination account (or its RAM role) has the permissions needed for the playbook's operations, such as creating VPC security group rules or quarantining files.
Entity parameters — Confirm that the entity information from the triggering alert is complete and can be passed as a valid parameter to the playbook.