The web tamper proofing feature can monitor website directories and files on your server in real time. The feature can also restore tampered files or directories by using backups if a website is tampered with. This prevents the website from being inserted with illegal information and ensures that the website runs as expected. This topic describes how to use the web tamper proofing feature.
Prerequisites
The Security Center agent is installed on the server for which you want to enable the web tamper proofing feature. For more information, see Install the Security Center agent.
Background information
To make illegal profits or launch business attacks, attackers exploit vulnerabilities in websites to tamper with the websites. For example, attackers insert hidden links to the websites. Tampering with web pages affects normal user access and may cause serious economic loss, damage to brand reputation, and political risks.
The Security Center agent automatically collects information about the processes related to the files in the protected directories of protected servers. The agent identifies suspicious processes and abnormal file changes in real time and generates alerts for or intercepts the processes that cause abnormal file changes.
Billing rules
Web tamper proofing is a value-added feature of Security Center. You can use the feature after you purchase it. For more information about the billing of web tamper proofing, see Billing.
Usage notes
A quota of 1 on web tamper proofing can be consumed to protect one server.
You can enable web tamper proofing for a server only once. You can add up to 10 directories on each server for protection.
If the operating system and kernel version of your server are supported by the whitelist feature, take note of the following items. For more information, see Supported versions of operating systems and kernels.
Use the whitelist feature: If Security Center blocks or generates an alert for a process that causes abnormal file changes but the process is required by your workloads, you can add the process to the process whitelist. Then, Security Center no longer blocks or generates alerts for the process.
When you add directories for protection, take note of the following items:
The maximum length of the full path to each specified file or directory is 1,000 characters.
If you add a process path of a Network File System (NFS) server for protection, Security Center cannot protect the files in the path from NFS client-based attacks that attempt to modify the files.
If the operating system and kernel version of your server are not supported by the whitelist feature, take note of the following items. For more information, see Supported versions of operating systems and kernels.
The whitelist feature is not supported. The web tamper proofing feature still blocks a process even if you add the process to the process whitelist.
When you add directories for protection, take note of the following items:
The maximum size of each specified directory is 20 GB.
The maximum number of folders in each specified directory is 20,000.
The maximum number of folder levels in each specified directory is 20.
The maximum size of each specified file is 20 GB.
You cannot set Prevention Mode to Alert Mode.
The paths to the NFS cannot be protected.
Alerts may not be generated. Details of alerts do not include information about process paths.
Table 1. Supported versions of operating systems and kernels
Operating system | Operating system version | Kernel version |
Windows (32-bit or 64-bit) | Windows Server 2008, Windows Server 2012, Windows Server 2016, and Windows Server 2019. | All versions |
CentOS (64-bit) | Unlimited. However, only limited kernel versions are supported. | |
Ubuntu (64-bit) | Unlimited. However, only limited kernel versions are supported. | |
Debian | Unlimited. However, only limited kernel versions are supported. | |
Anolis OS (64-bit) | Unlimited. However, only limited kernel versions are supported. | |
RHEL | Unlimited. However, only limited kernel versions are supported. | |
Alibaba Cloud Linux (64-bit) | Unlimited. However, only limited kernel versions are supported. | |
Oracle Linux | Unlimited. However, only limited kernel versions are supported. |
Step 1: Purchase the quota for web tamper proofing
Before you use web tamper proofing, make sure that the quota for web tamper proofing is sufficient within the current Alibaba Cloud account.
Log on to the Security Center console. In the top navigation bar, select the region of the asset that you want to manage. You can select China or Outside China.
In the left-side navigation pane, choose .
Perform the following operations based on your business scenarios.
No quota for web tamper proofing is purchased
On the Web Tamper Proofing page, click Upgrade Now.
Perform the following operations based on the edition of Security Center:
Basic edition:
In the Select a product version panel, select an edition. On the Security Center page, configure the parameters such as the Edition and Protected Servers parameters. You must set the Web Tamper Proofing parameter to Yes and configure the Quota for Web Tamper Proofing parameter based on the number of servers for which you want to enable web tamper proofing.
If you want to separately purchase web tamper proofing, set the Edition parameter to Value-added Plan. For more information about how to select an edition of Security Center and purchase other features, see Purchase Security Center.
Paid edition:
In the Select a product version panel, click Upgrade. On the Upgrade page, set the Web Tamper Proofing parameter to Yes and configure the Quota for Web Tamper Proofing parameter based on the number of servers for which you want to enable web tamper proofing.
Click Buy Now and complete the payment.
The quota for web tamper proofing is purchased
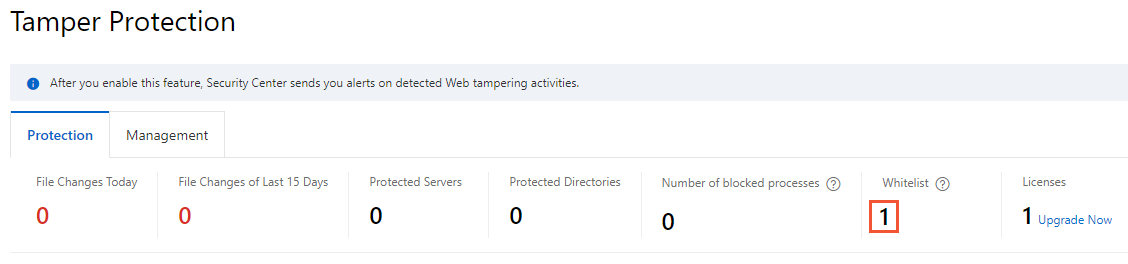
If the quota for web tamper proofing is 0 or insufficient, you can click Upgrade Now in the upper-right corner of the Tamper Protection page to purchase a sufficient quota for web tamper proofing.
Step 2: Enable web tamper proofing for servers
You can enable the web tamper proofing feature for servers on which the Security Center agent is installed. You can also specify multiple directories on a server for protection.
The first time you use web tamper proofing, click Add Servers for Protection on the Web Tamper Proofing page.
If this is not the first time that you use web tamper proofing, click the Management tab on the Web Tamper Proofing page and click Add Server.
In the Add Servers for Protection panel, select the server for which you want to enable web tamper proofing from the server list and click Next.
In the Add Directory step, configure the parameters and click Enable Protection.
By default, the Whitelist Mode is used. In whitelist mode, you must specify the directories and formats of files that you want to protect. You can click Blacklist Mode to switch to the blacklist mode. In blacklist mode, you must specify the directory that you want to protect, and the subdirectories, formats of files, and files that do not require protection in the protected directory.
Whitelist Mode
In whitelist mode, Security Center intercepts or generates an alert for modifications to the files of the specified formats in the protected directory.
Parameter
Description
Protected Directory
The server directory that you want to protect. After you specify a directory, Security Center determines whether to intercept modifications to the name, content, or attribute of the files in the directory based on the process whitelist and prevention mode that you specify.
Enter a value in the /The name of the directory/ format. Example:
/tmp/.Protected File Formats
The formats of the files that you want to protect.
You can select formats from the drop-down list. You can also enter formats that are not displayed in the drop-down list.
NoteAll formats of files can be added for protection.
Prevention Mode
Interception Mode: Security Center intercepts suspicious processes and abnormal file changes. This ensures the security of websites and files on your server.
Alert Mode: Security Center identifies suspicious processes and abnormal file changes and generates alerts.
ImportantIf the operating system or kernel version of your server is not supported by web tamper proofing, Security Center does not generate alerts. In this case, if you set Prevention Mode to Alert Mode, Security Center intercepts suspicious processes. For more information, see Supported versions of operating systems and kernels.
Local Backup Directory
The directory in which backup files of the protected directories are stored.
By default, Security Center uses
/usr/local/aegis/bakas the backup directory for Linux servers andC:\Program Files (x86)\Alibaba\Aegis\bakas the backup directory for Windows servers. You can change the default backup directories.ImportantIf the operating system or kernel version of your server is not supported by web tamper proofing, you do not need to configure the Local Backup Directory parameter. For more information, see Supported versions of operating systems and kernels.
Configuration example
If you specify
/tmp/for Protected Directory, xml for Protected File Formats, and Interception Mode for Prevention Mode, Security Center intercepts the modifications to the XML files in the tmp directory.Blacklist Mode
In blacklist mode, Security Center does not intercept or generate alerts for modifications to the specified subdirectories, files of the specified formats, or specified files in the protected directory. Security Center intercepts and generates an alert for modifications to other subdirectories and files in the protected directory.
For more information about how to configure the Protected Directory, Prevention Mode, and Local Backup Directory parameters, see Whitelist Mode.
Parameter
Description
Excluded Sub-Directories
The path to the subdirectories that do not require protection.
Enter a value in the Subdirectory name/ format. Example:
dir1/dir0/.Excluded File Formats
The formats of the files that do not require protection.
Excluded Files
The files that do not require protection.
Enter a value in the Subdirectory name/File name format. Example:
dir2/file3.ImportantThe Excluded Sub-Directories, Excluded File Formats, and Excluded Files parameters are evaluated by using a logical OR.
Configuration example
If you specify
/tmp/for Protected Directory,dir1/dir0/for Excluded Sub-Directories, txt for Excluded File Formats,dir2/file3for Excluded Files, and Interception Mode for Prevention Mode, the files in thedir1subdirectory belowdir0in the tmp directory, TXT files in the tmp directory, or thefile3file in thedir2subdirectory in the tmp directory can be modified. The modifications to other subdirectories and files in the tmp directory are intercepted by Security Center.
Optional. On the Management tab of the Web Tamper Proofing page, find the server that you specify in the Add Servers for Protection panel and click Add Directory in the Actions column to add other directories for protection.
You can click the
 icon next to the server name to view the list of protected directories on the server. You can find a protected directory and click Modify in the Actions column to modify the parameter configurations.
 On the Management tab of the Web Tamper Proofing page, find the server that you specify in the Add Servers for Protection panel and click the
 icon in the Protection column to enable the web tamper proofing feature for the server.
 The first time you enable this feature for a server, the status in the Status column of the server changes to Initializing, and a progress bar appears. Wait until the feature is enabled. After this feature is enabled, the status of the server changes to Running.
The following table describes the statuses that are available in the Status column.
Status
Description
Suggestion
Initializing
Web tamper proofing is being initialized.
The first time you enable web tamper proofing for a server, the status is Initializing. Wait until web tamper proofing is enabled.
Running
Web tamper proofing is enabled and runs as expected.
None.
Exception
An error occurred during the initialization of web tamper proofing.
Move the pointer over Exception, view the causes, and then click Retry.
Not Initialized
The switch in the Protection column is turned off.
Turn on the switch in the Protection column.
Step 3: View the protection status
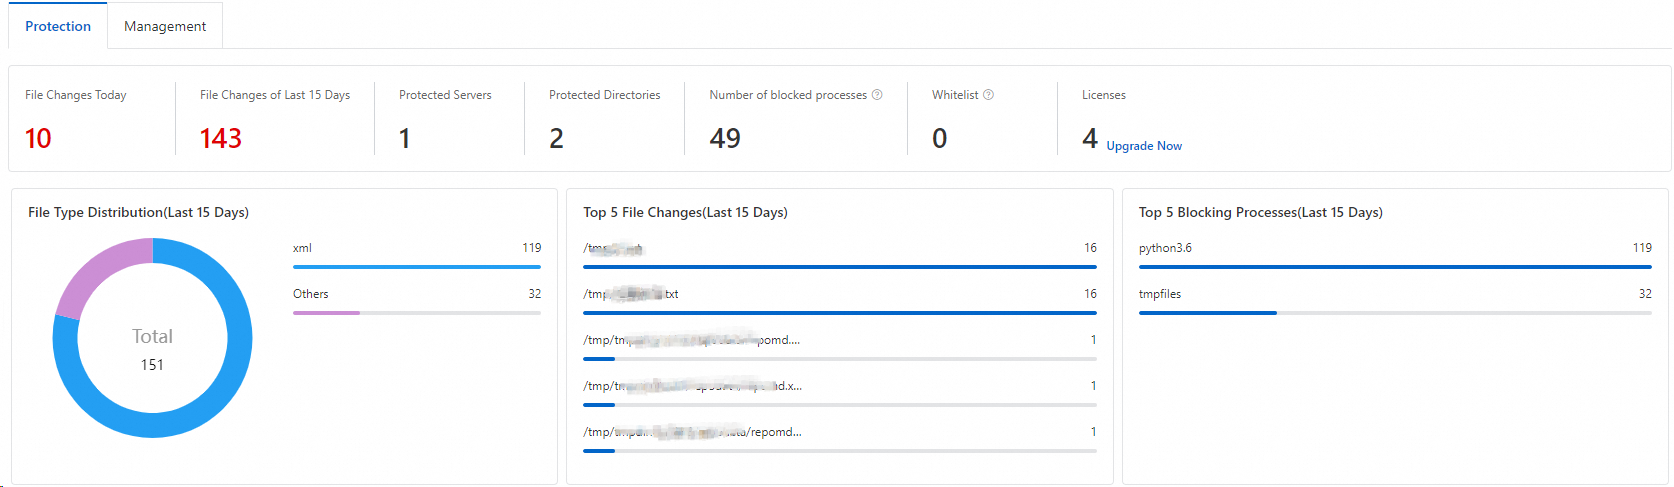
On the Protection tab of the Web Tamper Proofing page, view the details of the protection status.
The overview statistics on web tamper proofing, and the statistics on the top 5 protected files and top 5 blocked processes in the last 15 days
Details of alerts triggered by web tamper proofing
The alert list displays all alerts that are generated for abnormal file changes on your server regardless of whether the alerts are generated in Interception Mode or Alert Mode. You can view the details of an alert, including the severity level, alert name, affected assets, file path, process name, and protection status. The severity level is Medium.
List of Handled alerts
By default, alerts that are generated in Interception Mode are displayed, and the status of the alerts is Defended. This indicates that the web tamper proofing feature detects abnormal file changes and then intercepts the processes that modify files.

List of Unhandled alerts
Alerts that are generated in Alert Mode are displayed, and the default status of the alerts is Unhandled. This indicates that the web tamper proofing feature generates alerts for suspicious processes and abnormal file changes.

If an intercepted process that modifies files or the process that modifies files and then triggers an alert is required by your workloads, you can add the process to the whitelist to allow the process. After you add a process for which an alert is generated to the whitelist, the status of the alert changes to Added to Whitelist, and the alert is added to the Handled alert list. For more information, see (Optional) Add a process to the whitelist.
ImportantIf an alert is reported more than 100 times or the number of times that a process writes on files exceeds 100, we recommend that you handle the alert at the earliest opportunity.
(Optional) Add a process to the whitelist
If you confirm that the process that modifies the protected files on your server is normal and want the process to modify the files, you can add the process to the whitelist.
You can add a process to the process whitelist only if the operating system and kernel versions of your server are supported by the whitelist feature. For more information, see Supported versions of operating systems and kernels.
Attackers may exploit the processes in the whitelist to compromise your server. We recommend that you add only trusted processes to the whitelist.
On the Protection tab of the Web Tamper Proofing page, add a normal process to the whitelist.
Add a process for which an alert is generated to the whitelist
In the Unhandled alert list, find a process that you want to add to the whitelist and click Handle in the Actions column.
In the dialog box that appears, set the Handling Method parameter to Add to Whitelist and click Process Now.
A process may run on multiple servers or run in multiple directories on the same server. If you want to add the process to the whitelist, select Process servers with the same process at the same time.
You can also find alerts generated for processes that modify files in the Handled alert list and add an alert whose status is Defended to the whitelist. You can view process paths to check whether a process is normal.
Add multiple processes for which alerts are generated to the whitelist at the same time
In the alert event list on the Protection tab, find and select the processes that you want to add to the whitelist.
Click Add to Whitelist below the list. In the message that appears, click OK.
Specify processes in the process whitelist
Click the number below Number of blocked processes or Whitelist to go to the Process Management panel.
Click Enter the Whitelist in the upper-right corner. Then, configure the Process Path and Server Name/IP parameters to add multiple processes to the process whitelist.
View the processes in the whitelist or remove processes from the whitelist
Click the number below Whitelist to go to the Process Management panel. In the Process Management panel, you can view the information about all suspicious processes that are added to the whitelist. The information includes the server on which the processes run, the paths to the processes, and the numbers of times that the processes modify files.
In the Process Management panel, find the suspicious process that you want to remove and click Remove from Whitelist in the Actions column. You can also select multiple suspicious processes and click Remove from Whitelist below the list to remove the processes from the whitelist at a time.