Security Center blocks processes and files that it identifies as threats. When legitimate activity triggers a false positive alert, create a custom defense rule to whitelist the activity and prevent future blocking.
Prerequisites
Security Center Advanced, Enterprise, or Ultimate edition. For more information, see Purchase Security Center and Upgrade and downgrade Security Center.
Open the custom defense rule panel
Log on to the Security Center console. In the top navigation bar, select the region of the asset that you want to manage. The following regions are supported: China and Outside China.
In the left-side navigation pane, choose .
On the Malicious Behavior Defense tab, click the Custom Defense Rule tab, and then click Create Rule.
In the Create Rule panel, configure the parameters in the Create Rule step and click Next.
Parameter syntax
Before configuring a rule, review the following syntax rules for parameter values:
String equations are supported. Example:
'a' = 'a'.An asterisk (\*) matches any string, including an empty string. Recommended formats:
*pattern*,*pattern, orpattern*.Logical operators
|,&, and!are supported. A vertical bar (|) is the OR operator, an ampersand (&) is the AND operator, and an exclamation point (!) is the NOT operator. Example:&!*pattern*.The combination
|!*pattern*is not supported.The Parent Process Path and Parent Command Line parameters can be left blank.
Rule types
The following table provides a quick reference for all rule types. For detailed configuration of each type, see the corresponding subsection.
| Rule type | Trigger | Key parameters | OS restriction |
|---|---|---|---|
| Process hash | MD5 hash of a file | Process MD5 | None |
| Command line | Process startup or command execution | Process Path, Command Line | Select OS |
| Process Network | Network communication by a process | Process Path, IP Address, Port | Select OS |
| File Read and Write | File read or write operation | Process Path, File Path | Select OS |
| Operation on Registry | Registry operation | Registry Key, Registry Value | Windows only |
| Dynamic-link Library Loading | DLL or shared library loading | Process Path, File Path | Select OS |
| File Renaming | File rename operation | File Path, New File Path | Windows only |
For each rule type, find the matching false positive alert in the Security Center console, open the alert details panel, and use the field values to fill in the rule parameters.
Process hash
Use this rule type when a false positive alert is triggered by the MD5 hash of a file. The system blocks the file based on the value of the Malicious File MD5 field.
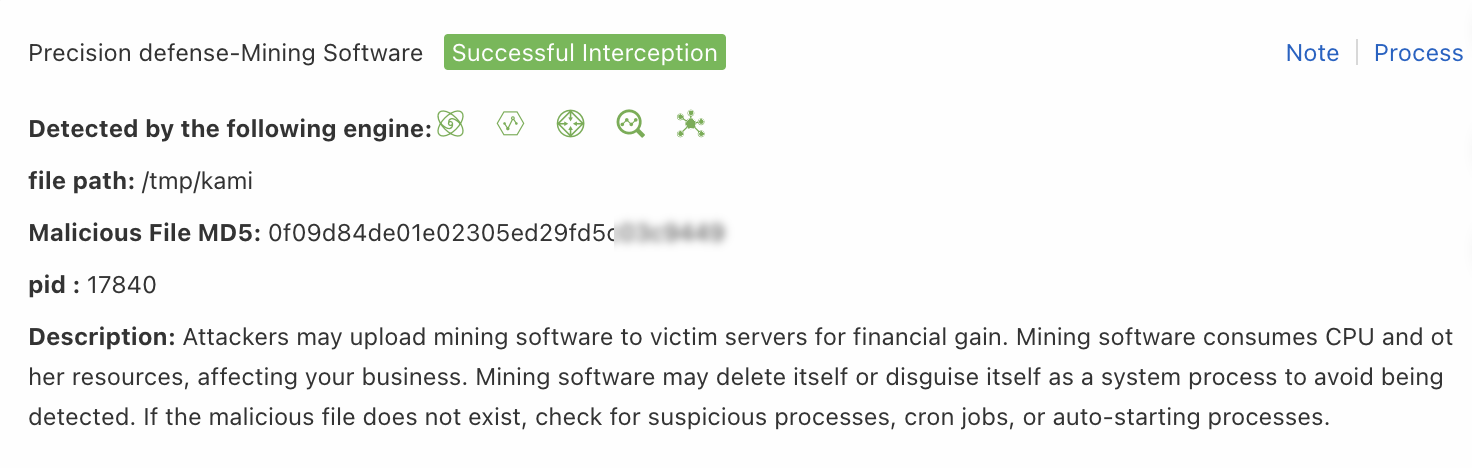
| Parameter | Description |
|---|---|
| Rule name | Enter a descriptive name. Example: mining program. |
| Rule type | Select Process hash. |
| Process MD5 | Enter the value of the Malicious File MD5 field from the alert details panel. Example: d2f295a89555579c39a0507e96XXXXXX. |
| Action | Select Add to Whitelist. |
Command line
Use this rule type when a false positive alert is triggered by a process startup or command line execution. The system blocks the process based on the value of the Process of executing command or Command in execution field.
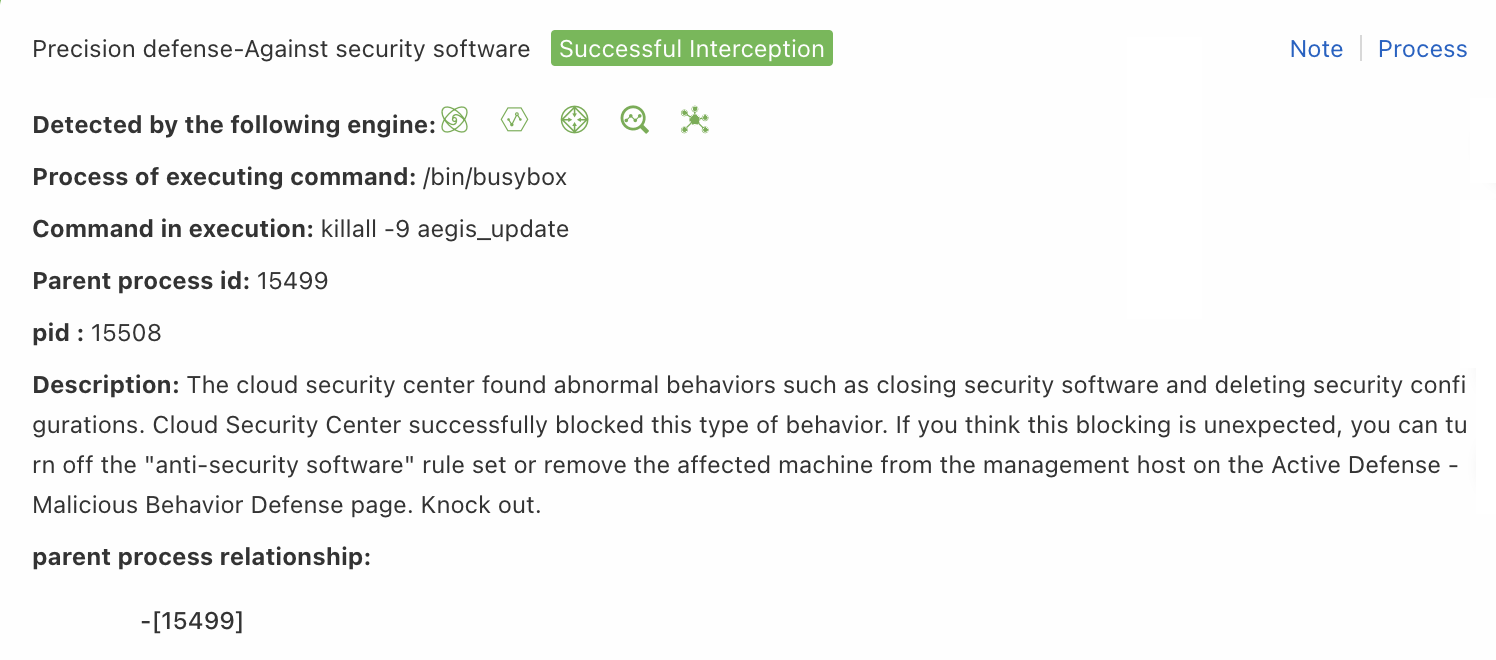
| Parameter | Description |
|---|---|
| Rule name | Enter a descriptive name. Example: process startup. |
| Rule type | Select Command line. |
| OS Type | Select the operating system. Example: linux. |
| Process Path | Enter the value of the Process of executing command field from the alert details panel. Example: */pkill. |
| Command Line | Enter the value of the Command in execution field from the alert details panel. Example: *AliYunDun*. |
| Action | Select Add to Whitelist. |
Process Network
Use this rule type when a false positive alert is triggered by a process performing network communication. The system blocks the network activity based on the value of the IP, Port, or Process Path Of Network Communication field.
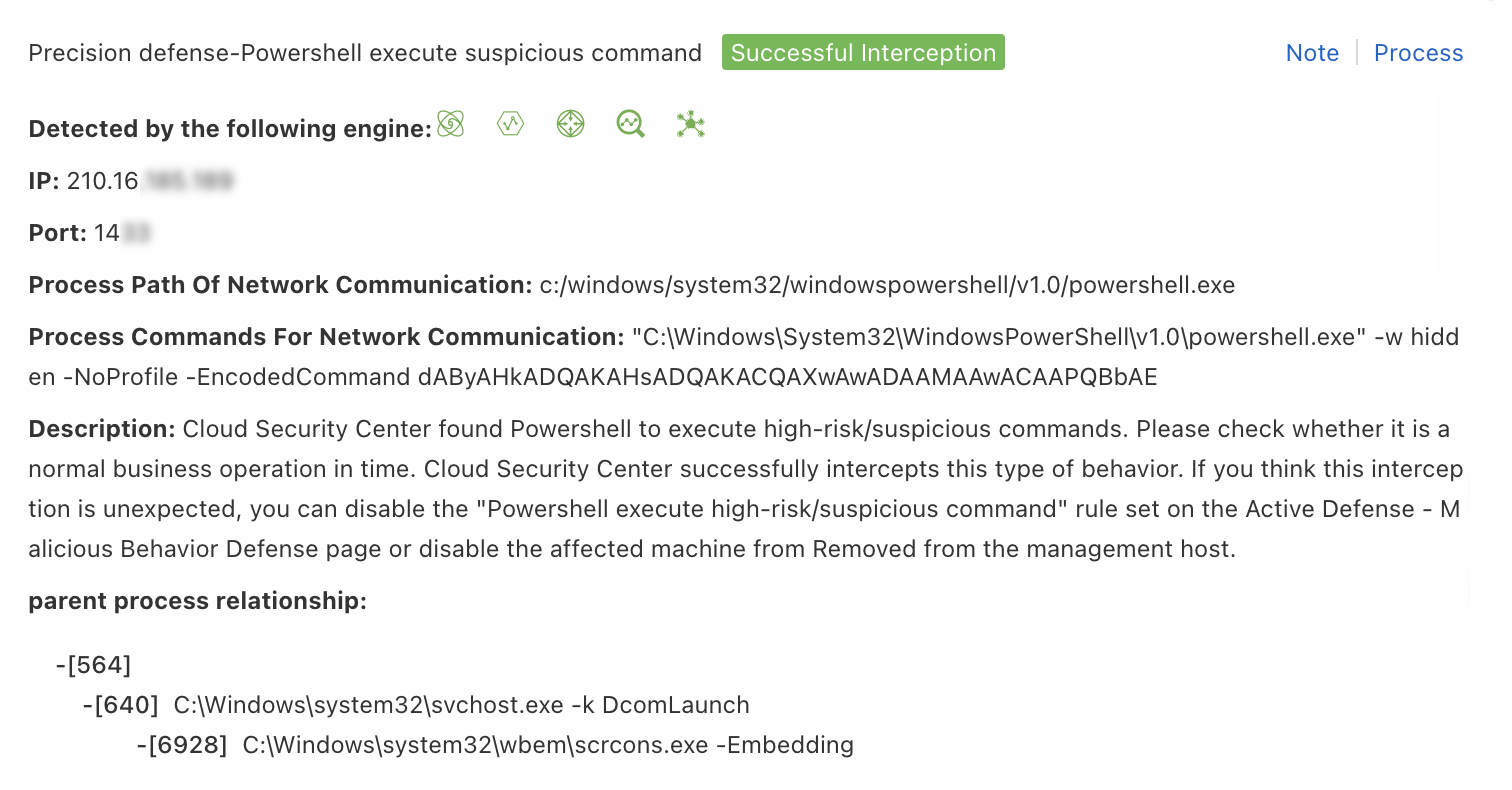
| Parameter | Description |
|---|---|
| Rule name | Enter a descriptive name. Example: network process. |
| Rule type | Select Process Network. |
| OS Type | Select the operating system. Example: windows. |
| Process Path | Enter the value of the Process Path Of Network Communication field from the alert details panel. Example: */powershell.exe. |
| Command Line | Enter the value of the Process Commands For Network Communication field from the alert details panel. Example: *dAByAhADQAKAHsADQAkACXXXXXX*. |
| IP Address | Enter the value of the IP field from the alert details panel. Example: 45.117.XX.XX. |
| Port | Enter the value of the Port field from the alert details panel. Example: 14XX. |
| Action | Select Add to Whitelist. |
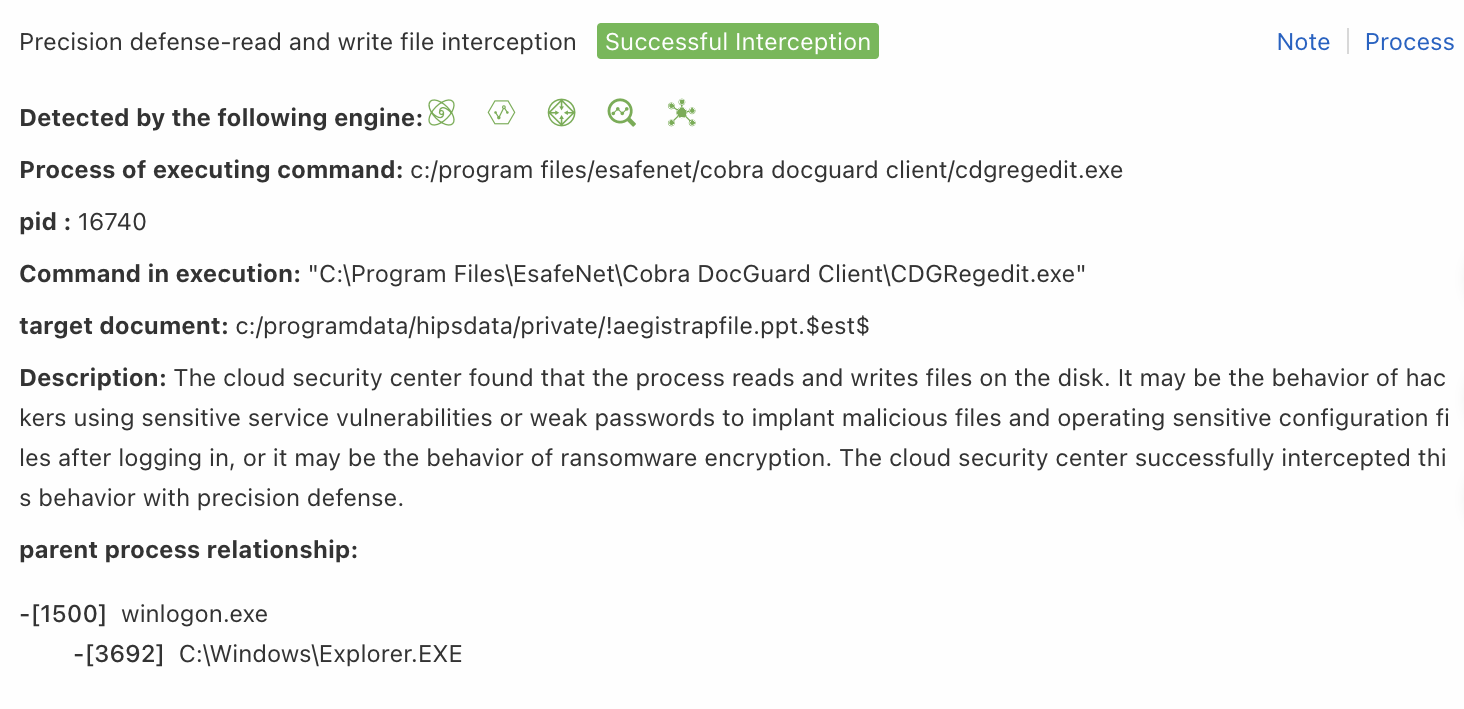
File Read and Write
Use this rule type when a false positive alert is triggered by file read or write operations. The system blocks the file based on the value of the target document field.
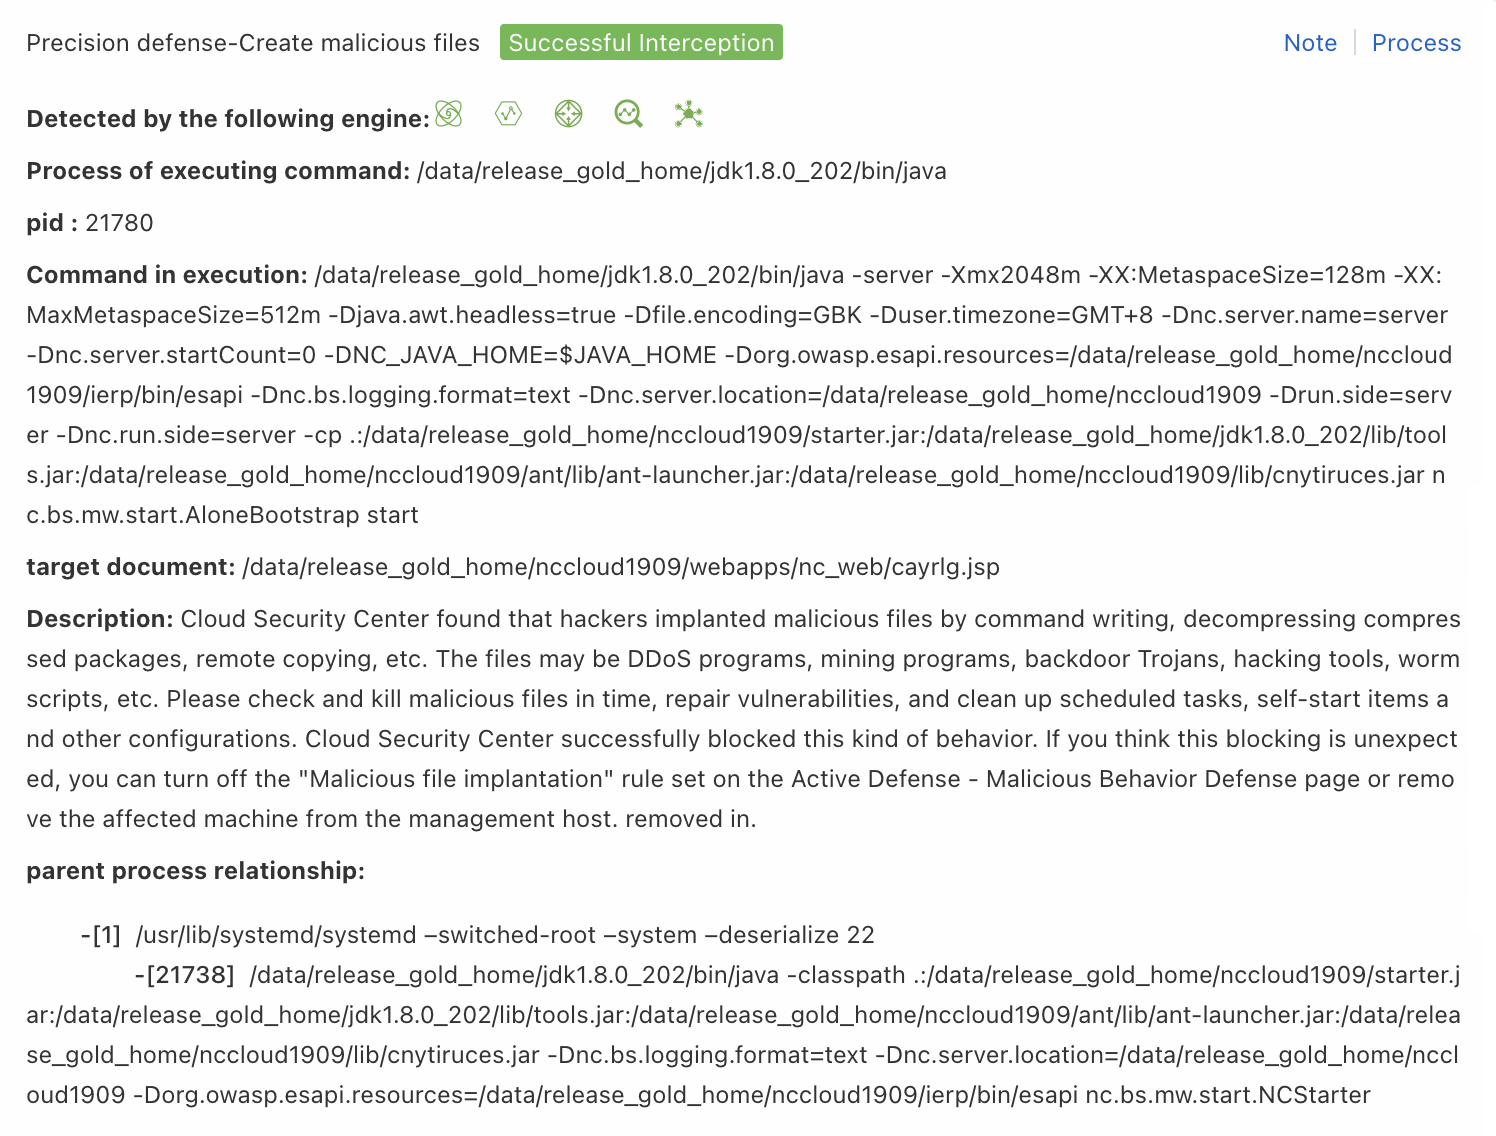
| Parameter | Description |
|---|---|
| Rule name | Enter a descriptive name. Example: file read and write. |
| Rule type | Select File Read and Write. |
| OS Type | Select the operating system. Example: linux. |
| Process Path | Enter the value of the Process of executing command field from the alert details panel. Example: */java. |
| Command Line | Enter the value of the Command in execution field from the alert details panel. Example: *weaver*. |
| File Path | Enter the value of the target document field from the alert details panel. Example: */console_login.jsp. |
| Action | Select Add to Whitelist. |
Operation on Registry
Use this rule type when a false positive alert is triggered by a registry operation. The system blocks the registry activity based on the value of the Registry Path or Registry Value field.
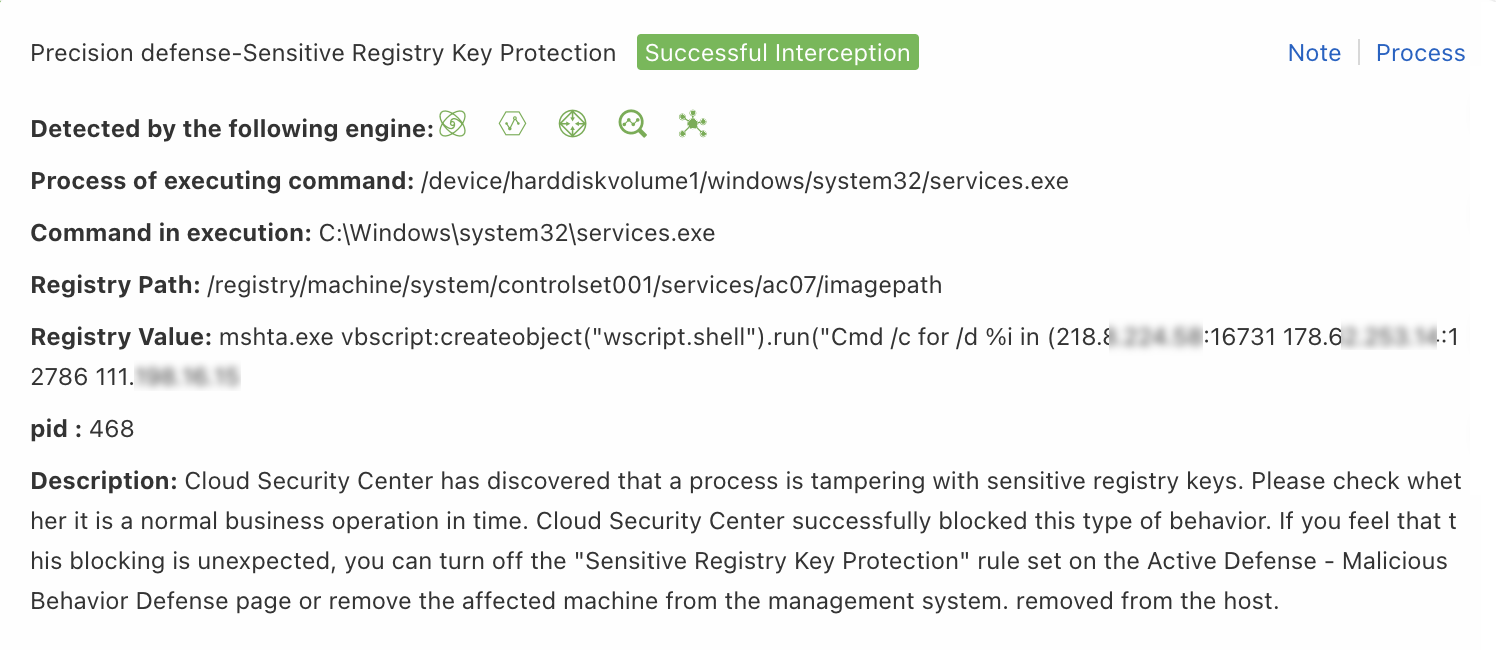
| Parameter | Description |
|---|---|
| Rule name | Enter a descriptive name. Example: registry protection. |
| Rule type | Select Operation on Registry. |
| OS Type | Fixed to windows. This value cannot be changed. |
| Process Path | Enter the value of the Process of executing command field from the alert details panel. Example: */iexplore.exe. |
| Command Line | Enter the value of the Command in execution field from the alert details panel. Example: *iexplore.exe*. |
| Registry Key | Enter the value of the Registry Path field from the alert details panel. Example: *currentversion*. |
| Registry Value | Enter the value of the Registry Value field from the alert details panel. Example: *svch0st.exe*. |
| Action | Select Add to Whitelist. |
Dynamic-link Library Loading
Use this rule type when a false positive alert is triggered by a shared library or DLL loading event, such as DLL hijacking or malicious shared object injection. The system blocks the activity based on the value of the Hijacked process path or Malicious so file path field.
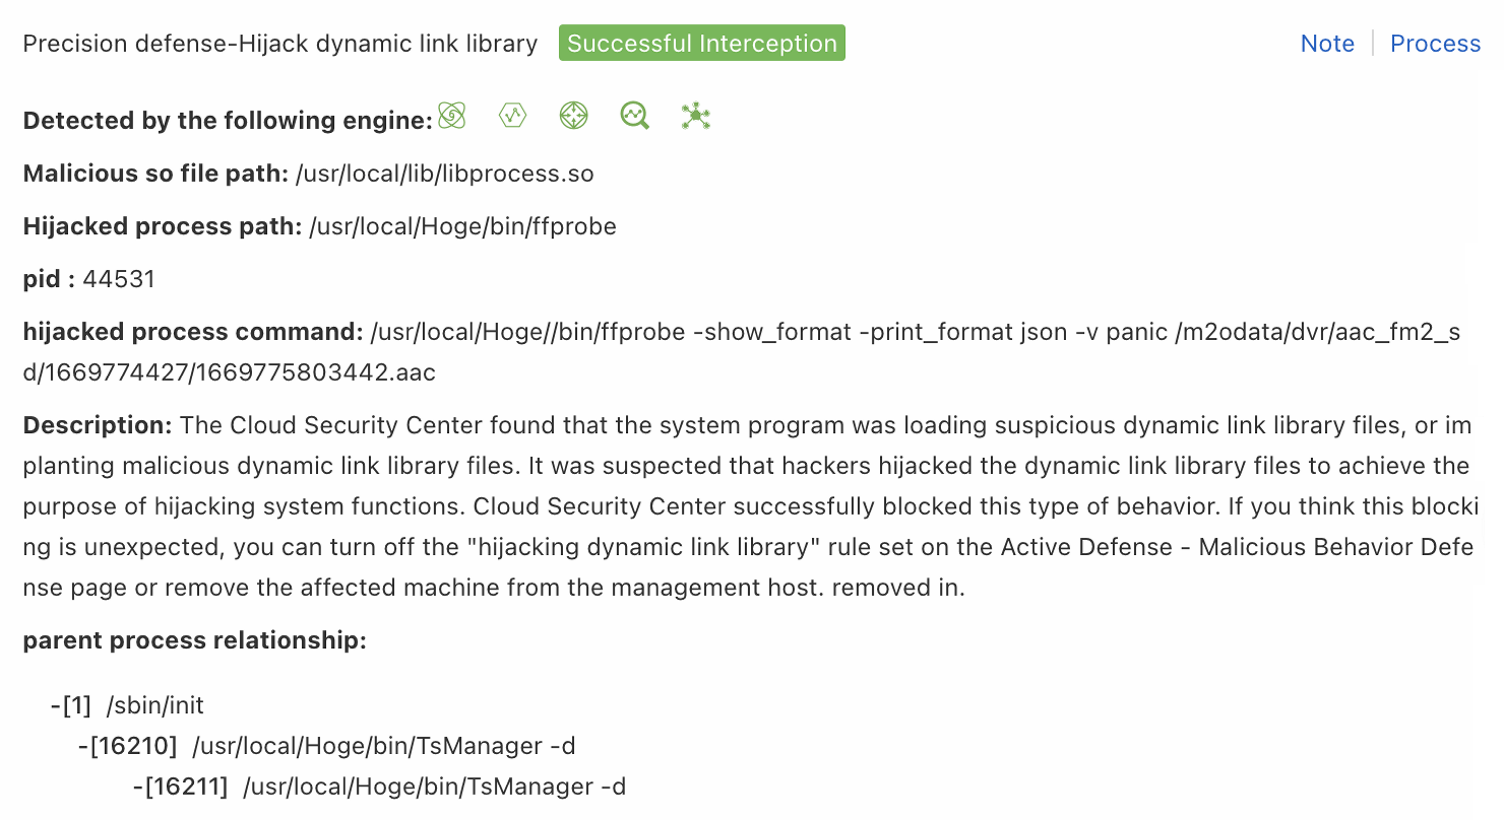
| Parameter | Description |
|---|---|
| Rule name | Enter a descriptive name. Example: registry protection. |
| Rule type | Select Dynamic-link Library Loading. |
| OS Type | Select the operating system. Example: linux. |
| Process Path | Enter the value of the Hijacked process path field from the alert details panel. Example: */python*. |
| Command Line | Enter the value of the hijacked process command field from the alert details panel. Example: *python*. |
| File Path | Enter the value of the Malicious so file path field from the alert details panel. Example: /usr/local/lib/kswapd0.so. |
| Action | Select Add to Whitelist. |
File Renaming
Use this rule type when a false positive alert is triggered by a file rename operation. The system blocks the file based on the value of the target document field.
| Parameter | Description |
|---|---|
| Rule name | Enter a descriptive name. Example: file renaming. |
| Rule type | Select File Renaming. |
| OS Type | Fixed to windows. This value cannot be changed. |
| Process Path | Enter the value of the Process of executing command field from the alert details panel. Example: */cdgregedit.exe. |
| Command Line | Enter the value of the Command in execution field from the alert details panel. Example: *CDGRegedit.exe*. |
| File Path | Enter the value of the target document field from the alert details panel. Example: c:/programdata/hipsdata/private/*. |
| New File Path | Enter the value of the target document field from the alert details panel. Example: c:/programdata/hipsdata/private/*. |
| Action | Select Add to Whitelist. |
Select target assets
After configuring the rule parameters, the Select Asset step appears. Select the assets to which the rule applies, and then click Finish.
What happens next
A newly created custom defense rule is enabled by default. After creation, you can modify the rule and manage the servers to which it applies.