Install Python on your operating system and configure a virtual environment for your projects.
Use a package manager to install Python
Package managers provide a quick installation method, but may offer outdated Python versions.
Alibaba Cloud Linux and CentOS
-
Update the system packages.
sudo yum update -y -
List available Python packages.
sudo yum list available | grep '^python3\([0-9]\|\.[0-3]\+\)\.\(x86_64|aarch64\)*'In this example, the package manager provides Python 3.8 and Python 3.11.

-
Select and install a Python version. This example uses Python 3.8. If no available version fits your needs, manually install Python.
-
x86 architecture
sudo yum install python38.x86_64 -y -
Arm architecture
sudo yum install python38.aarch64 -y
-
-
Run
python3.8 -Vto verify the installation.
Ubuntu
-
Update the system packages.
sudo apt update -
List all available Python packages.
apt-cache search python | grep '^python3\.[0-9]\+ 'In this example, the package manager provides Python 3.8 and Python 3.9.

-
Select and install a Python version. This example uses Python 3.8. If no available version fits your needs, manually install Python.
sudo apt install -y python3.8 -
Run
python3.8 -Vto verify the installation.
Manually install Python
Use this method to install a specific Python version or apply custom build settings.
Alibaba Cloud Linux and CentOS
-
Go to the Python website. In the top navigation bar, choose Downloads > Source code.
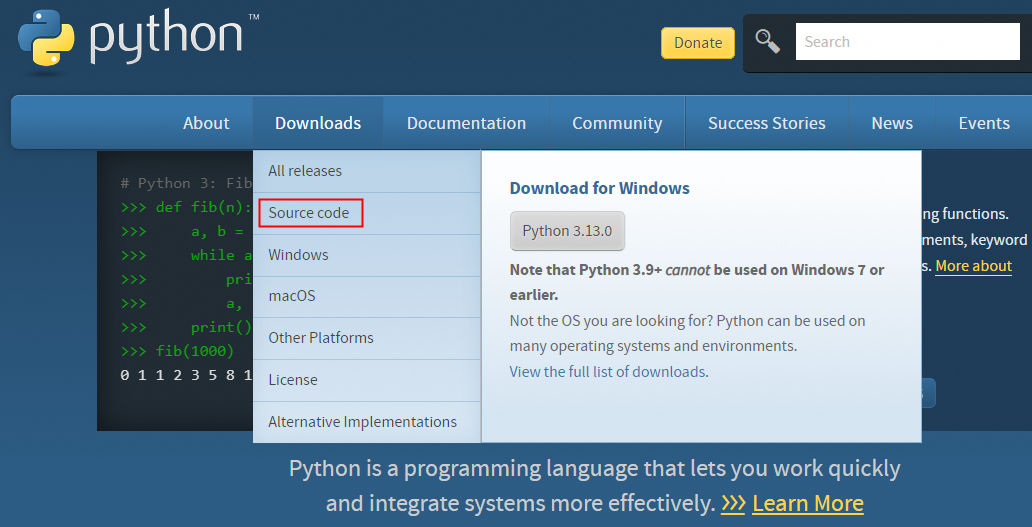
-
Select a Python version, copy the download link, and download and extract the package. This example uses Python 3.8.10.
# Replace https://www.python.org/ftp/python/3.8.10/Python-3.8.10.tgz with the actual URL. wget https://www.python.org/ftp/python/3.8.10/Python-3.8.10.tgz tar xzf Python-3.8.10.tgz cd Python-3.8.10 -
Install the required dependencies.
sudo yum groupinstall -y "Development Tools" sudo yum install -y python3-devel -
Compile and install the source code.
./configure --enable-optimizations make -j $(nproc) sudo make altinstall -
Verify the installation.
python3.8 --version
Ubuntu
-
Go to the Python website. In the top navigation bar, choose Downloads > Source code.

-
Select a Python version, copy the download link, and download and extract the package. This example uses Python 3.8.10.
wget https://www.python.org/ftp/python/3.8.10/Python-3.8.10.tgz tar -xzf Python-3.8.10.tgz -
Install the required dependencies.
sudo apt update sudo apt install -y build-essential checkinstall libreadline-gplv2-dev libncursesw5-dev libssl-dev libsqlite3-dev tk-dev libgdbm-dev libbz2-dev libffi-dev zlib1g-dev -
Compile and install the source code.
cd Python-3.8.10 ./configure --enable-optimizations make -j $(nproc) sudo make altinstall -
Verify the installation.

Windows
-
Go to the Python website. In the top navigation bar, choose Downloads > Windows.
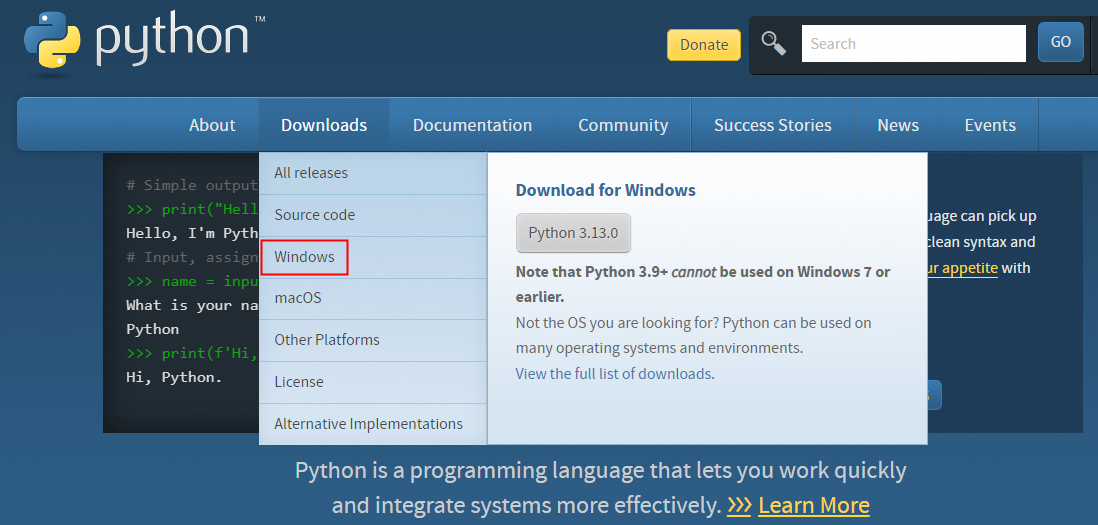
-
Select a Python version. This example uses Python 3.8.10. Click Download Windows installer (64-bit) to download the installer.

-
Double-click the installer to start the installation. In this example, the file is python-3.12.3-amd64.exe.
-
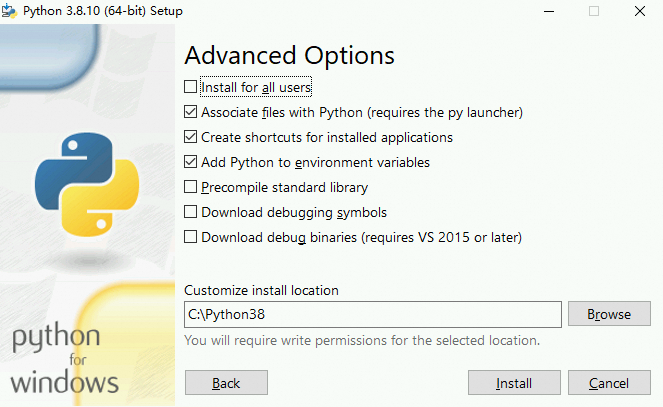
Select Customize installation and Add Python 3.8 to PATH.

-
Click Next.

-
Set the installation path and click Install.
-
Open the Command Prompt, enter
python, and press Enter. If the following output appears, Python is installed.
Install Python with Pyenv
Pyenv lets you install and switch between multiple Python versions on the same machine.
Install Pyenv
Alibaba Cloud Linux and CentOS
-
Install the compiler and build dependencies:
sudo yum groupinstall -y "Development Tools" sudo yum install -y openssl-devel bzip2 bzip2-devel readline-devel sqlite sqlite-devel libffi-devel xz-devel -
Install Pyenv:
git clone https://gitee.com/mirrors/pyenv.git ~/.pyenv -
Configure the environment variables.
NoteEnvironment variables set with the export command apply only to the current session. To make them permanent, add the export command to your shell startup file.
export PATH="$HOME/.pyenv/bin:$PATH" eval "$(pyenv init --path)" eval "$(pyenv init -)" -
Apply the new environment variables:
source ~/.bashrc -
Verify the Pyenv installation:
pyenv --version
Ubuntu
-
Install the compiler and build dependencies:
sudo apt update sudo apt install -y make build-essential libssl-dev zlib1g-dev libbz2-dev libreadline-dev libsqlite3-dev libncurses5-dev libncursesw5-dev xz-utils tk-dev libffi-dev liblzma-dev -
Install Pyenv:
git clone https://gitee.com/mirrors/pyenv.git ~/.pyenv -
Configure the environment variables.
NoteEnvironment variables set with the export command apply only to the current session. To make them permanent, add the export command to your shell startup file.
echo 'export PYENV_ROOT="$HOME/.pyenv"' >> ~/.bashrc echo 'export PATH="$PYENV_ROOT/bin:$PATH"' >> ~/.bashrc echo -e 'if command -v pyenv 1>/dev/null 2>&1; then\n eval "$(pyenv init -)"\nfi' >> ~/.bashrc -
Apply the new environment variables:
exec $SHELL -
Verify the Pyenv installation:
pyenv --version
Windows
-
In the taskbar search box, search for Windows PowerShell and click Open.
-
Install Chocolatey in the Windows PowerShell.
Set-ExecutionPolicy Bypass -Scope Process -Force; [System.Net.ServicePointManager]::SecurityProtocol = [System.Net.ServicePointManager]::SecurityProtocol -bor 3072; iex ((New-Object System.Net.WebClient).DownloadString('https://community.chocolatey.org/install.ps1')) -
Use Chocolatey to install pyenv-win.
choco install pyenv-win -
Configure the environment variables.
Add pyenv to the system PATH. Right-click This PC, choose , select the Path variable in System variables, and click . Add
%USERPROFILE%\.pyenv\pyenv-win\binto the path list and click OK. -
Close and reopen Windows PowerShell.
-
Verify the Pyenv installation:
pyenv --version
Install Python
After you install Pyenv, use it to install and manage multiple Python versions.
-
List available Python versions.
pyenv install -l | grep -E '^[^a-zA-Z]+$' -
Install the required Python versions. This example installs Python 3.8.10 and Python 3.12.1.
NoteBy default,
pyenvcompiles with a single thread. To speed up the build, setexport MAKE_OPTS="-j$(nproc)".pyenv install 3.8.10pyenv install 3.12.1 -
View all installed Python versions.
pyenv versions
-
Set the global default Python version.
pyenv global 3.8.10 -
Verify the current Python version.
pyenv version
-
Set a project-specific Python version.
pyenv local 3.12.1
Set up a virtual environment
A virtual environment isolates project dependencies to prevent conflicts between projects.
Alibaba Cloud Linux/CentOS
-
Install python3-pip.
sudo yum install python3-pip -y -
Create a virtual environment named venv.
python3 -m venv venv -
Activate the virtual environment.
source venv/bin/activateAfter activation, (venv) appears before your command prompt.
-
Exit the virtual environment.
deactivate
Ubuntu
-
Create a virtual environment named venv.
python3 -m venv venv -
Activate the virtual environment.
source venv/bin/activateAfter activation, (venv) appears before your command prompt.
-
Exit the virtual environment.
deactivate
Windows
-
Create a virtual environment named venv.
python -m venv venv -
Activate the virtual environment.
venv\Scripts\activateAfter activation, (venv) appears before your command prompt.
-
Exit the virtual environment.
deactivate
Frequently asked questions
-
Windows: "The installer was interrupted before Python could be installed".
Delete the downloaded installer and re-download it from the official Python website.
-
Linux: -bash: python3: command not found.
-
Run
which python3. If it returns a path such as/usr/bin/python3, Python 3 is installed. -
If Python 3 is installed but unavailable, the symbolic link may be broken. Delete and re-create it.
sudo which python3 pip3
rm -rf /usr/bin/python3 /usr/bin/pip3

# Create symbolic links. /usr/python/bin/python3.11 is the installation path for Python 3.
sudo ln -s /usr/python/bin/python3.11 /usr/bin/python3
sudo ln -s /usr/python/bin/pip3.11 /usr/bin/pip3
-
-
Linux: "Permission denied".
The current user lacks the required permissions. Use
sudoto run commands with administrator privileges.Importantsudois not always the safest solution. Determine the root cause of the permission issue before using sudo. Elevate privileges withsudoonly when necessary and be aware of the security risks.