This topic describes how to manage jobs on the Jobs page in the Enterprise Distributed Application Service (EDAS) console or on the Task Management page in the SchedulerX console.
Create a job
Before you create a job, make sure that an application is created for the job. For more information, see Application management.
Log on to the SchedulerX console.
In the top navigation bar, select a region.
In the left-side navigation pane. click Task Management.
On the Task Management page, select a namespace and click Create task. In the Basic Configuration step, configure the parameters and click Next Step.
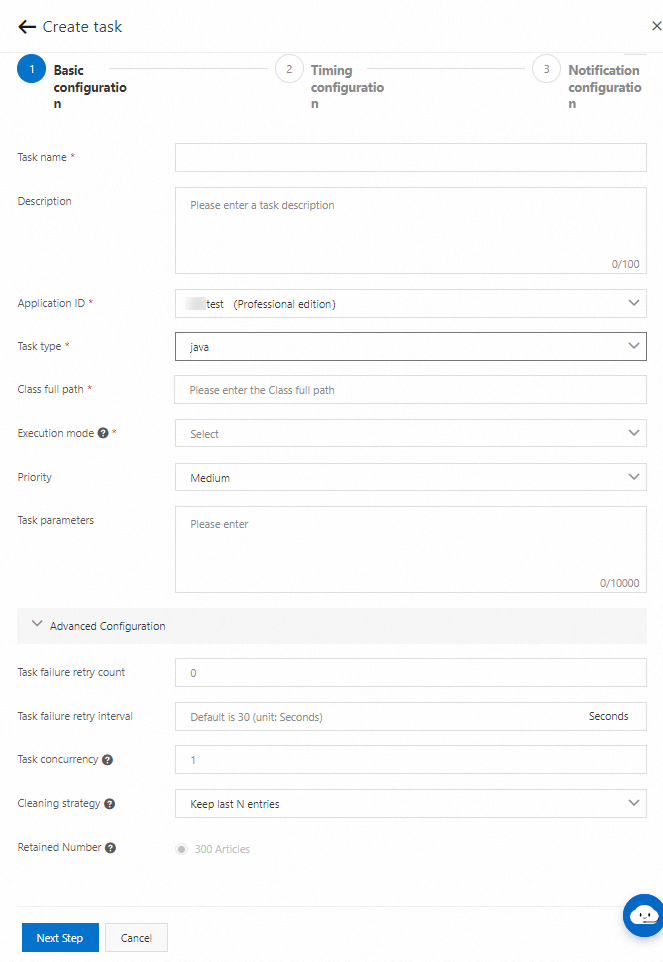
The following table describes the basic parameters.
Parameter
Description
Task name
The name of the job.
Description
The description of the job. Specify a concise and clear description to facilitate job search and management.
Application ID
The group to which the job belongs. Select a value from the drop-down list.
Task type
The programming language that you want to use to create the job. Valid values: Java, XXL-JOB, SpringSchedule, Golang, ScriptTask, Http, and DataWorks. If you select ScriptTask, you must select shell, python, or go for the Script parameter, and enter a script in the editor that appears.
Class full path
NoteThis parameter is available only if the Task type parameter is set to java.
The full path of the JobProcessor. Example:
xxx.xxx.xxx.HelloProcessor.Execution mode
The mode in which the job is executed. Valid values:
Stand-alone operation: The job is executed on a random worker.
Broadcast run: The job is concurrently executed on all workers, and the system waits until all workers complete the job.
Visual MapReduce: a Map model. No more than 300 jobs are allowed in the job list.
In Professional Edition, a maximum of 1,000 jobs are allowed, and jobs can be queried by keyword.
MapReduce: a regular MapReduce model. In this mode, you can process a large number of jobs in parallel. But you can query only the summary information of jobs. We recommend that you select this mode if the number of jobs is less than 1,000,000.
Shard run: This mode is similar to the elastic-job model. Shards are evenly distributed to run on multiple agents based on the specified sharding settings. This execution mode supports jobs that use different programming languages.
NoteThe advanced settings of a job vary based on the execution mode of the job.
Task parameters
An arbitrary string that can be obtained from the context when SchedulerX runs the job.
The following table describes the parameters for advanced configurations.
Parameter
Applicable execution mode
Description
Default value
Task failure retry count
All modes
The number of automatic retries if a job fails.
NoteIf a job is running on a worker and the worker is restarted, the job fails. If you want to immediately rerun the job, you can specify this parameter.
0
Task failure retry interval
All modes
The interval between two consecutive retries. Unit: seconds.
30
Task concurrency
All modes
The number of instances that run the same job at the same time. A value of 1 specifies that concurrent execution is not allowed.
1
Cleaning strategy
All modes
The cleanup policy for job execution history.
Keep last N entries
Retained Number
All modes
The number of retained job execution records.
300
Number of single-machine concurrent subtasks
Visual MapReduce
MapReduce
Shard run
The number of tasks that concurrently run on a single worker in a distributed model. To speed up the execution, you can specify a larger value. If the downstream or the databases cannot withstand the value that you specified, you can specify a smaller value.
5
Number of failed retries of subtasks
Visual MapReduce
MapReduce
Shard run
The number of automatic retries if a task fails in a distributed model.
0
Sub-task failure retry interval
Visual MapReduce
MapReduce
Shard run
The interval between two consecutive retries if a task fails in a distributed model. Unit: seconds.
0
Subtask Failover Strategy
Visual MapReduce
MapReduce
Shard run
Specifies whether to distribute a task to a new worker after the worker fails to execute the task and is stopped. If you turn on the switch, the system may execute a task more than once when a failover is triggered. You must implement the idempotence of tasks.
NoteThis parameter is applicable to agents V1.8.13 and later.
The master node participates in the execution
Visual MapReduce
MapReduce
Shard run
Specifies whether the master node participates in the execution of tasks. At least two workers must be available to run tasks. If an extremely large number of tasks exist, we recommend that you turn off the switch.
NoteThis parameter is applicable to agents V1.8.13 and later.
Subtask distribution method
Visual MapReduce
MapReduce
Shard run
Push model: Tasks are evenly distributed to workers.
Pull model: Every worker pulls tasks. The Wooden Bucket Theory is not applicable to this model. During the pull process, all tasks are cached on the master node. This puts pressure on the memory. We recommend that you do not distribute more than 10,000 tasks at a time.
Push model
distribution policy
Visual MapReduce
MapReduce
The task distribution policy. Default value: Polling Scheme.
Polling Scheme: The system evenly distributes the same number of tasks to each worker. This policy is suitable for scenarios in which each worker requires almost the same amount of time to process a task.
WorkerLoad optimal strategy: The master node automatically detects the loads of workers. This policy is suitable for scenarios in which a large difference exists between the amount of time each worker requires to process a task.
NoteThis parameter is applicable to agents V1.10.14 and later.
Distribution rate
Visual MapReduce
MapReduce
The task distribution rate. You can specify the number of tasks to be distributed per second or per minute.
Number of subtasks pulled per time
Visual MapReduce
MapReduce
Shard run
The number of tasks that a slave node pulls from the master node at a time. This parameter is displayed only if the Subtask distribution method parameter is set to Pull model.
5
Subtask queue capacity
Visual MapReduce
MapReduce
Shard run
The size of the queue that caches tasks on a slave node. This parameter is displayed only if the Subtask distribution method parameter is set to Pull model.
10
Global concurrency of subtasks
Visual MapReduce
MapReduce
Shard run
The total number of concurrent tasks on all workers in the pull model. This parameter helps you limit the number of concurrent tasks. This parameter is displayed only if the Subtask distribution method parameter is set to Pull model.
1000
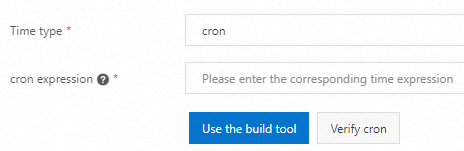
In the Timing configuration step, configure scheduling settings and advanced settings and click Next Step.
The following table describes the parameters for job scheduling.
Parameter
Description
Time type
none: The job is triggered by using a workflow.
cron: The job is triggered based on a CRON expression.
api: The job is triggered by calling an API operation.
fixed_rate: The job is triggered at a specified interval.
second_delay: The job is triggered with a delay of a few seconds.
one_time: The job is triggered only once at the specified point in time.
unix cron: The job is triggered based on a CRON expression that is available in the Unix system.
cron expression
Enter a CRON expression that complies with the cron syntax or use the tool that is provided by SchedulerX to generate an expression. Then, verify the CRON expression. This parameter is available only if the Time type parameter is set to cron.
Fixed frequency
Specify the interval at which the job is triggered. This parameter is available only if the Time type parameter is set to fixed_rate. The value must be greater than 60. Unit: seconds. For example, a value of 200 indicates that the job is triggered at an interval of 200 seconds.
Fixed delay
Specify a delay. This parameter is available only if the Time type parameter is set to second_delay. Valid values: 1 to 60. Unit: seconds. For example, a value of 5 indicates that the job is triggered with a delay of five seconds.
Scheduling time
Specify the date and point in time at which the job is triggered. This parameter is available only if the Time type parameter is set to one_time. Example:
2023-7-13 00:00:00.unix cron expression
Enter a CRON expression that is available in the UNIX system. This parameter is available only if the Time type parameter is set to unix cron.
The following table describes the parameters for advanced configurations.
Parameter
Description
Time offset
The offset between the timestamp of the data to be processed and the time when the job is triggered. You can obtain the offset value from the context when SchedulerX runs a job.
Time zone
Select the time zone of a country or region. You can also select a Coordinated Universal Time (UTC) time zone based on your business requirements.
In the Notification configuration step, configure alert settings and contacts. Then, click Complete.

You can select Application group contact or user-defined for the Notification channel and contact person parameter.
Application group contact
All application group contacts can receive notifications.
user-defined
You can specify the Contact group or Contact that can receive notifications.
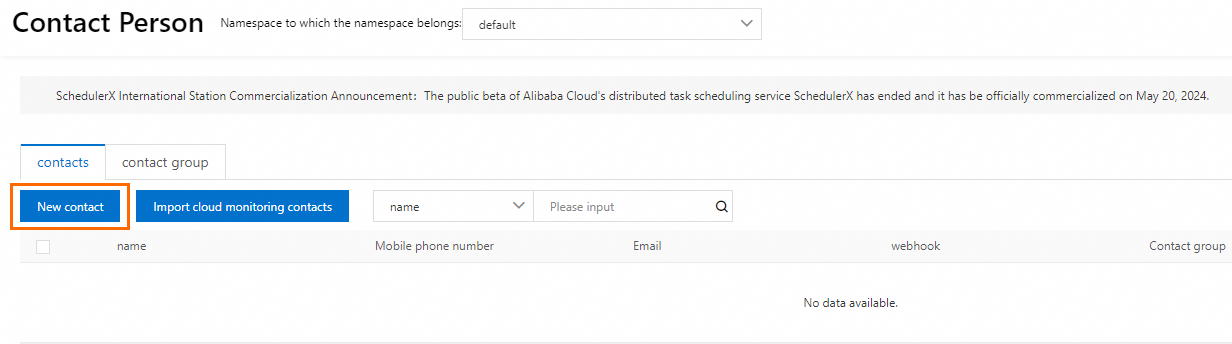
Contact group
Add a contact group. All contacts in the contact group can receive notifications. For more information about how to create a contact group, see the Create a notification contact and a notification contact group section of the Notification contacts and notification contact groups topic.
Contact
1. Add contacts to receive notifications. You can add multiple contacts at a time. If you have not created any contact, click Add contact and then click Create Contact.

2. On the page that appears, click New contact and enter the contact information.

Return to the Task Management page and check whether the job exists and uses the specified configurations.
NoteBy default, a job is enabled after the job is created. You can enable or disable a job based on your business requirements. For more information, see the Enable or disable jobs section of this topic.
Modify a job
On the Task Management page, find the job that you want to manage and click Edit in the Operation column.
In the Edit panel, modify the basic configurations, scheduling settings, and alerting settings.
NoteYou cannot change the values of the Application ID and Task type parameters of a job. You can configure other parameters in the same way as you configure them when you create a job.
Run a job
On the Task Management page, find the job that you want to manage and click Run once in the Operation column to run the job once.
Enable or disable jobs
Enable or disable a single job
On the Task Management page, find the job that you want to manage and choose more > Disable or Enable in the Operation column.
In the dialog box that appears, click Confirm.
Enable or disable multiple jobs at a time
In Professional Edition, you can enable or disable multiple jobs at a time. On the Task Management page, select the jobs that you want to manage and click Batch disable or Batch enable below the job list.

Replicate a job
On the Task Management page, find the job that you want to manage and choose more > Replication in the Operation column. You can copy the configurations of a job and modify the configurations of the copied job to create a new job.
Update job outputs
If your workloads are updated, you can run the corresponding job again to reprocess the data within a specific time period. For example, if you added a new field to the database or the data that was generated at a point in time of the previous month contains errors, you can update the output of the corresponding job.
You can update the outputs of jobs and workflows. The interval of the data points that you want to update must be one day.
If the output of a job contains deviations or some values in the output are missing, you can modify the scheduling parameters of the job and configure a specific job property to update the job output.
Log on to the SchedulerX console.
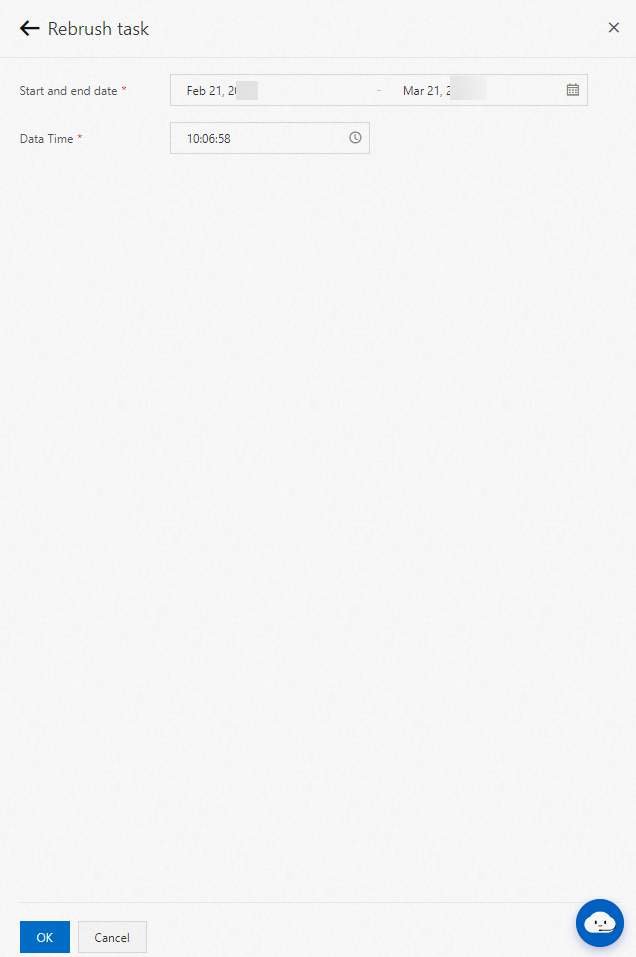
On the Task Management page, find the job that you want to manage and choose more > Rebrush task in the Operation column.
In the Rebrush task panel, specify the Start and end date and Data Time parameters and click OK.
Start and end date: specifies the time range of the job.
Data Time: specifies the point in time of the data that you want to update.
Sample configurations:
The current time is 10:00:00 on January 1, 2019.
The time range of the job is from October 1, 2018 to October 7, 2018. The default start time is 00:00:00 on October 1, 2018 and the default end time is 23:59:59 on October 7, 2018.
The point in time of the data to be reprocessed is 11:11:11.
The job is rerun seven times and seven job instances are generated.
S/N
Scheduling time
Point in time at which data is reprocessed
1
2019.1.1 10:00:00
2018.10.1 11:11:11
2
2019.1.1 10:00:00
2018.10.2 11:11:11
3
2019.1.1 10:00:00
2018.10.3 11:11:11
4
2019.1.1 10:00:00
2018.10.4 11:11:11
5
2019.1.1 10:00:00
2018.10.5 11:11:11
6
2019.1.1 10:00:00
2018.10.6 11:11:11
7
2019.1.1 10:00:00
2018.10.7 11:11:11
View the operation records and execution records of a job
View execution records: On the Task Management page, find the job that you want to manage and choose more > Historical records in the Operation column.
View operation records: On the Task Management page, find the job that you want to manage and choose more > Operation Record in the Operation column.
Delete a job
To stop the billing for SchedulerX, delete or disable the jobs for the application to prevent the fees from being generated during the scheduling period.
If your jobs are orchestrated, delete the related workflows before you disable or delete a job.
For information about the billable items and billing method of SchedulerX, see Billing of SchedulerX serverless instances.
On the Task Management page, find the job that you want to manage and choose more > Delete in the Operation column.
In the dialog box that appears, click Confirm.
Import or export a job
On the Task Management page, select an application of Professional Edition.
Click Import Task or Export Tasks.