Deployment
Versions
Version | Revision date | Description | Release date |
1.0 | 2019.05.07 | ||
1.1 | 2019.07.04 | 1. Apsara File Storage NAS (NAS) parameters are optimized. | 2019.07.04 |
1.2 | 2021.06.01 | 1. Pacemaker SBD timeout period is optimized. | 2021.06.01 |
1.3 | 2022.1.25 | 1. Fence agent solution is updated. 2. The layout is optimized. | 2022.1.25 |
1.4 | 2022.12.5 | 1. The description of the fence_aliyun component dependency packages for different operating system versions is updated. | 2022.12.5 |
1. Overview
This topic describes how to perform high-availability installation and deployment of S/4 HANA 1809 and later versions on Alibaba Cloud within the same zone by using SUSE HAE.
With the introduction of the standalone enqueue server 2 (ENSA2) after Netweaver 7.51, ENSA2 has become the default installation option for high-availability deployment of S/4 HANA ABAP PLATFORM 1809.
This topic describes how to deploy S/4 HANA 1809 and later versions in a high-availability setup. However, it does not completely replace the SAP official installation and configuration documentation or specific system sizing recommendations. We recommend that you review the SAP official installation guides and related SAP notes before deployment.
1.1. In the old standalone enqueue server (ENSA1) architecture, when the central services instance (ASCS) encounters a failure, it must be switched to the active and running ERS (the counterpart of ASCS) server and restarted. It then takes over the locks from the enqueue replication table by accessing shared memory.
1.2. In the new ENSA2 architecture, when the ASCS encounters a failure, ASCS is no longer required to switch to the server running ERS. Instead, ASCS can be switched to a separate server and restarted, taking over the locks from Enqueue Replicator 2 through the network rather than through shared memory.
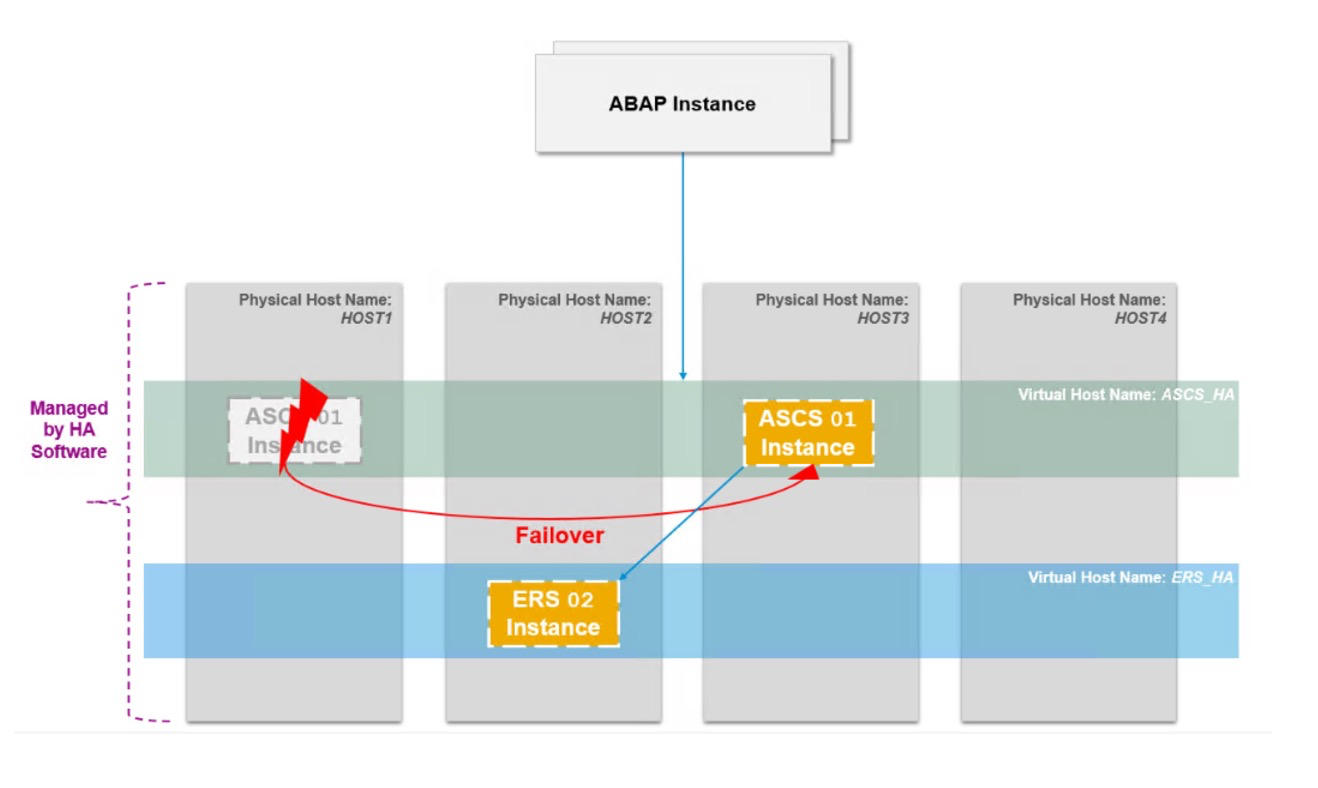
1.3. For the ENSA1 architecture, Pacemaker supports a two-node cluster, and ASCS must follow ERS. In the new ENSA2 architecture, Pacemaker can support not only a two-node cluster but also multi-node clusters.
This deployment still uses a two-node cluster as the best practice, including only the installation of the S/4 HANA 1809 server and excluding the Fiori front-end server. In addition, SAP liveCache Integration is not installed in this deployment.
2. Architecture
The following figure shows the architecture of this deployment.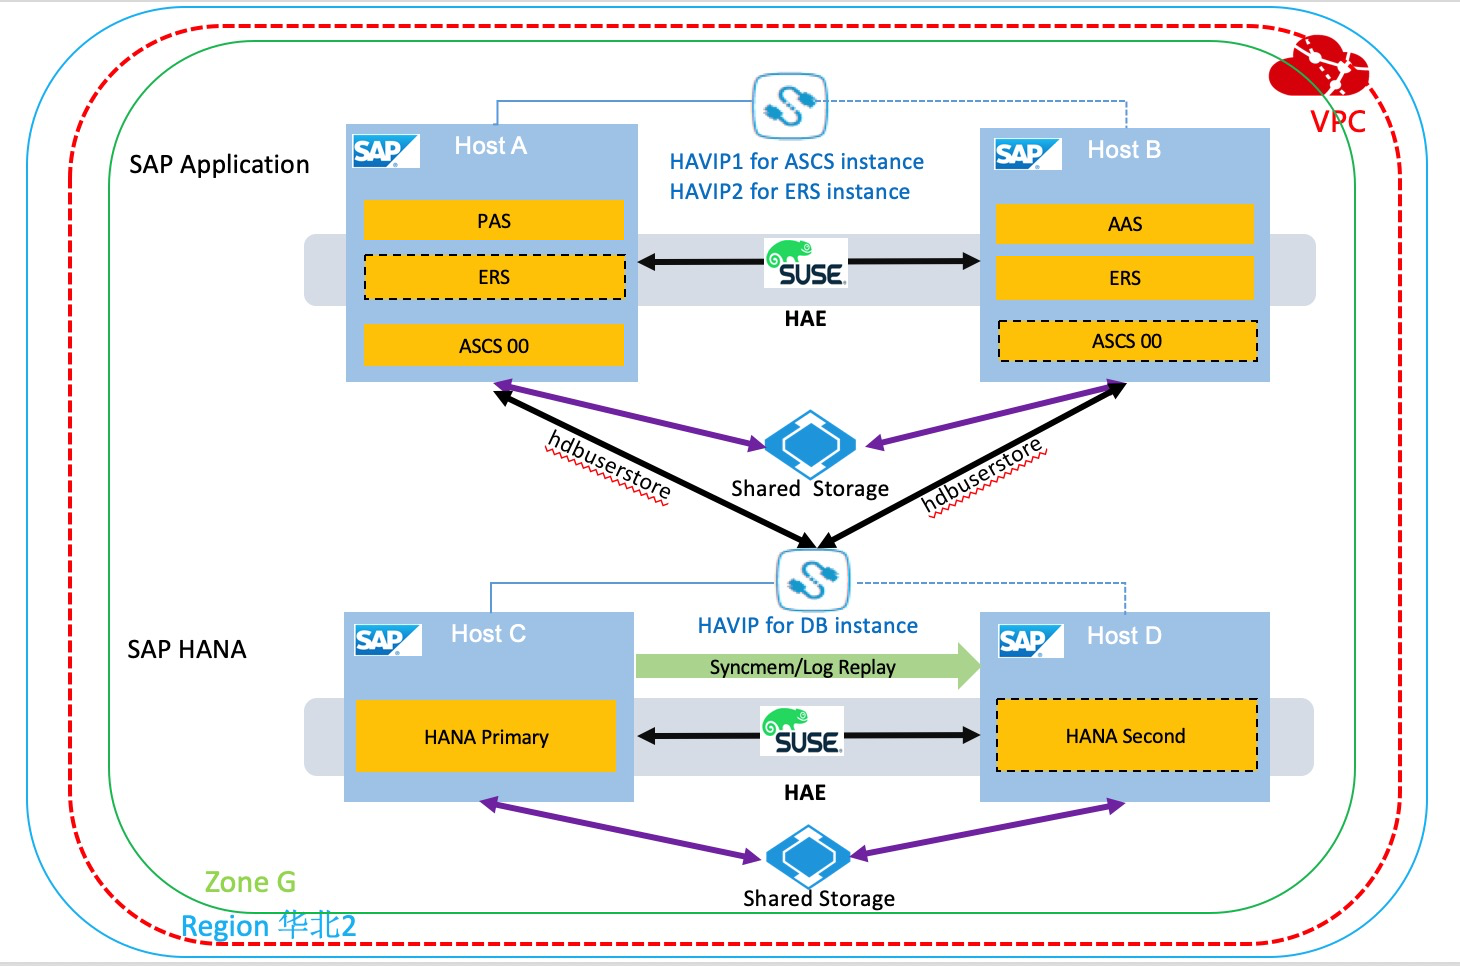
3. Resource planning
3.1 Network planning
Network | Zone | CIDR block | vSwitch | VPC |
Business network | Beijing Zone G | 10.0.10.0/24 | SAP_Business_Vswitch | S4_1809_VPC |
Heartbeat network | Beijing Zone G | 10.0.20.0/24 | SAP_Heartbeat_Vswitch | S4_1809_VPC |
3.2 SAP and host planning
SAP application SID: S4T
SAP HANA SID: S4T
The SID of the application and HANA may be different.
Hostname | IP address | Type | Instance ID | Remarks |
s4app1 | 10.0.10.10/10.0.20.10 | PAS Instance | 01 | Local installation |
s4app2 | 10.0.10.11/10.0.20.11 | AAS Instance | 02 | Local installation |
VASCSS4T | 10.0.10.12 | ASCS Instance | 00 | Installation on the virtual hostname |
VERSS4T | 10.0.10.13 | ERS Instance | 10 | Installation on the virtual hostname |
VDBS4T | 10.0.10.9 | DB Instance | Installation on the virtual hostname | |
hana01 | 10.0.10.7/10.0.20.7 | DB (Primary) | 00 | Local installation |
hana02 | 10.0.10.8/10.0.20.8 | DB (Secondary) | 00 | Local installation |
3.3 User and group planning
Ensure that SAP and HANA on the two nodes in the high-availability cluster use the same user ID and group ID.
User ID: <sid>Set adm to 2000 and sapadm to 2001.
Group ID: Set sapsys to 2000.
3.4 SWAP planning
The swap space is required for installing SAP applications. We recommend that you create an SSD or enhanced SSD (ESSD) to provide the swap space when you create an Elastic Compute Service (ECS) instance. For more information about swap space, see SAP Note: 1597355 - Swap-space recommendation for Linux.
3.5 File system planning
We recommend that you use Autofs to mount global file systems of SAP applications. To make a plan for the file system size, refer to the official SAP installation and configuration documentation or the planning provided by the implementation partner. The example in this topic is for reference only.
File system | Type | LV | VG |
/usr/sap | XFS | usrsaplv | sapvg |
/sapmnt | NAS | ||
/usr/sap/trans | NAS | ||
/hana/data | XFS | datalv | hanavg |
/hana/log | XFS | loglv | hanavg |
/hana/shared | XFS | sharedlv | hanavg |
4. Preparations
4.1 Alibaba Cloud account
If you do not have an Alibaba Cloud account, register one on the Alibaba Cloud official website or in the Alibaba Cloud app. You need to use a mobile phone number to register the account and complete real-name verification for the account. Then, you can log on to the Alibaba Cloud app with this account to manage and monitor your cloud resources, perform identity authentication, and ask questions and acquire knowledge in Yunqi Community.
4.2 VPC
A virtual private cloud (VPC) is an isolated virtual network built on Alibaba Cloud. VPCs are logically isolated from each other. A VPC is a private network in the cloud. You have full control over your VPC. For example, you can specify IP address ranges and configure route tables and gateways for your VPC. For more information about how to create VPCs, vSwitches of the related business network, and heartbeat vSwitches based on a plan, visit the Documentation center.
4.3 ECS instance
ECS is a basic cloud computing service provided by Alibaba Cloud. You can log on to the ECS console to configure your ECS instances.
For more information about Alibaba Cloud NetWeaver, see SAP note: 1380654 - SAP support in public cloud environments.
4.3.1. Create an ECS instance
When you create an ECS instance in the ECS console, select a billing method, specify Beijing Zone G as the zone, and purchase an image named SUSE Linux Enterprise Server for SAP Applications 12 SP3 from Alibaba Cloud Marketplace.
Select the number and size of disks based on the planning. In this example, a 300 GB data disk and a 50 GB SWAP disk are used. For the system disk, we recommend that you use an efficient cloud disk or SSD. For the data disk, use an ESSD or SSD. We also recommend that you create an SSD or ESSD as the SWAP disk. For more information about cloud disks, see Block storage performance.
Select an existing VPC and a security group. In this example, select the hanasg security group. For more information, see FAQ about security groups.
You can also select a Resource Access Management (RAM) role based on your business requirements and planning. After you confirm parameter configurations, create an ECS instance. In this deployment planning, you need to create four ECS instances in the Beijing Zone G zone. After you create the instances, modify configurations to change hostnames or private IP addresses based on the planning.
4.3.2 Configure ENIs
Create an elastic network interface (ENI) for each ECS instance in the high-availability cluster to configure the heartbeat network.
Log on to the ECS console. In the left-side navigation pane, choose Network & Security > Elastic Network Interfaces. On the page that appears, create ENIs.
You need to create four ENIs.
4.3.3 Install ECS Metrics Collector
ECS Metrics Collector is a monitor agent that the SAP system uses on Alibaba Cloud to collect required information about virtual machine configuration and underlying physical resource usage. When the SAP system runs in an ECS instance, the SAP Host Agent uses the metadata service and APIs to obtain the information required for monitoring the SAP system, including the information about the operating system, network, storage, and SAP architecture. Then, the SAP Host Agent provides the information for SAP applications to analyze events and system performance. You need to install ECS Metrics Collector for SAP for each ECS instance in which the SAP system is running, either for SAP applications or SAP HANA.
For more information, see ECS Metrics Collector for SAP deployment guide.
4.4 Configure Fence
Alibaba Cloud provides two solutions to implement the Fence feature in the high-availability deployment of the SAP system. We recommend that you use the cloud-native solution 2: Fence_aliyun.
Solution 1: Implement SBD fence by using Shared Block Storage devices (no longer available)
Shared Block Storage is a block-level data storage service that features high concurrency, high performance, and high reliability. It supports concurrent reads and writes to multiple ECS instances. A single Shared Block Storage device can be attached to a maximum of 16 ECS instances at the same.
A Shared Block Storage device is used as an SBD device in the high-availability cluster. Select the same zone of the same region as the ECS instance and attach the device to the ECS instance in the high-availability cluster.
Contact your Alibaba Cloud Solution Architect (SA) to assist you in applying for the service use.
[1] Create a Shared Block Storage device
Log on to the ECS console. In the left-side navigation pane, choose Storage & Snapshots > Storage & Snapshots. On the page that appears, create a Shared Block Storage device in the same zone of the same region as the ECS instance.
After you create the Shared Block Storage device, go to the Elastic Block Storage (EBS) console and attach the device to two ECS instances in the high-availability cluster.
[2] Configure the Shared Block Storage device
Log on to the operating system and run the lsblk command to view disk information.
lsblk
NAME   MAJ:MIN RM  SIZE RO TYPE MOUNTPOINT
vda    253:0    0  100G  0 disk
└─vda1 253:1    0  100G  0 part /
vdb    253:16   0  500G  0 disk
vdc    253:32   0  500G  0 disk
vdd    253:48   0  500G  0 disk
vde    253:64   0   64G  0 disk
vdf    253:80   0   20G  0 disk
In this example, the disk /dev/vdf is used as the device identifier of the Shared Block Storage device.
[3] Configure watchdog (two nodes of the cluster)
echo "modprobe softdog" > /etc/init.d/boot.local
echo "softdog" > /etc/modules-load.d/watchdog.conf
modprobe softdog

# Check the watchdog configuration.
ls -l /dev/watchdog
crw------- 1 root root 10, 130 Apr 23 12:09 /dev/watchdog
lsmod | grep -e wdt -e dog
softdog                16384  0
grep -e wdt -e dog /etc/modules-load.d/watchdog.conf
softdog
[4] Configure SBD (two nodes of the cluster)
sbd -d /dev/vdf -4 60 -1 30 create

# Configure SBD parameters.
vim /etc/sysconfig/sbd

# Modify the following parameters and replace the value of SBD_DEVICE with the device identifier of the Shared Block Storage device.
SBD_DEVICE="/dev/vdf"
SBD_STARTMODE="clean"
SBD_OPTS="-W"
[5] Check SBD
Check SBD on the nodes.
sbd -d /dev/vdf listEnsure that the SBD status on both nodes is clear.
sbd -d /dev/vdf list
0       s4app1      clear
1       s4app2      clear
[6] Verify SBD configuration
Make sure that the application of the fence node is shut down. The shutting down operation triggers the node restart action.
In this example, log on to the primary node s4app1.
sbd -d /dev/vdf message s4app2 resetIf the secondary node is restarted, the configuration is successful.
After the secondary node is restarted, you also need to manually reset it to the clear state.
sbd -d /dev/vdf list
0       s4app1      clear
1       s4app2      reset   s4app1
sbd -d /dev/vdf message s4app2 clear
sbd -d /dev/vdf list
0       s4app1      clear
1       s4app2      clear   s4app1
Solution 2: Implement the Fence feature by using fence_aliyun
fence_aliyun is a fence agent developed specifically for the Alibaba Cloud platform. It is used to isolate faulty nodes in high-availability environments of SAP. You can call APIs of Alibaba Cloud to enable flexible scheduling and management of Alibaba Cloud resources. This capability supports high-availability deployments of SAP within the same zone and meets enterprise needs for deploying critical SAP applications with high availability.
fence_aliyun is an open source fence agent tailored for the Alibaba Cloud environment. It is used to isolate faulty nodes in high-availability environments of SAP.
Starting from SUSE Enterprise Server for SAP Applications 12 SP4 and later versions, the fence_aliyun component has been natively integrated, allowing it to be easily configured for deploying high-availability environments of SAP on Alibaba Cloud public cloud.
[1] Prepare an environment
In this example, an Alibaba Cloud SUSE CSP paid image is used, which can directly connect to the Alibaba Cloud SUSE SMT update source to download or update SUSE components.
If you use a custom image, you can connect the image to the SUSE official update source. For more information, visit How to register SLES using the SUSEConnect command line tool.
To install open source software such as Python, an Internet connection is required. Ensure that an elastic IP address (EIP) or a NAT gateway is configured for the ECS instance.
[2] Install and verify Python and pip
fence_aliyun supports Python 3.6 or later. Make sure that the version requirement is met.
# Check the version of Python 3.
python3 -V
Python 3.6.15
# Check pip that is used to manage Python packages.
pip -V
pip 21.2.4 from /usr/lib/python3.6/site-packages/pip (python 3.6)
If Python 3 is not installed or a Python version is earlier than Python 3.6, install a required Python version.
The following code uses Python 3.6.15 as an example.
# Install Python 3.6.
wget https://www.python.org/ftp/python/3.6.15/Python-3.6.15.tgz
tar -xf Python-3.6.15.tgz
./configure
make && make install
# Verify the installation result.
python3 -V

# Install pip.
curl https://bootstrap.pypa.io/pip/3.6/get-pip.py -o get-pip.py
python3 get-pip.py
# Verify the installation result.
pip3 -V
[3] Install Alibaba Cloud SDK and dependency packages
Make sure that the version of aliyun-python-sdk-core is 2.13.35 or later and the version of aliyun-python-sdk-ecs is 4.24.8 or later.
python3 -m pip install --upgrade pip
pip3 install --upgrade  aliyun-python-sdk-core
pip3 install --upgrade  aliyun-python-sdk-ecs

# Install dependency packages.
### If you use a custom image, you must manually activate the relevant modules before you can perform the subsequent installation operations.
## For SUSE Linux Enterprise Server (SLES) 12 SP1, SLES 12 SP2, SLES 12 SP3, and SLES 12 SP5, run the following commands. x indicates the minor version number of SP.
SUSEConnect -p sle-sdk/12.x/x86_64
SUSEConnect -p SLES_SAP/12.x/x86_64
## For the SLES 12 SP4 environment, run the following commands:
SUSEConnect -p sle-sdk/12.4/x86_64
SUSEConnect -p sle-ha/12.4/x86_64

## For the SLES 15 SP1 environment, run the following commands:
SUSEConnect -p SLES_SAP/15.1/x86_64
SUSEConnect -p sle-ha/15.1/x86_64
## For SLES 15 SP2 and SLES 15 SP3, run the following commands. x indicates the minor version number of SP.
SUSEConnect -p sle-module-basesystem/15.x/x86_64
SUSEConnect -p sle-ha/15.x/x86_64
###

zypper install libcurl-devel
pip3 install pycurl pexpect
zypper install fence-agents

Sample code for verifying the installation result:
pip3 list | grep aliyun-python
aliyun-python-sdk-core 2.13.35
aliyun-python-sdk-core-v3 2.13.32
aliyun-python-sdk-ecs  4.24.8
[4] Configure a RAM role
fence_aliyun utilizes a RAM role to query the status of cloud resources such as ECS instances and perform operations such as starting and stopping instances.
Log on to the RAM console. In the left-side navigation pane, choose Permissions > Policies. On the page that appears, click Create Policy.
In this example, the policy SAP-HA-ROLE-POLICY is used. The following code provides an example of the policy content:
{
    "Version": "1",
    "Statement": [
        {
            "Effect": "Allow",
            "Action": [
                "ecs:StartInstance",
                "ecs:StopInstance",
                "ecs:RebootInstance",
                "ecs:DescribeInstances"
            ],
            "Resource": [
                "acs:ecs:*:*:instance/*"
            ]
        }
    ]
}
Attach a policy to a RAM role
Return to the RAM console. On the Roles page, find the role AliyunECSAccessingHBRRole. In the Actions column, click Grant Permission. In the panel that appears, select the policy SAP-HA-ROLE-POLICY and attach the policy to the role AliyunECSAccessingHBRRole.
Assign a RAM role to an ECS instance
Log on to the ECS console. On the Instance page, find the required ECS instance, click the More icon in the Actions column, and click Attach/Detach RAM role. In the dialog box that appears, select or create the role AliyunECSAccessingHBRRole and click Confirm.
[5] Install and configure fence_aliyun
Download fence_aliyun of the latest version
To download fence_aliyun, access to GitHub is required. Ensure that the ECS instance has proper network connectivity to reach the GitHub site.
Open a browser and navigate to GitHub for fence_aliyun source code. Create a file and copy the source code into /usr/sbin/fence_aliyun.
# Configure permissions.
chmod 755 /usr/sbin/fence_aliyun
chown root:root /usr/sbin/fence_aliyun
Adapt to the user environment
# Set the interpreter to Python 3.
sed -i "1s|@PYTHON@|$(which python3 2>/dev/null || which python 2>/dev/null)|" /usr/sbin/fence_aliyun
# Specify a directory for Fence agent lib.
sed -i "s|@FENCEAGENTSLIBDIR@|/usr/share/fence|" /usr/sbin/fence_aliyun
Verify the installation result
# Sample syntax:
# fence_aliyun --[region ID] --ram-role [RAM role] --action status --plug '[ECS instance ID]'
# Sample code:
fence_aliyun --region cn-beijing --ram-role AliyunECSAccessingHBRRole --action status --plug 'i-xxxxxxxxxxxxxxxxxxxx'

# If the configuration is valid, the status of the instance is returned. Sample code:
Status: ONFor more information about mappings between Alibaba Cloud regions and region IDs, see Regions and zones.
Make sure that the names of all ECS instances in the current region do not contain Chinese characters.
4.5 HAVIP
A high-availability virtual IP address (HAVIP) is a private IP address that can be created and released as an independent resource. You can advertise an HAVIP on an ECS instance by using ARP messages. In this deployment, use an HAVIP as the virtual IP address in the cluster to mount on each node in the cluster.
In this example, create an HAVIP for the ASCS instance. The HAVIP is used as the virtual IP address for installing the ASCS instance. Create the HAVIP in the business network. Similarly, create an HAVIP for an ERS instance.
[1] Create an HAVIP
Log on to the VPC console. In the left-side navigation pane, click HaVip. On the page that appears, create an HAVIP.
Contact your Alibaba Cloud SA to assist you in applying for the service use.
[2] Associate an ECS instance with the HAVIP
Click the ECS instance that is bound to the high-availability cluster. Make sure that two ECS instances in the cluster are bound.
[3] Configure a temporary HAVIP
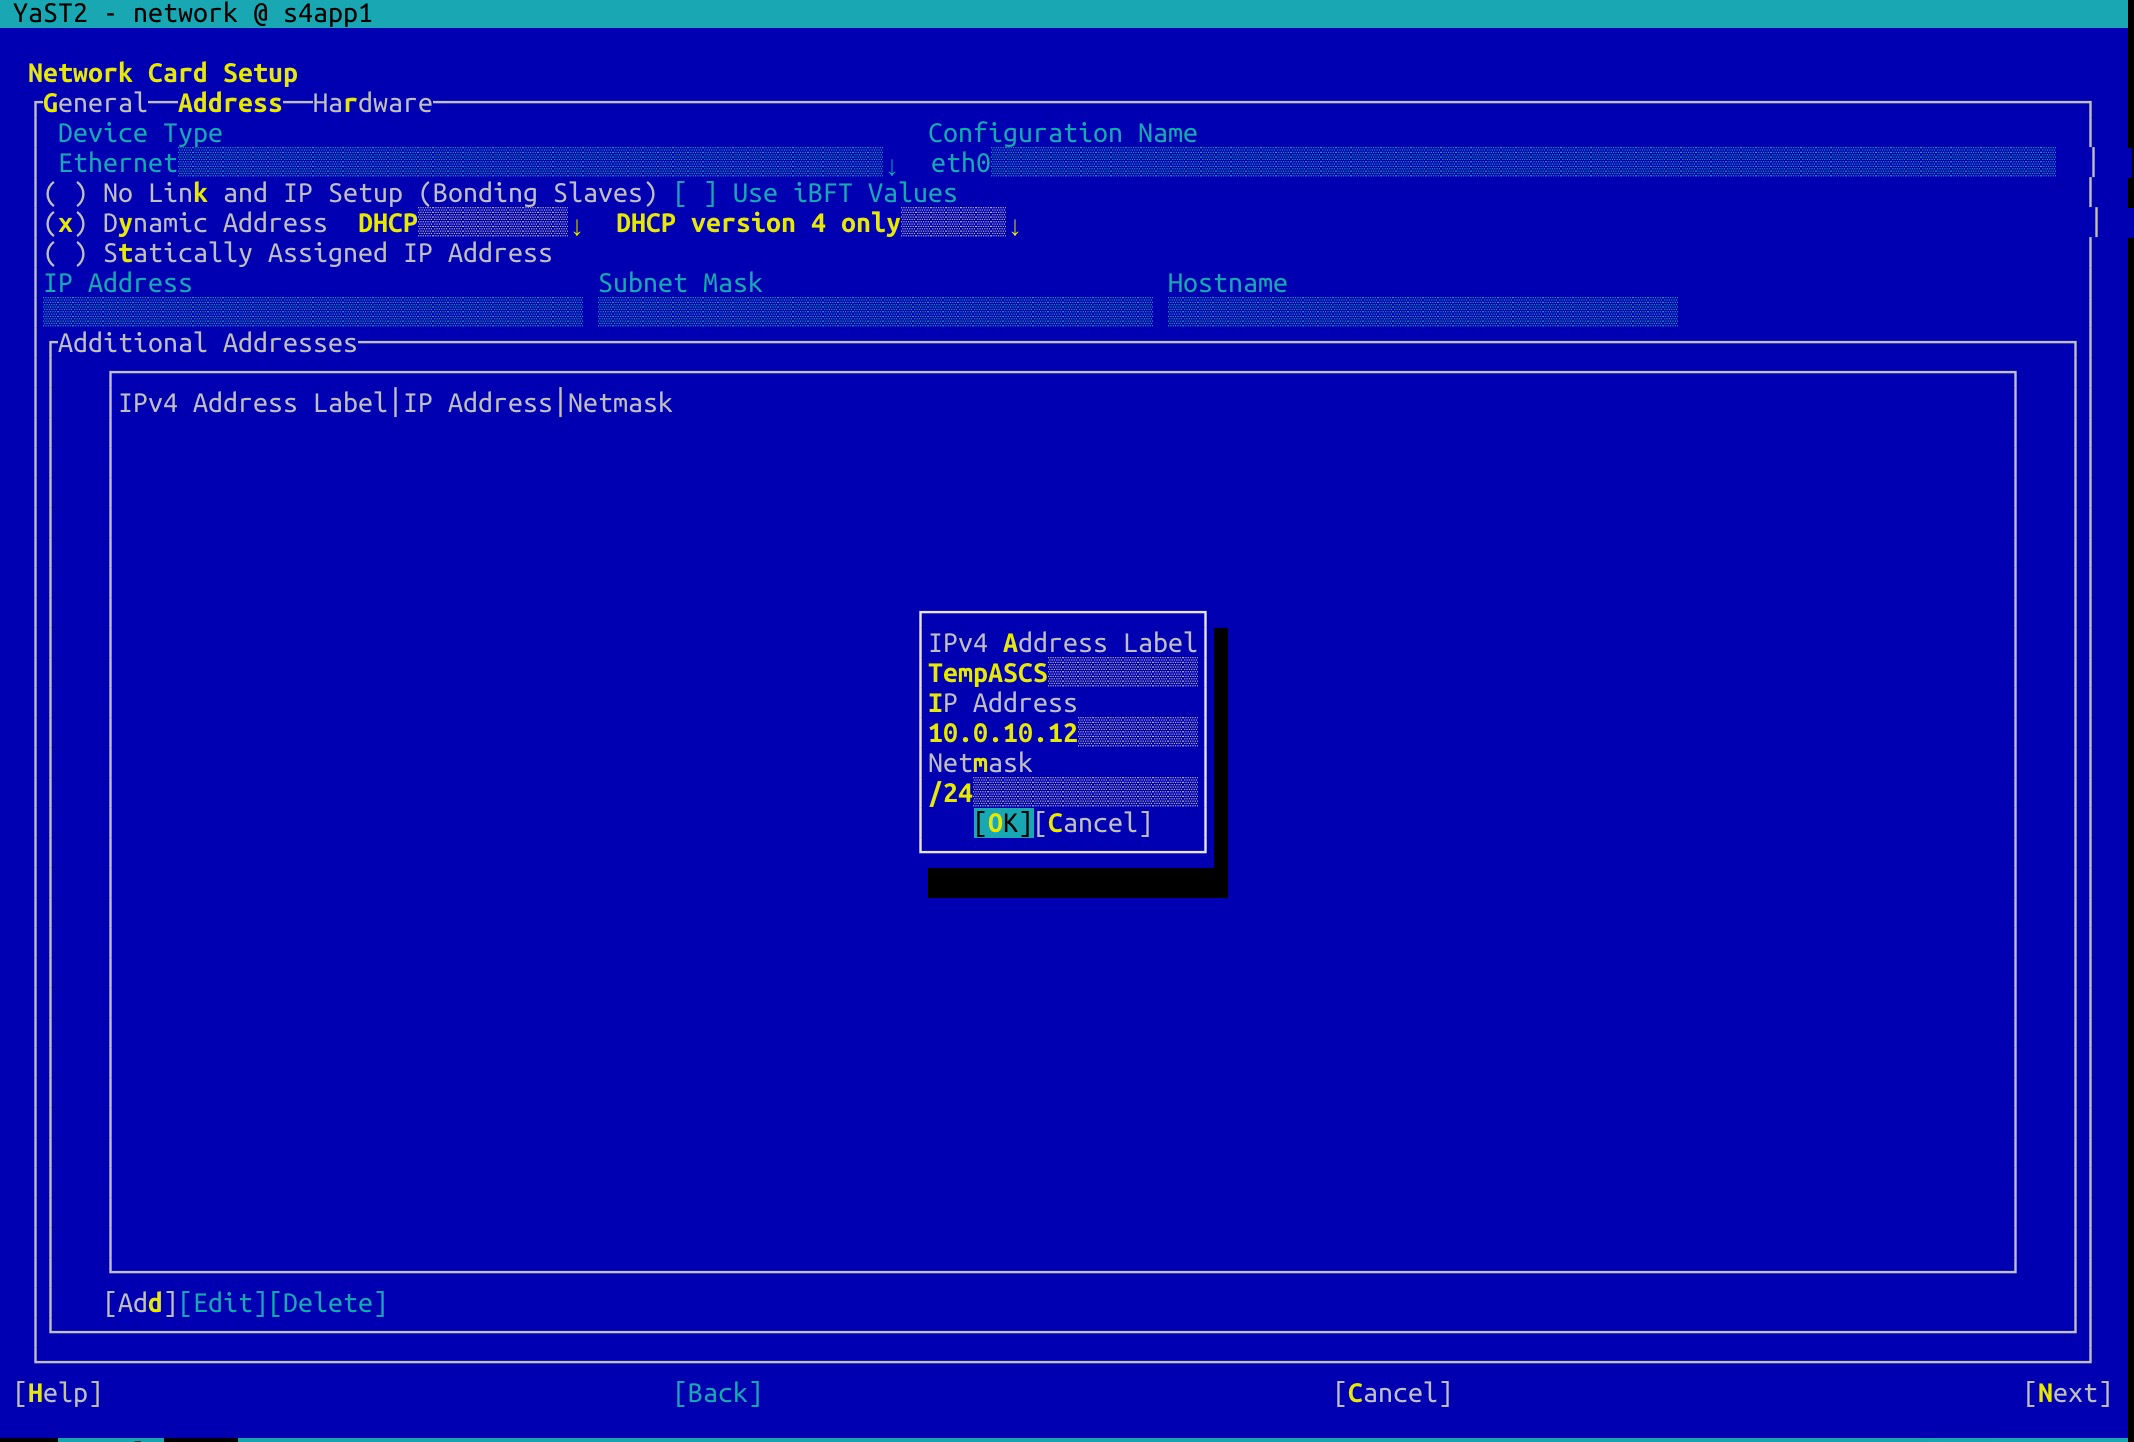
An HAVIP only takes effect after being taken over as a resource by cluster software such as Pacemaker. For deployment purposes, you need to create a temporary HAVIP.
Log on to the first node and temporarily configure the applied HAVIPs for the ASCS and ERS instances into the additional addresses to ensure connectivity of the HAVIPs during installation.
#yast2 network
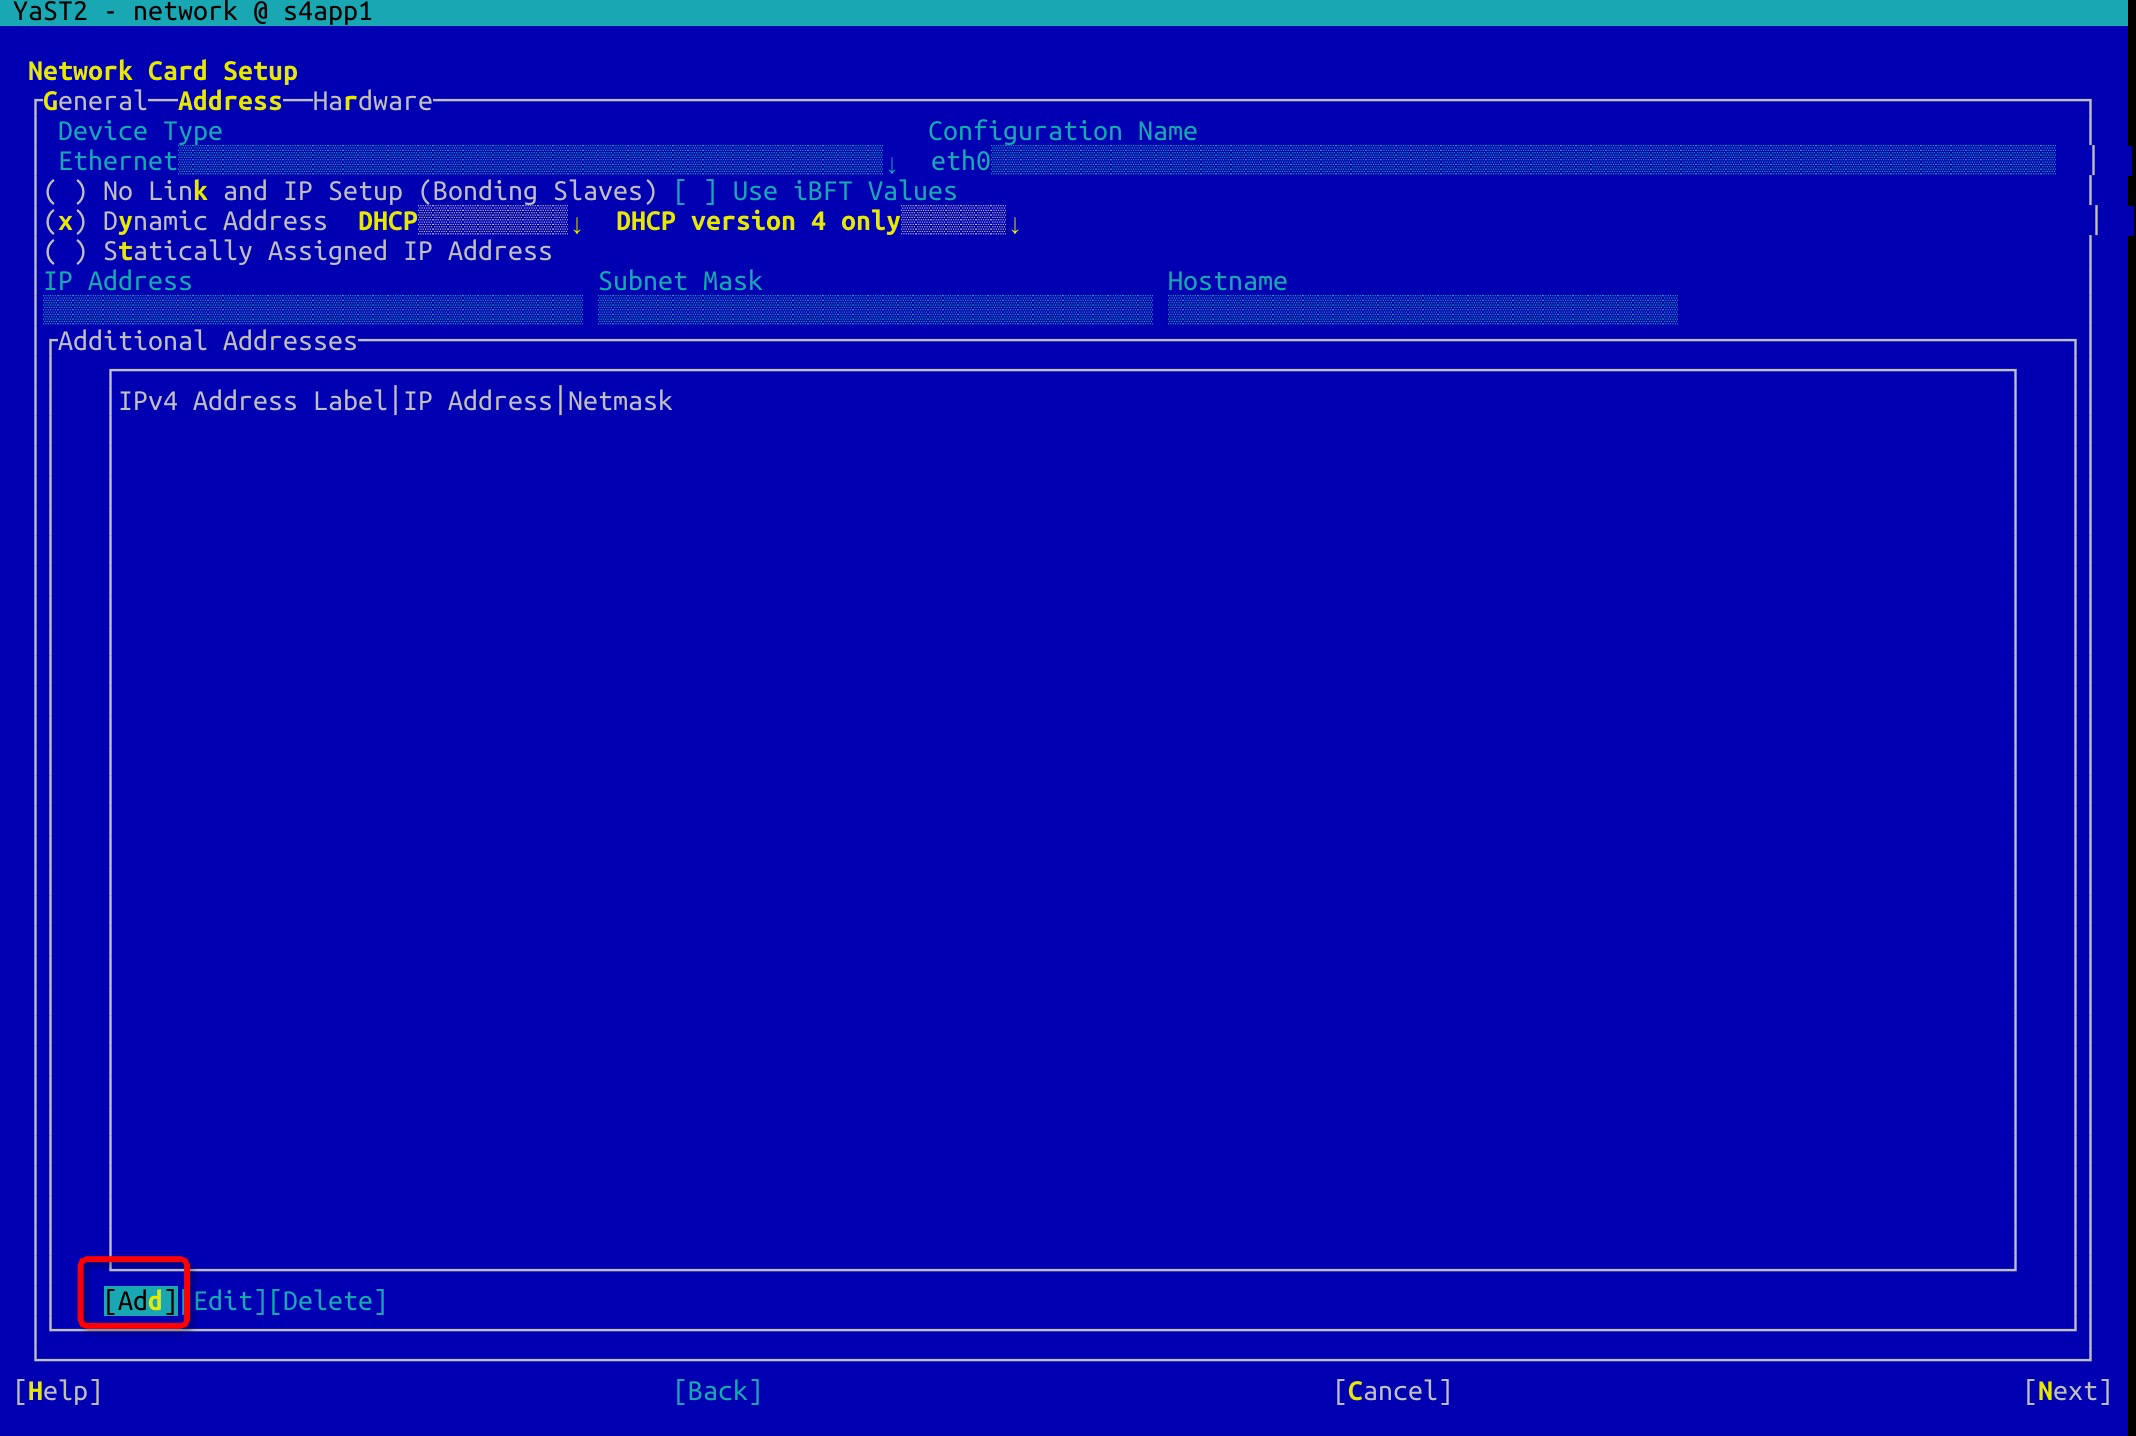
Configure HAVIPs for ASCS and ERS instances:
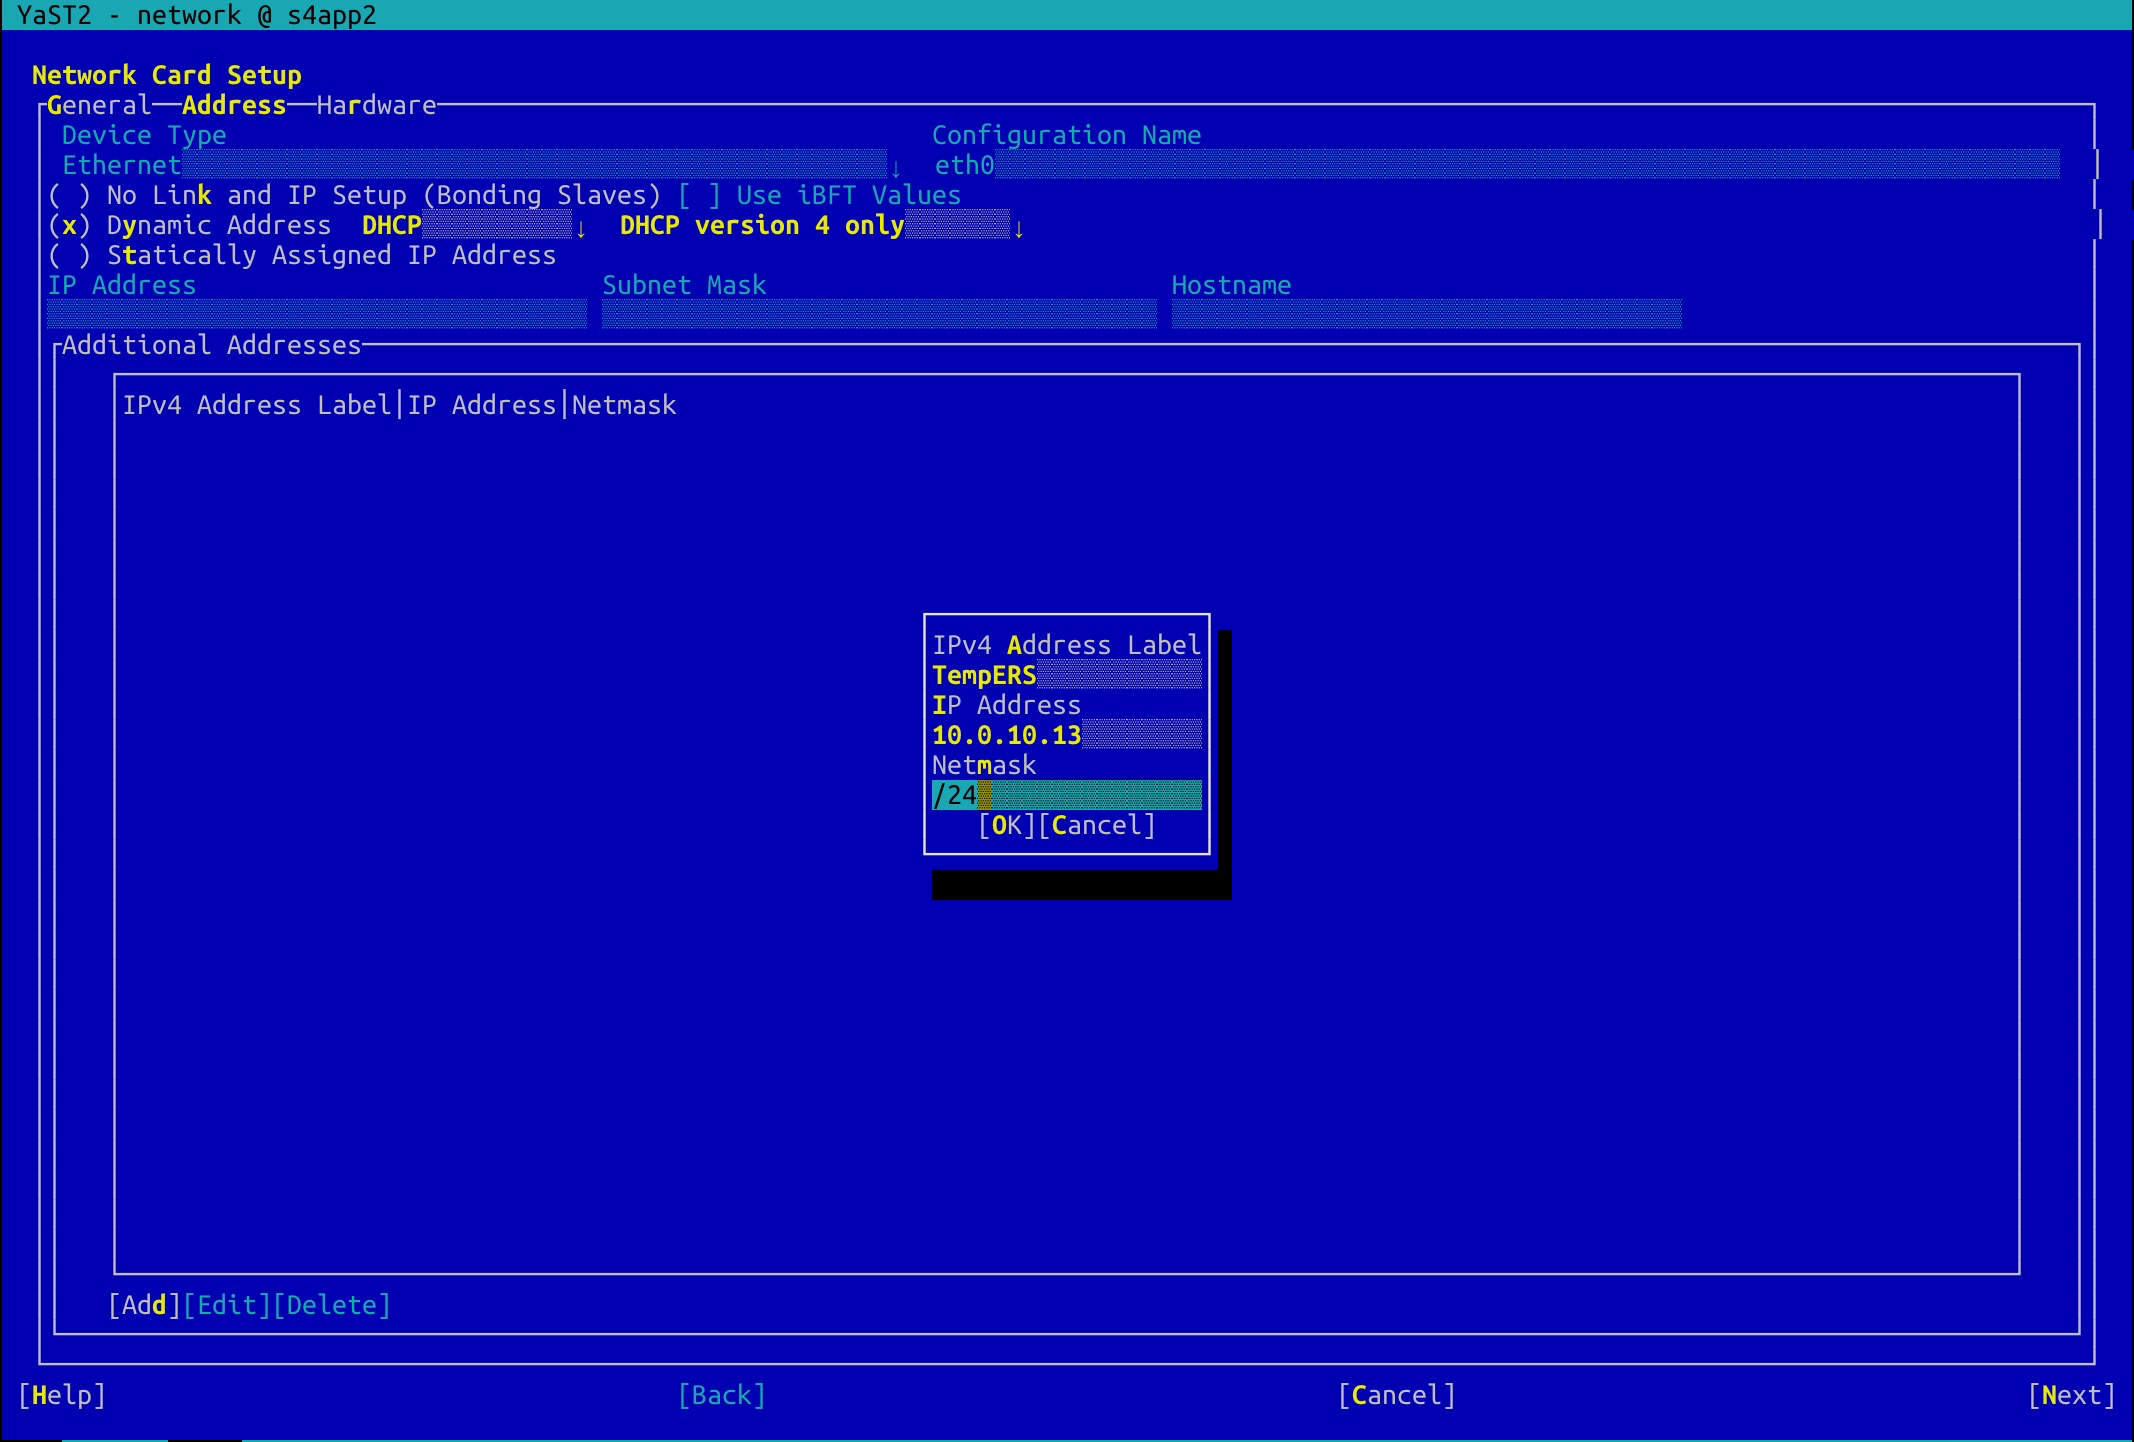 Configure an HAVIP for the ERS instance in the same manner.
Test the connectivity of the HAVIP of the ASCS instance:
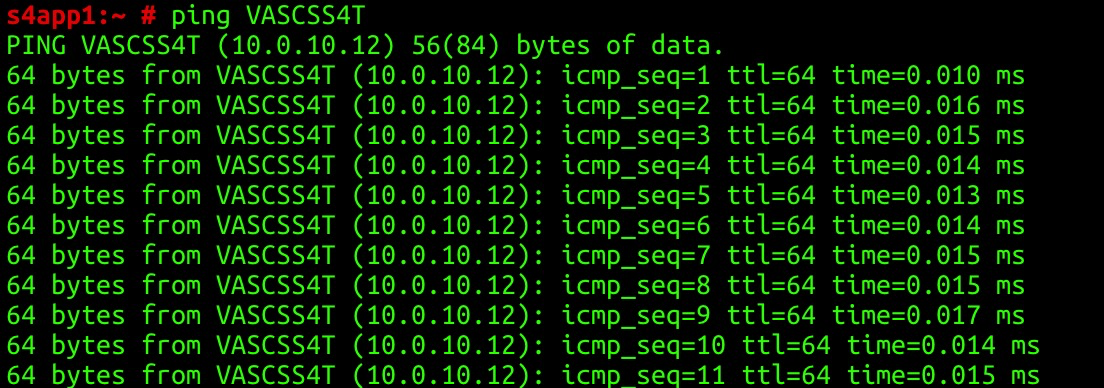
Test the connectivity of the HAVIP of the ERS instance:

4.6 NAS
Apsara File Storage NAS (NAS) provides a file storage solution for compute nodes such as ECS instances, E-HPC instances, and Docker containers. NAS supports standard file access protocols. You can use NAS without the need to modify existing applications. NAS provides various features such as unlimited capacity, performance expansion, single namespace, multi-party sharing, high reliability, and high availability. To deploy SAP applications on Alibaba Cloud, we recommend that you use NAS for the file systems of the Global host and the trans host.
[1] Create an NAS file system
Select a region and a storage type. This deployment uses a Capacity NAS file system. For more information about NAS performance, see General-purpose NAS file systems. Click Add Mount Target and select the VPC and the vSwitch of the service CIDR block that you created.
[2] Record the mount address of the NAS file system
Click the system ID or name to go to the NAS configuration page, and create two NAS file systems for /sapmnt and /usr/sap/trans based on your plan.
5. Install SAP HANA
For more information about how to install and configure SAP HANA, visit SAP HANA Platform.
For more information about how to configure SAP HANA System Replication, visit How To Perform System Replication for SAP HANA.
For more information about how to install and configure SAP HANA HA, see SAP HANA high availability deployment in the same zone.
6. Configure a high-availability cluster
6.1 Maintain hostnames
Modify hostnames for all nodes of SAP applications and SAP HANA. Add the following information in the /etc/hosts directory as planned:
###S4 application business###
10.0.10.10     s4app1  s4app1.alibaba.com
10.0.10.11     s4app2  s4app2.alibaba.com
10.0.10.12      VASCSS4T        VASCSS4T.alibaba.com
10.0.10.13      VERSS4T         VERSS4T.alibaba.com
###S4 application heatbeat###
10.0.20.10     s4app1-ha
10.0.20.11     s4app2-ha
###S4 HANA datebase####
10.0.10.7     hana01        hana01.alibaba.com
10.0.10.8     hana02        hana02.alibaba.com
10.0.10.9      VDBS4T  VDBS4T.alibaba.com
###S4 HANA datebase heartbeat####
10.0.20.7     hana01-ha
10.0.20.8     hana02-ha
6.2 Create file systems
In the following example:
/sapmnt and /usr/sap/trans use NAS file systems.
/usr/sap uses an XFS file system.
[1] /usr/sap
(1). Check the disk.
(2). Create a persistent volume (PV).
(3). Create sapvg.
(4). Create usrsaplv.
(5). Create a file system.
(6) Add mount points for the file system. Enable the file system to be mounted upon system startup.
#fdisk -l
#pvcreate /dev/vdb
#vgcreate sapvg /dev/vdb
#lvcreate -L 100G -n usrsaplv sapvg
#mkfs.xfs /dev/sapvg/usrsaplv
#mkdir -p /usr/sap
Add the following content to the /etc/fstab file:
/dev/sapvg/usrsaplv /usr/sap xfs defaults 0 0Mount all file systems:
#mount -a#mount -a
[2] Create a swap
(1). Check the swap disk.
#fdisk -l
/dev/vdd is a separately created swap disk.
(2). Configure swap.
mkswap  /dev/vdc
swapon  /dev/vdc
swapon -s
Add the following content to the /etc/fstab file:
/dev/vdc swap swap defaults 0 0[3] Global file system and Trans host file system
We recommend that you use autofs for both /sapmnt and /usr/sap/trans. You do not need to create a directory to configure autofs.
(1). Run the following command to edit the auto.master file:
#vim /etc/auto.master
Add /- /etc/auto.nfs to the end of the file.
(2). Create and edit the /etc/auto.nfs file:
Replace the address with the NAS address.
/sapmnt -vers=3,noacl,nolock,proto=tcp,rsize=1048576,wsize=1048576,hard,timeo=600,retrans=2,noresvport xxxxxxxx-beijing.nas.aliyuncs.com:/
/usr/sap/trans -vers=3,noacl,nolock,proto=tcp,rsize=1048576,wsize=1048576,hard,timeo=600,retrans=2,noresvport xxxxxxxx-beijing.nas.aliyuncs.com:/
(3). Start the autofs service.
#systemctl start autofs
(4). Enable automatic start upon system startup.
#systemctl enable autofs
You can run the cd command to access the two file systems to check whether they are mounted.
6.3 Prepare an OS and an installation package
The following configuration procedures all need to be operated in dual machines that participate in HA. This example only describes the operation on one of the nodes.
[1]. Install the package required by HA configuration and optimization
# Components of SLES 12 for SAP versions
zypper in -y patterns-ha-ha_sles sap-suse-cluster-connector fence-agents
Components of SLES 15 for SAP versions
zypper in -y patterns-ha-ha_sles sap-suse-cluster-connector corosync-qdevice saptune fence-agents
[2]. Check the Network Time Protocol (NTP) service
#ntpq -p
By default, the NTP service is enabled for Alibaba ECS instances. If the time zone of your ECS instances is not Asia/Shanghai, change the time zone and configure the NTP service. Ensure that all ECS instances enable the NTP service and use the same time zone.
[3]. Install saptune
As an upgraded version of the sapconf tool, saptune is available to SUSE Linux Enterprise Server 12 SP2 and later versions. You can use saptune to tune parameters for operating systems and databases. This ensures better performance for SAP NetWeaver or SAP HANA. Syntax:
SAP Note
Tune system according to SAP and SUSE notes:
  saptune note [ list | verify ]
  saptune note [ apply | simulate | verify | customise | revert ] NoteID
SAP Solution
Tune system for all notes applicable to your SAP solution:
  saptune solution [ list | verify ]
  saptune solution [ apply | simulate | verify | revert ] SolutionName
In this example, NETWEAVER is installed. Code for installation:

Run the following command to start a daemon:
saptune daemon start
systemctl enable tuned
For more information about saptune, visit Prepare your Linux for your SAP solution with saptune or the official documentation for SLES.
6.4 Configure a cluster
[1]. Configure corosync
(1). Start the cluster graphical interface. Start yast2 on the first node and select cluster.
(2). Configure Communication Channels.
Select the transport method as Unicast. Enter the Channel bind address 10.0.20.0 (heartbeat IP subnet). Enter the Redundant channel bind address 10.0.10.0 (service IP subnet). Add the heartbeat IP addresses and service IP addresses (redundant) for the two HA nodes. Enter the Expected votes count as 2 (number of nodes).
(3). Configure security.
Select Enable Security Auth and click Generate Auth Key File to generate the Auth key file.
(4) Configure Csync2.
csync2 is a synchronization tool used to replicate configuration files to all nodes in the cluster. To add a host, select add Suggested files and click Turn csync2 ON. Then, click Generate Pre-shared-Keys. Copy the generated /etc/csync2/key_hagroup file to the corresponding directory on the second node.
(5). Configure the service.
Specify whether to automatically start Pacemaker after system boot. By default, it is disabled. In this example, select the manual control option and leave it turned off.
(6). Copy the corosync configuration file and authkey file in the /etc/corosync directory of the first node to the corresponding directory of the second node:
#scp -pr corosync.conf authkey root@s4app2:/etc/corosync
[2] Start Pacemaker for two nodes
#systemctl start pacemaker
Check and ensure that both nodes are online.
#crm_mon -r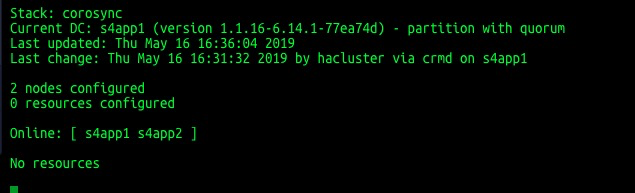
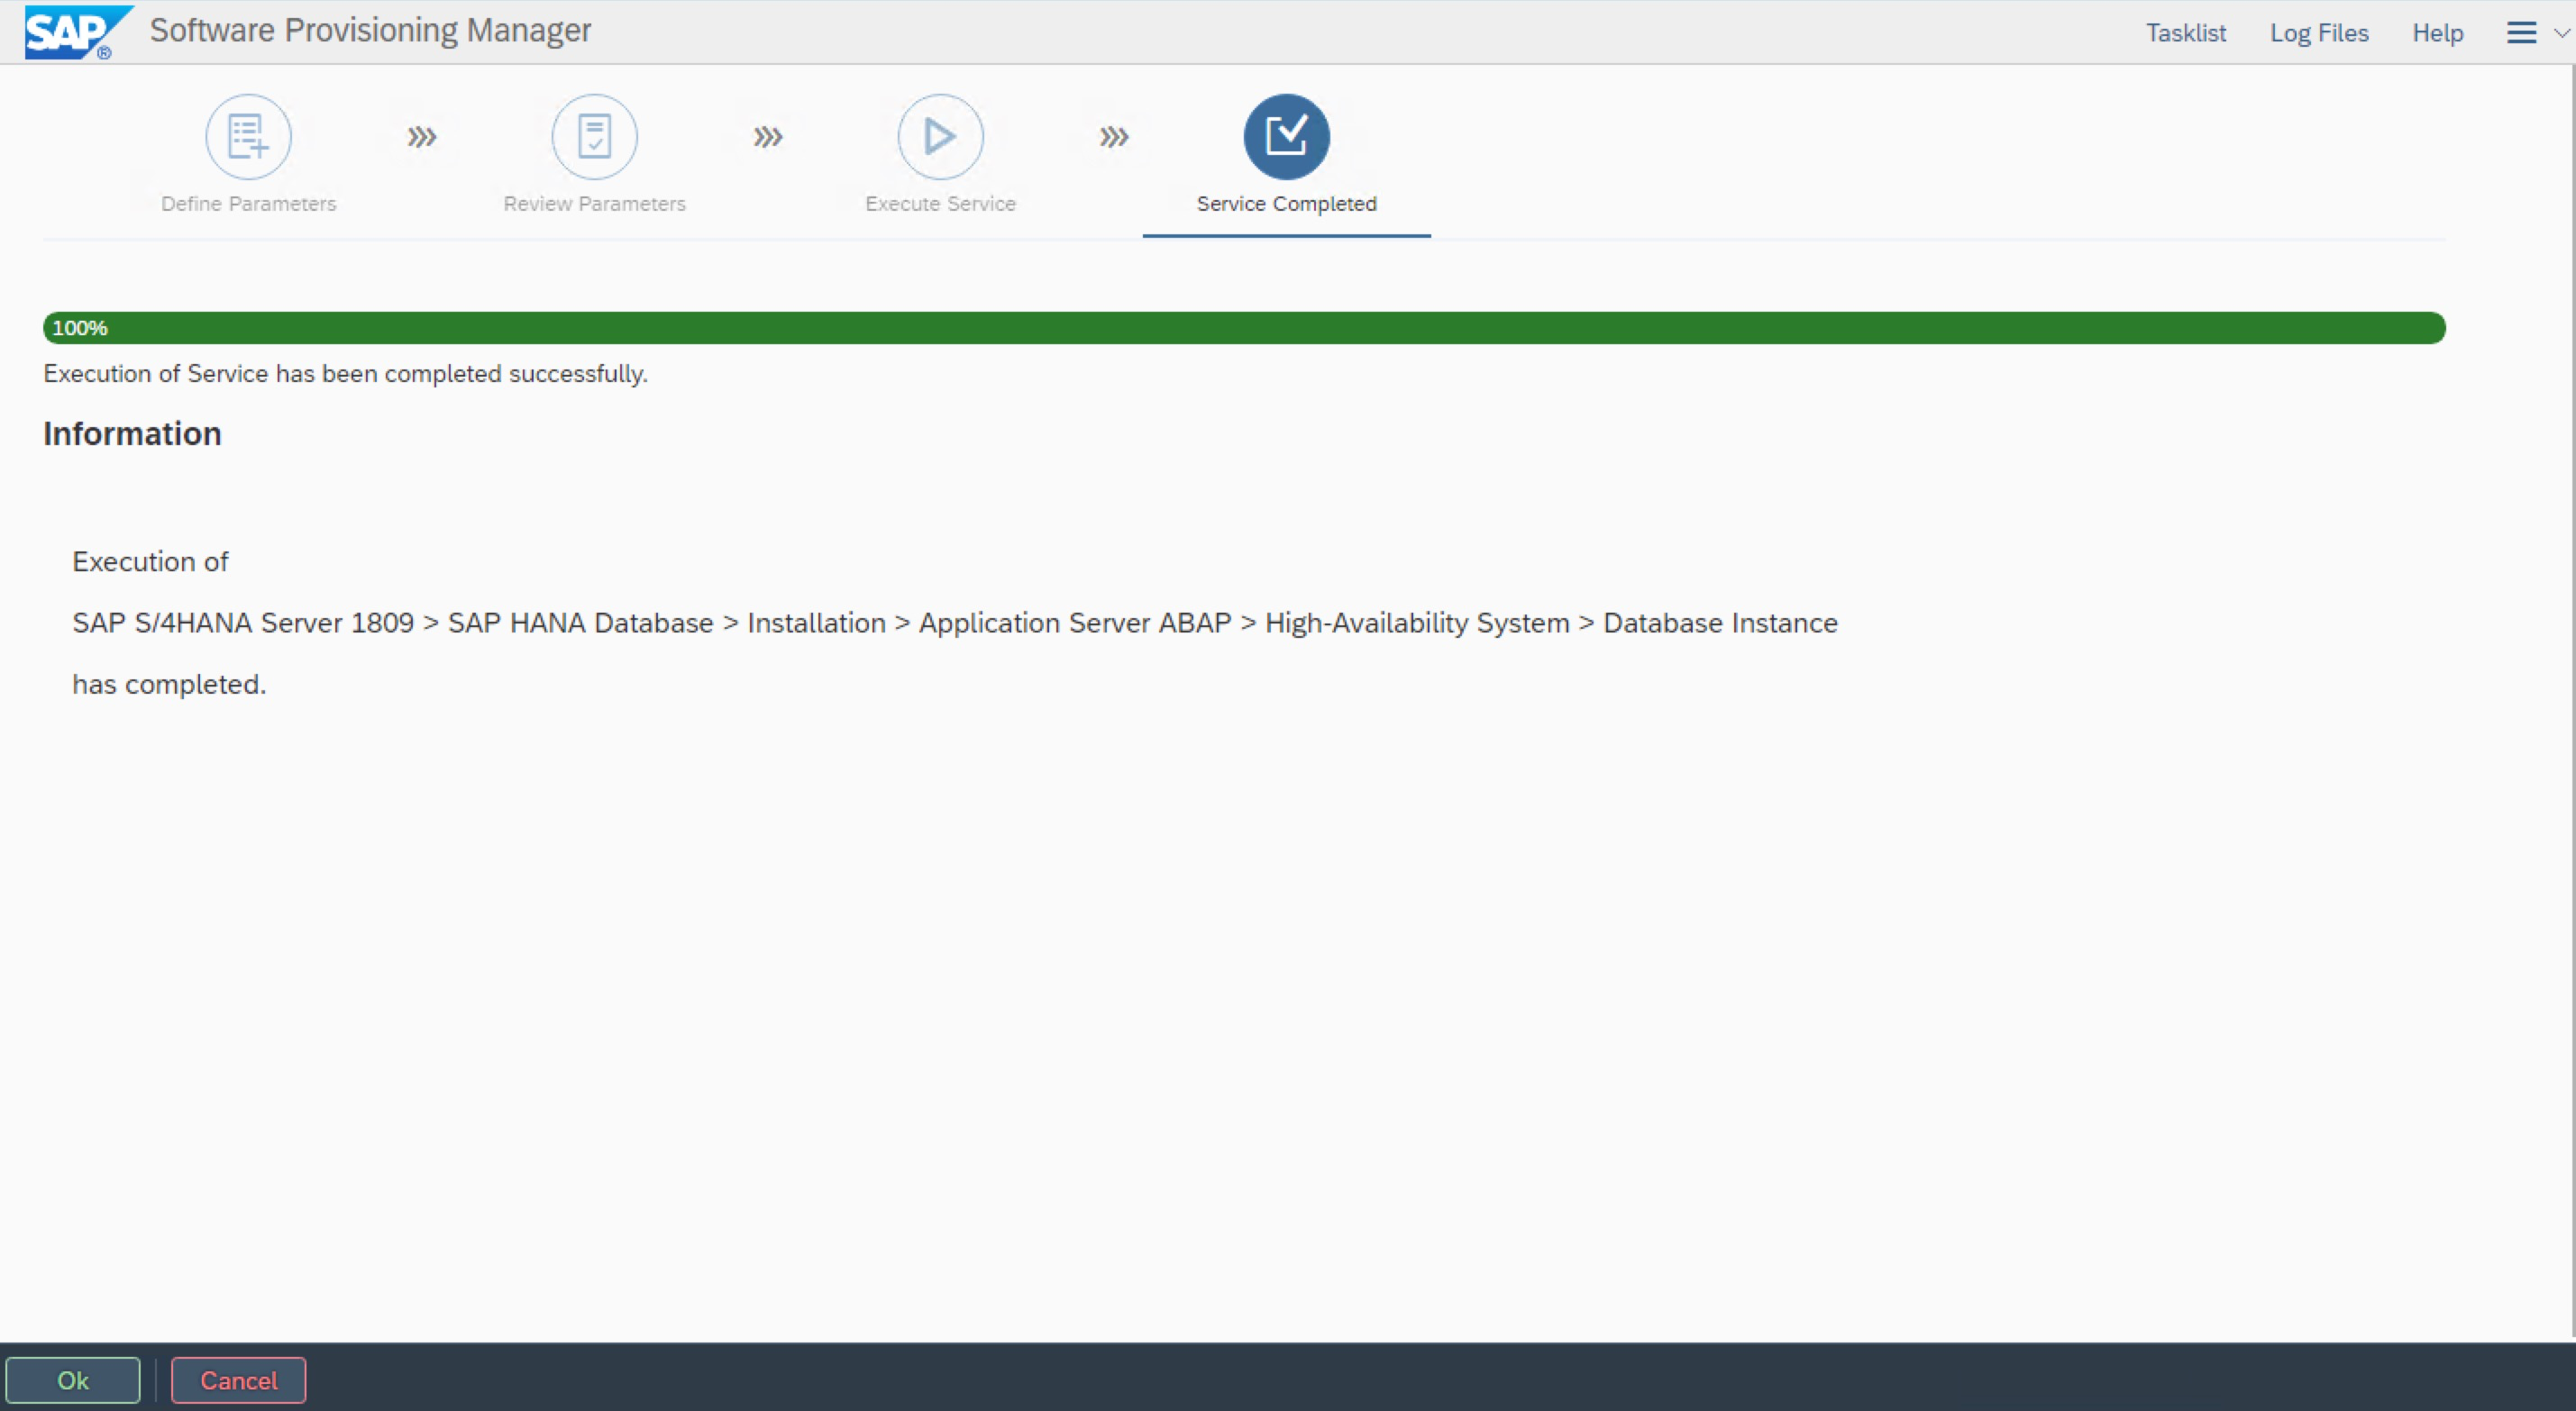
7. Install S/4HANA 1809
7.1 Install an ASCS instance
Start the SWPM installation on the first node. Install ASCS to the virtual hostname VASCSS4T.
# ./sapinst SAPINST_USE_HOSTNAME=VASCSS4T
In the browser of the Windows jump host, enter the access address:
https://VASCSS4T:4237/sapinst/docs/index.html
Log on by using the root user and password. Ensure that hostname resolution and the port are accessible.  Enter the SID and the sapmnt path based on the plan.
 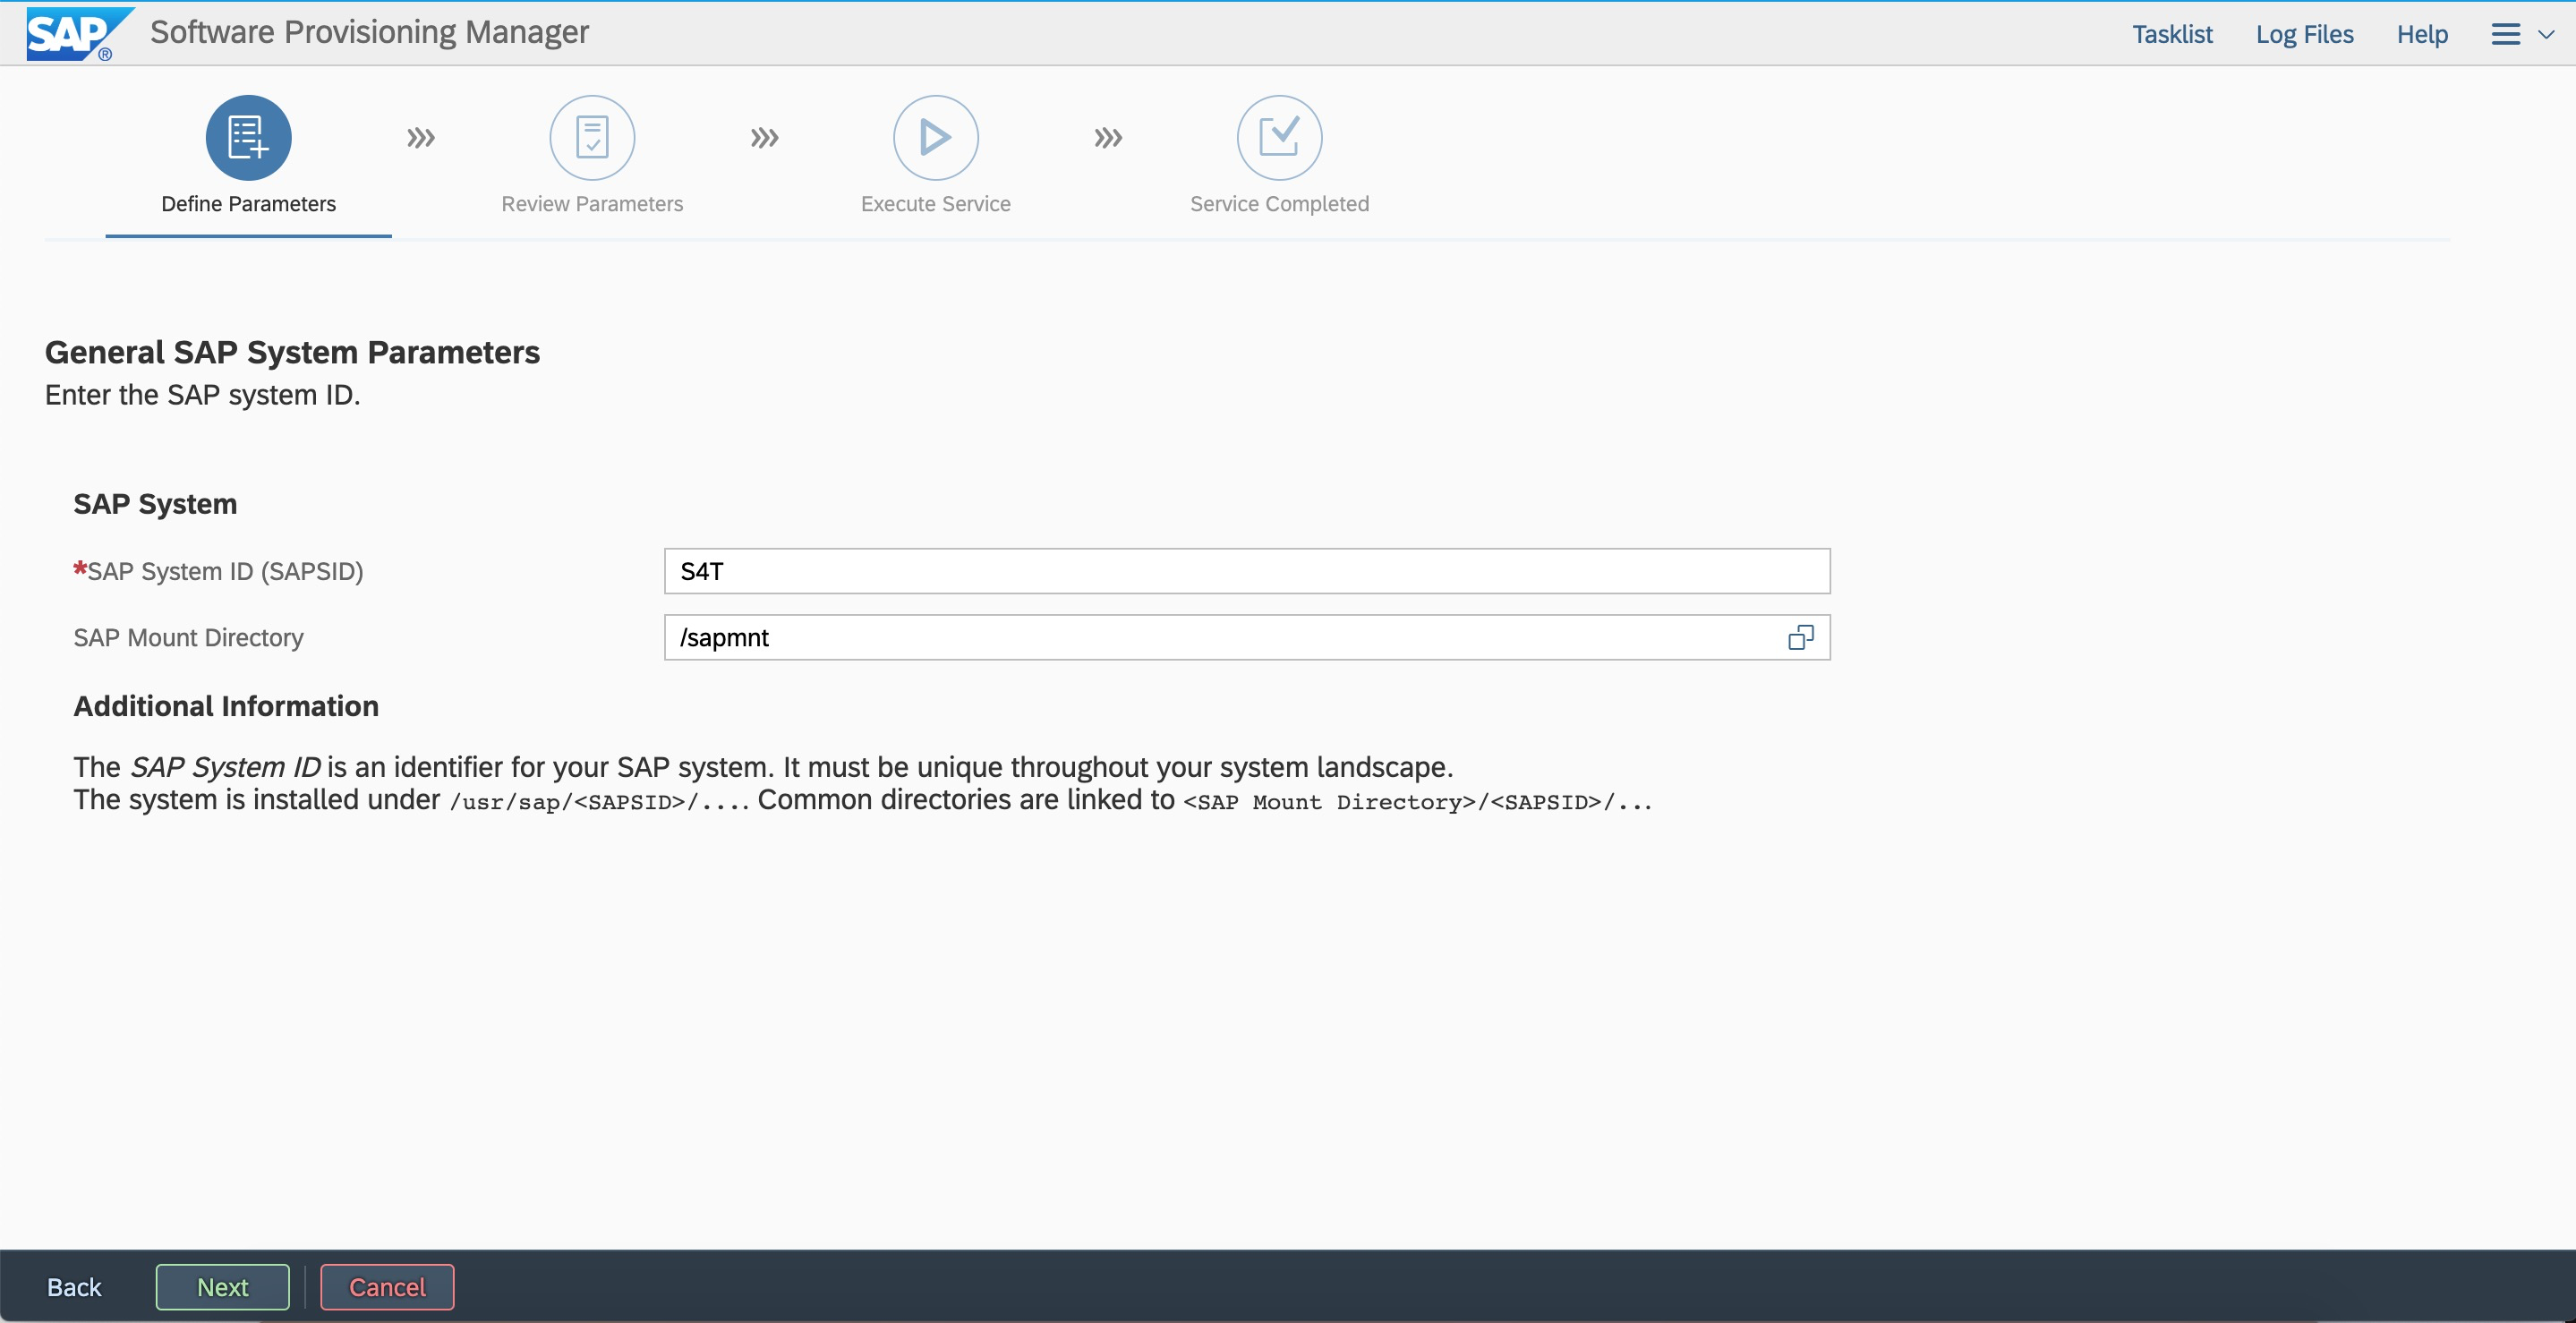 Configure FQDN.
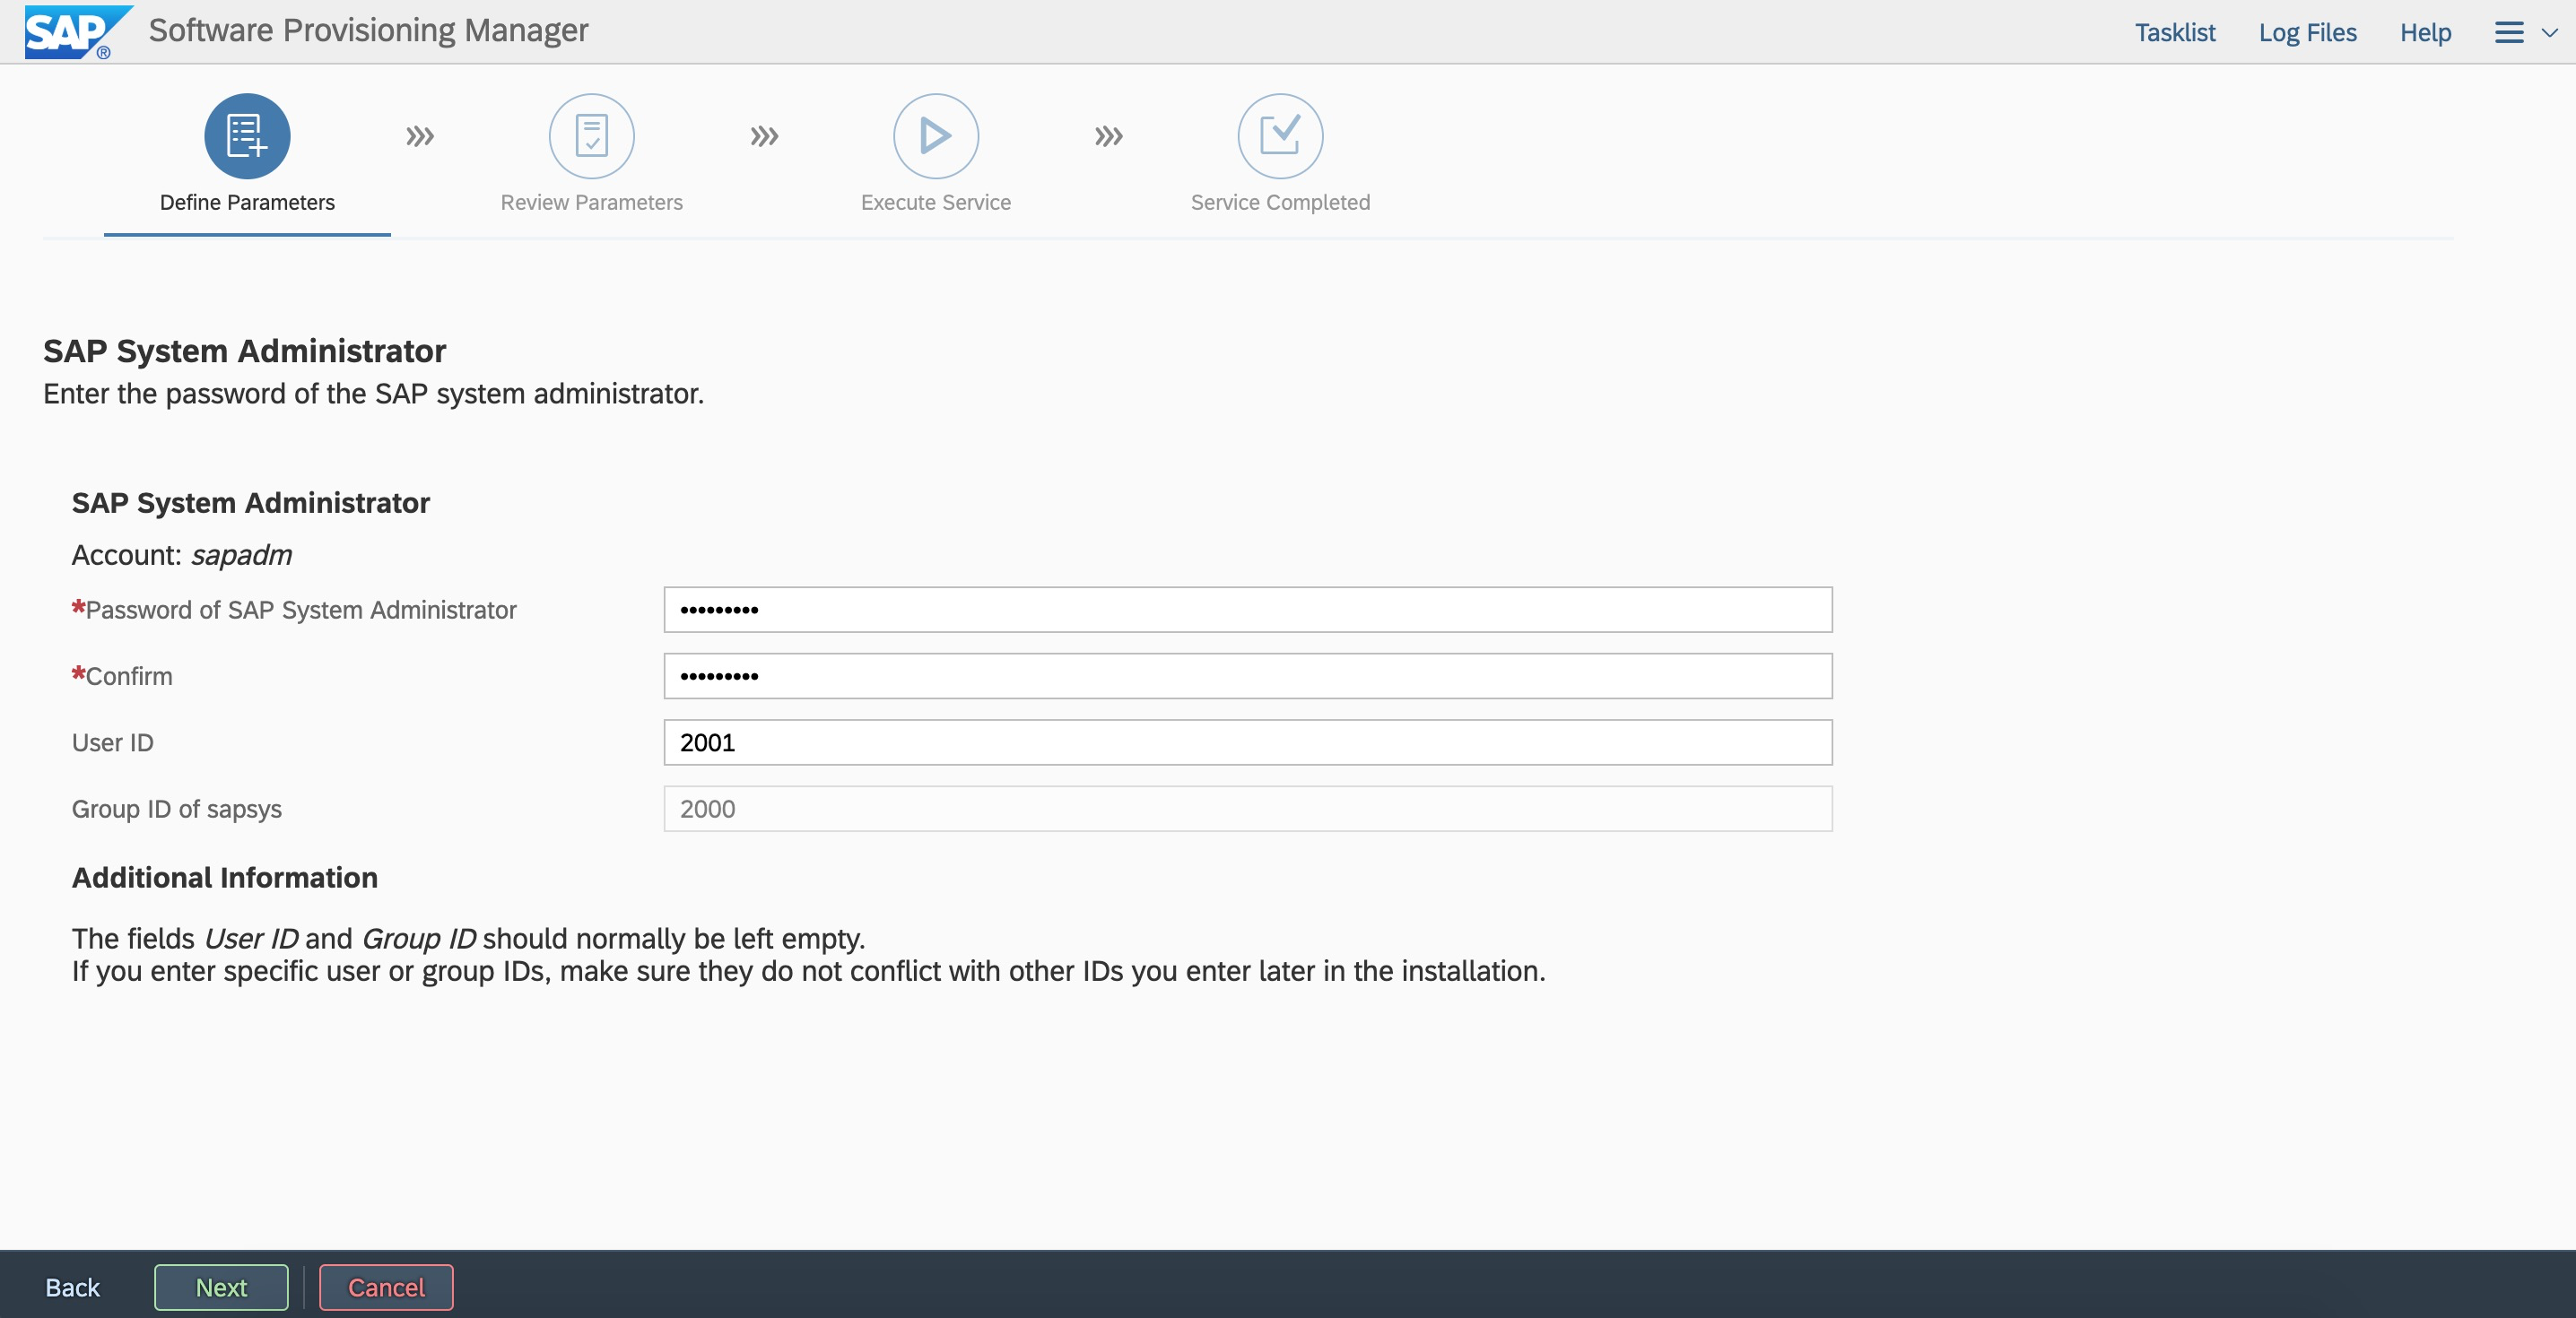
 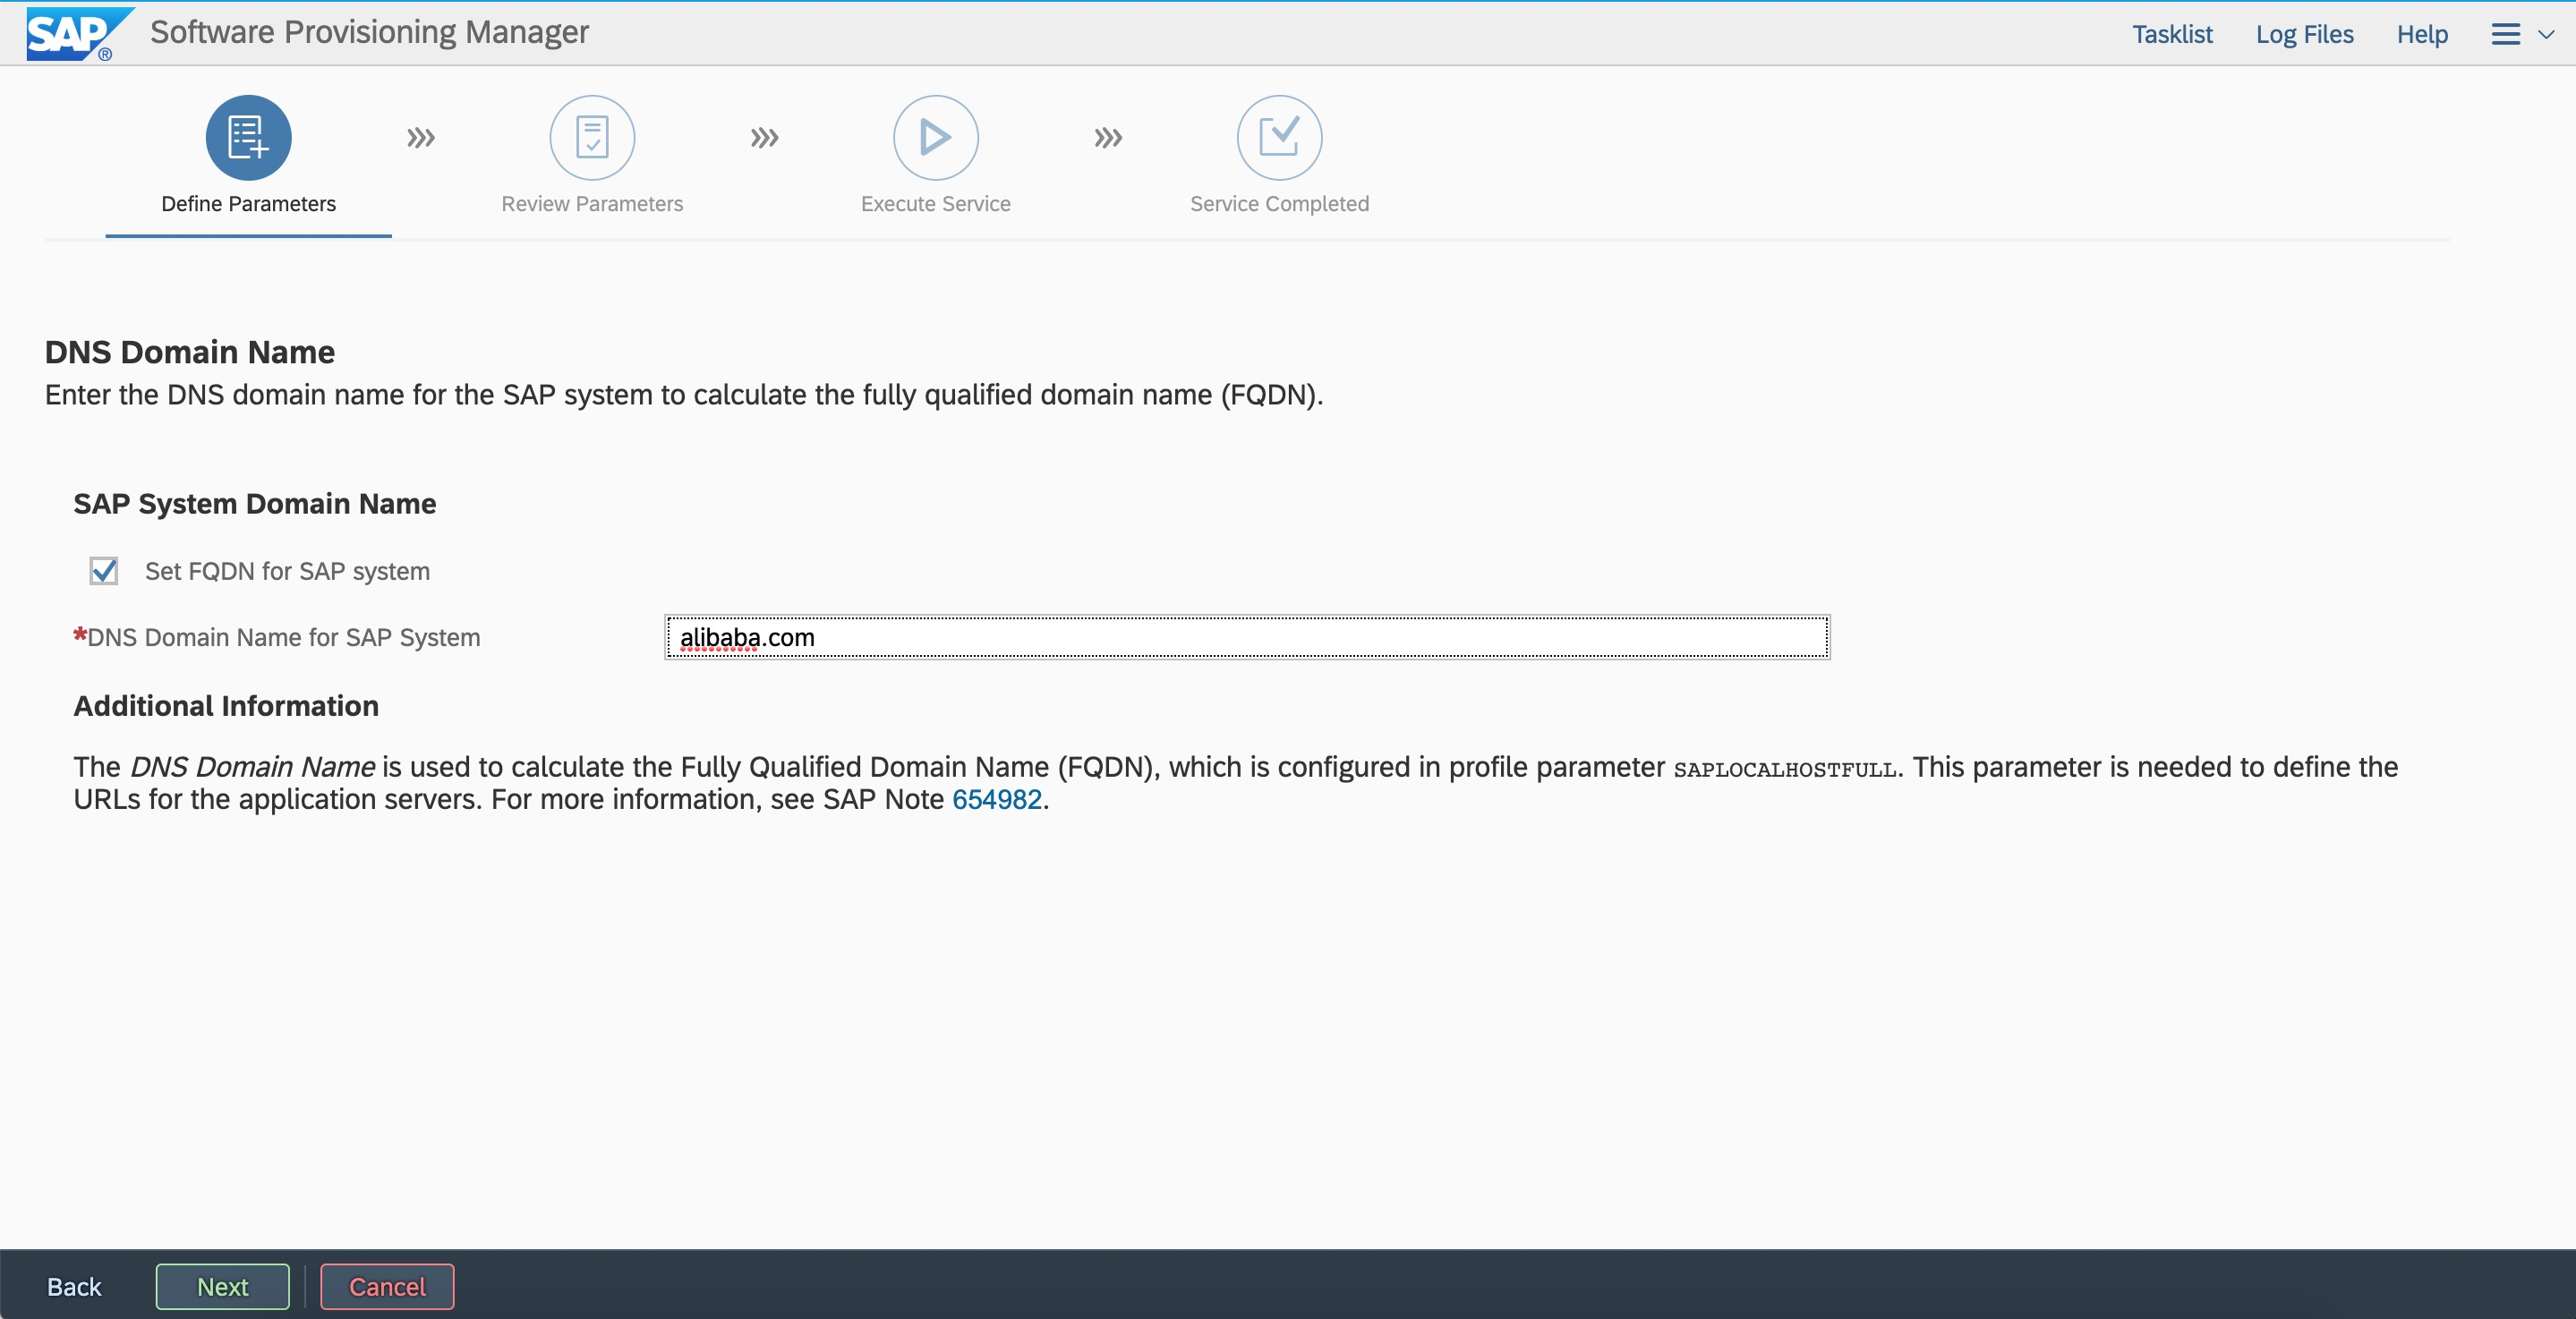 Configure a password.
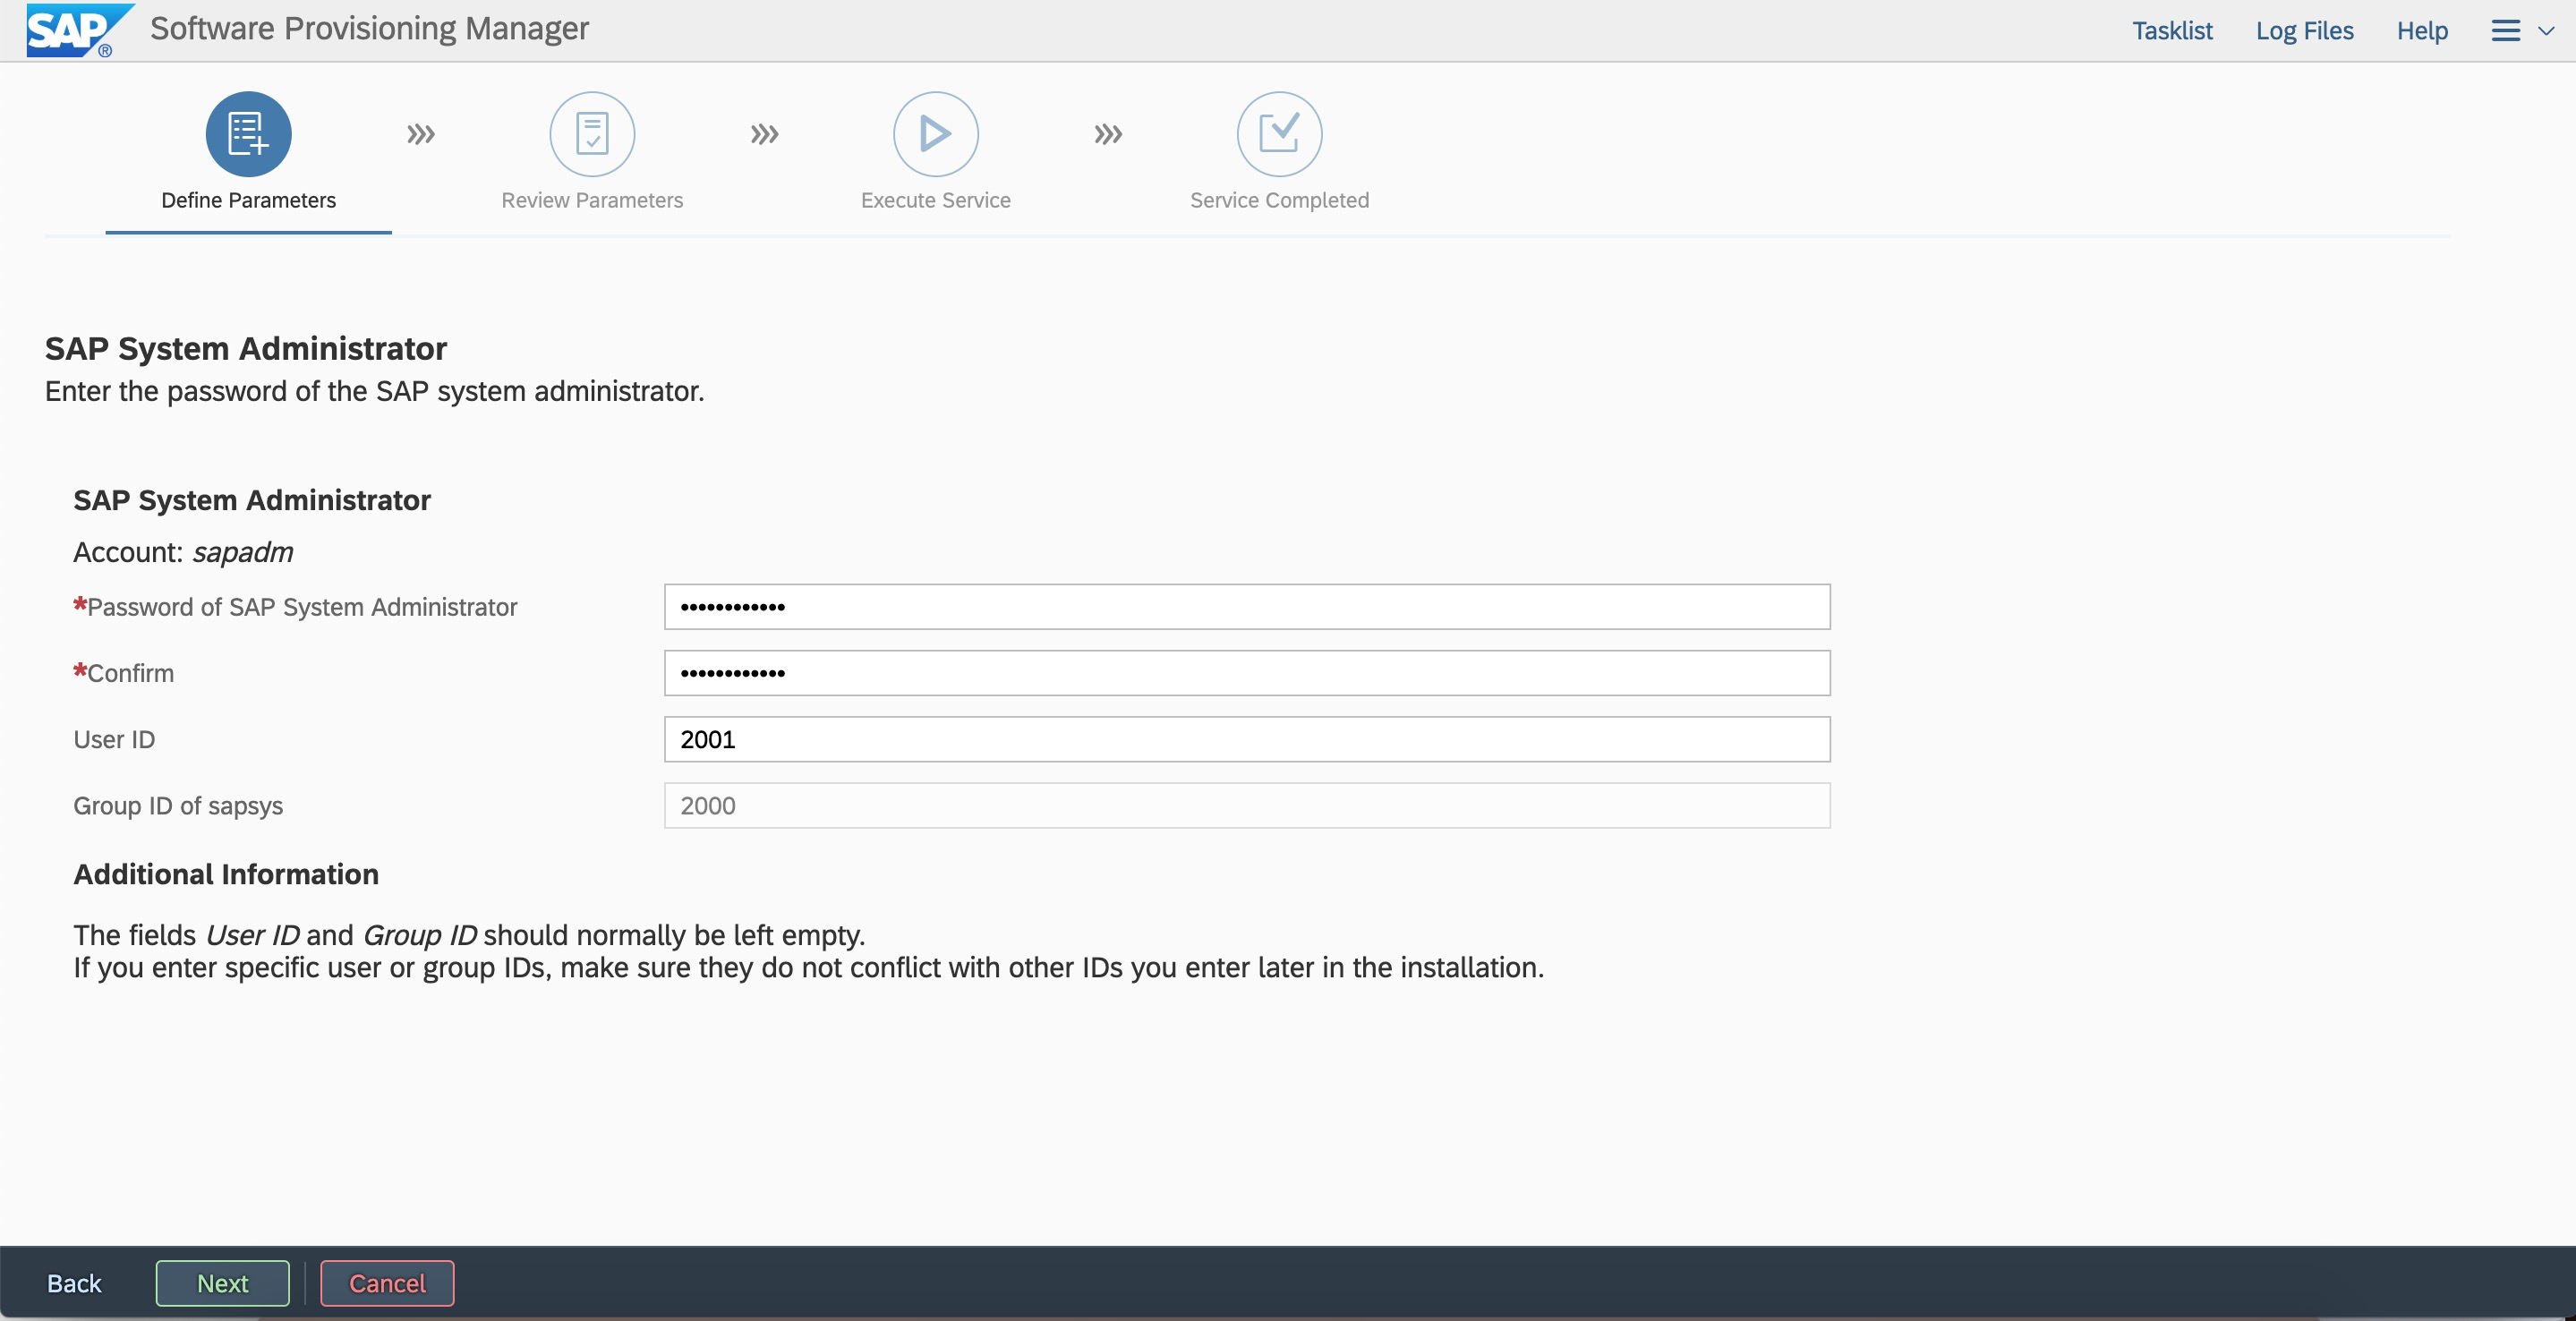
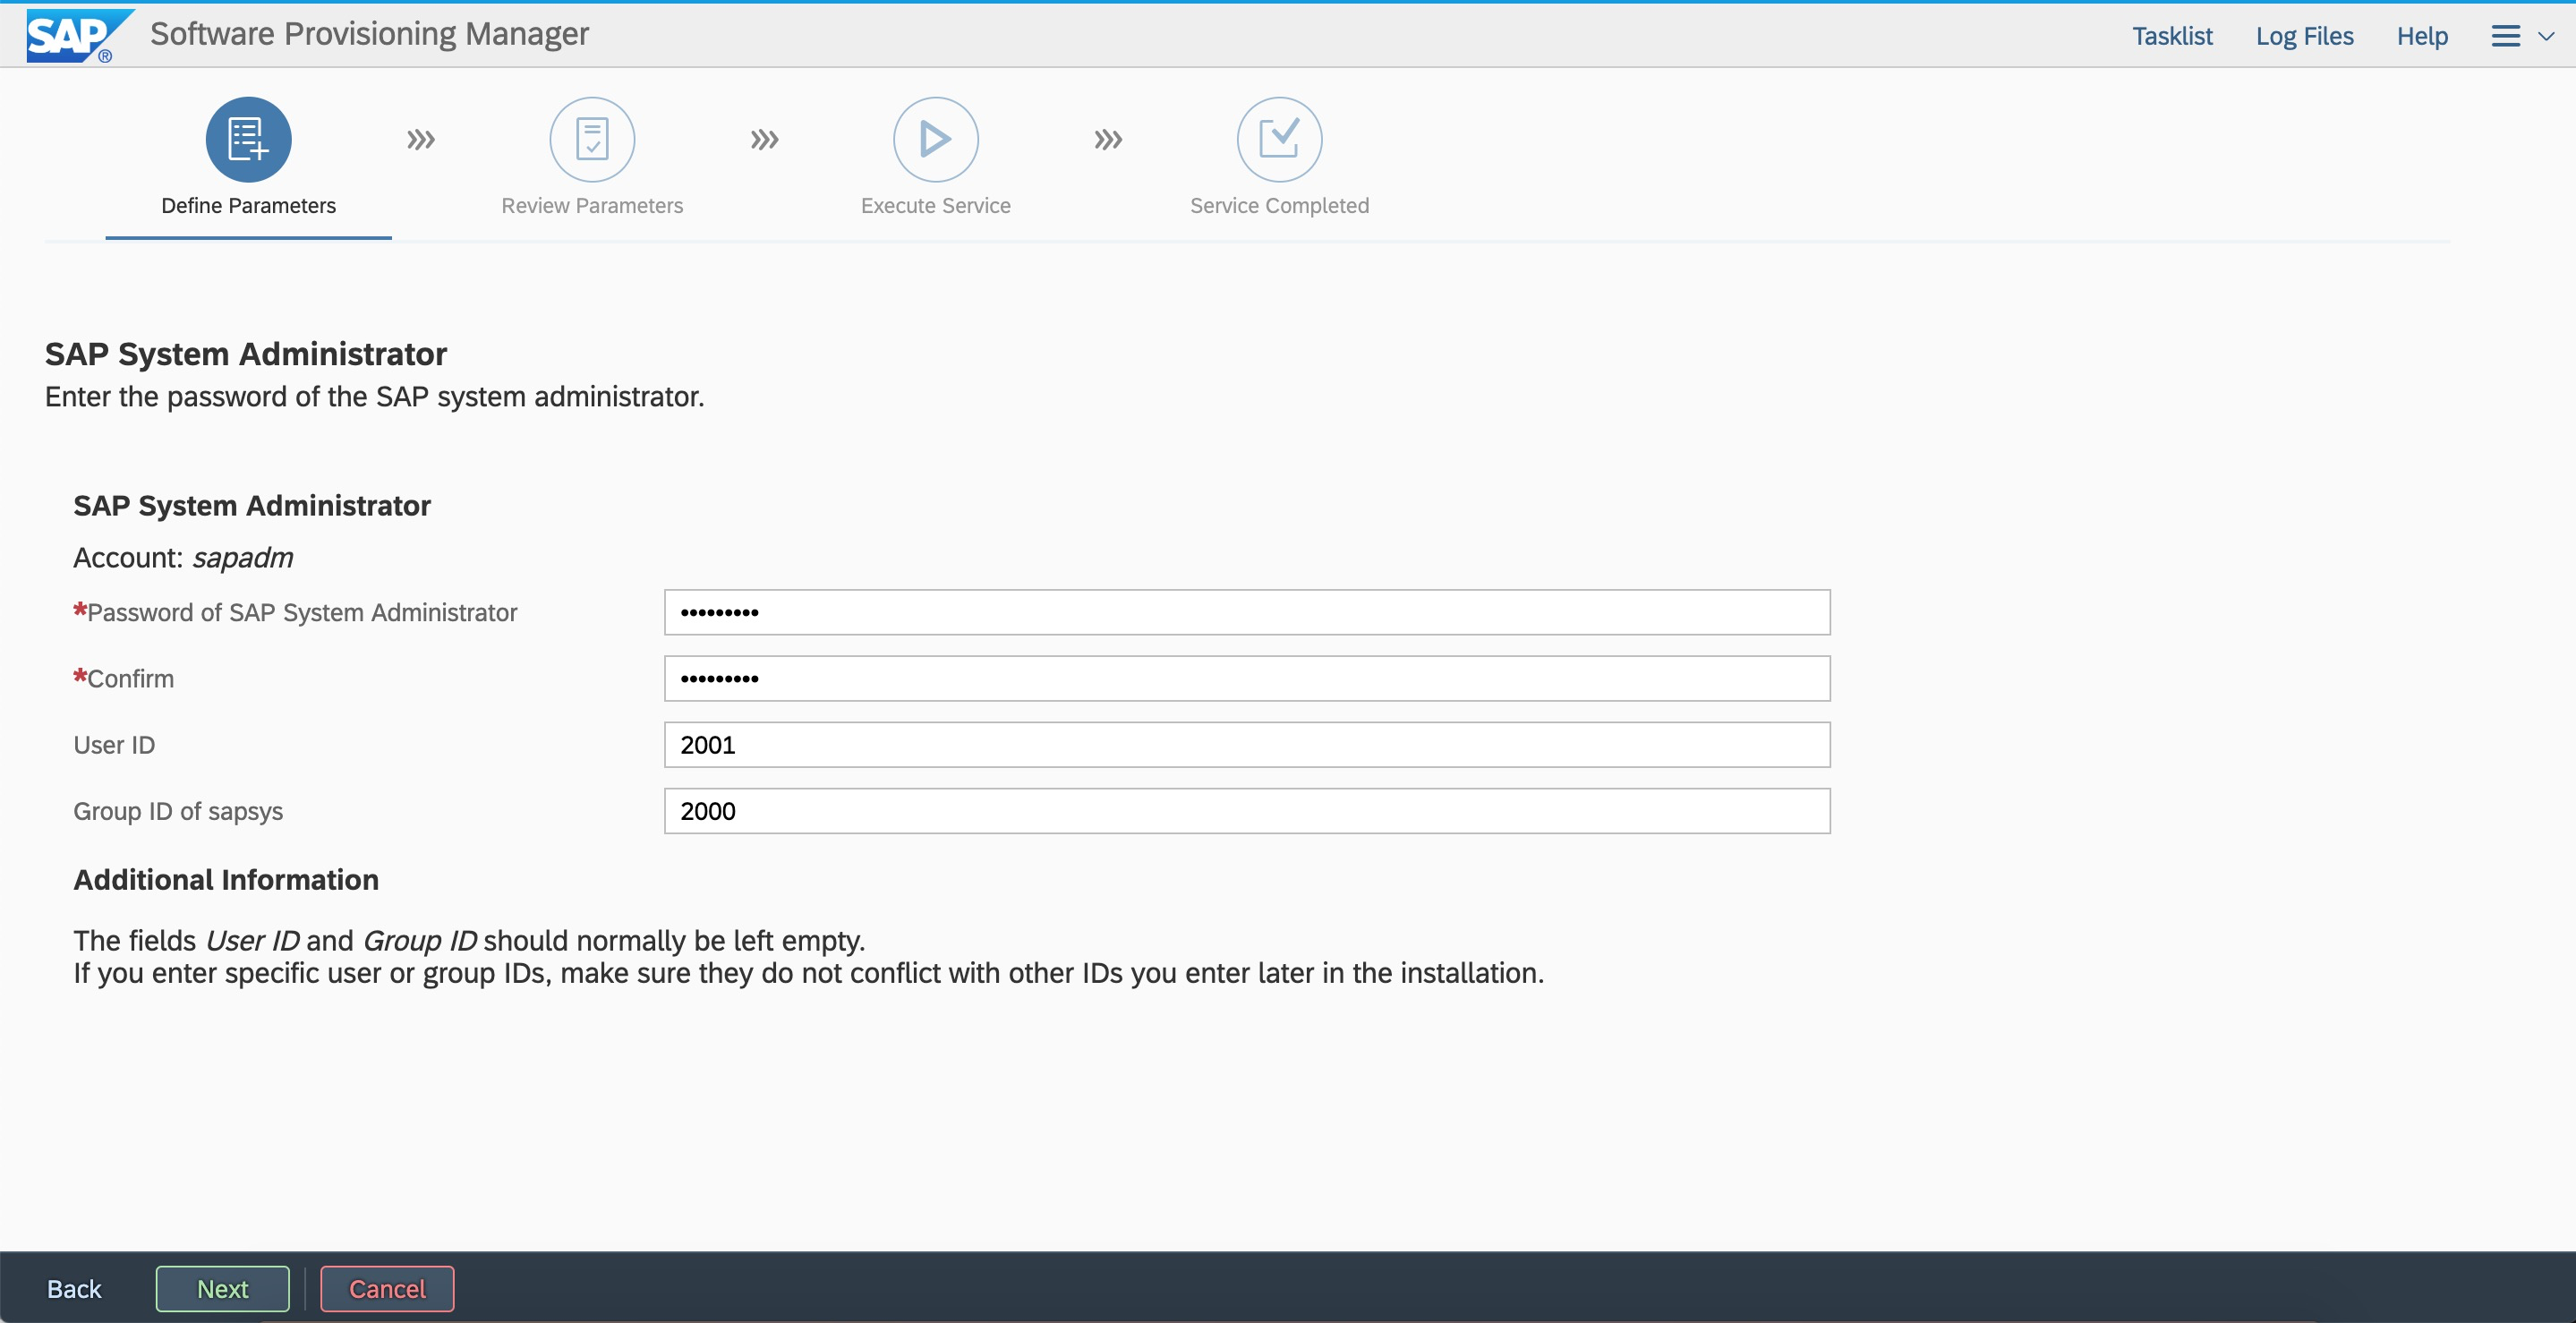
 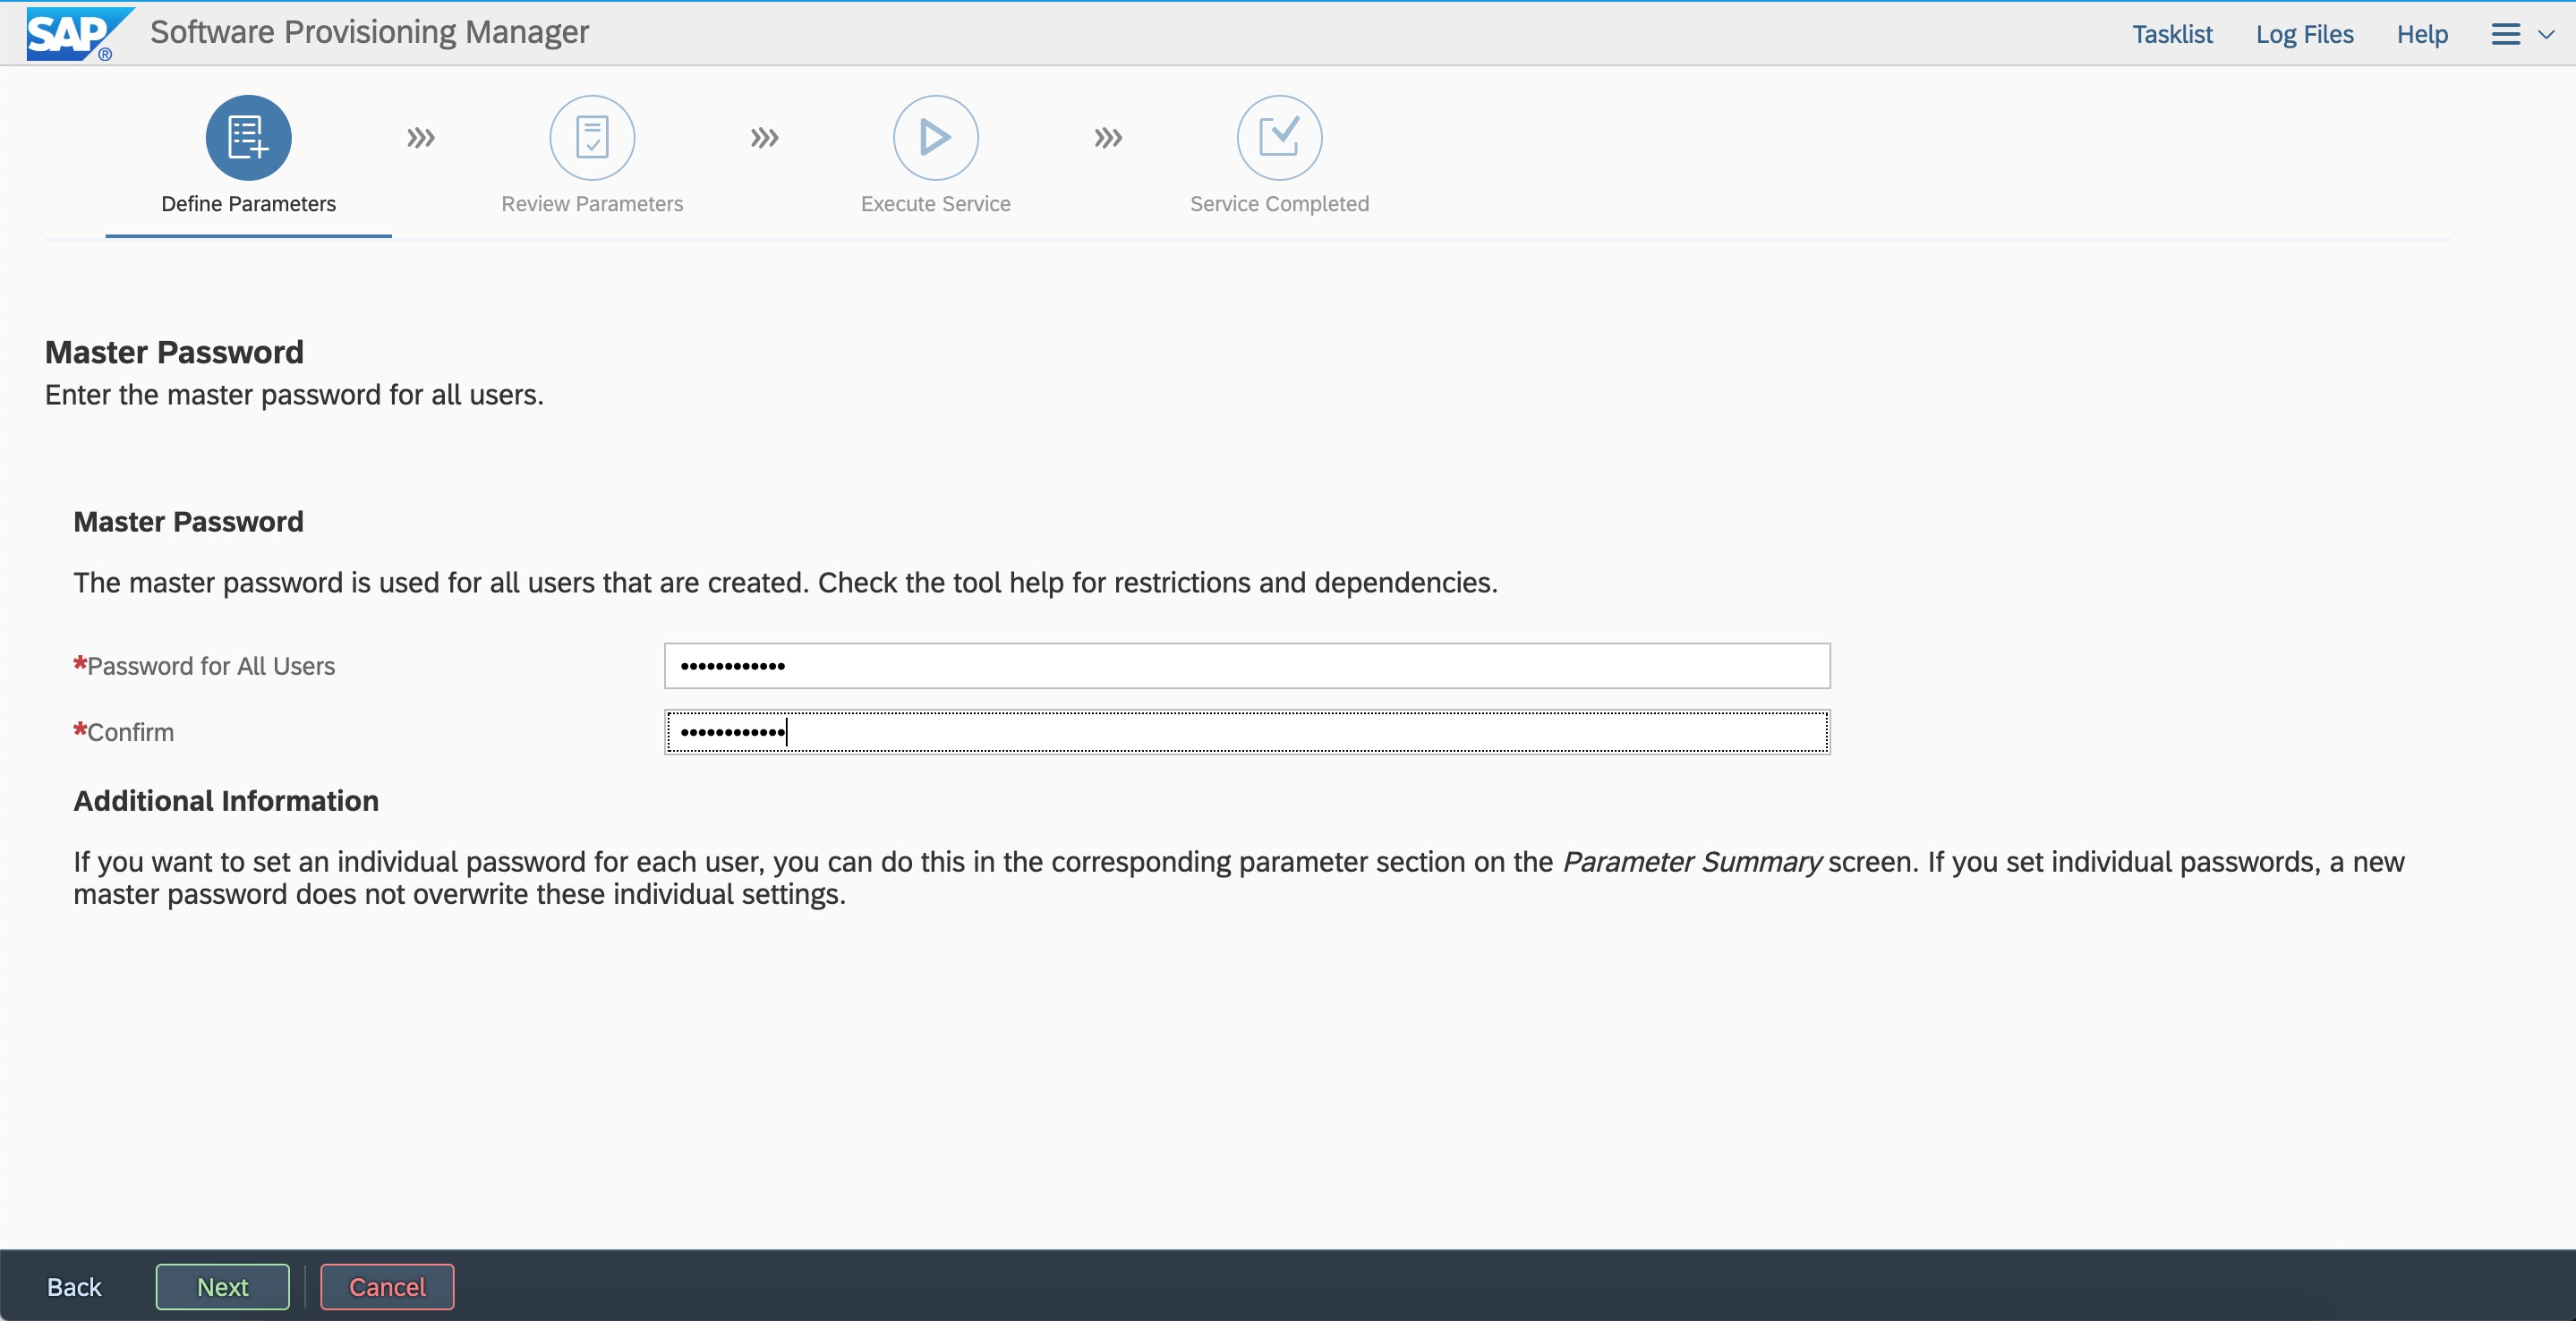 Enter the user ID and group ID.
  Enter the kernel path.
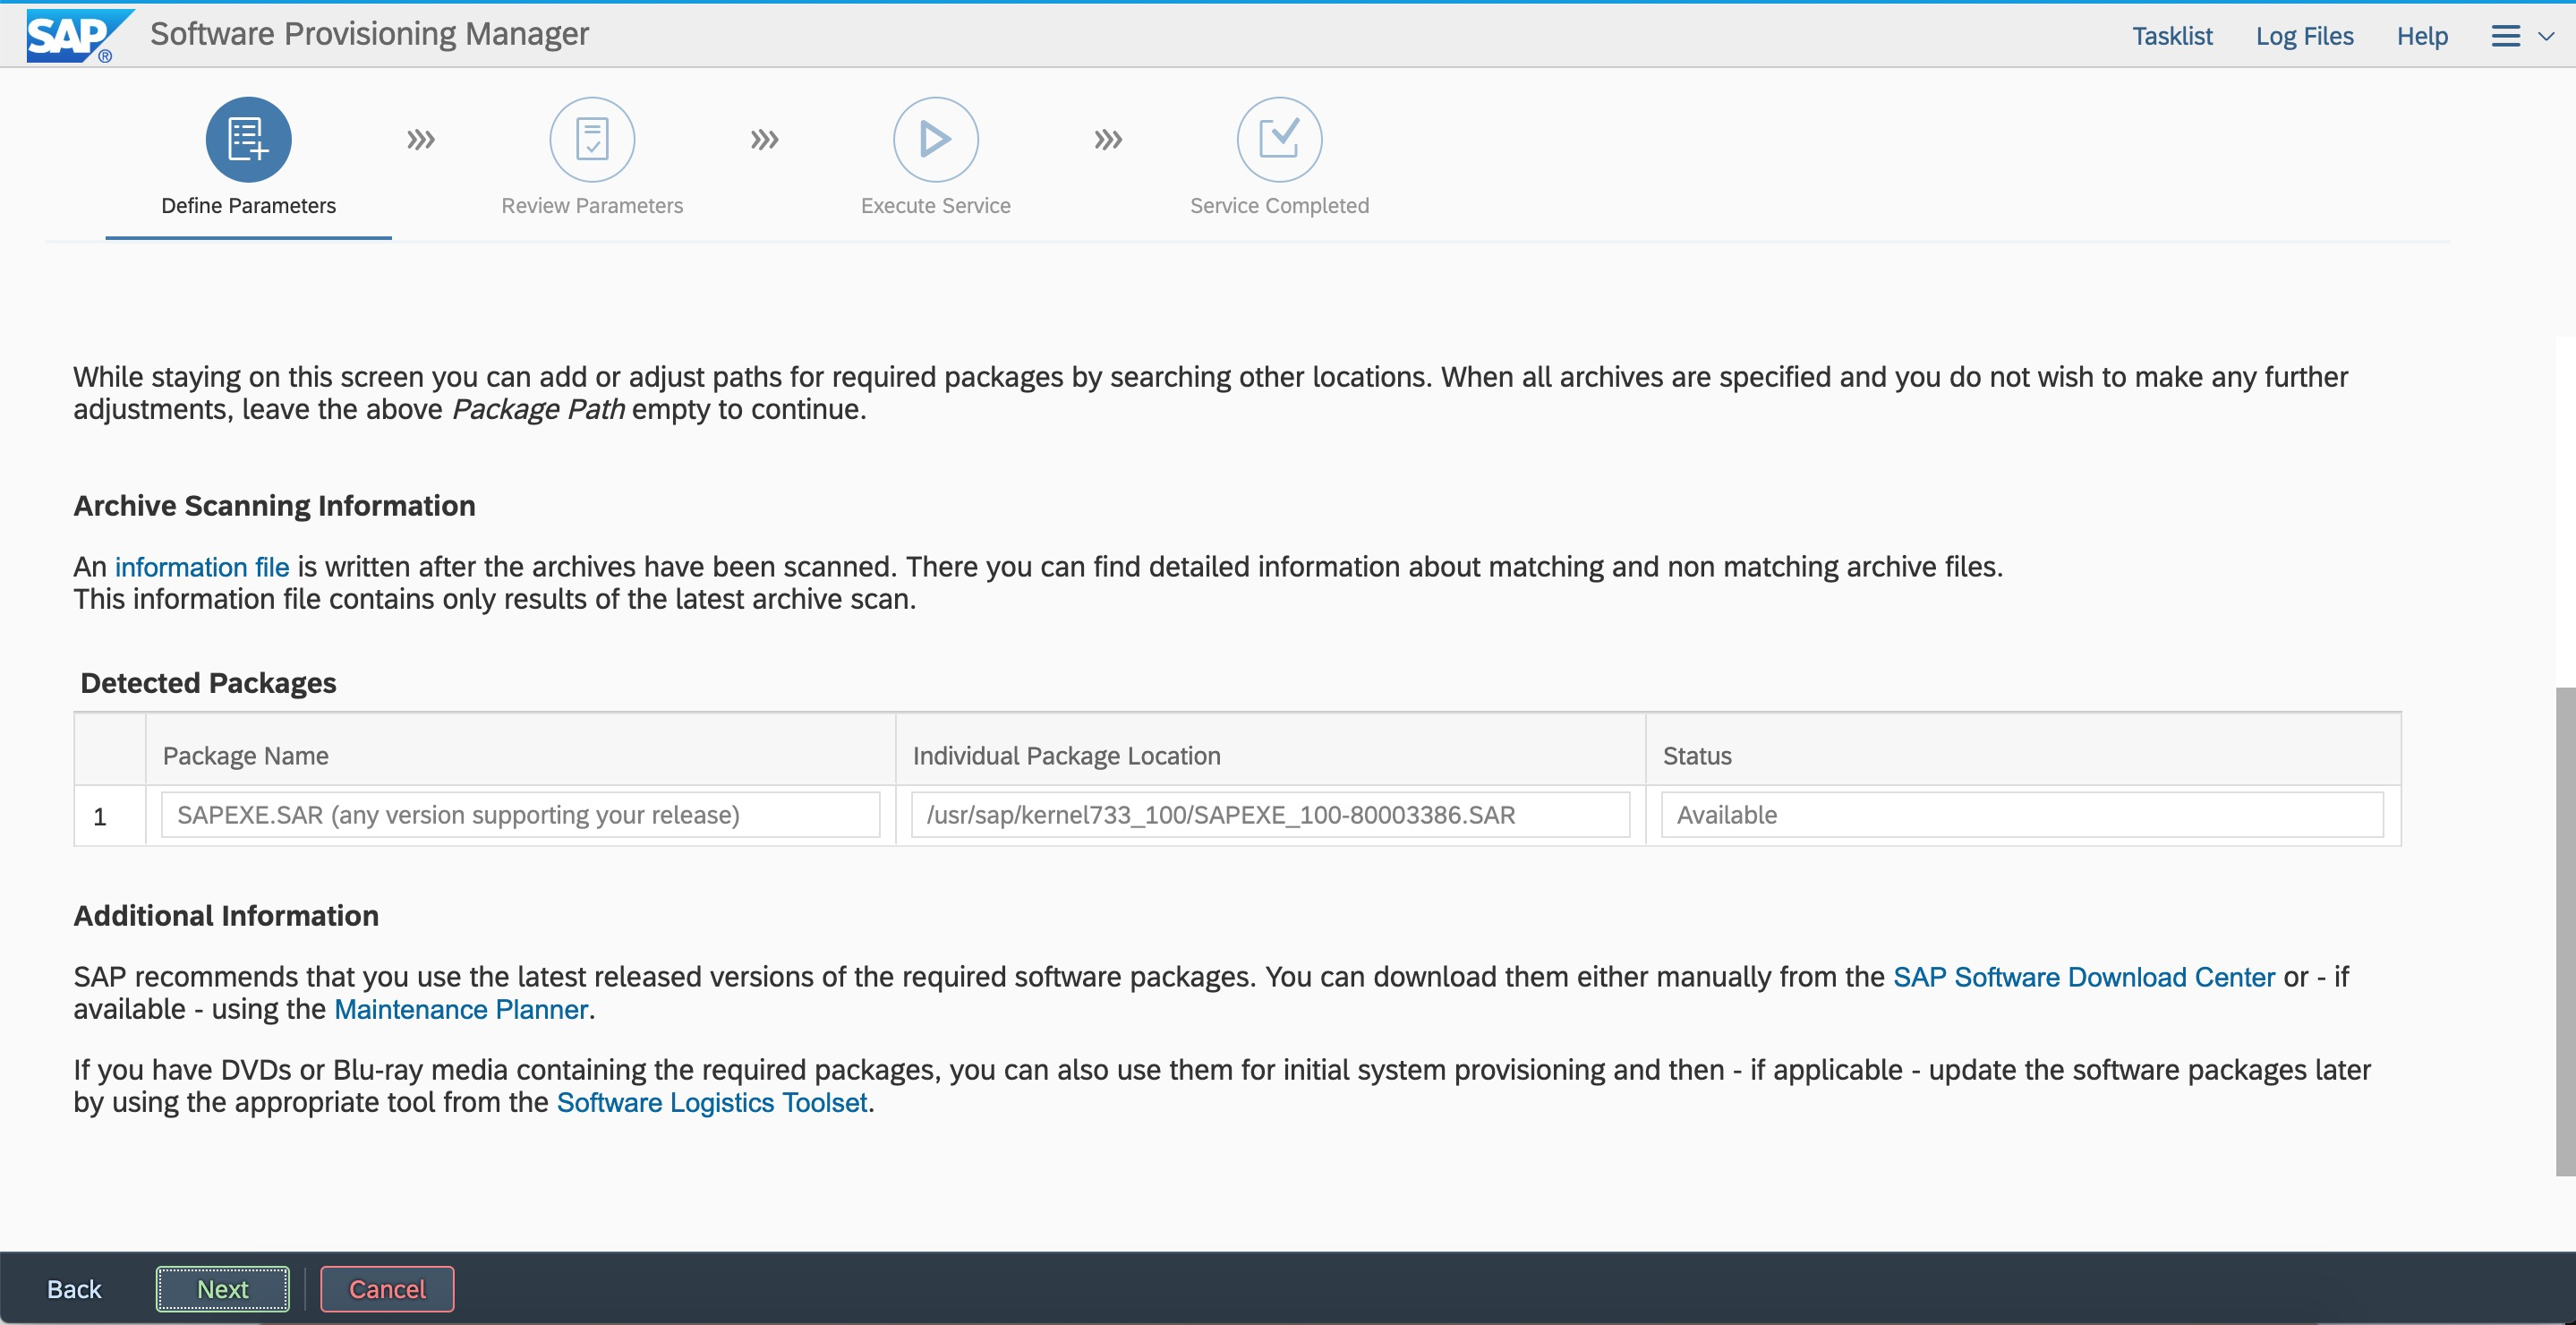
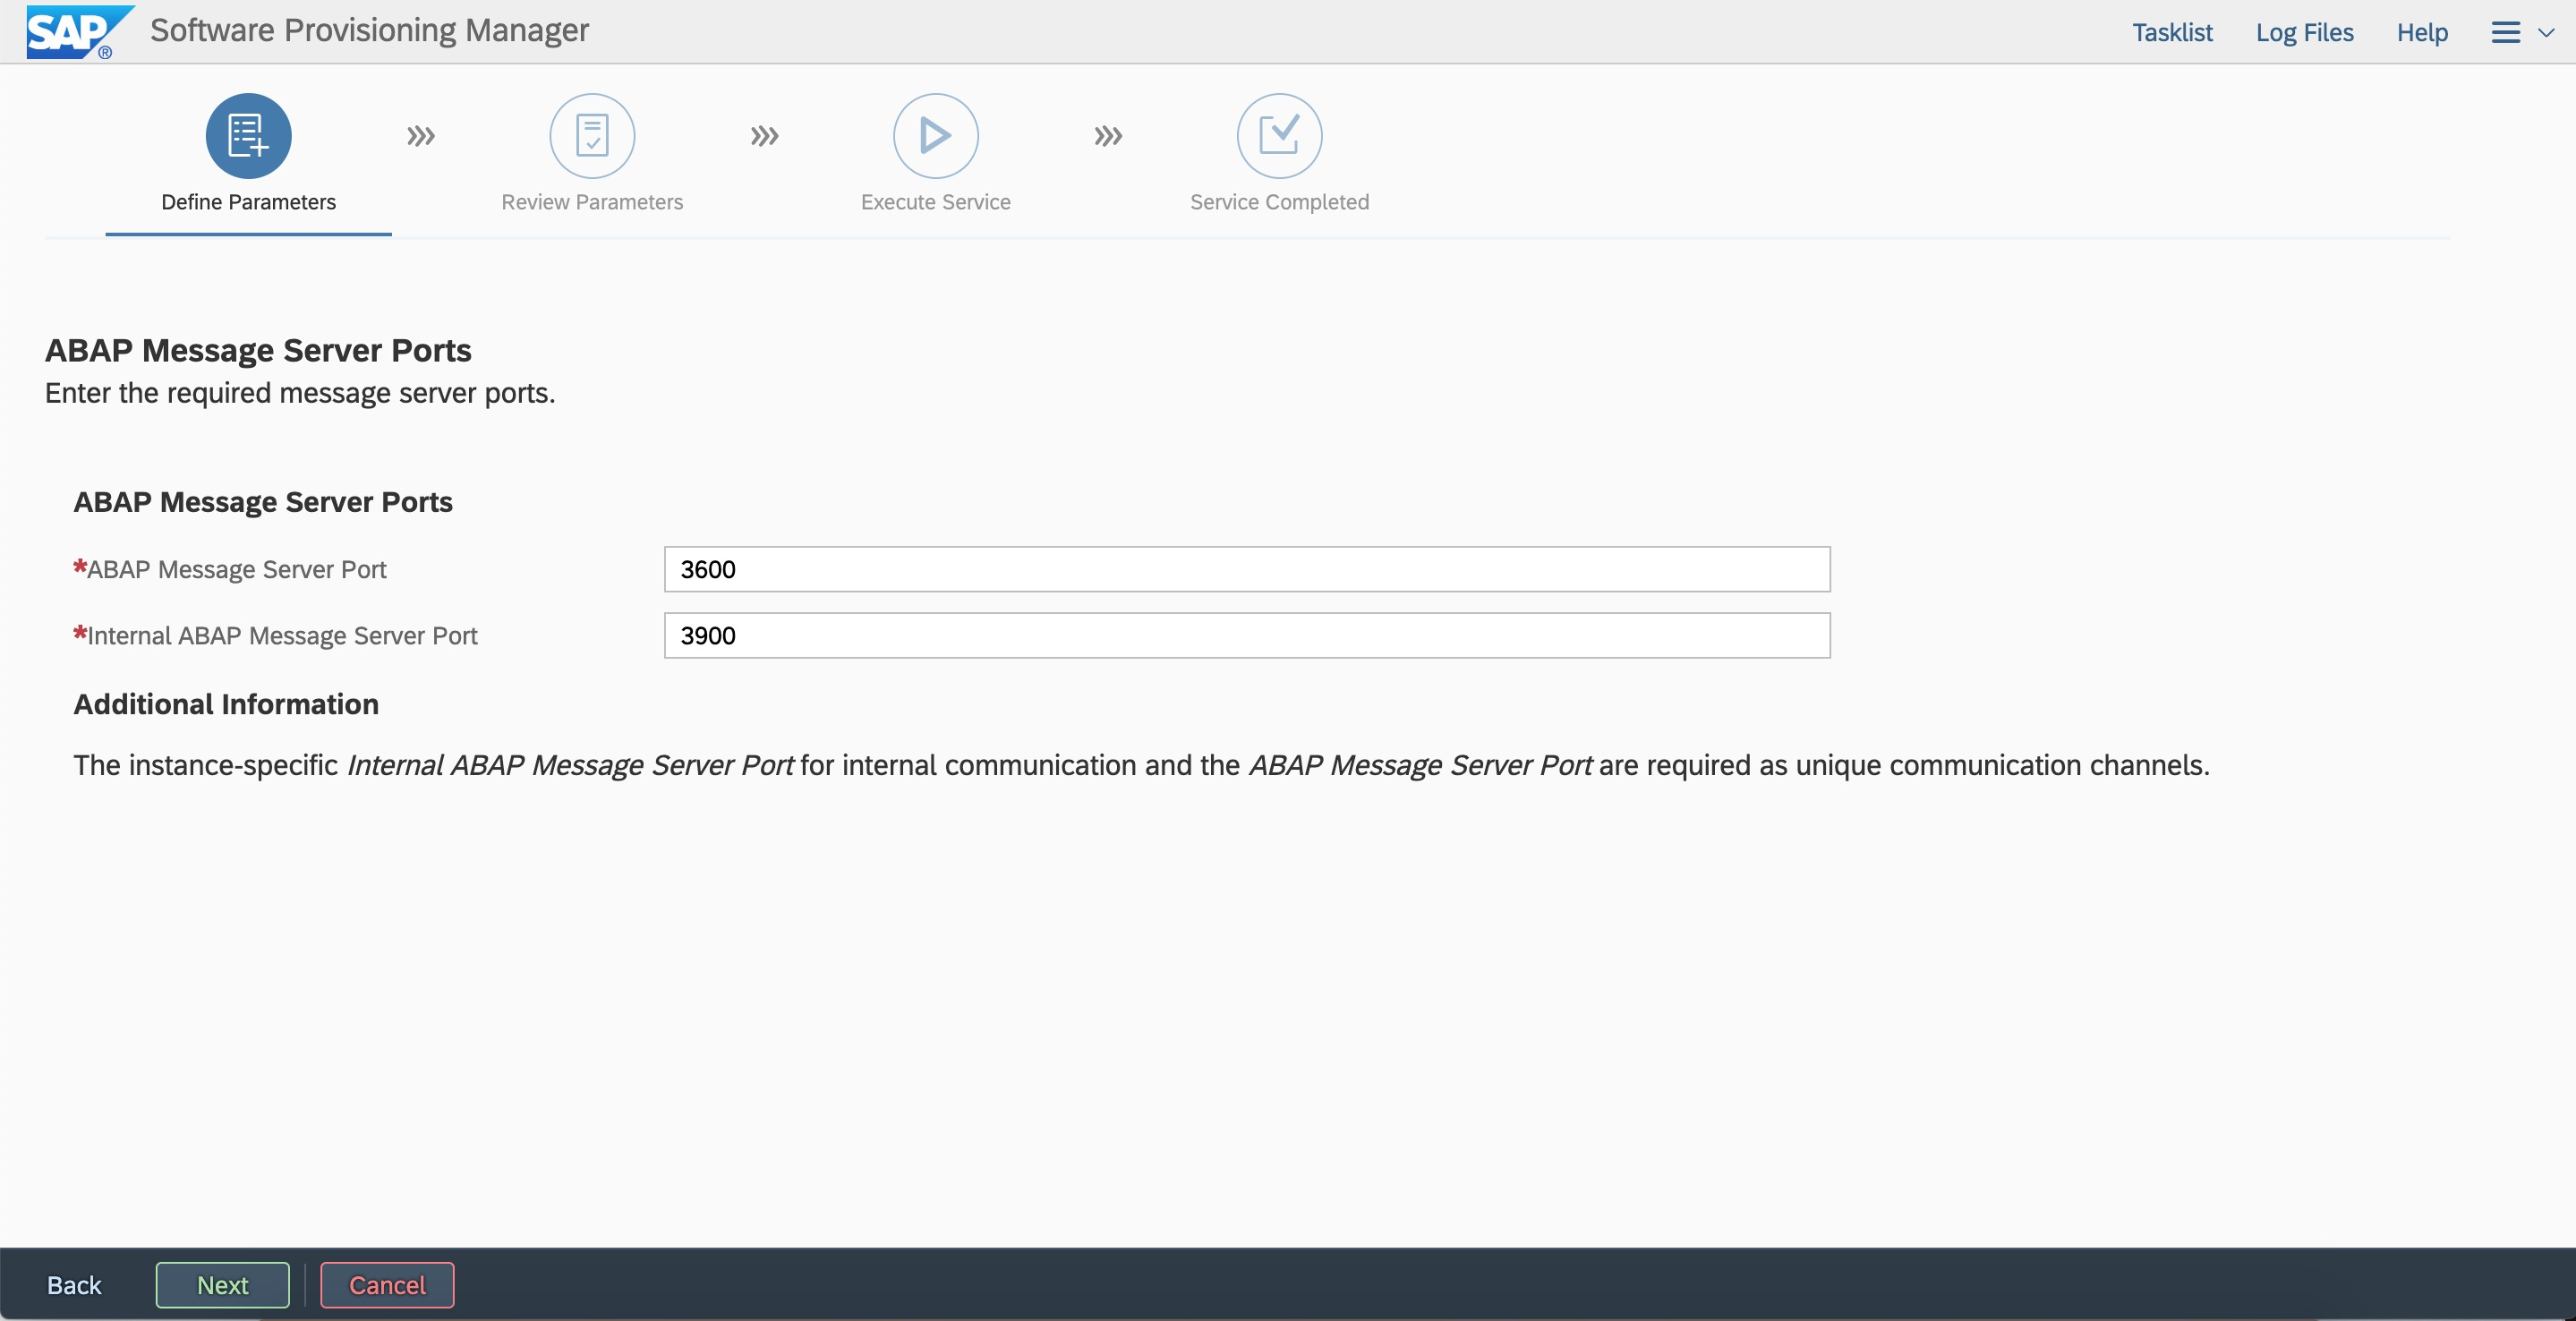
 Enter the ASCS instance number and virtual hostname.
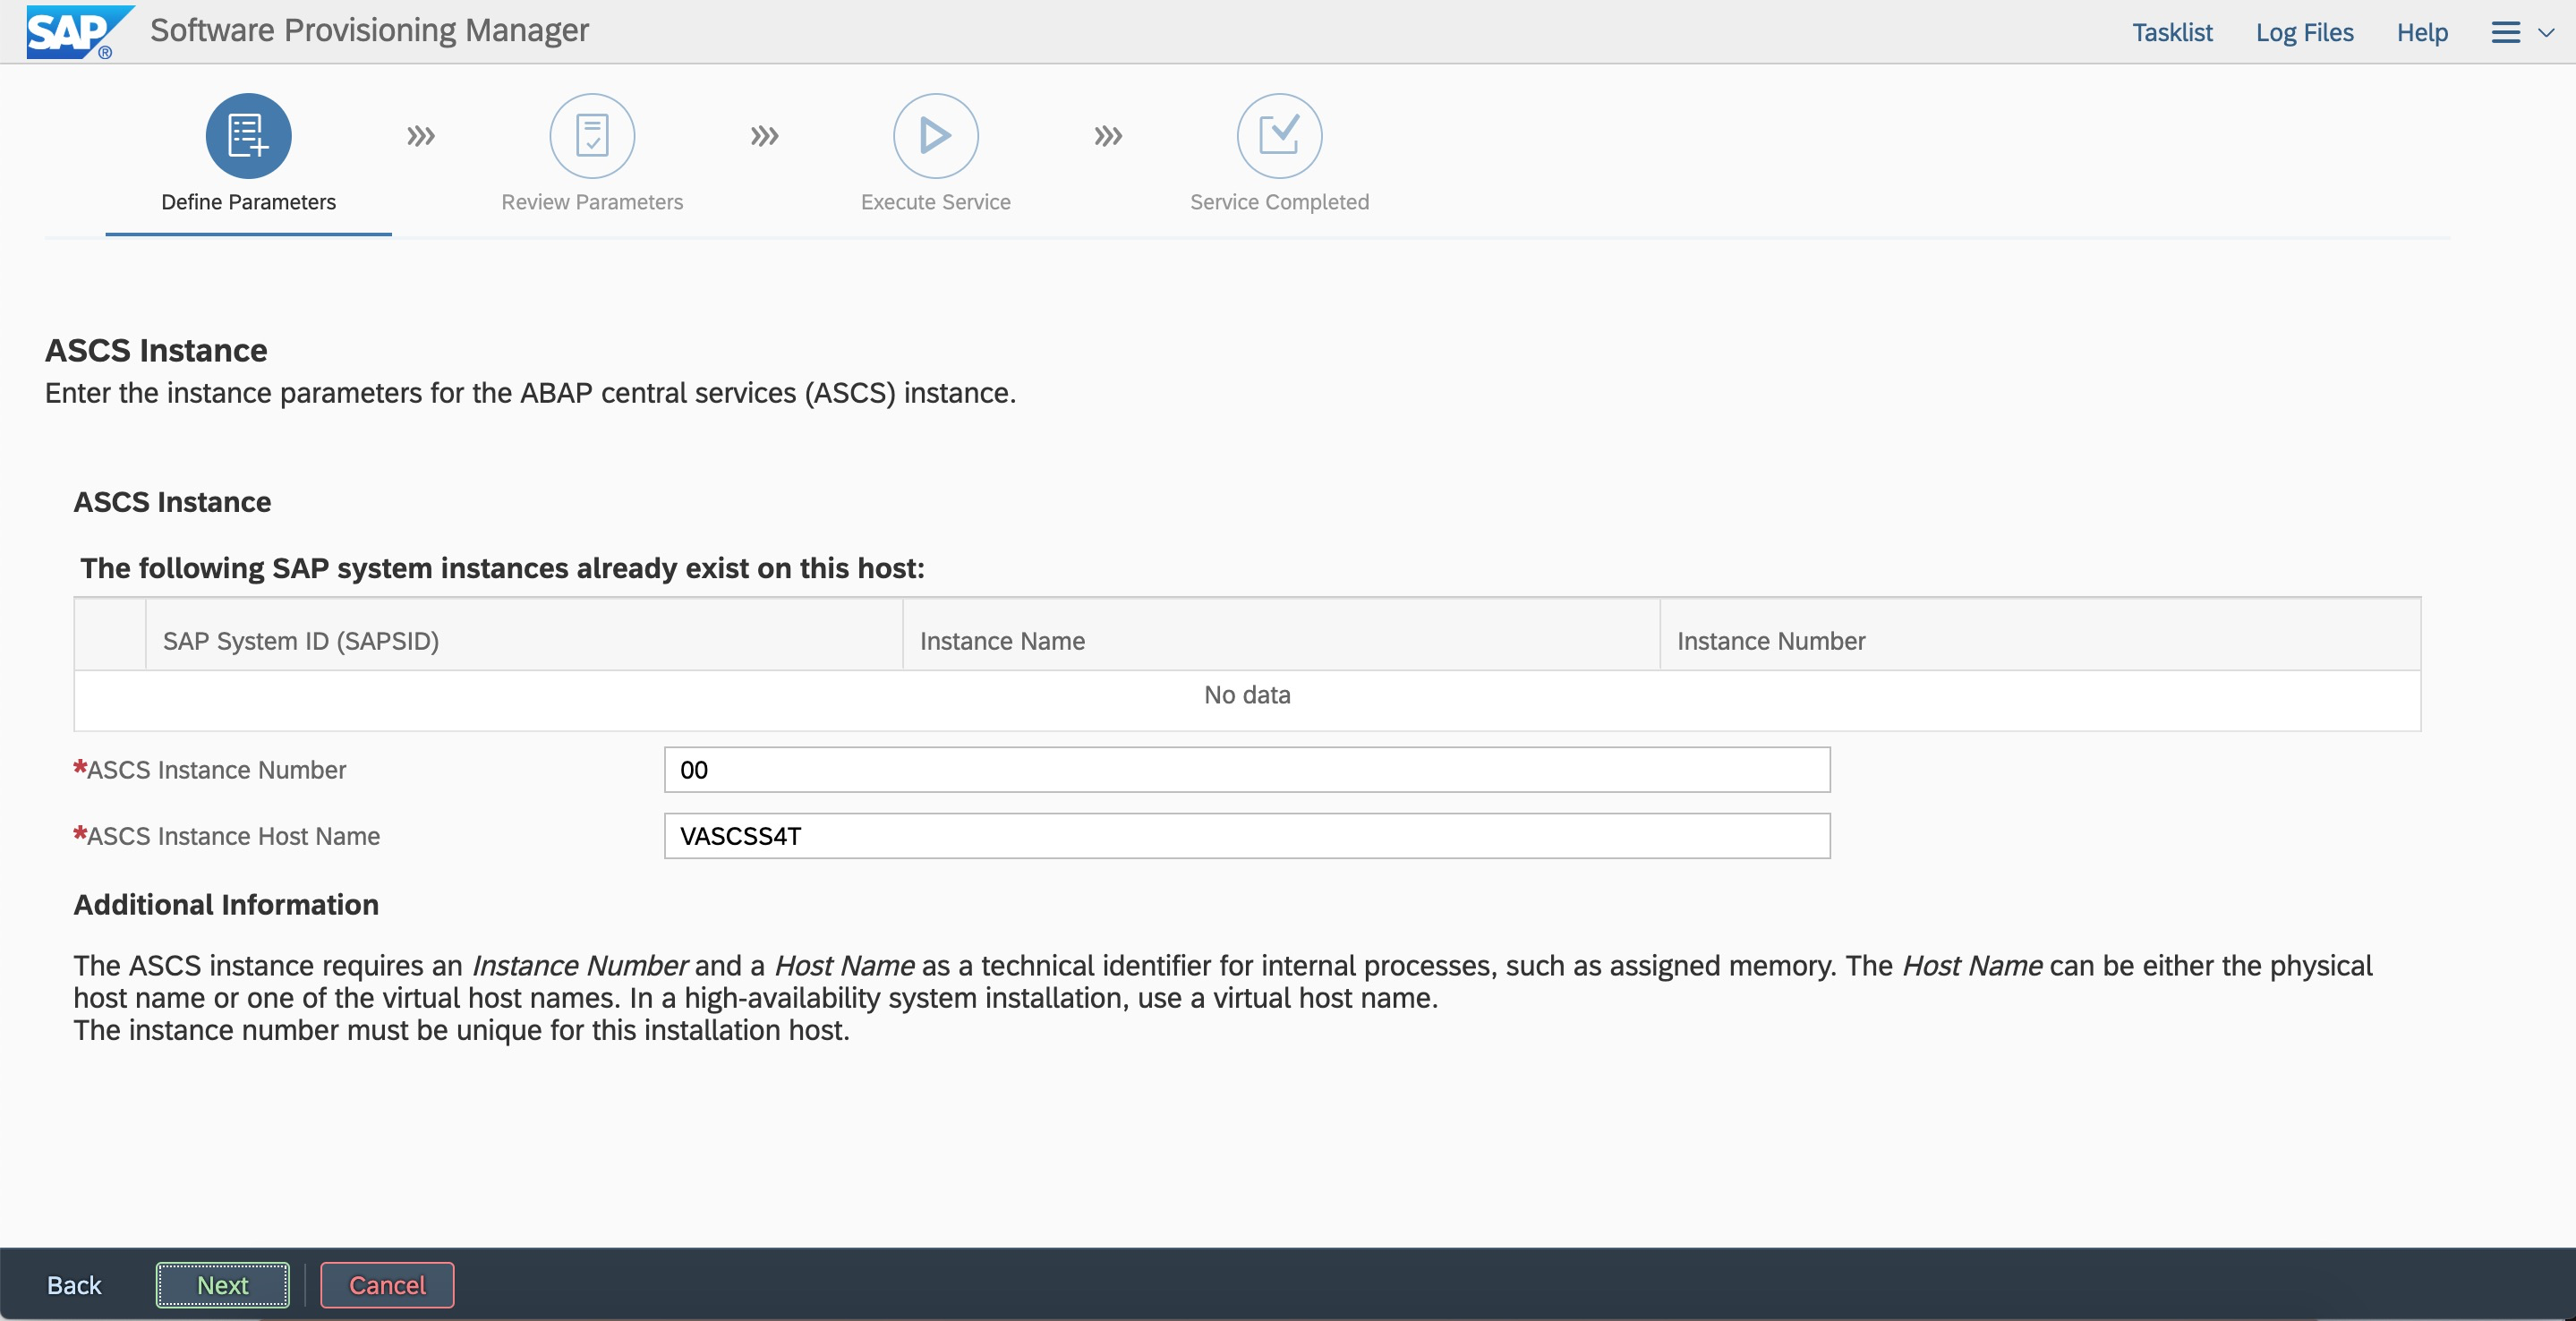
 Integrate Web Dispatcher and Gateway.
 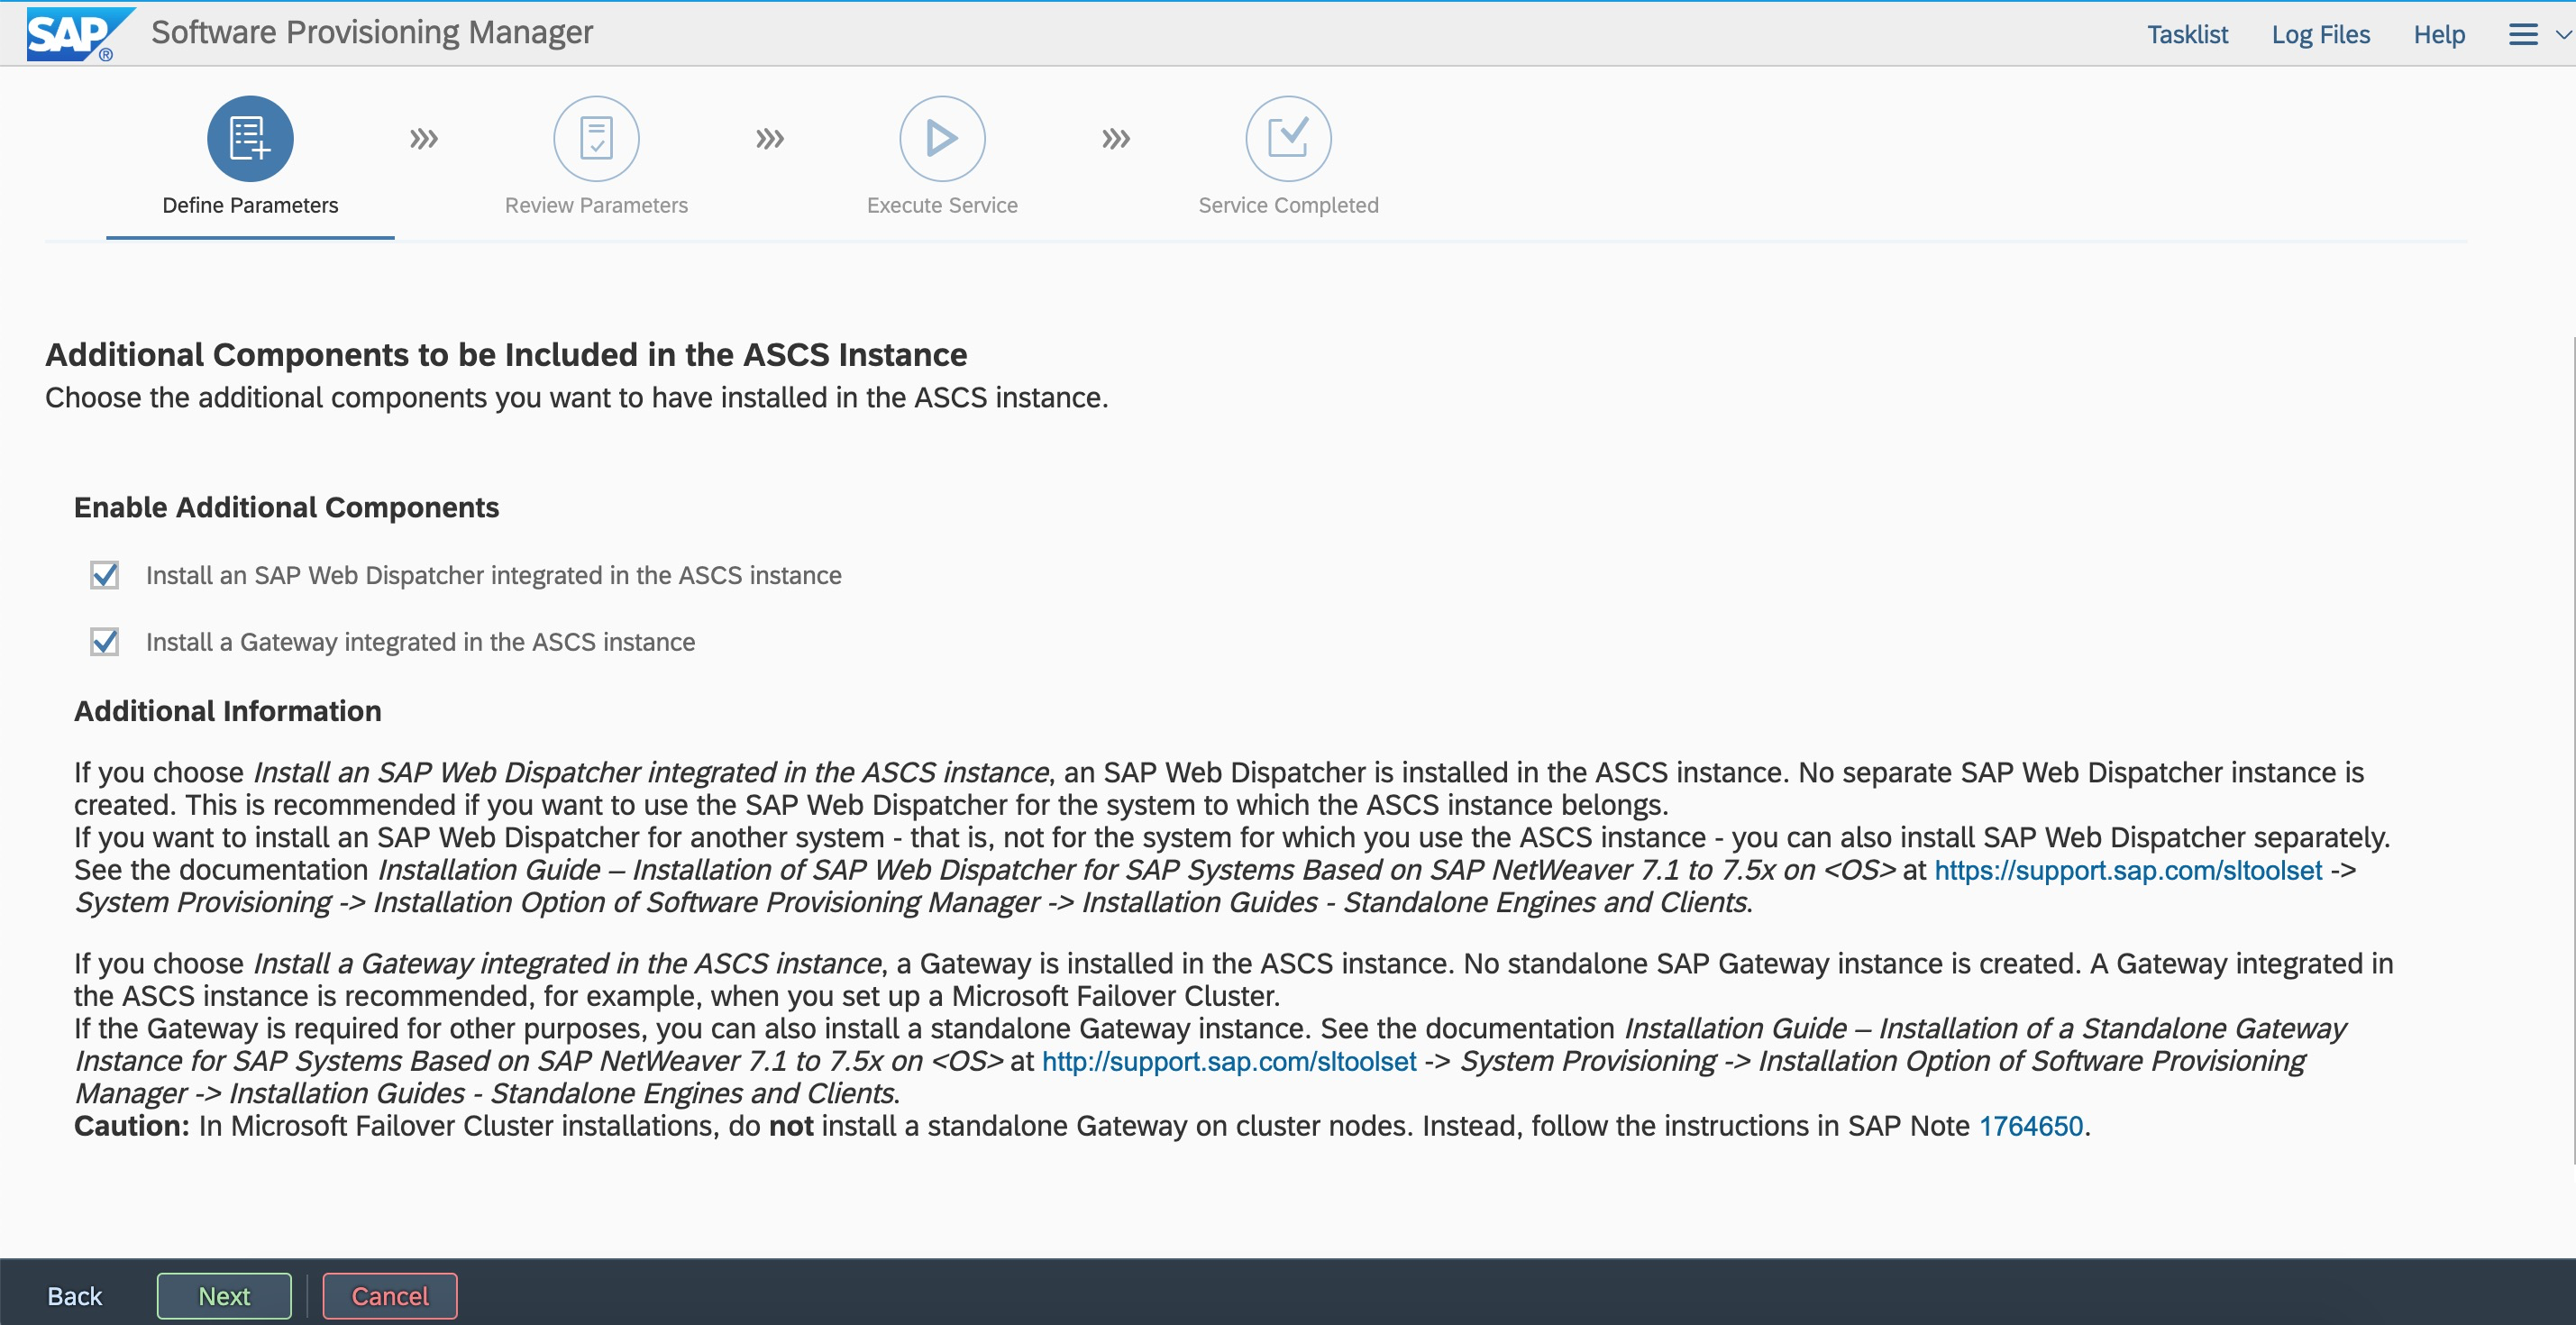 Configure Web Dispatcher. You can modify the parameters.
 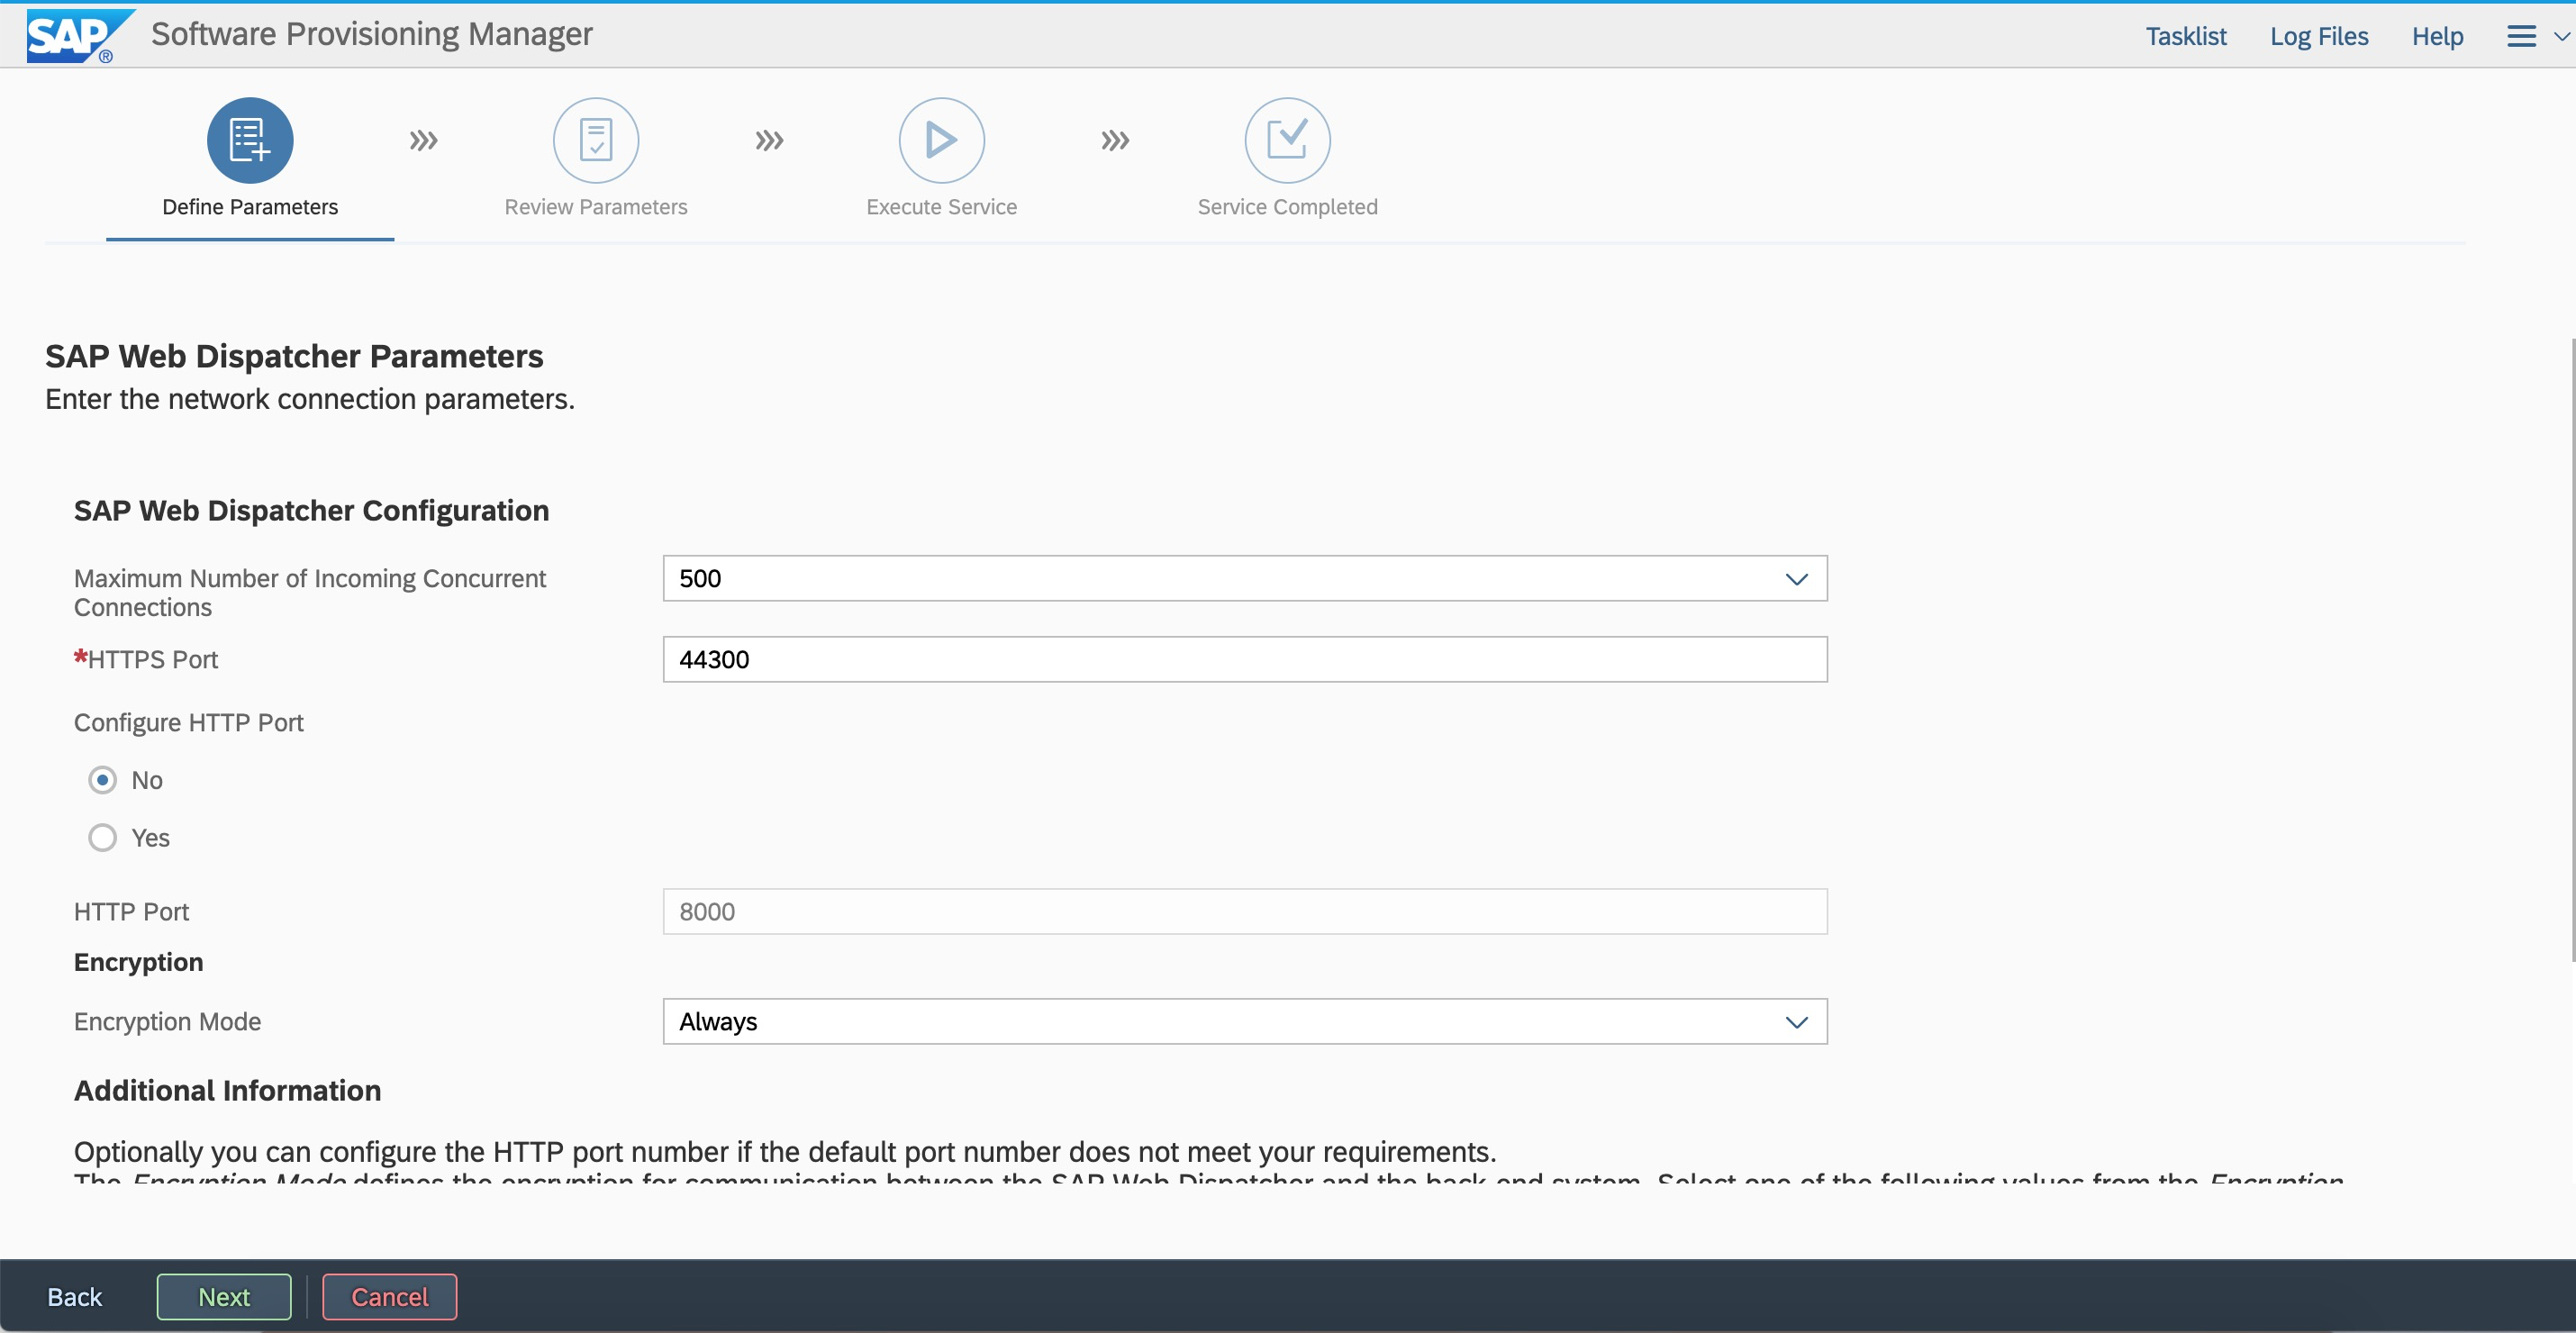 For security reasons, we recommend that you clear the sidadm user from the sapinst group.
 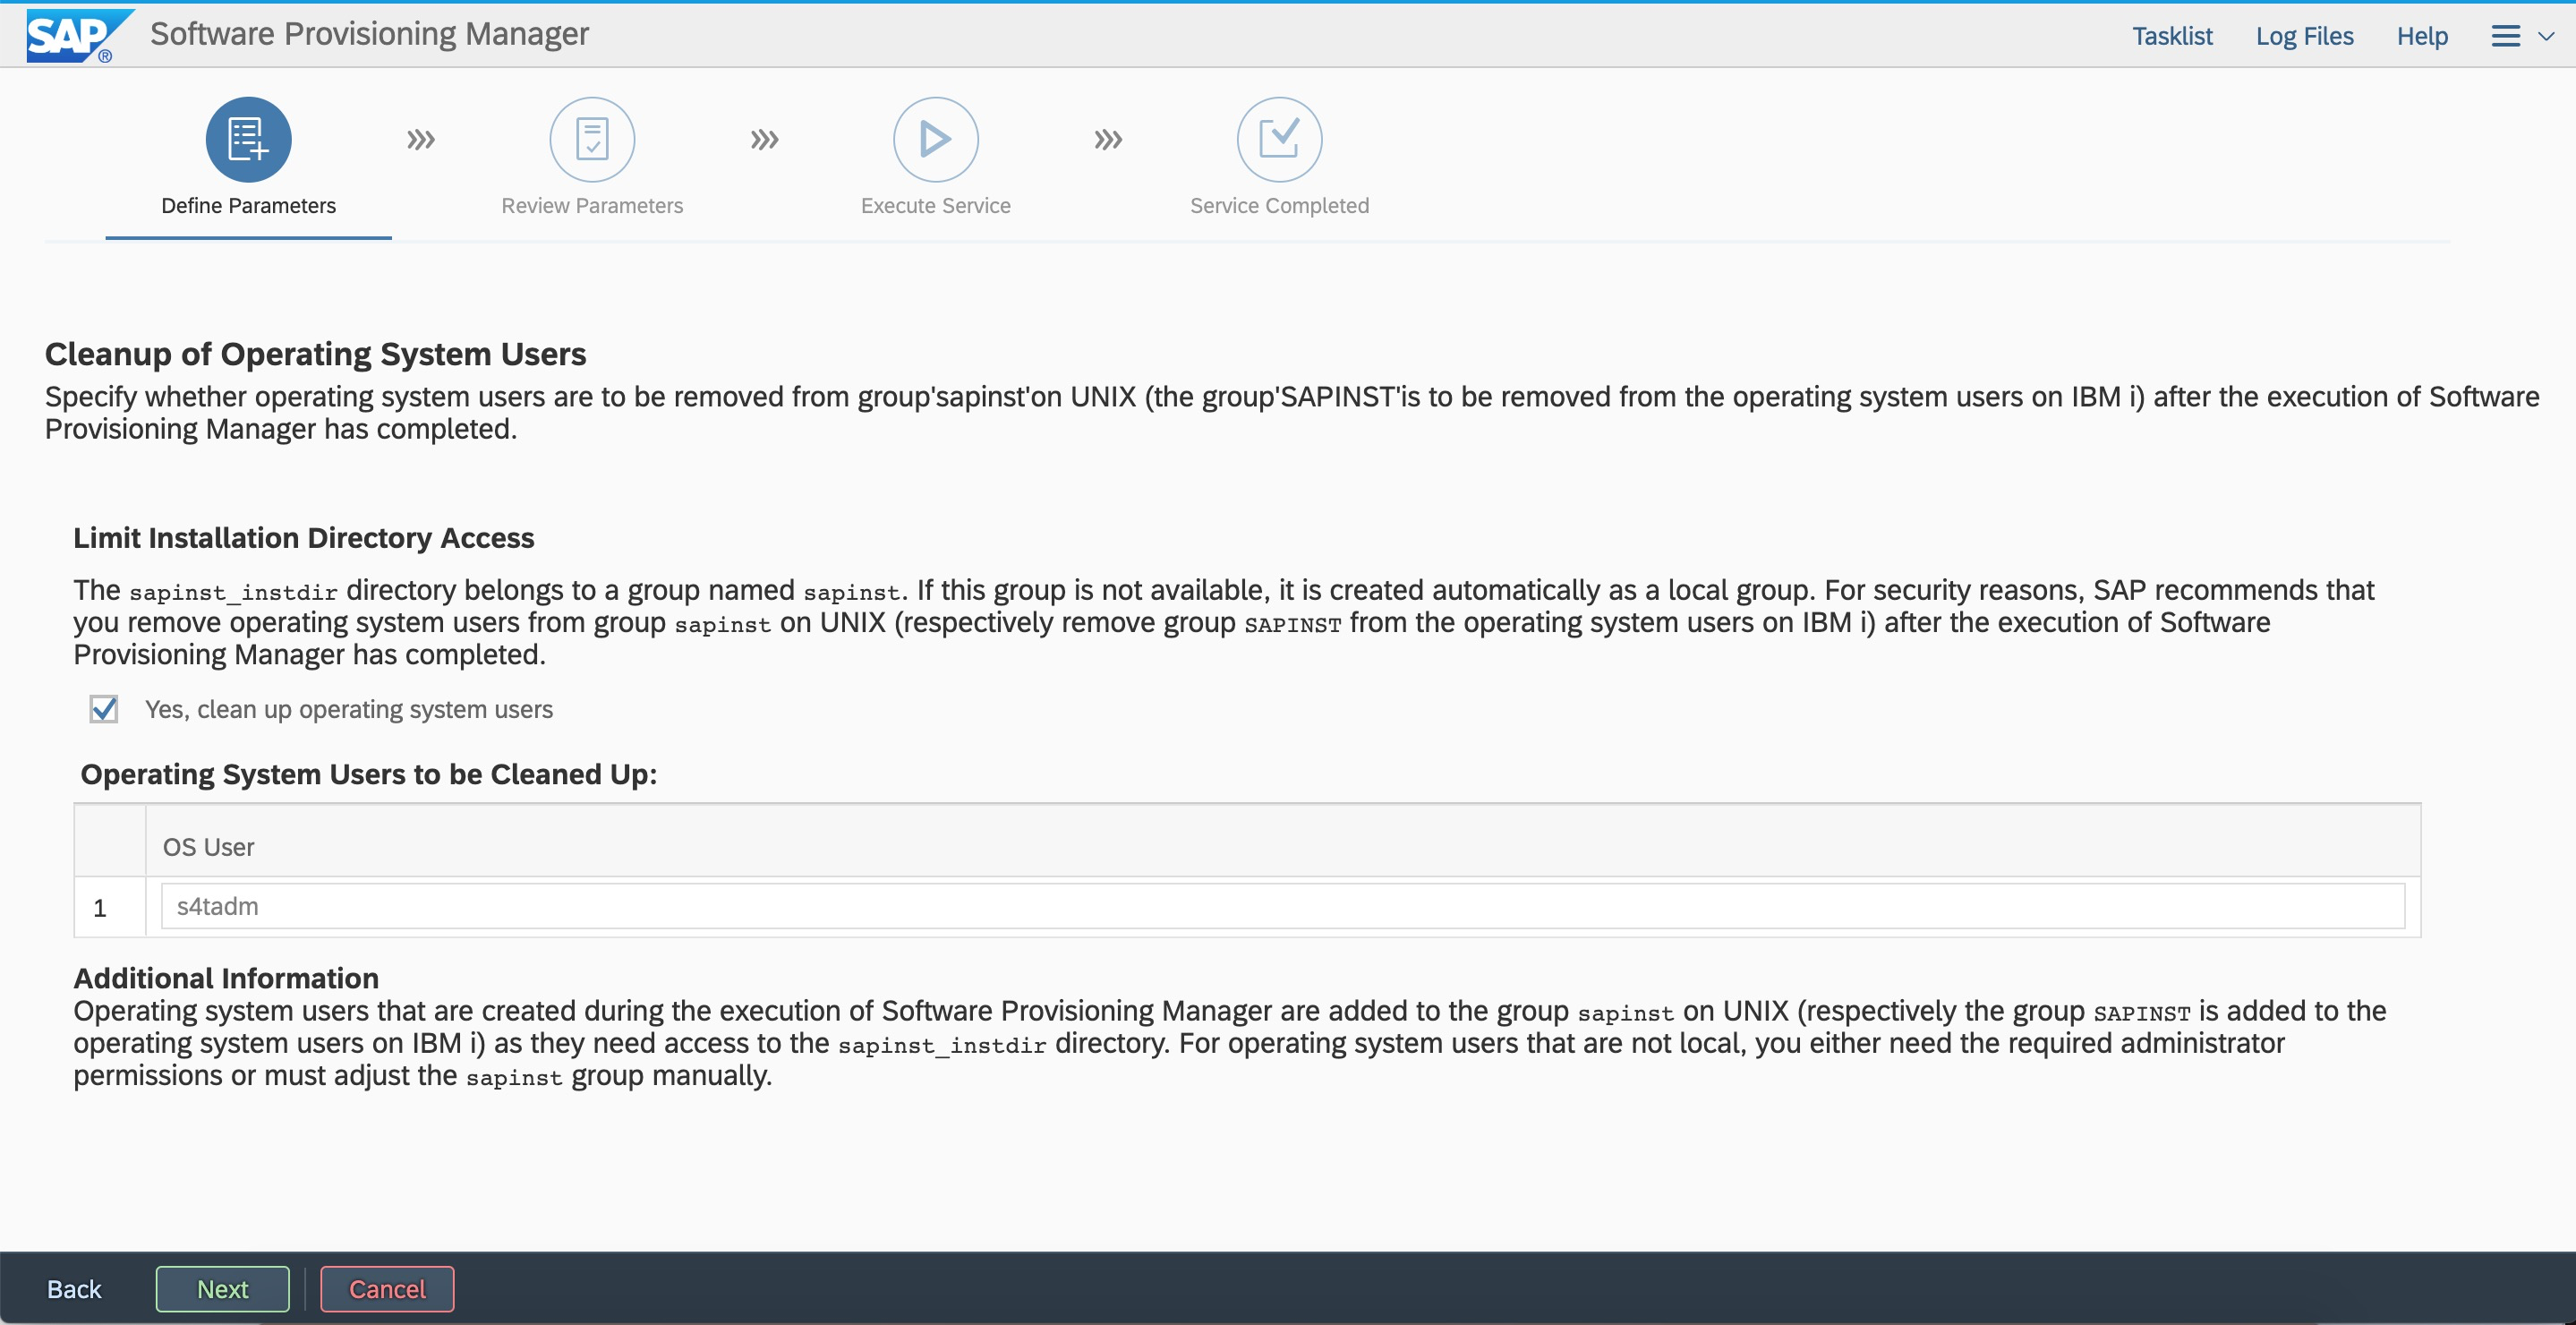 Review parameter configurations. You can modify the parameters that you defined.
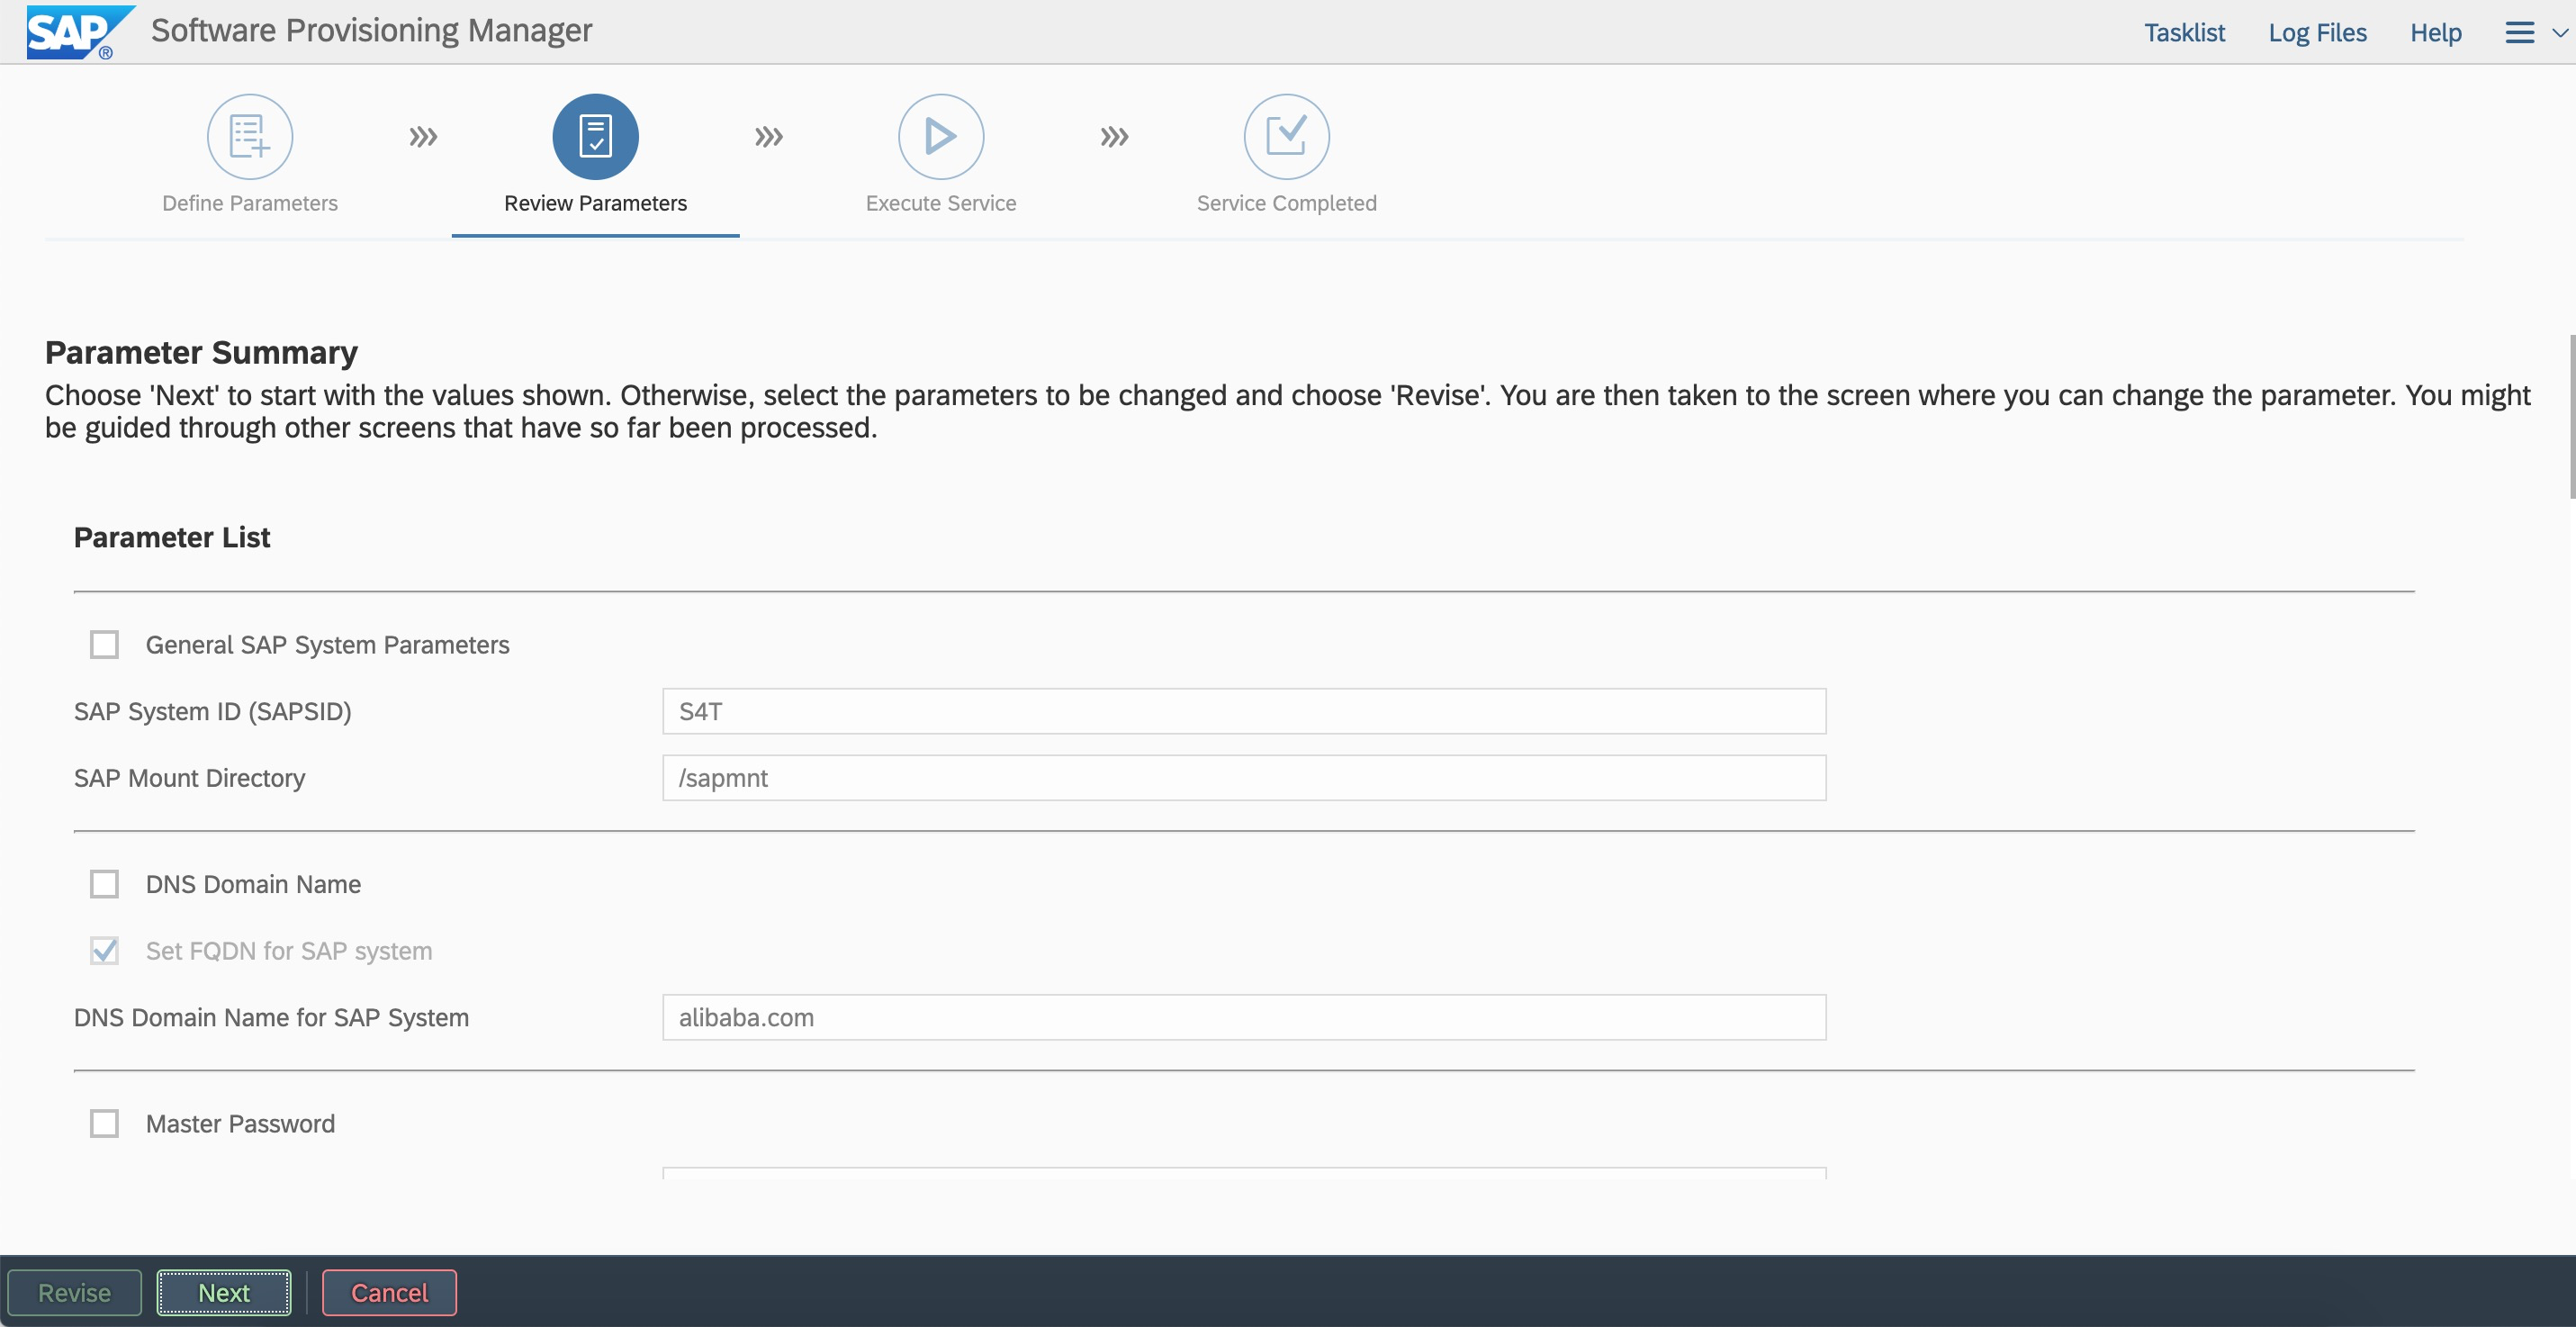
 Check the processes of the message server and enqueue server.
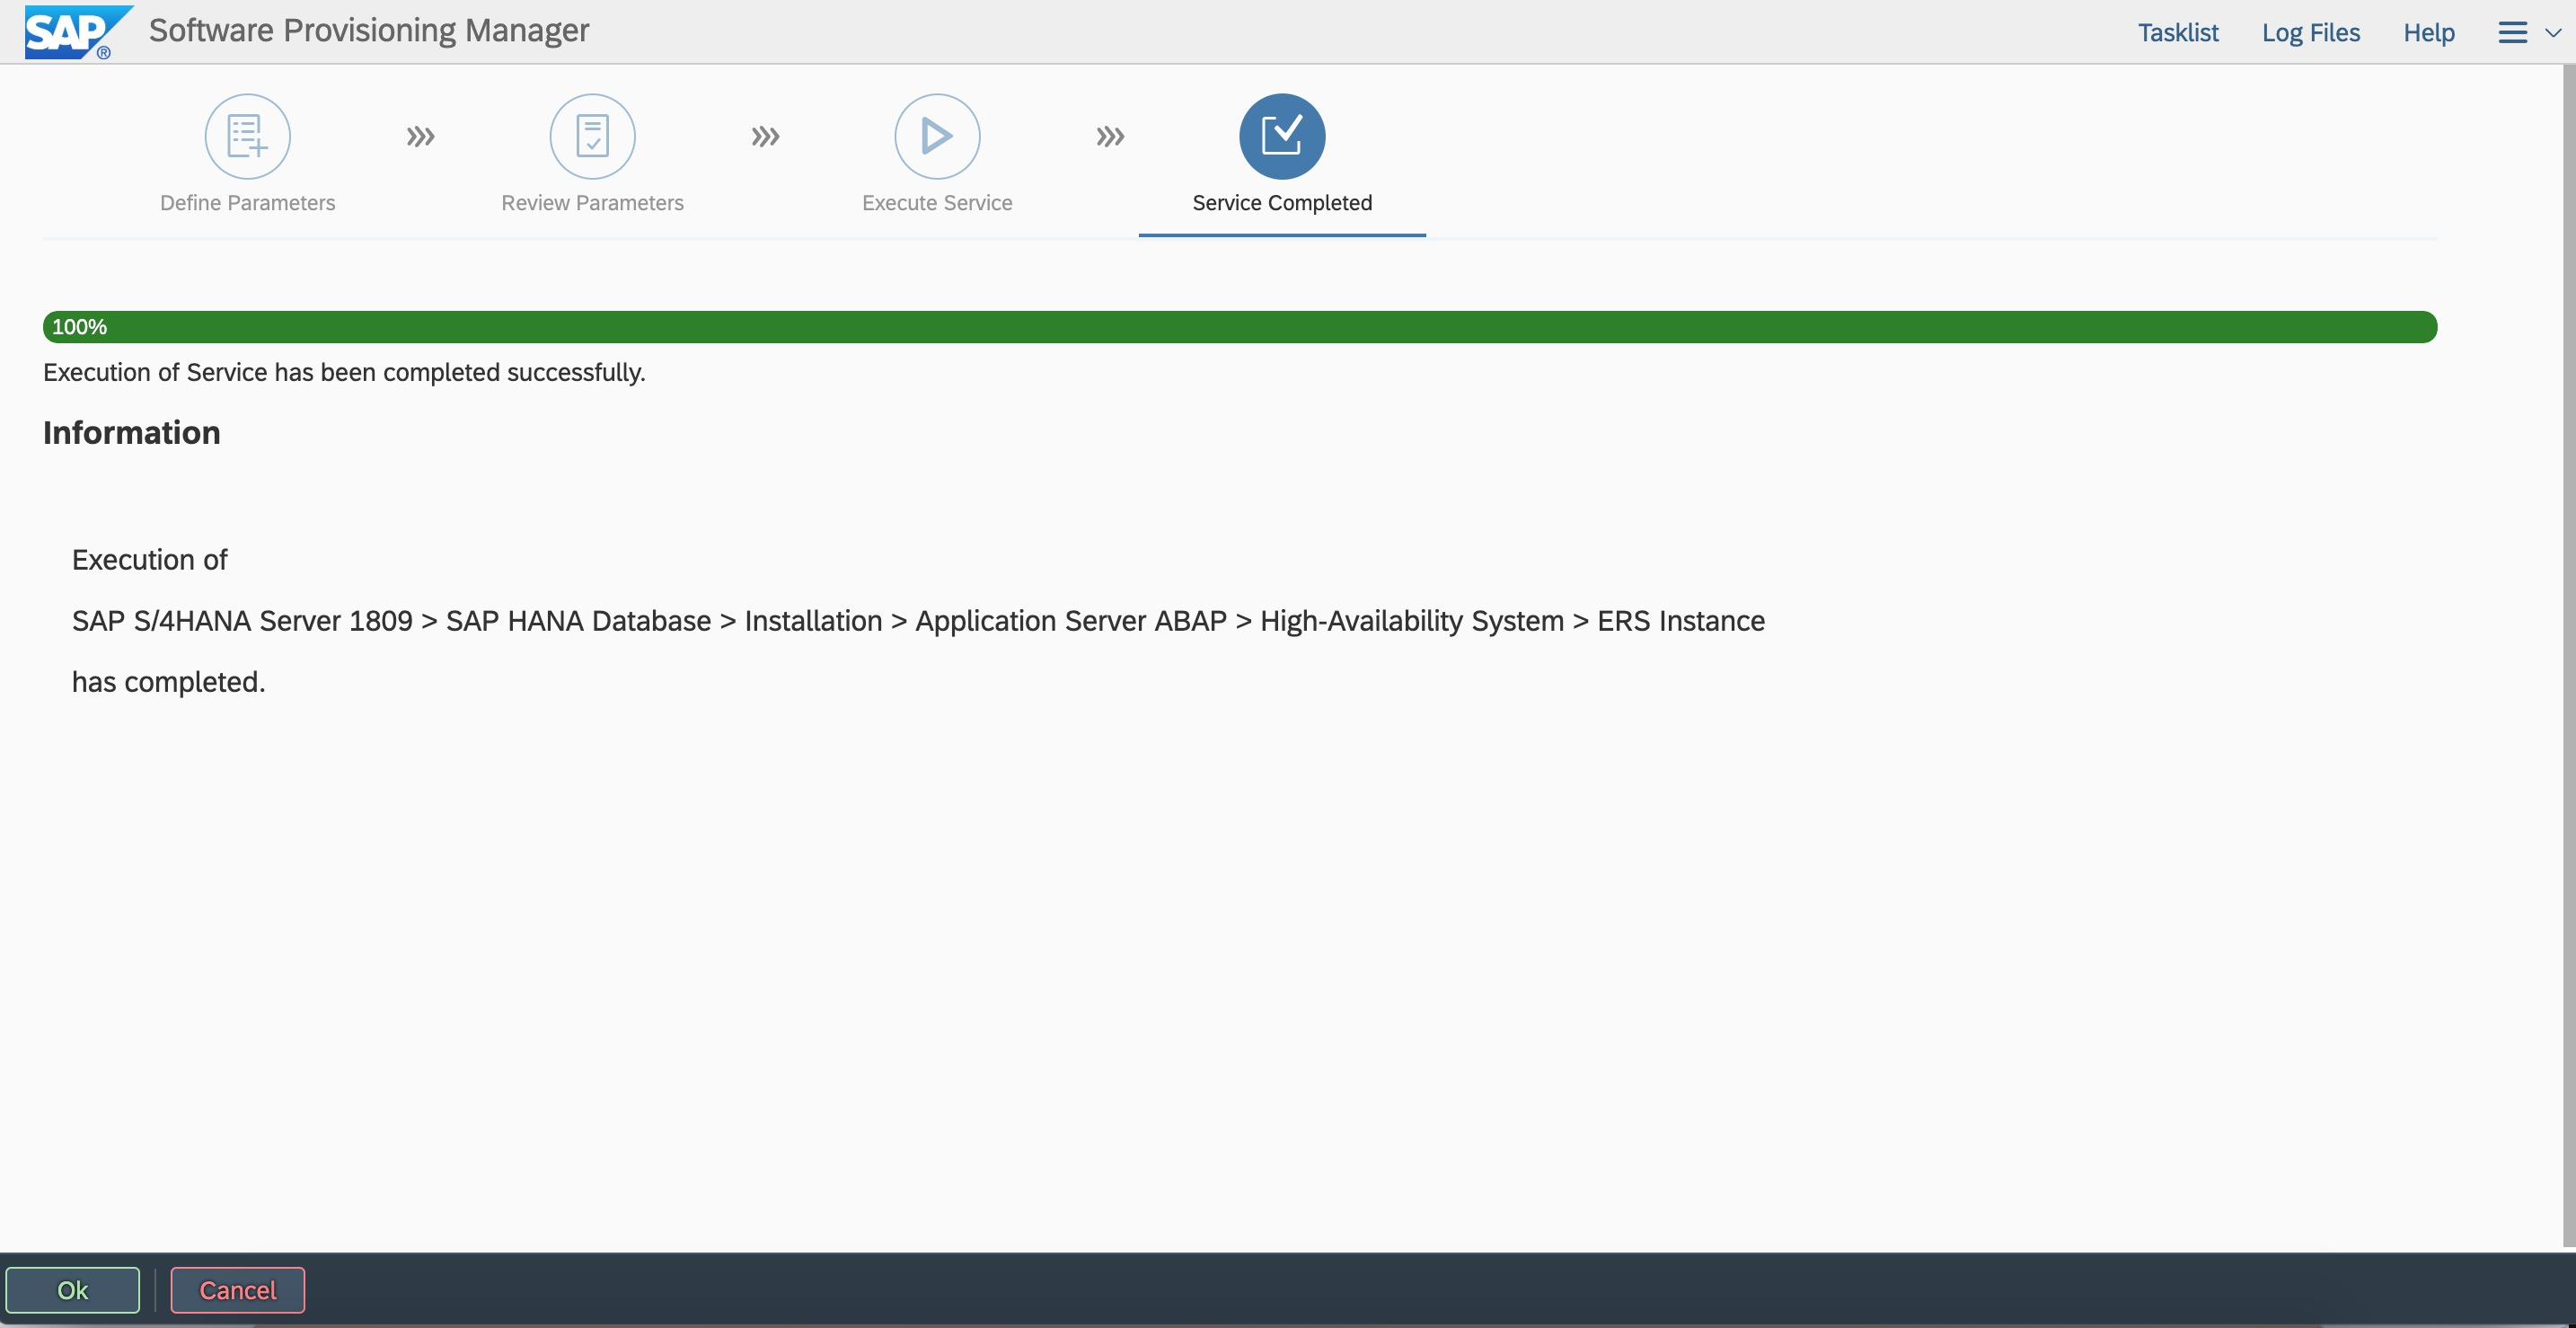
7.2 Install an ERS instance
Re-install SWPM on the first node. Install ERS to the virtual hostname VERS4T.
# ./sapinst SAPINST_USE_HOSTNAME=VERSS4T
In the browser of the Windows jump host, enter the access address:
https://VERSS4T:4237/sapinst/docs/index.html
Log on by using the root user and password. Ensure that hostname resolution and the port are accessible. 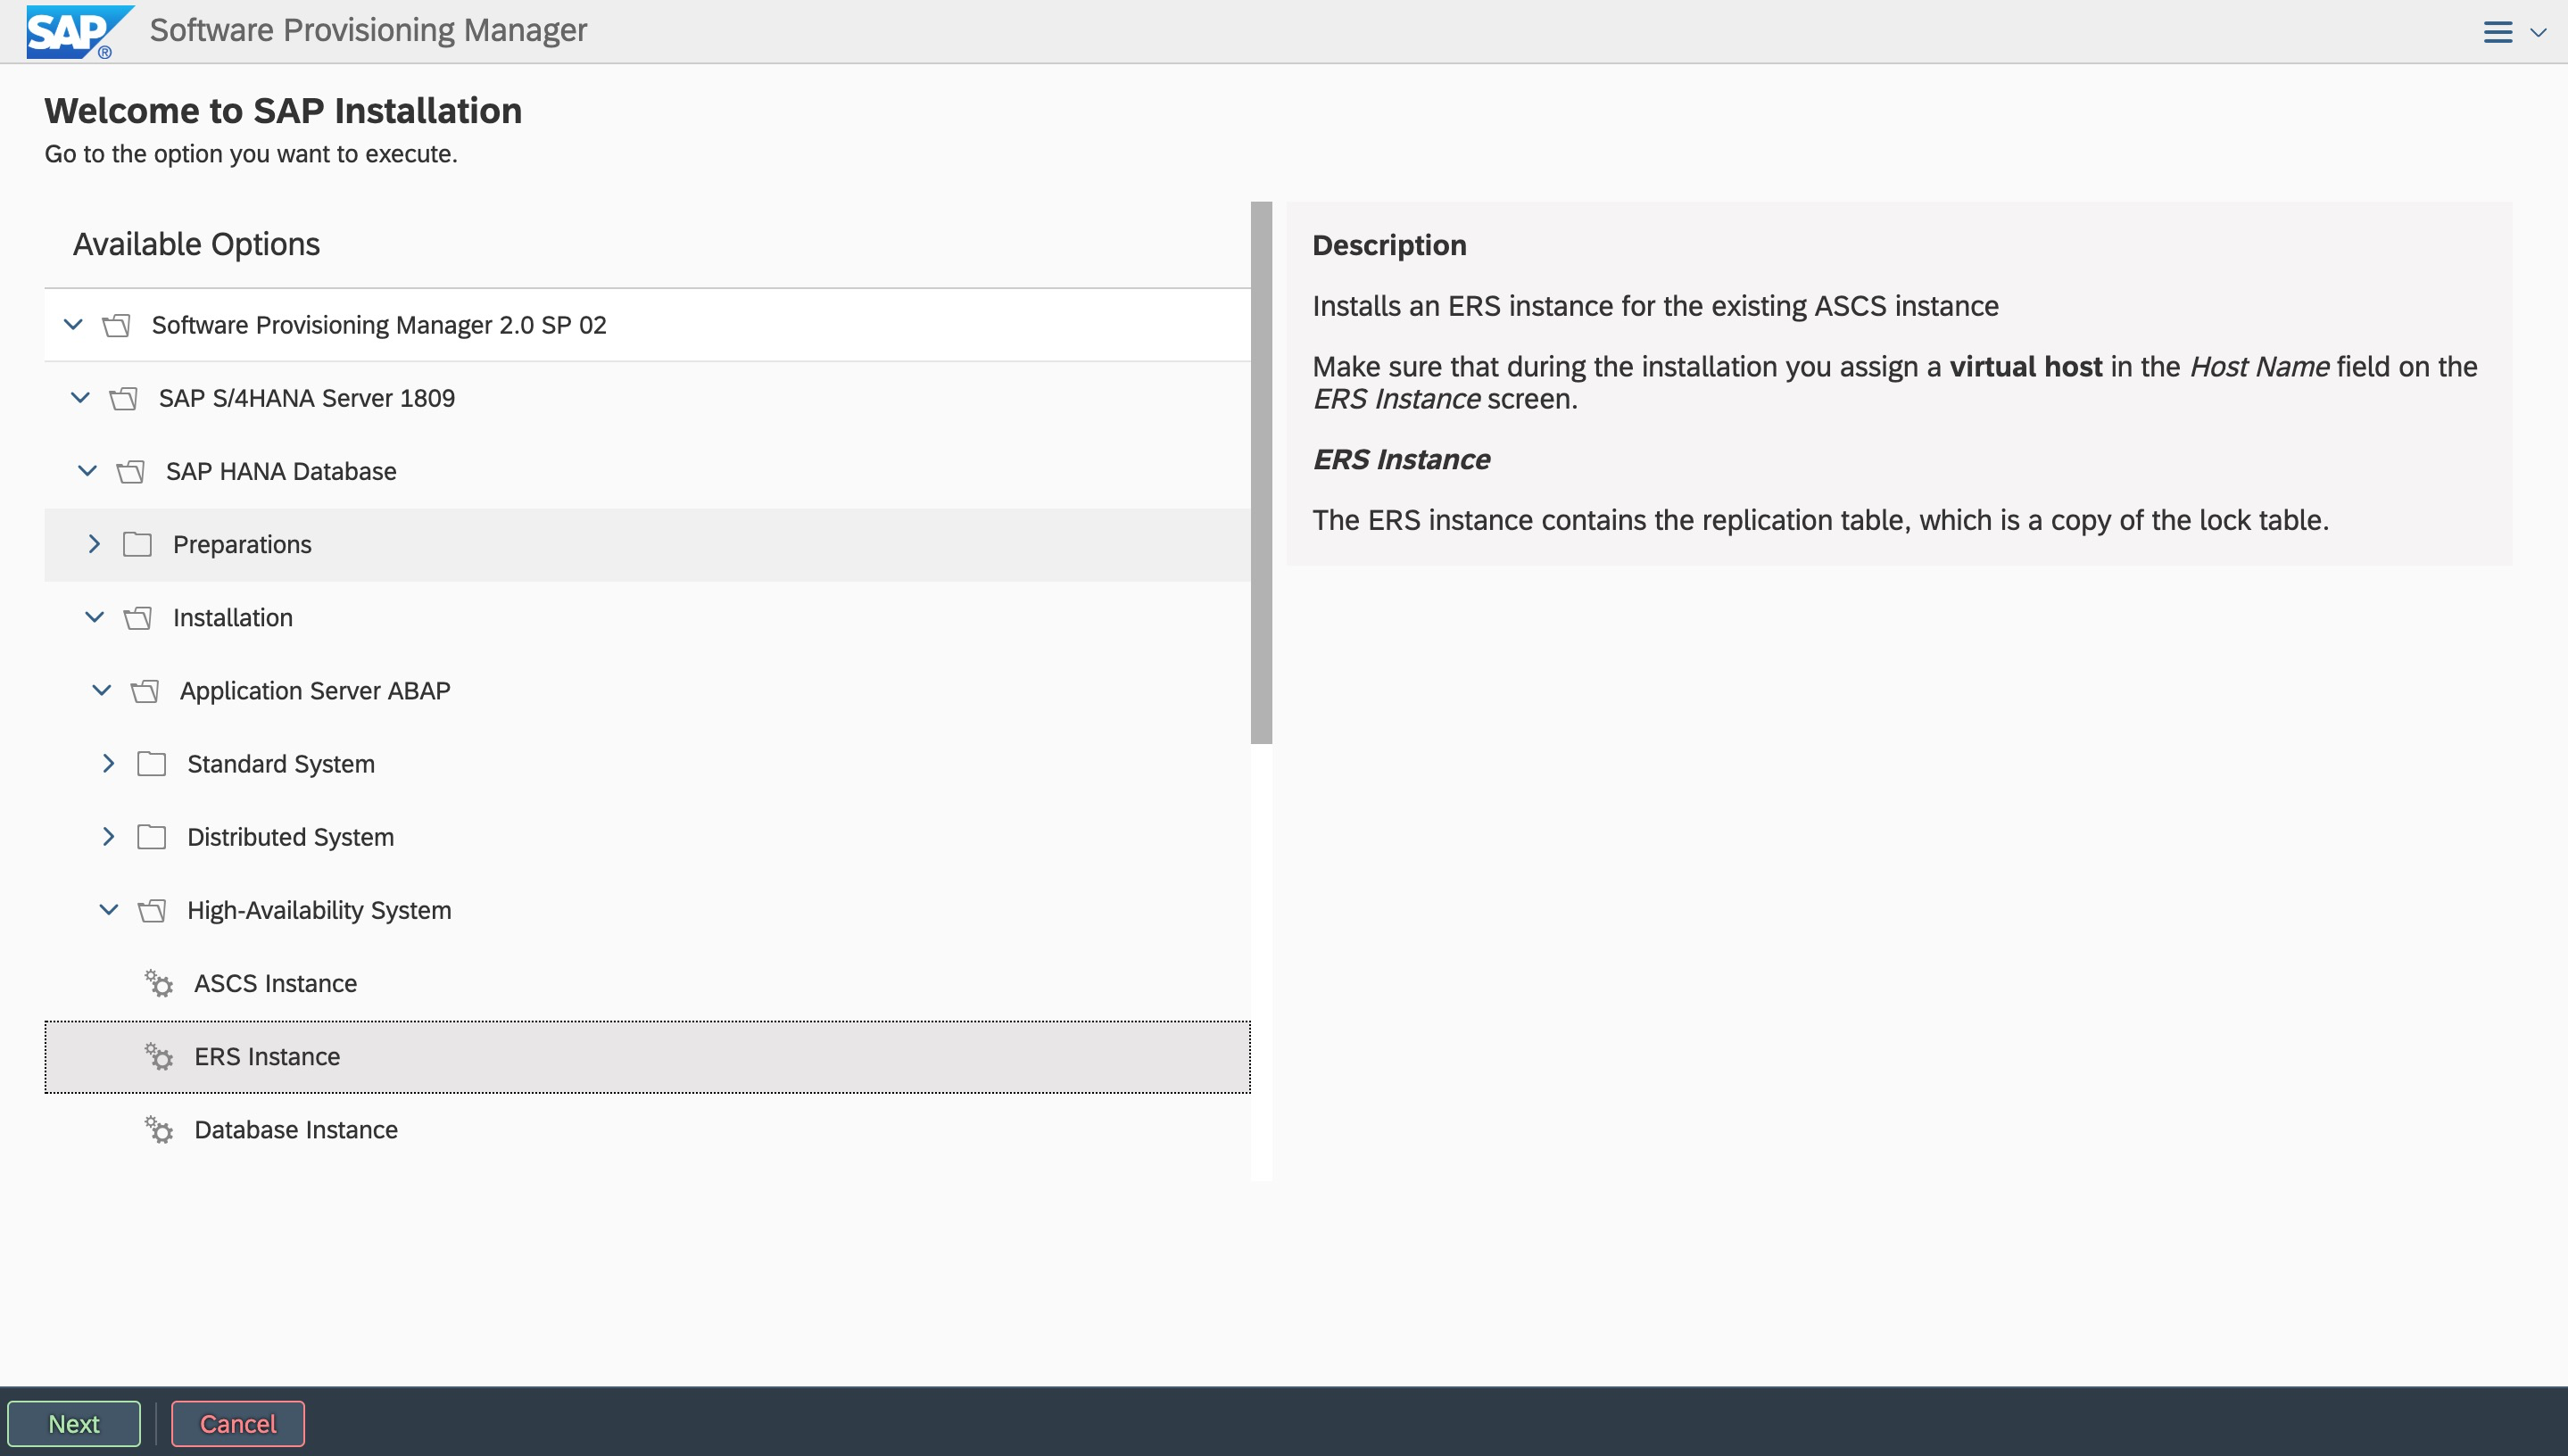
 Enter the user ID based on the plan.
 Enter the ERS instance number and virtual hostname.
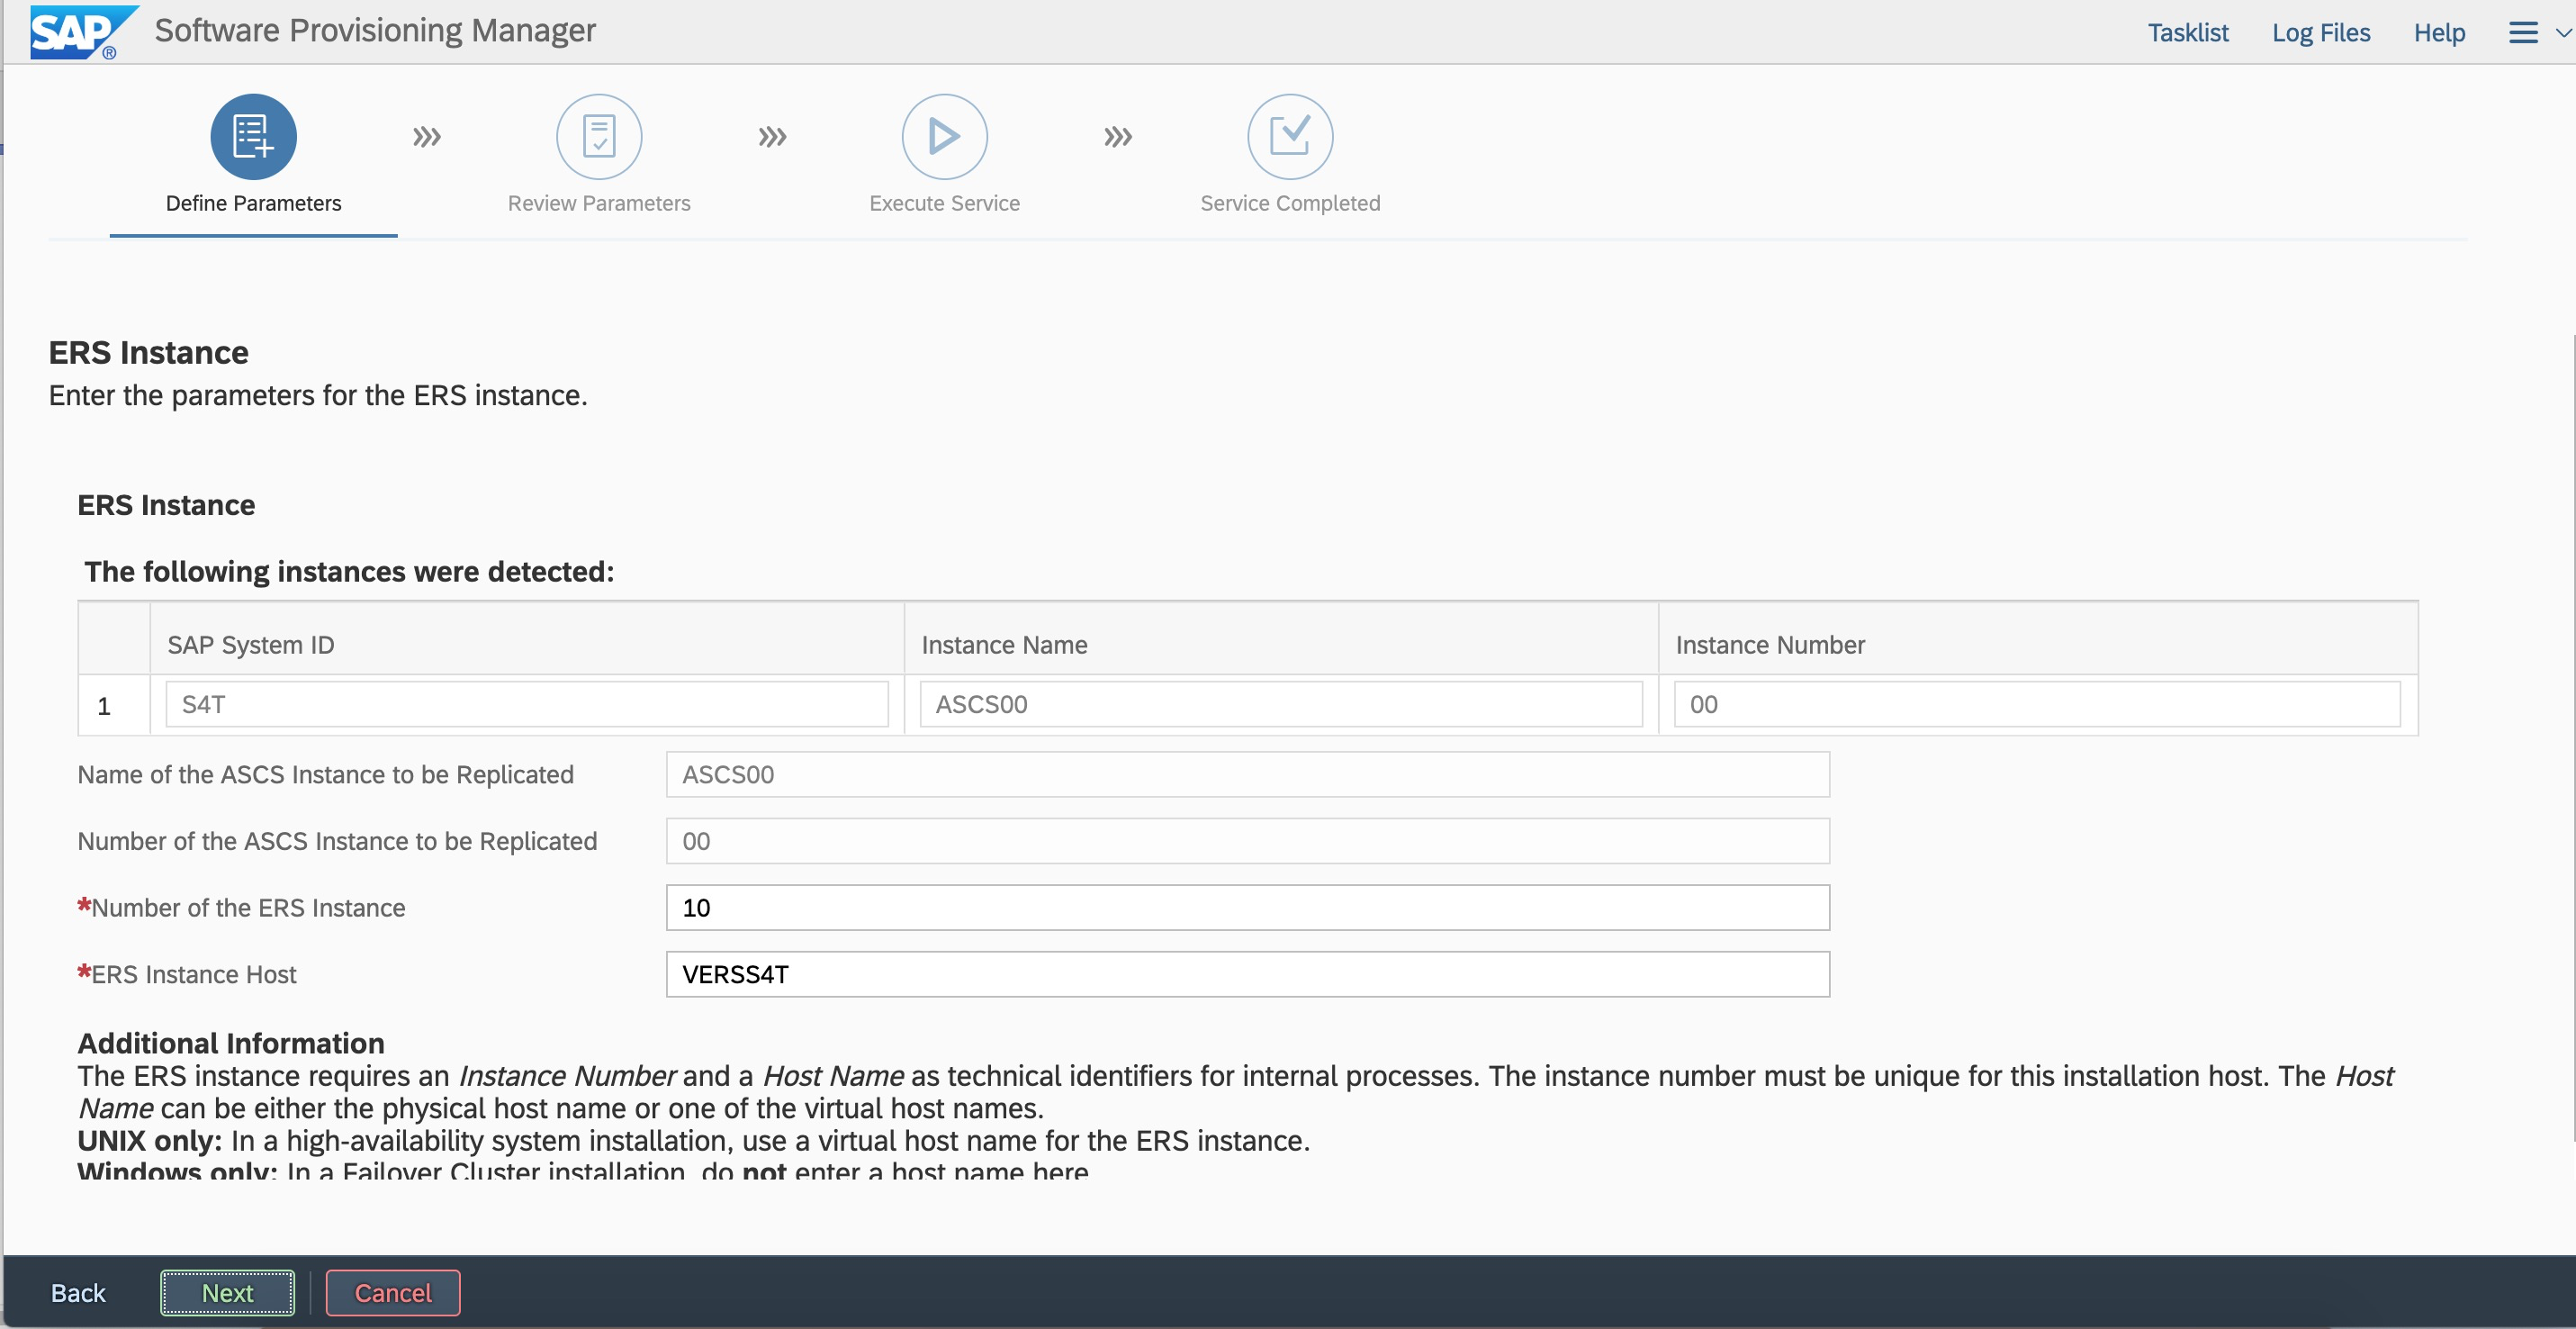 Enter the user ID based on the plan.
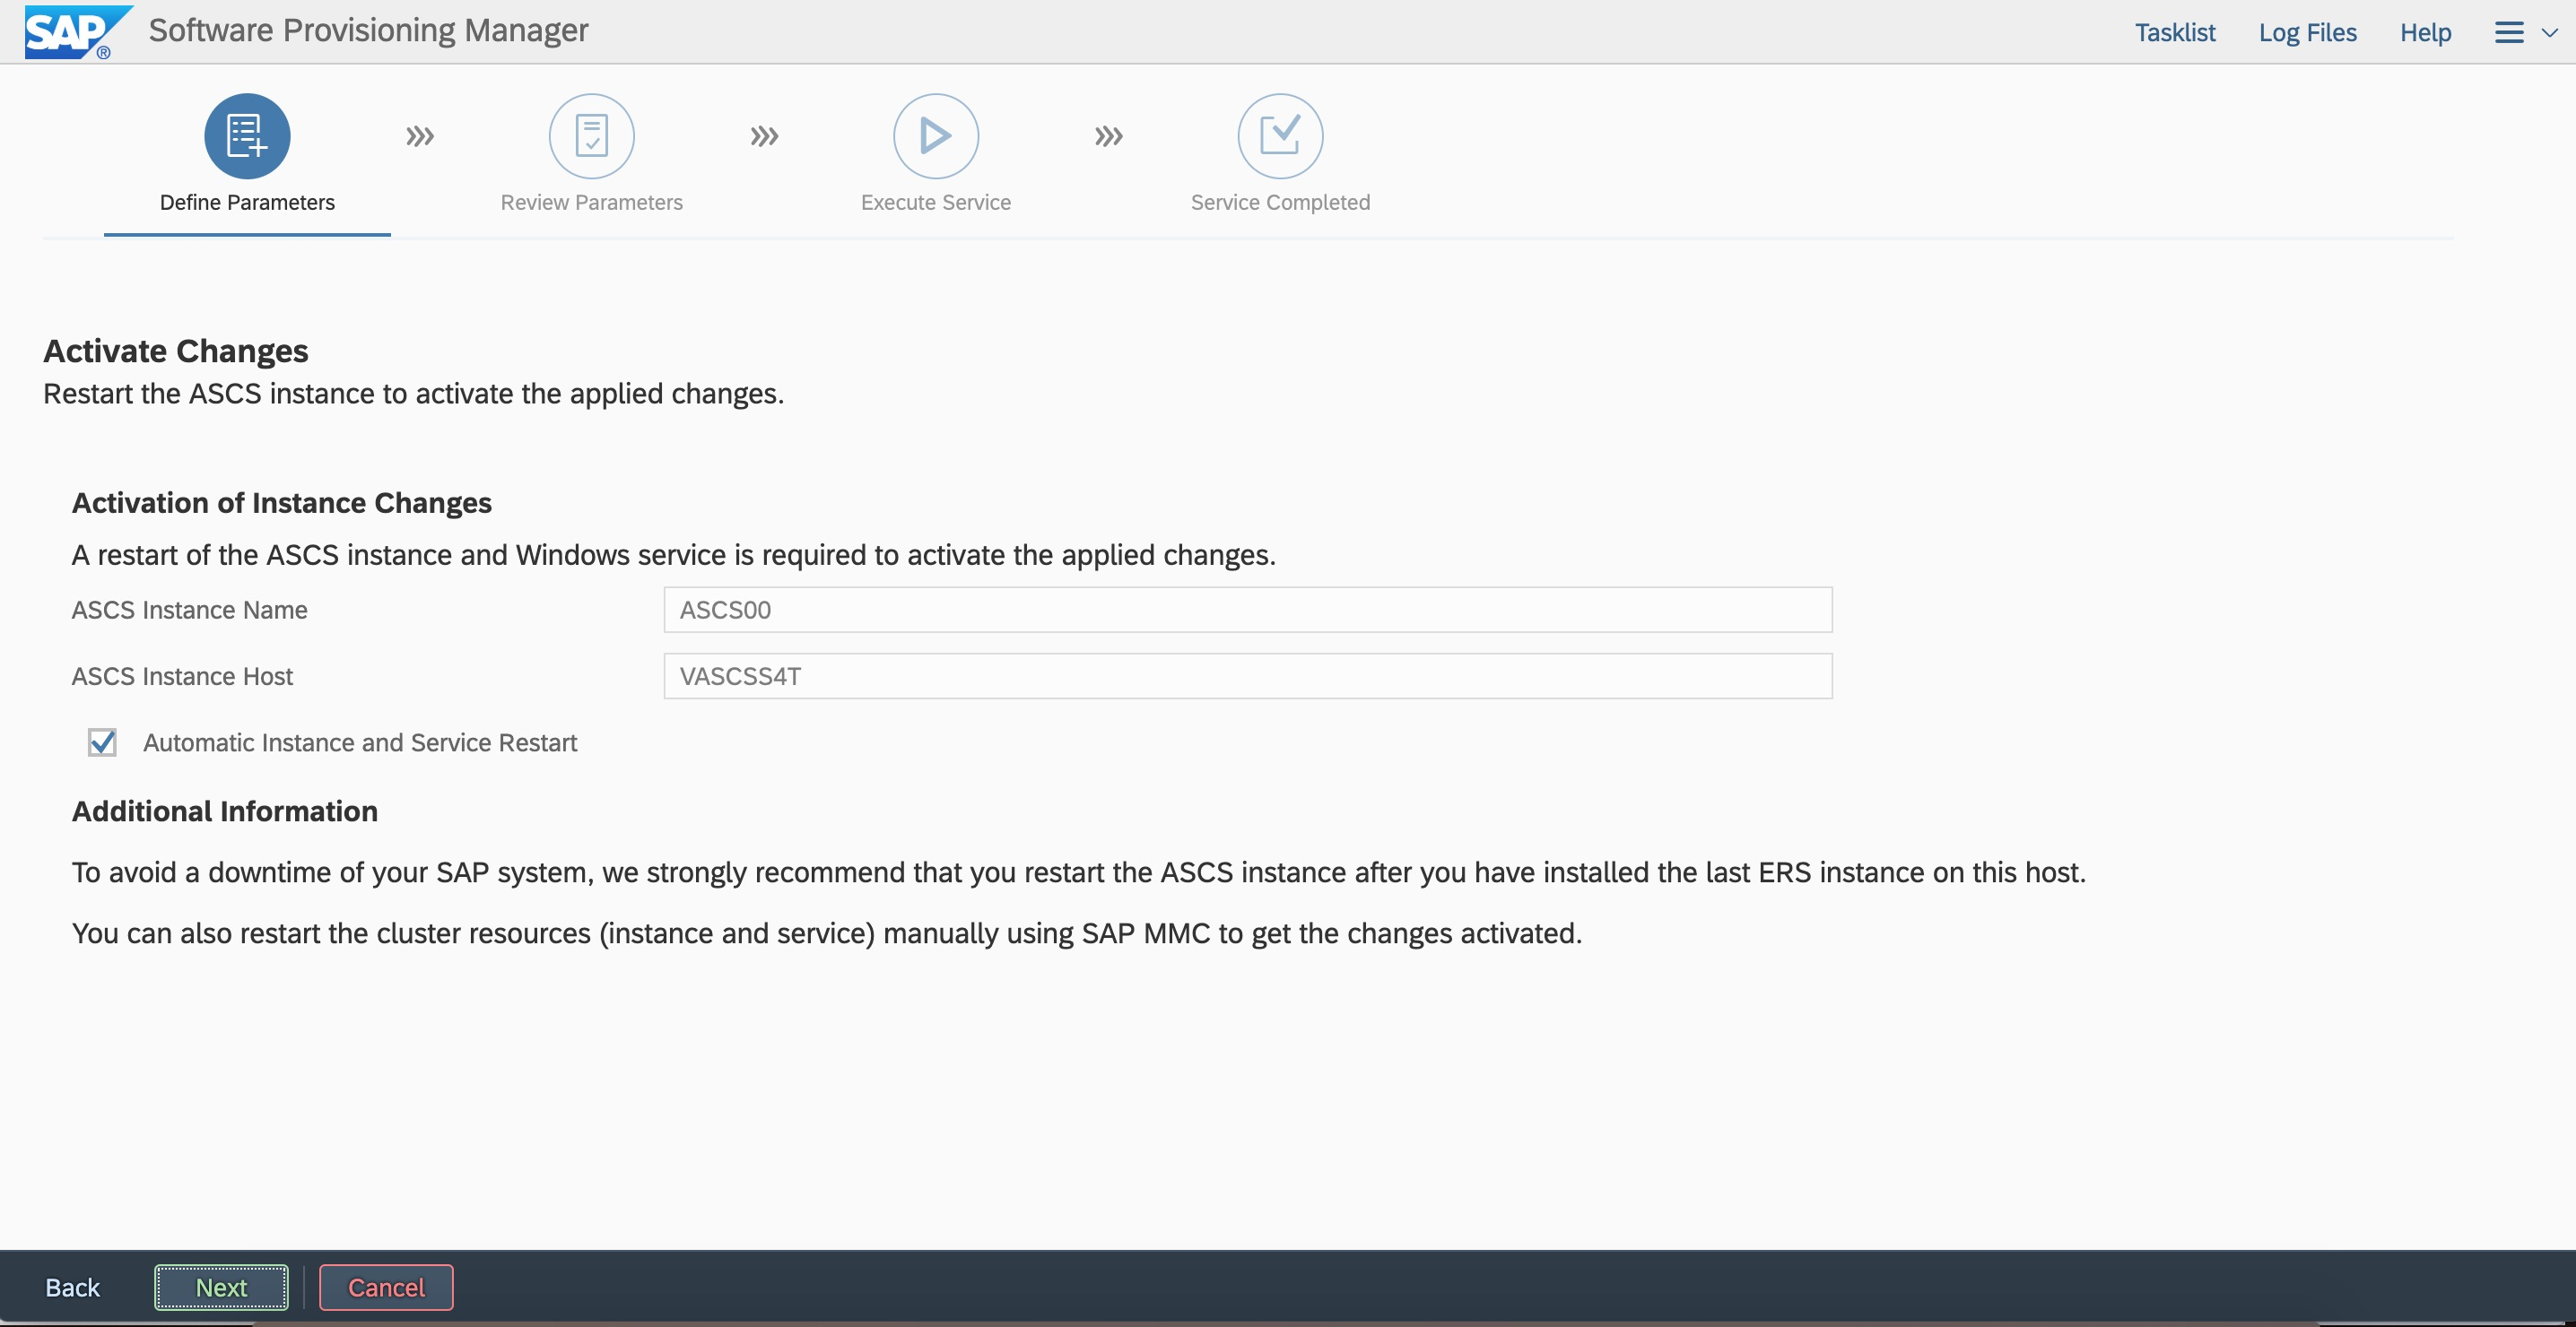

 Check the Enqueue replication server process.
7.3 Configure ASCS or ERS on a secondary node
1. Create users and groups. Use SWPM to create the same users and groups on the second node.
#./sapinst
Create the sidadm and sapadm users . Enter the SID and select ABAP stack.
  Enter the user ID and group ID based on the plan to keep them consistent with the first node.
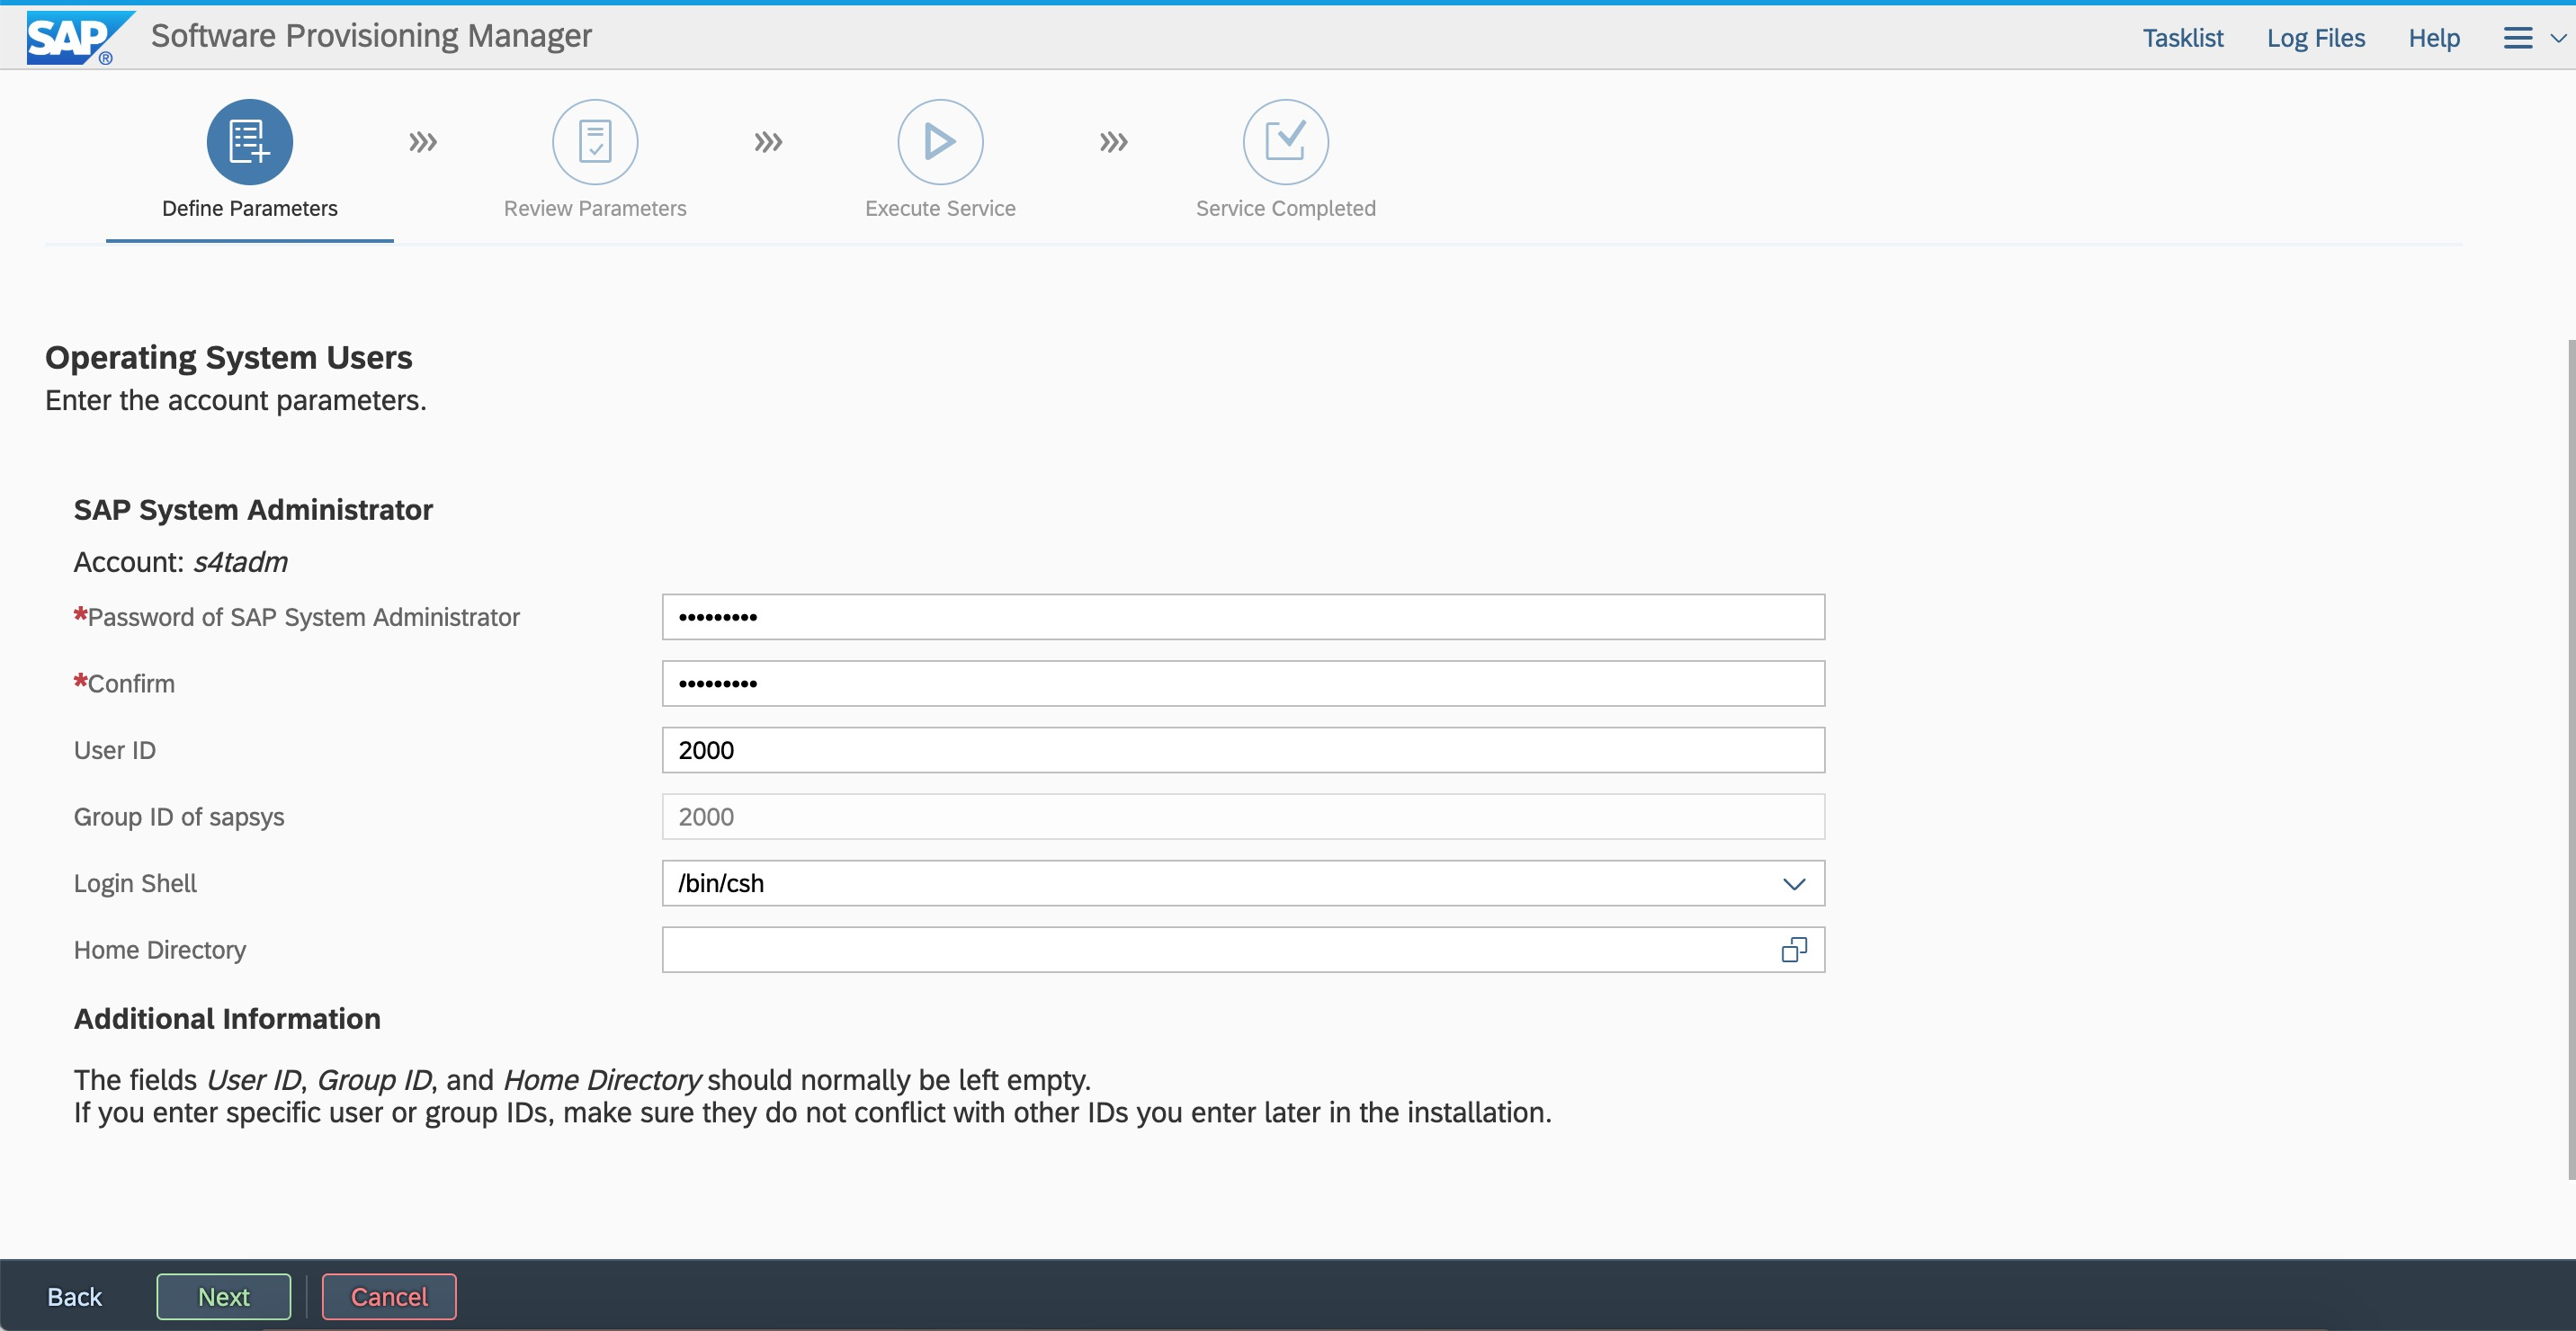
2. Copy files. Log on to the first node.
(1). Copy the services file in /etc/ to the second node.
#scp -pr services root@s4app2:/etc/
(2). Copy the sapservices file in /usr/sap to the second node.
#scp -pr sapservices root@s4app2:/usr/sap/
(3). Copy the ASCS00,ERS10,SYS directory to the second node.
#cd /usr/sap/S4T
#tar -cvf ASCSERSSYS.tar *
Log on to the second node. In the /usr/sap directory, create an S4T directory with the same permissions. Copy and decompress the directory.
#scp -pr ASCSERSSYS.tar root@s4app2:/usr/sap/S4T
#tar -xvf ASCSERSSYS.tar
(4). Check whether soft link in SYS is correct 
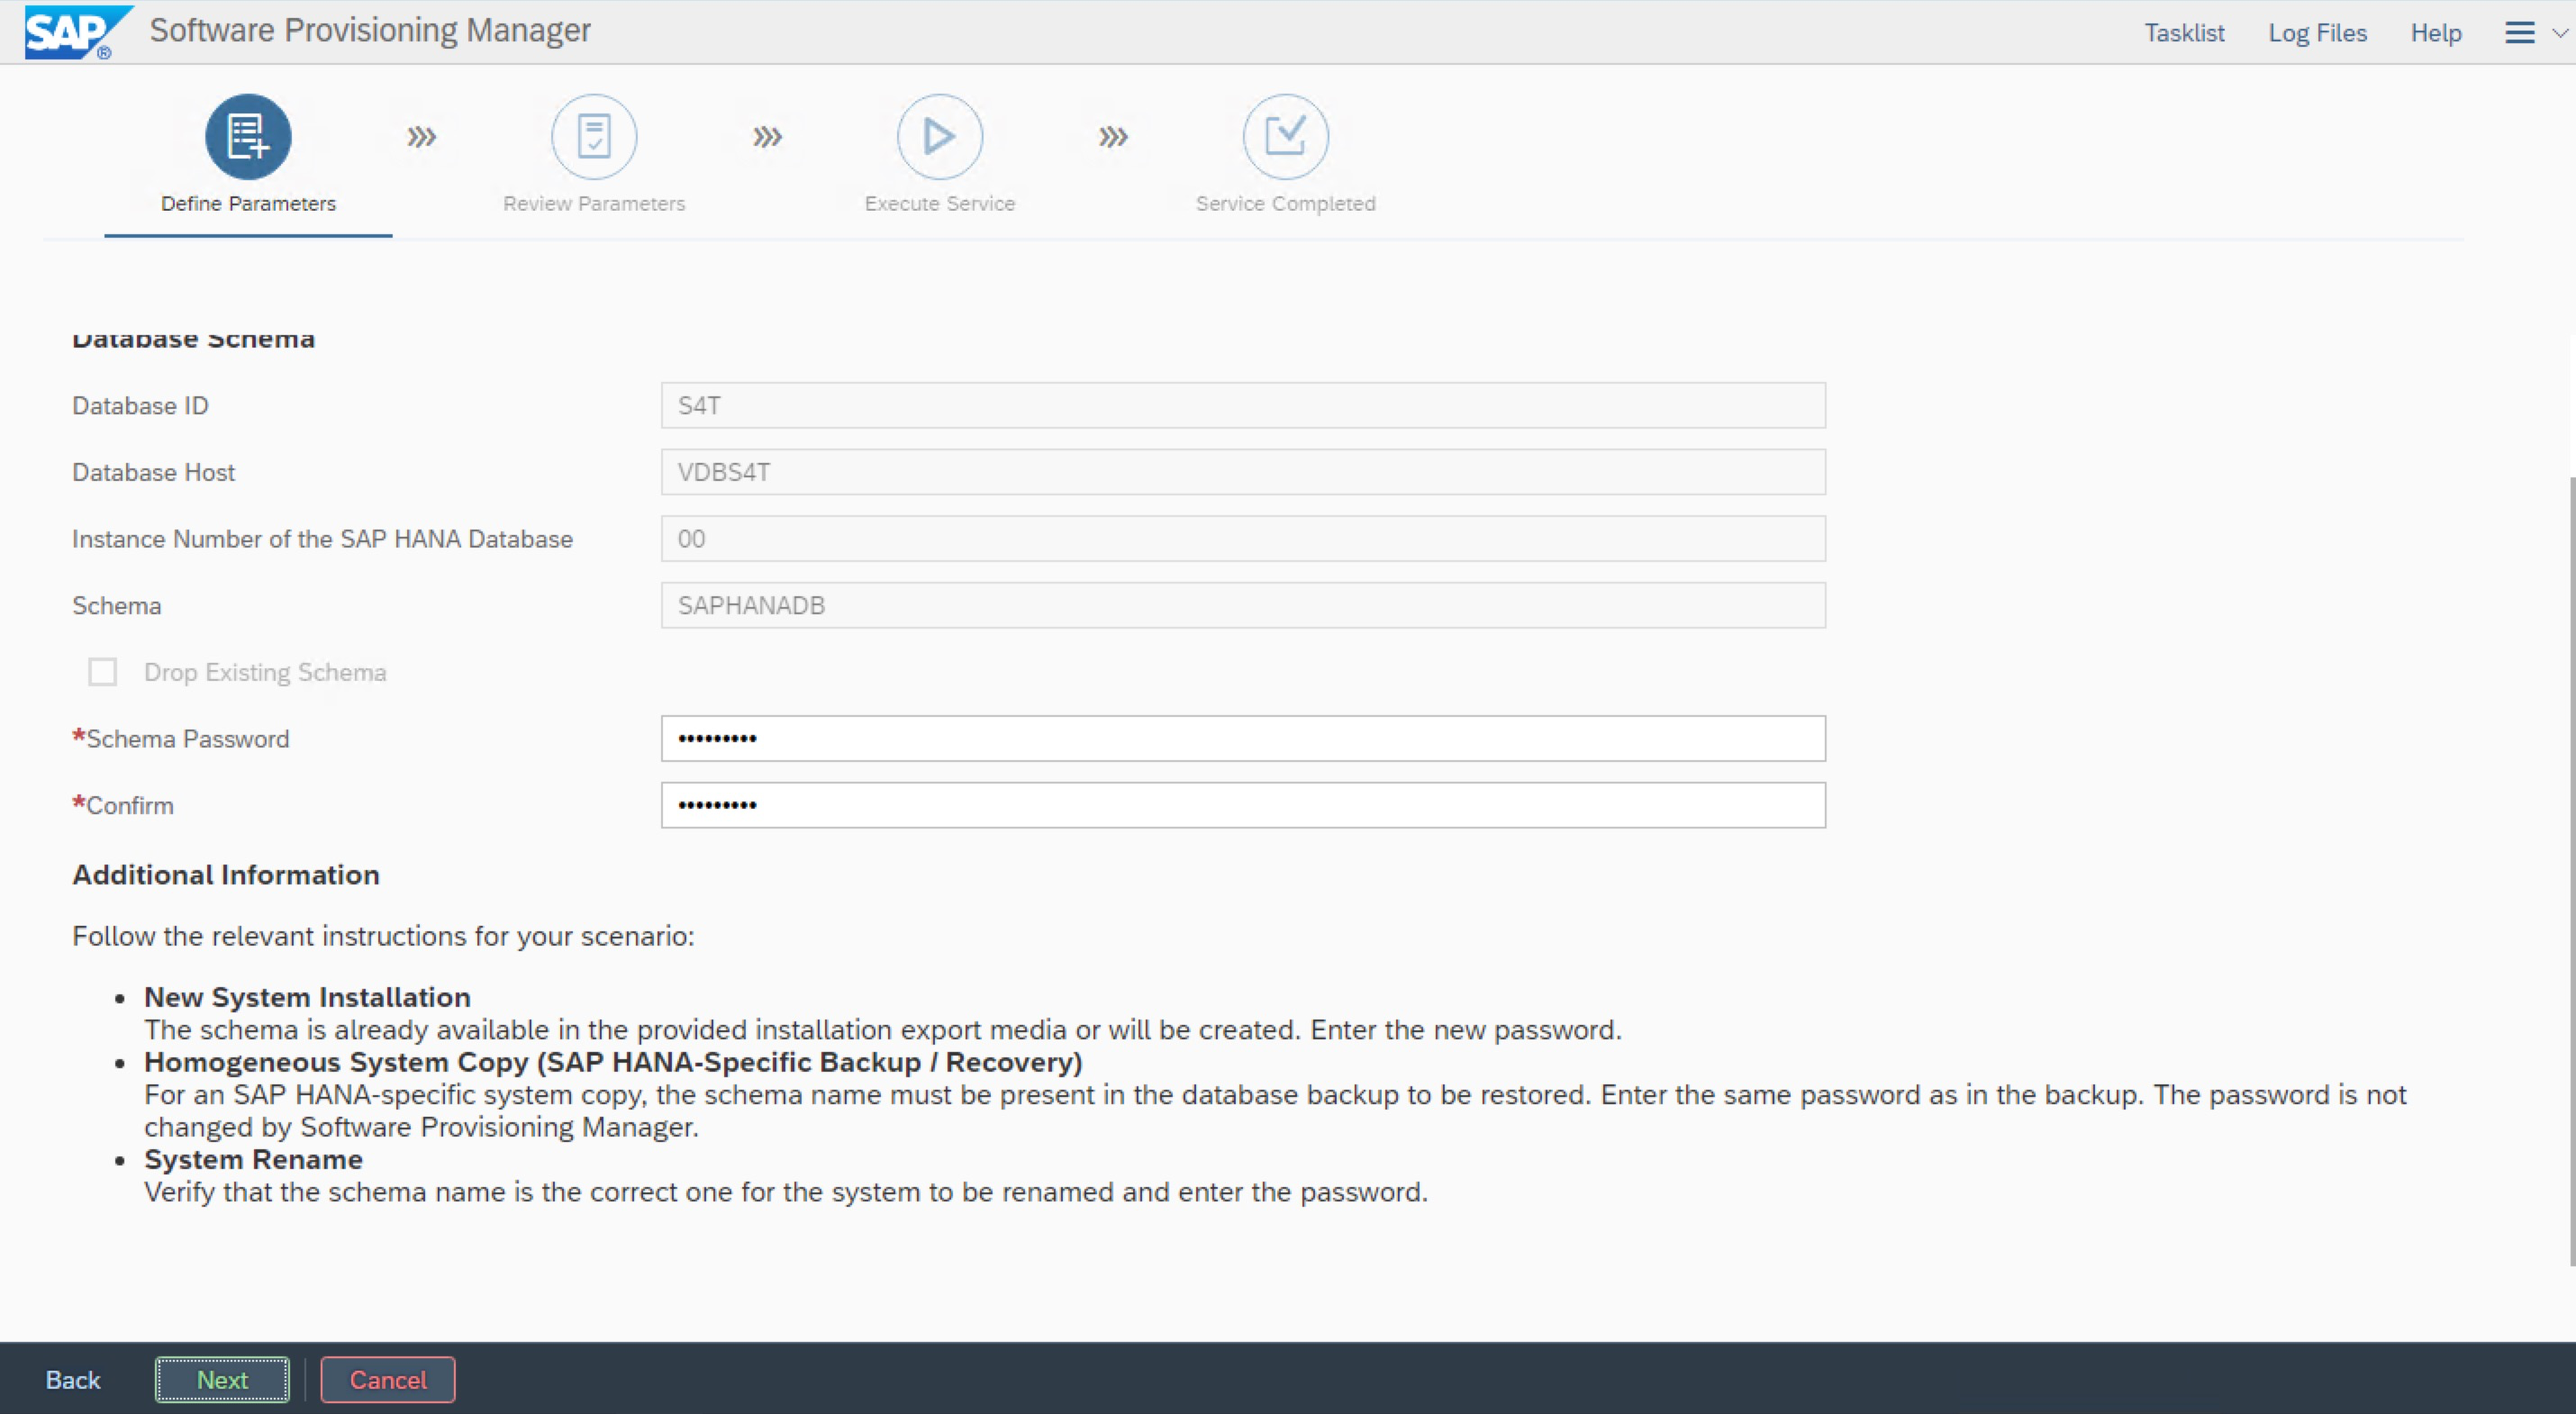
7.4 Install a DB instance
Log on to the first node and install SWPM. Install a DB instance to the virtual hostname VDBS4T.
# ./sapinst SAPINST_USE_HOSTNAME=VDBS4T
In the browser of the Windows jump host, enter the access address:
https://VDBS4T:4237/sapinst/docs/index.html
Log on by using the root user and password. Ensure that hostname resolution and the port are accessible.  Enter the DB SID, instance number, and hostname.
 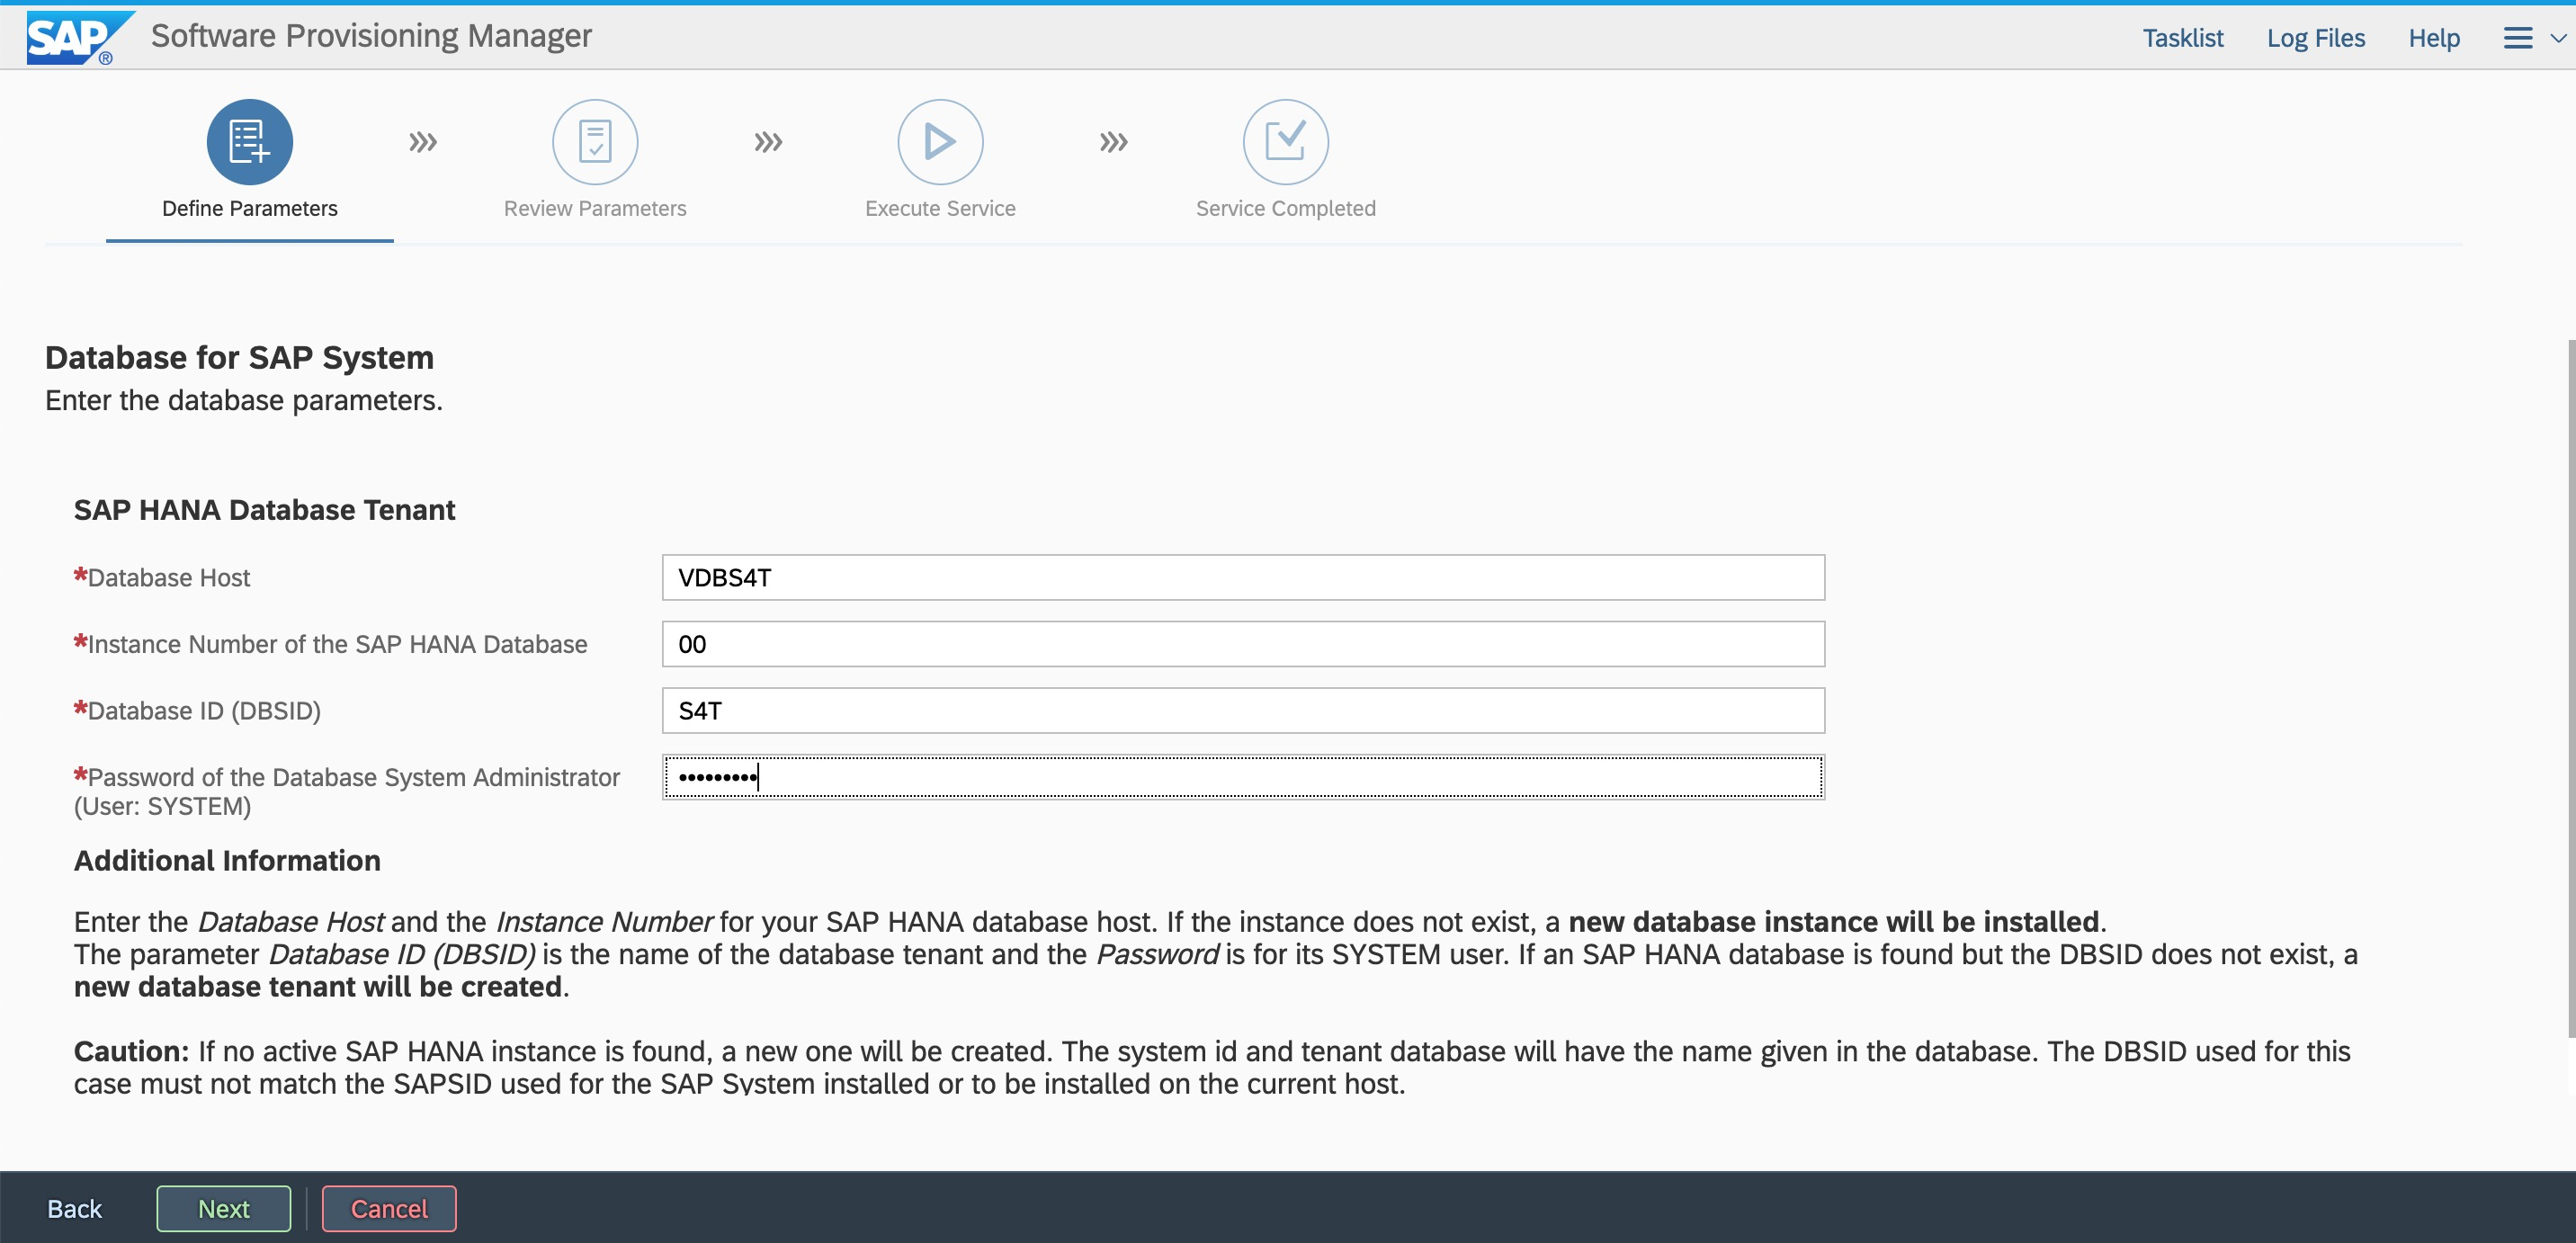 Specify the Export path.
  Enter the password.
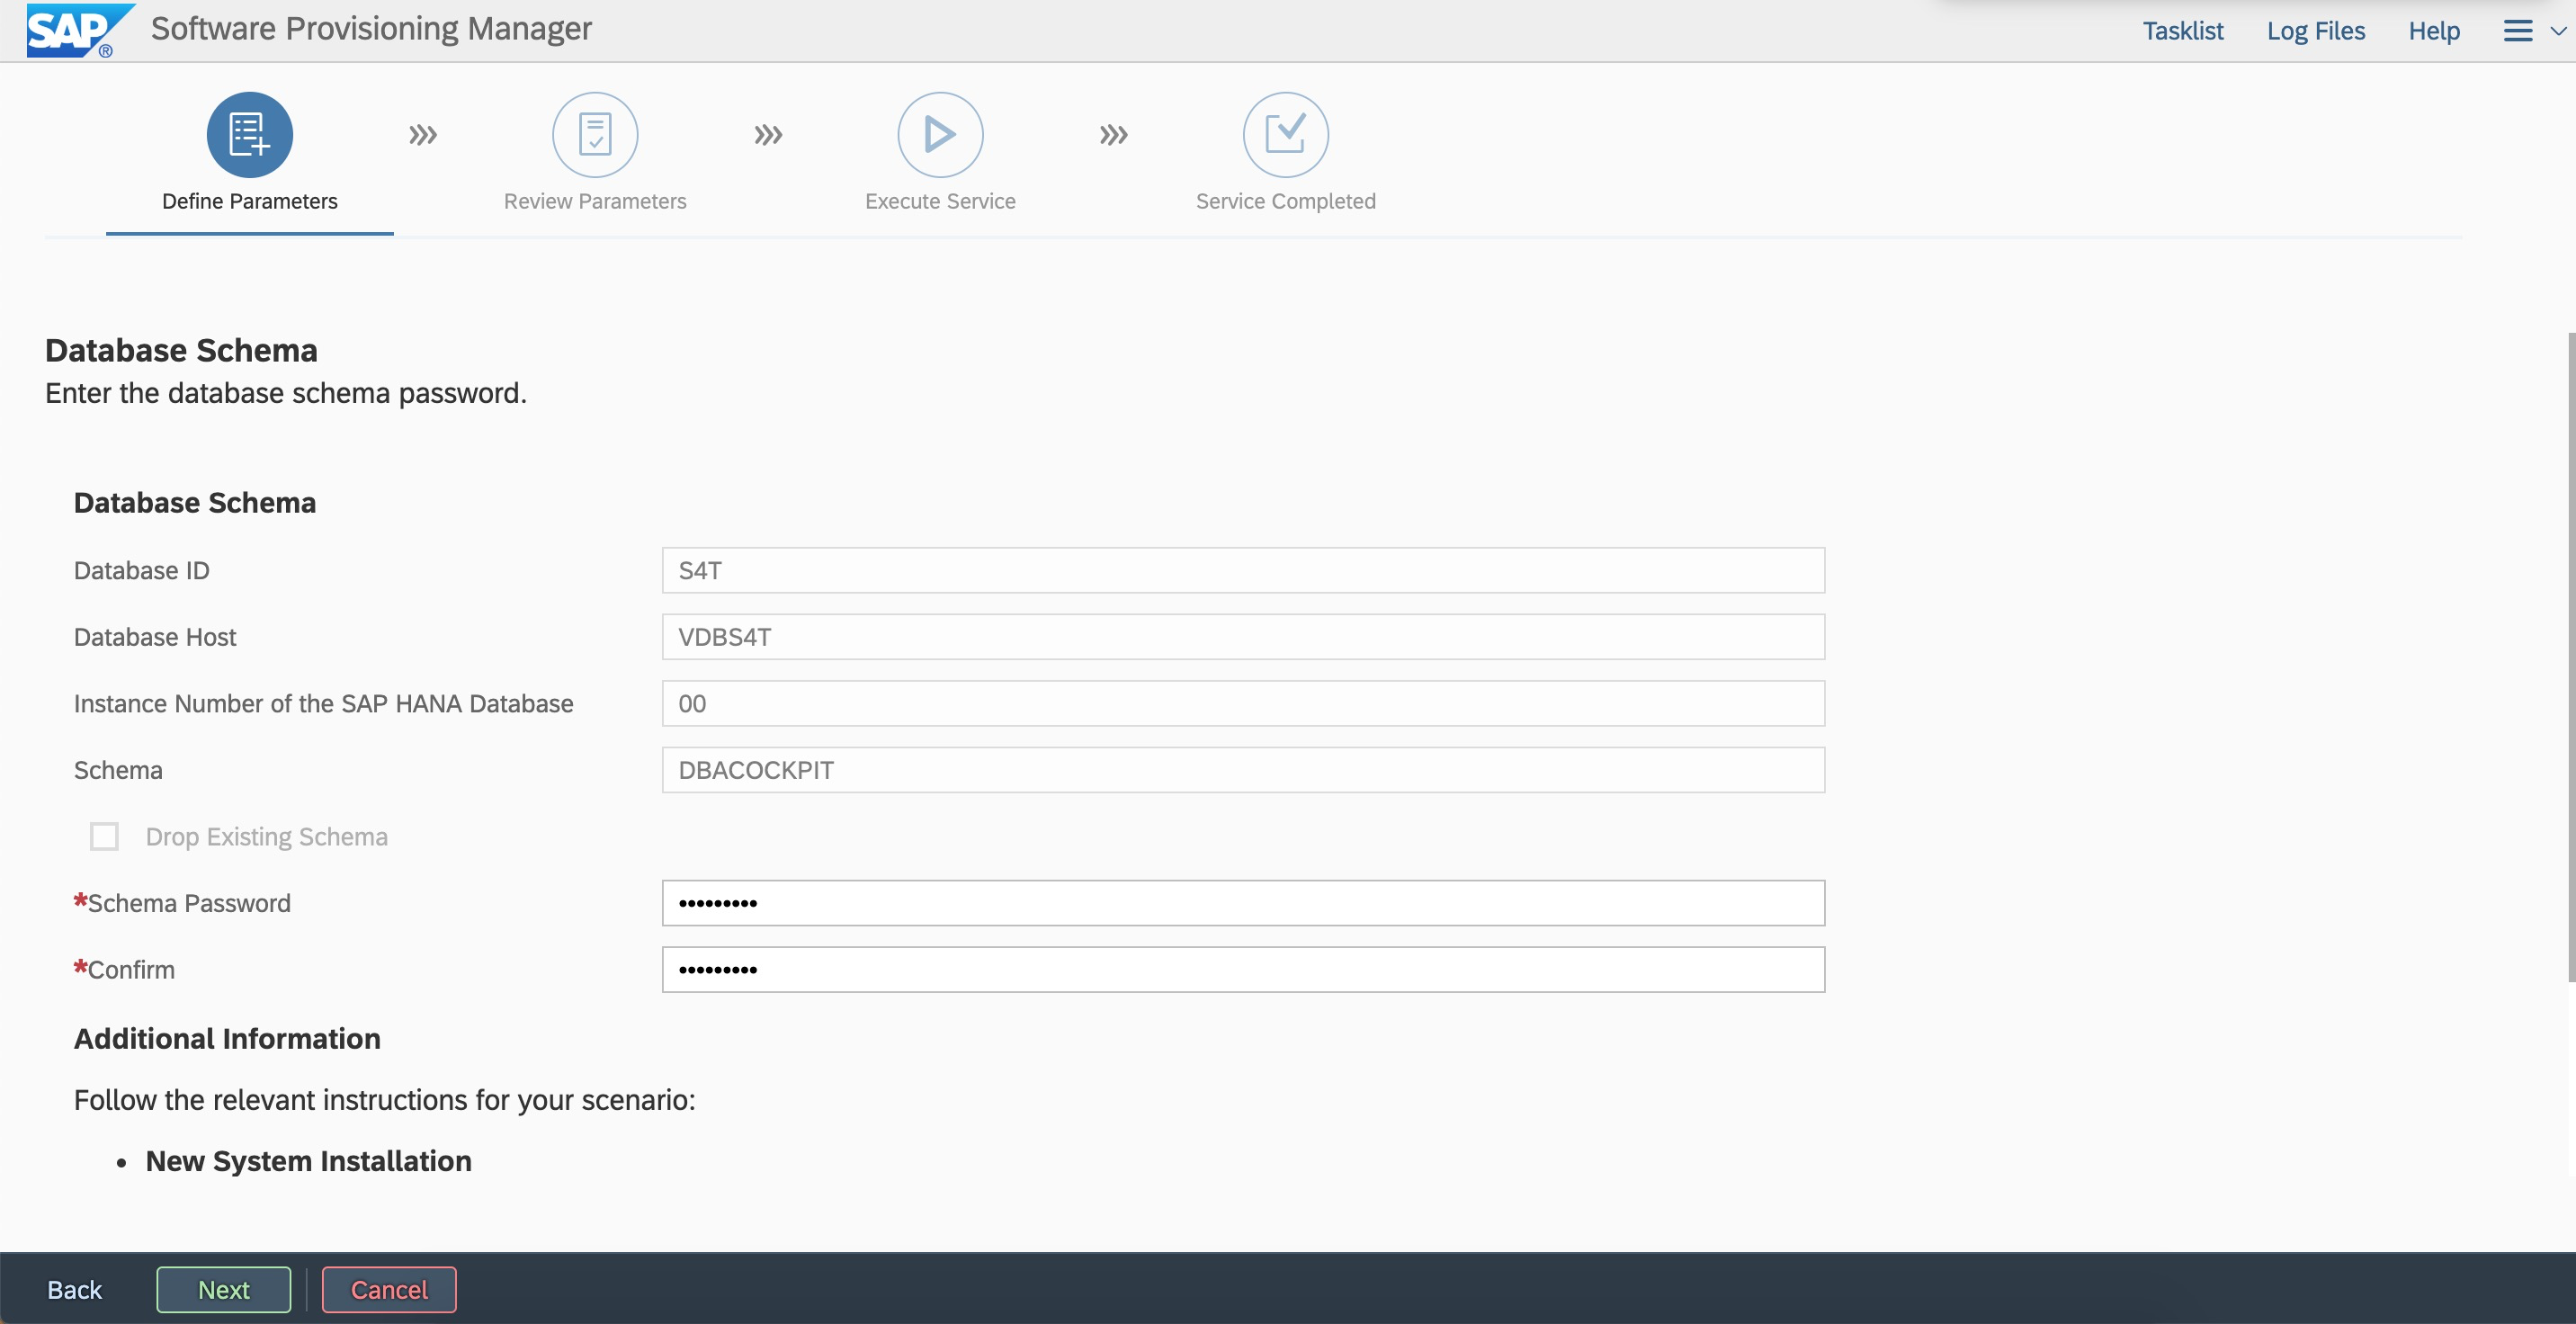
7.5 Integrate with an SAP instance
7.5.1 Add a user to the haclint group
Add the sidadm user to the haclient group on both nodes.
#usermod -a -G haclient s4tadm
7.5.2 Modify the ASCS parameter file
(1). Configure the integration of sap-suse-cluster-connector.
(2). Notify the SAP start framework not to restart when the enqueue server process fails.
####added for sap-suse-cluster-connector####
#-----------------------------------
#SUSE HAE sap_suse_cluster_connector
#-----------------------------------

service/halib = $(DIR_CT_RUN)/saphascriptco.so
service/halib_cluster_connector = /usr/bin/sap_suse_cluster_connector

####chanegd for not to self-restart the enqueue process####
# Start SAP enqueue server
_EN = en.sap$(SAPSYSTEMNAME)_$(INSTANCE_NAME)
Execute_04 = local rm -f $(_EN)
Execute_05 = local ln -s -f $(DIR_EXECUTABLE)/enserver$(FT_EXE) $(_EN)
#Restart_Program_01 = local $(_EN) pf=$(_PF)

Start_Program_01 = local $(_EN) pf=$(_PF)

##################################
7.5.3 Modify the ERS parameter file
(1). Configure the integration of sap-suse-cluster-connector.
(2). Notify the SAP start framework not to restart when the enqueue server process (Enqueue Replicator 2) fails.
####added for sap-suse-cluster-connector####
#-----------------------------------
#SUSE HAE sap_suse_cluster_connector
#-----------------------------------

service/halib = $(DIR_CT_RUN)/saphascriptco.so
service/halib_cluster_connector = /usr/bin/sap_suse_cluster_connector

###############################################################
#####changed by dongchen_201804###
#Restart_Program_00 = local $(_ENQR) pf=$(_PF) NR=$(SCSID)

Start_Program_00 = local $(_ENQR) pf=$(_PF) NR=$(SCSID)

##################################
7.5.4 Configure the resource agent
In this topic, two fence solutions are provided for configuration. You can select the required script based on the solution that you use.
Solution 1: Implement SBD fence by using Shared Block Storage devices (no longer available)
Log on to a node in the cluster to create a text file. Replace the values of the SID, InstanceNumber, and params ip parameters in the script with the values of the deployed SAP system.
Content of HA_script.txt:
#Cluster settings
property cib-bootstrap-options: \
        have-watchdog=true \
        cluster-infrastructure=corosync \
        cluster-name=hacluster \
        stonith-enabled=true \
        placement-strategy=balanced \
        maintenance-mode=false
rsc_defaults rsc-options: \
        resource-stickiness=1 \
        migration-threshold=3
op_defaults op-options: \
        timeout=600 \
        record-pending=true
#STONITH resource setting
primitive stonith-sbd stonith:external/sbd \
        params pcmk_delay_max=30s
#ASCS resource setting
primitive rsc_ip_S4T_ASCS00 IPaddr2 \
        params ip=10.0.10.12 \
        op monitor interval=10s timeout=20s
primitive rsc_sap_S4T_ASCS00 SAPInstance \
        operations $id=rsc_sap_S4T_ASCS00-operations \
        op monitor interval=11 timeout=60 on_fail=restart \
        params InstanceName=S4T_ASCS00_VASCSS4T START_PROFILE="/sapmnt/S4T/profile/S4T_ASCS00_VASCSS4T" AUTOMATIC_RECOVER=false \
        meta resource-stickiness=5000 target-role=Started
#ERS resource setting
primitive rsc_ip_S4T_ERS10 IPaddr2 \
        params ip=10.0.10.13 \
        op monitor interval=10s timeout=20s
primitive rsc_sap_S4T_ERS10 SAPInstance \
        operations $id=rsc_sap_S4T_ERS10-operations \
        op monitor interval=11 timeout=60 on_fail=restart \
        params InstanceName=S4T_ERS10_VERSS4T START_PROFILE="/sapmnt/S4T/profile/S4T_ERS10_VERSS4T" AUTOMATIC_RECOVER=false IS_ERS=true \
        meta target-role=Started maintenance=false
#Groups and colocations
group grp_S4T_ASCS00 rsc_ip_S4T_ASCS00 rsc_sap_S4T_ASCS00 \
        meta resource-stickiness=3000
group grp_S4T_ERS10 rsc_ip_S4T_ERS10 rsc_sap_S4T_ERS10 \
        meta target-role=Started
colocation col_sap_S4T_no_both -5000: grp_S4T_ERS10 grp_S4T_ASCS00
order ord_sap_S4T_first_start_ascs Optional: rsc_sap_S4T_ASCS00:start rsc_sap_S4T_ERS10:stop symmetrical=false
Check the HA status to ensure that all resources are started.
crm_mon -r

Scenario 2: Implement the Fence feature by using fence_aliyun
Log on to a node in the cluster and create a text file. Copy the sample script and modify it based on the deployment of SAP ASCS.
Replace the value of plug with the instance IDs of the two ECS instances in the S/4 ASCS cluster.
Replace the value of ram_role with the RAM role that you specify.
Replace the value of region with the ID of the region where the ECS instance resides.
Replace the value of ip with the HAVIPs of S/4 ASCS and ERS.
Replace the values of InstanceName and START_PROFILE with parameter names and paths of S/4 ASCS and ERS.
The values of group, colocation, and order must be consistent with the previously defined resource names.
Replace the parameters after location with the hostnames of the S/4 ASCS and ERS instances.
For more information about mappings between Alibaba Cloud regions and region IDs, see Regions and zones.
In this example, the script file name is HA_script.txt.
#Fence agent setting
primitive res_ALIYUN_STONITH_1 stonith:fence_aliyun \
    op monitor interval=120 timeout=60 \
    params plug=i-xxxxxxxxxxxxxxxxxxxx ram_role=AliyunECSAccessingHBRRole region=cn-beijing
primitive res_ALIYUN_STONITH_2 stonith:fence_aliyun \
    op monitor interval=120 timeout=60 \
    params plug=i-xxxxxxxxxxxxxxxxxxxx ram_role=AliyunECSAccessingHBRRole region=cn-beijing
#ASCS/ERS resource setting
primitive rsc_ip_S4T_ASCS00 IPaddr2 \
        params ip=10.0.10.12 \
        op monitor interval=10s timeout=20s
primitive rsc_sap_S4T_ASCS00 SAPInstance \
        operations $id=rsc_sap_S4T_ASCS00-operations \
        op monitor interval=11 timeout=60 \
        op_params on_fail=restart \
        params InstanceName=S4T_ASCS00_VASCSS4T START_PROFILE="/sapmnt/S4T/profile/S4T_ASCS00_VASCSS4T" AUTOMATIC_RECOVER=false \
        meta resource-stickiness=5000
primitive rsc_ip_S4T_ERS10 IPaddr2 \
        params ip=10.0.10.13 \
        op monitor interval=10s timeout=20s
primitive rsc_sap_S4T_ERS10 SAPInstance \
        operations $id=rsc_sap_S4T_ERS10-operations \
        op monitor interval=11 timeout=60 \
        op_params on_fail=restart \
        params InstanceName=S4T_ERS10_VERSS4T START_PROFILE="/sapmnt/S4T/profile/S4T_ERS10_VERSS4T" AUTOMATIC_RECOVER=false IS_ERS=true
#Groups
group grp_S4T_ASCS00 rsc_ip_S4T_ASCS00 rsc_sap_S4T_ASCS00 \
        meta target-role=Started resource-stickiness=3000
group grp_S4T_ERS10 rsc_ip_S4T_ERS10 rsc_sap_S4T_ERS10 \
        meta target-role=Started
#Colocations
colocation col_sap_S4T_no_both -5000: grp_S4T_ERS10 grp_S4T_ASCS00
#Stonith 1 should not run on primary node because it is controling primary node
location loc_s4app1_stonith_not_on_s4app1 res_ALIYUN_STONITH_1 -inf: s4app1
location loc_s4app2_stonith_not_on_s4app2 res_ALIYUN_STONITH_2 -inf: s4app2
#Order
order ord_sap_S4T_first_start_ascs Optional: rsc_sap_S4T_ASCS00:start rsc_sap_S4T_ERS10:stop symmetrical=false
#cluster setting
property cib-bootstrap-options: \
        have-watchdog=false \
        cluster-name=hacluster \
        stonith-enabled=true \
        stonith-timeout=150s
rsc_defaults rsc-options: \
        migration-threshold=5000 \
        resource-stickiness=1000
op_defaults op-options: \
        timeout=600
Run the following command as the root user to allow SAP ASCS resources to be taken over by SUSE HAE:
crm configure load update HA_script.txtCheck the HA status to ensure that all resources are started.
crm_mon -r

7.5.5 Remove the temporary HAVIP binding
#yast2 network
Delete the temporary HAVIPs of ASCS and ERS.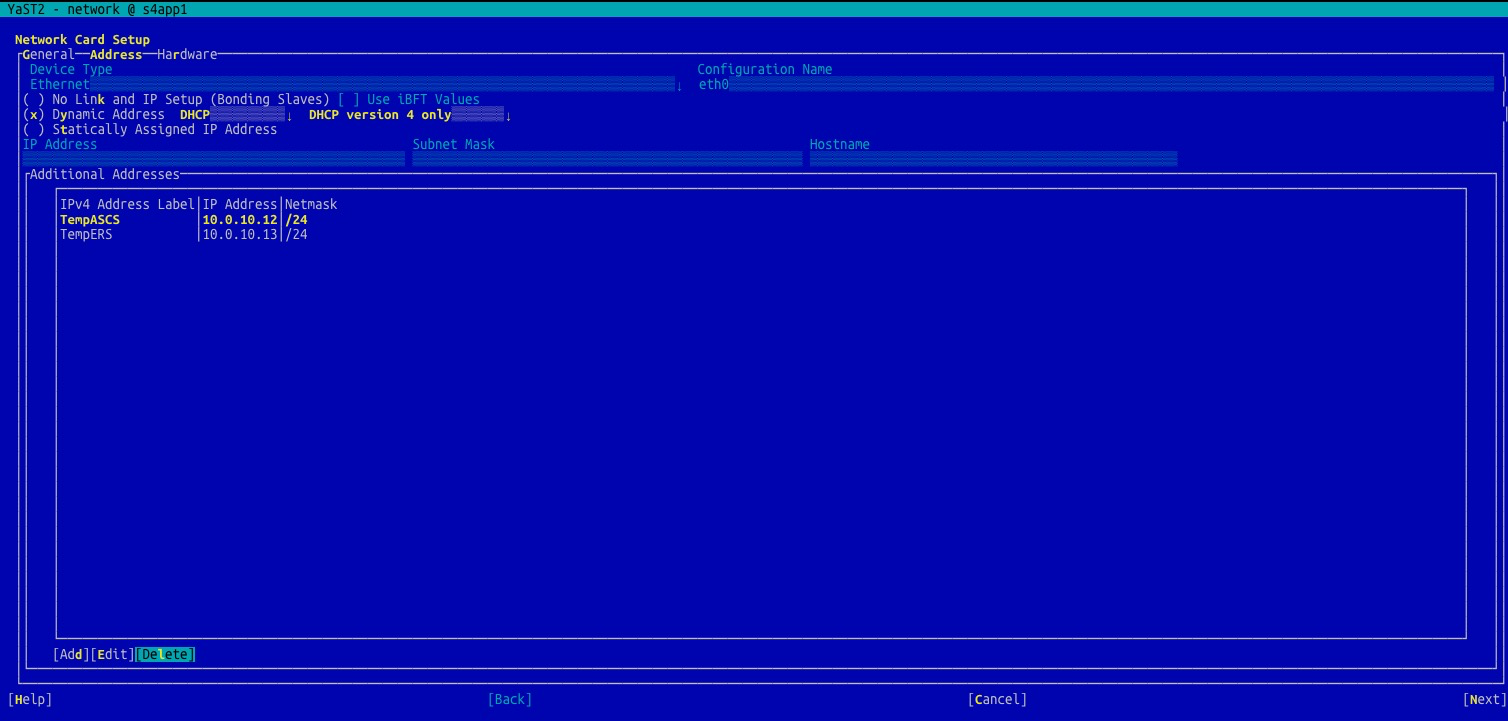
7.5.6Start and stop ASCS or ERS
Start an ASCS or ERS instance.
su - s4tadm
# Start ASCS.
sapcontrol -nr 00 -function StartService S4T
sapcontrol -nr 00 -function Start
# Start ERS
sapcontrol -nr 10 -function StartService S4T
sapcontrol -nr 10 -function Start
Stop an ASCS or ERS instance
su - s4tadm
# Stop ASCS.
sapcontrol -nr 00 -function Stop
sapcontrol -nr 00 -function StopService S4T
# Stop ERS.
sapcontrol -nr 10 -function Stop
sapcontrol -nr 10 -function StopService S4T
7.5.7Check the HA cluster
Check FailoverConfig.
sapcontrol -nr 00 -function HAGetFailoverConfig 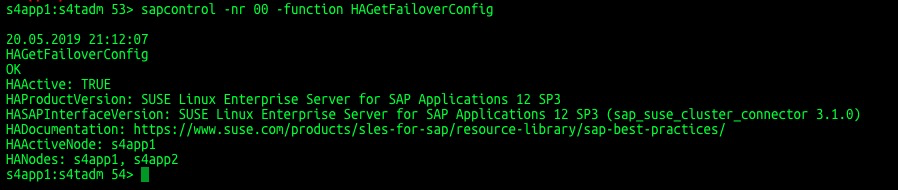 Check HACheckConfig.
sapcontrol -nr 00 -function HACheckConfig 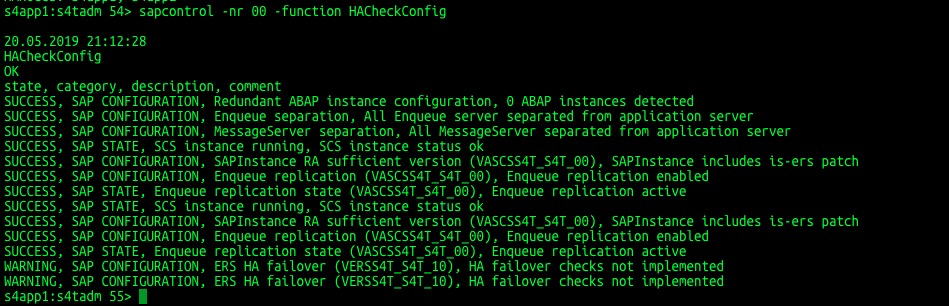 Check HACheckFailoverConfig.
sapcontrol -nr 00 -function HACheckFailoverConfig
7.6 Install a PAS instance
PAS does not participate in the switchover of HA and is installed locally. Start the SWPM installation and install PAS locally.
# ./sapinst
In the browser of the Windows jump host, enter the access address:
https://s4app1:4237/sapinst/docs/index.html
Log on by using the root user and password. Ensure that hostname resolution and ports are accessibile. 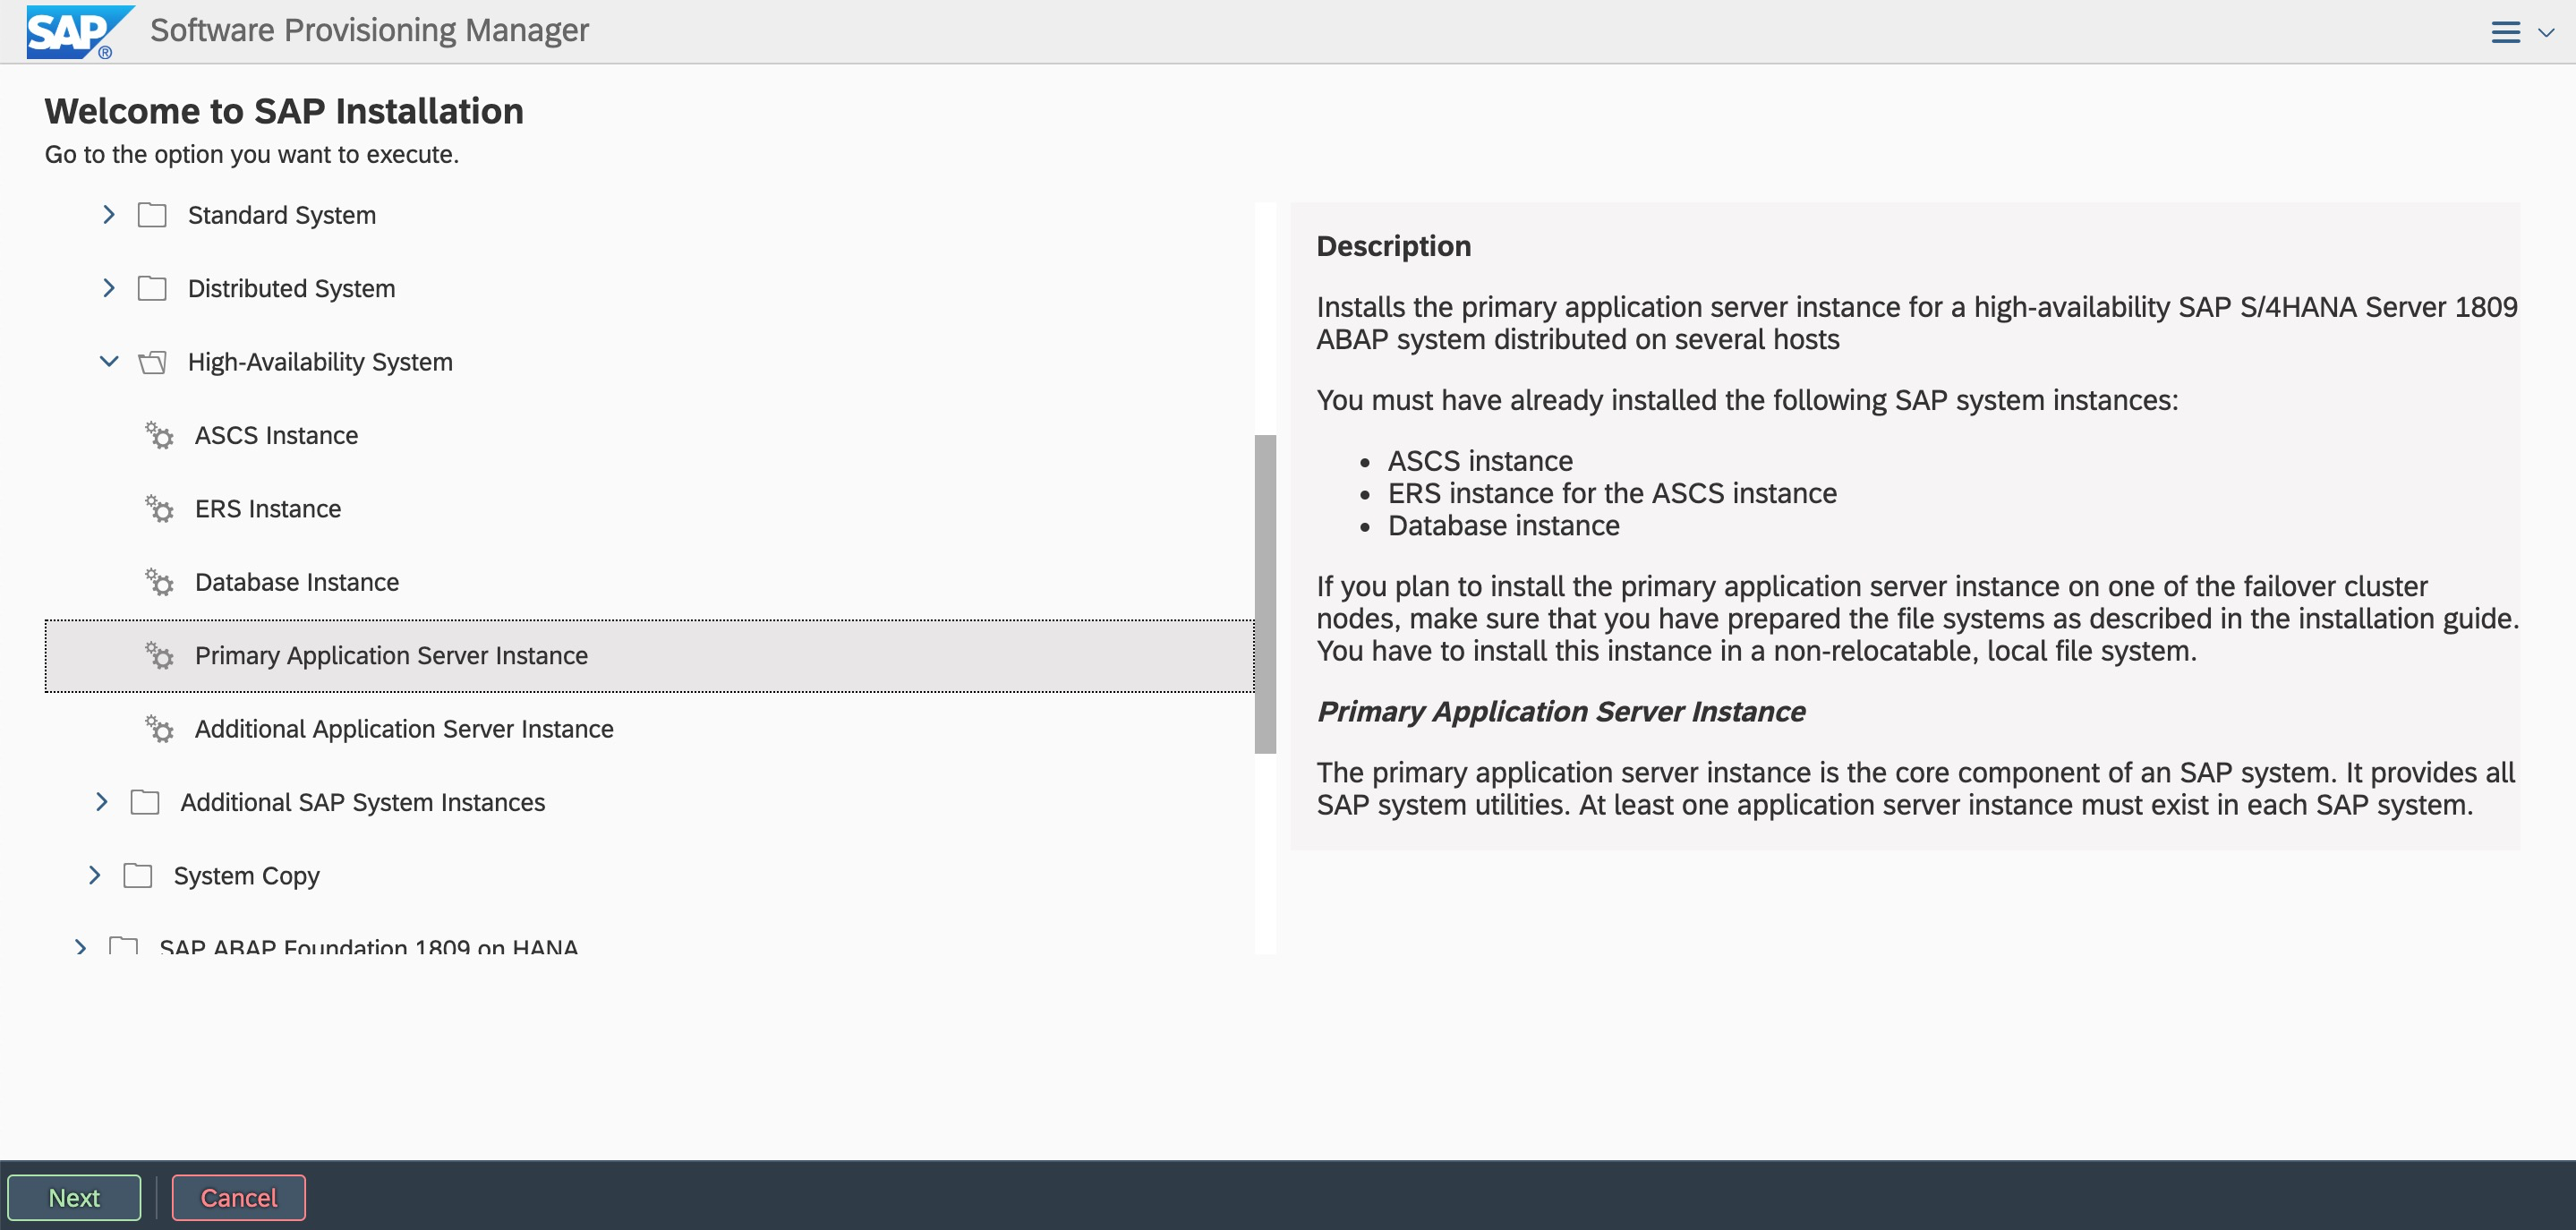 Enter the instance number.
 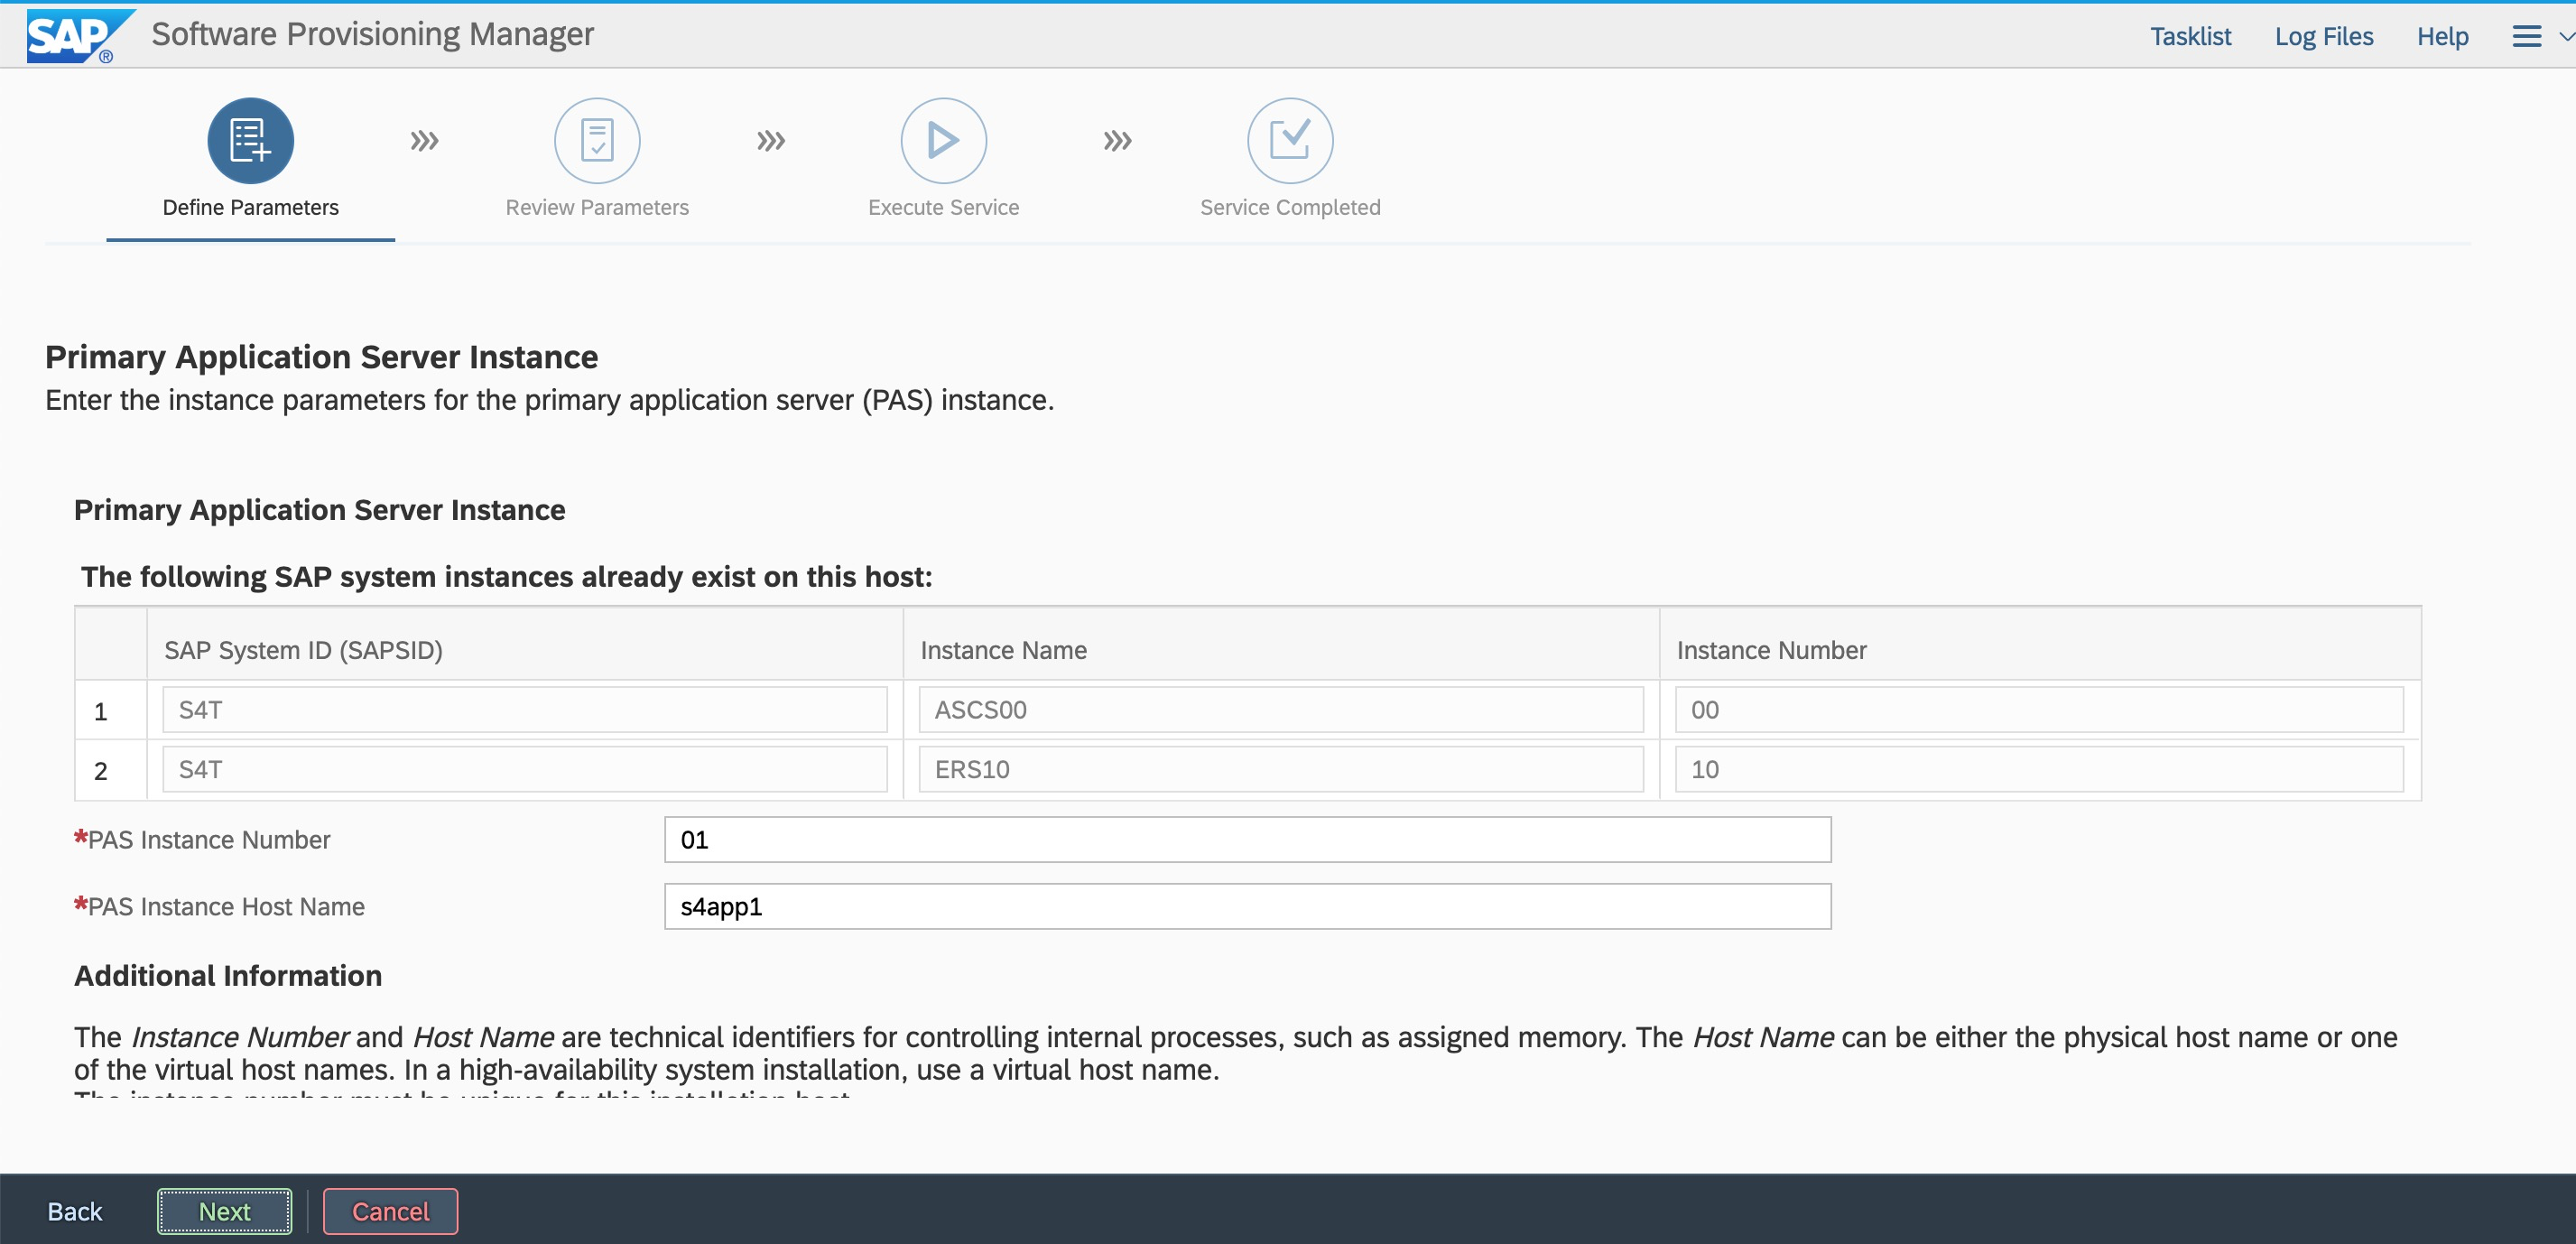 If you do to register sld, you can registerit later.
 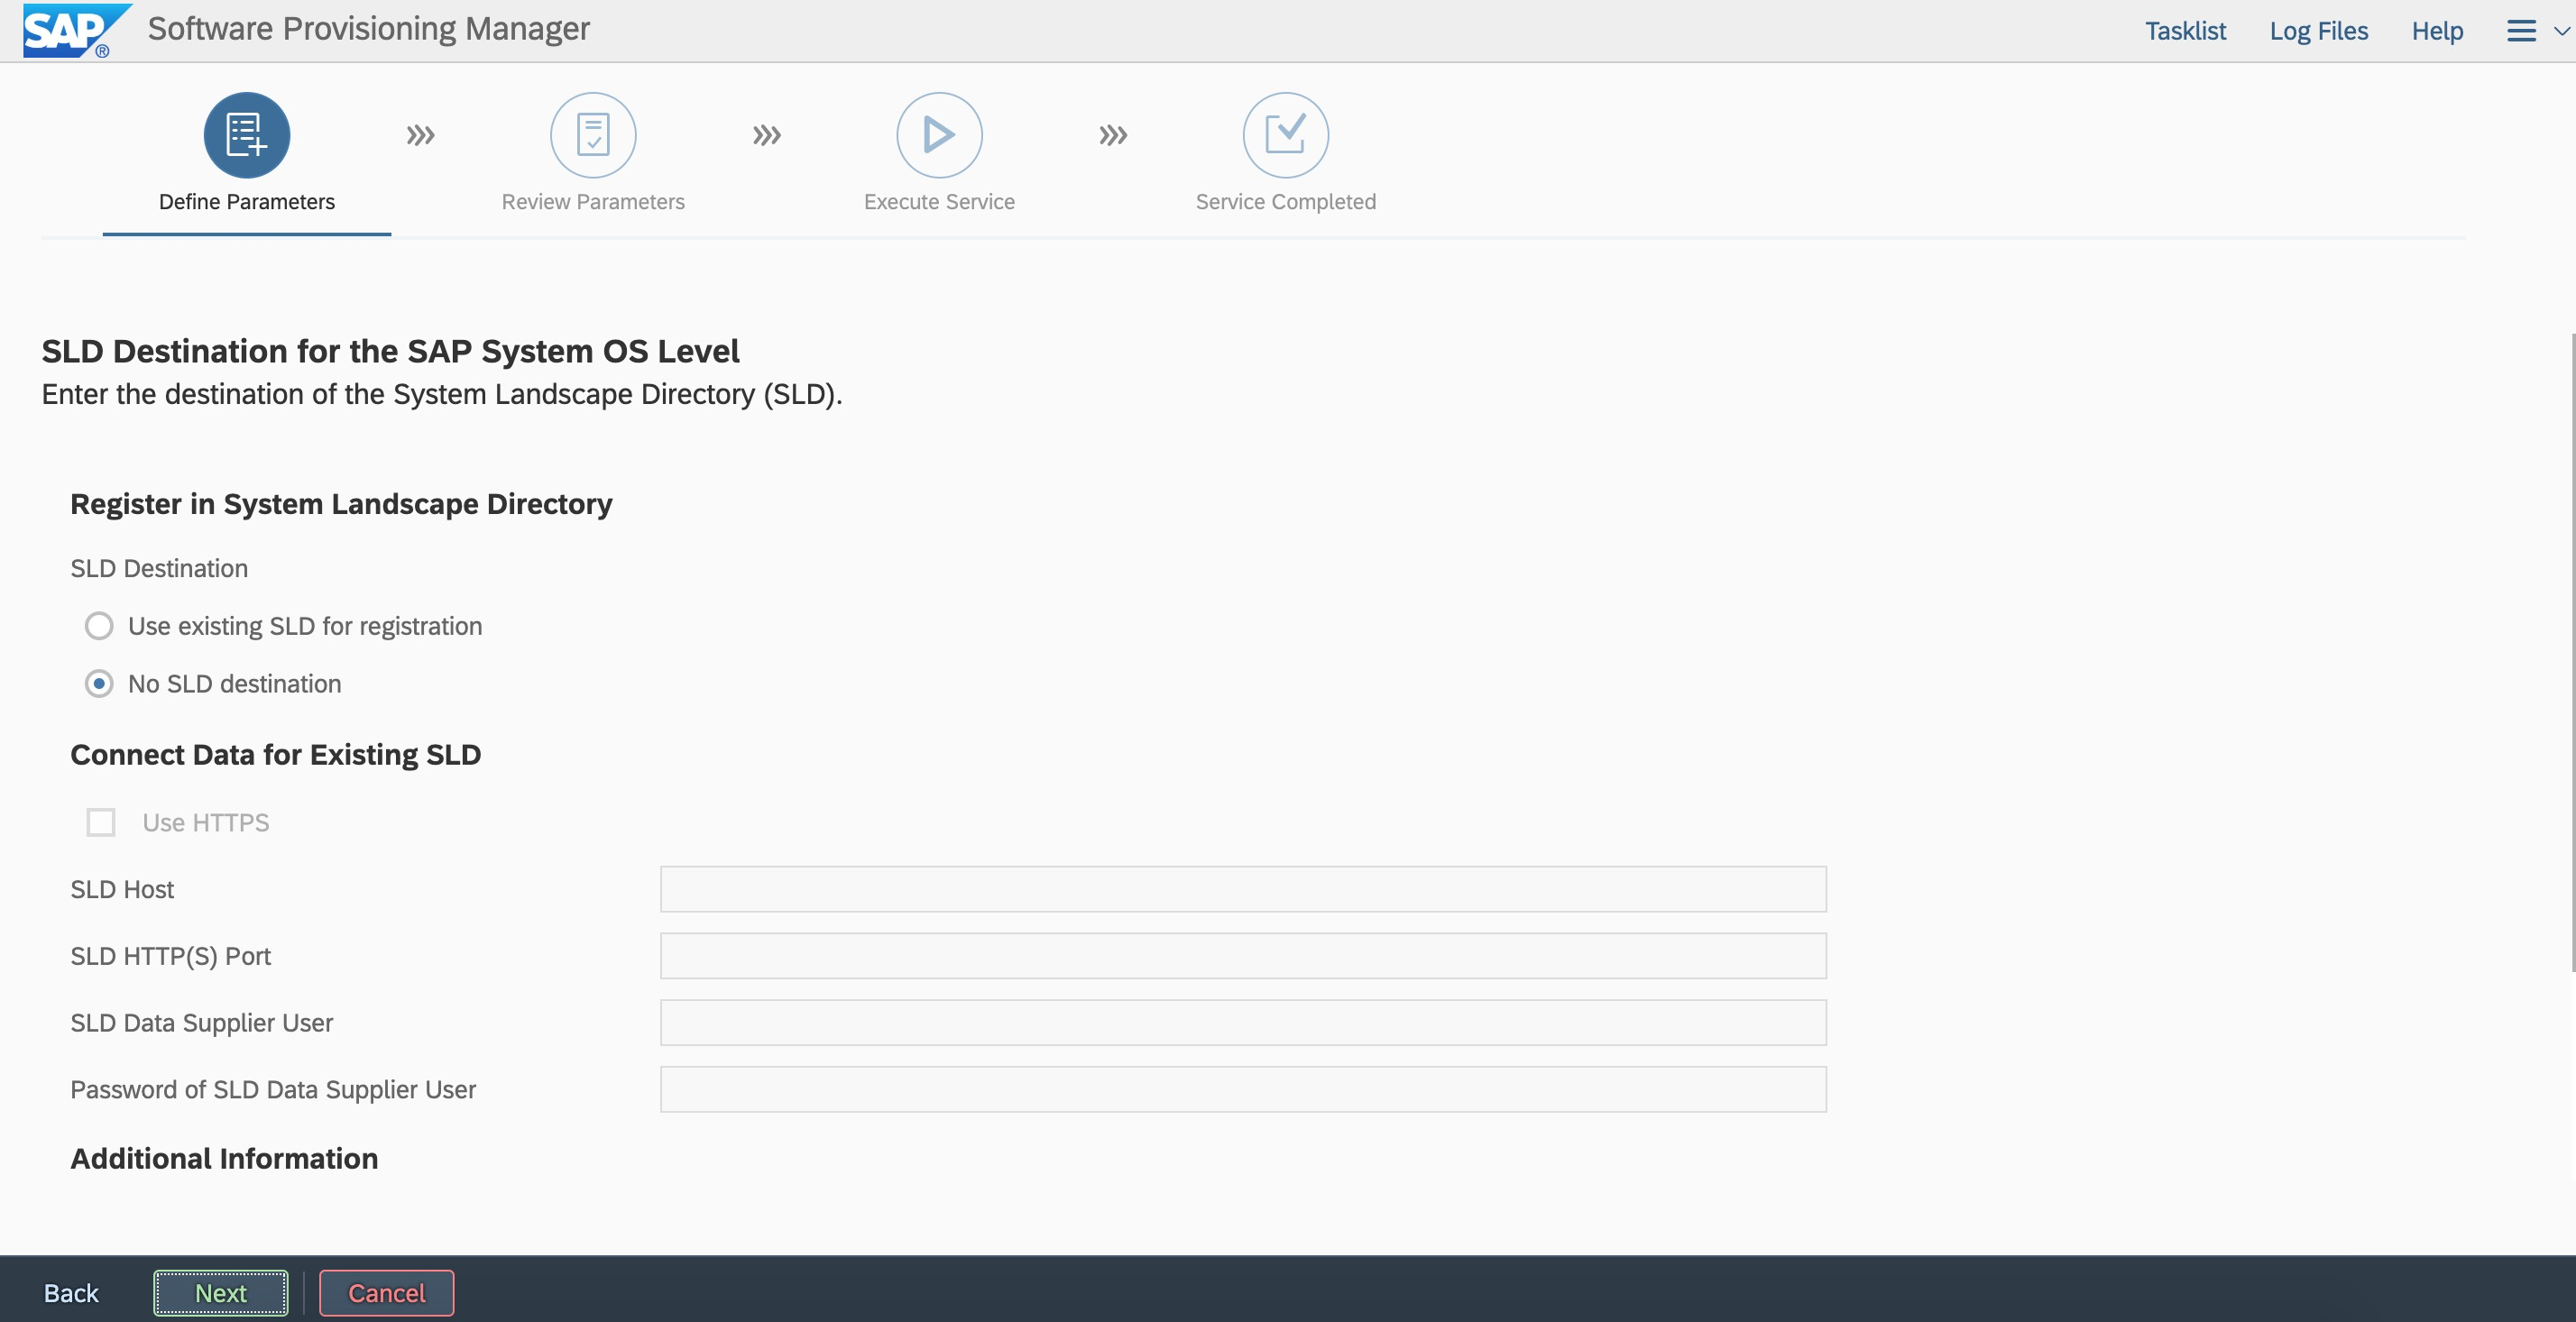 Specify whether to create an ACL of the message server. If you do not create an ACL in this deployment, you can create it later.
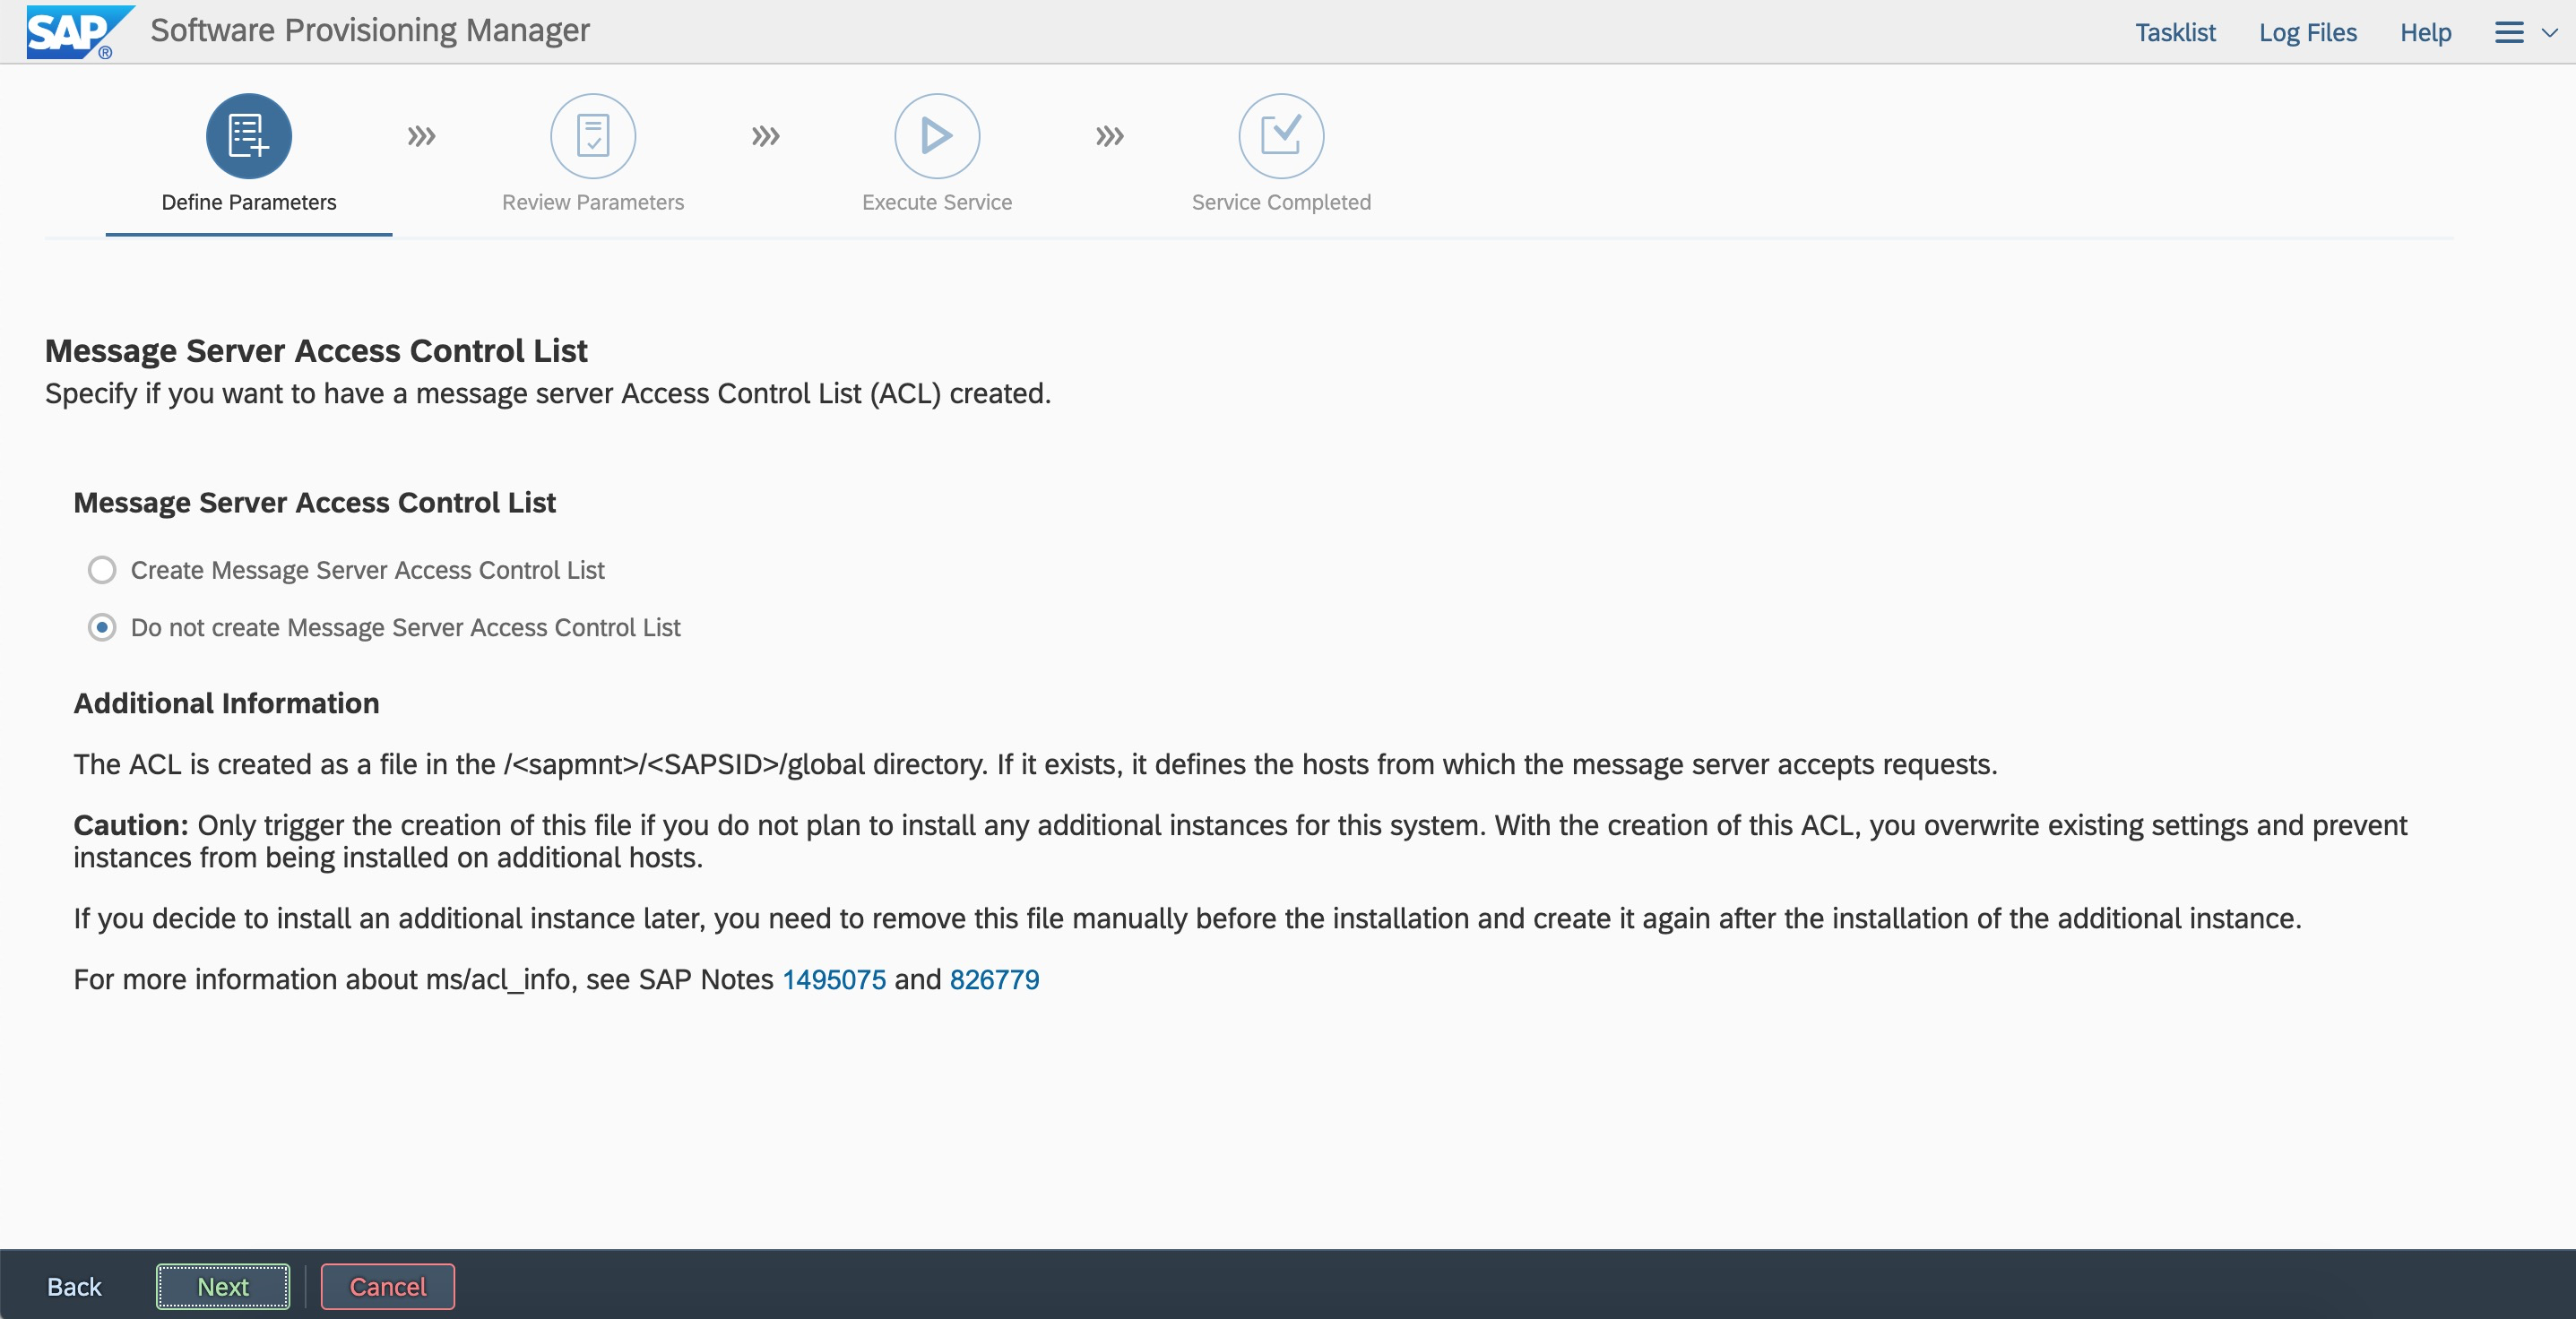
The process of installing AAS locally on s4app2 and installing PAS is similar.
7.7 Configure hdbuserstore
After PAS or AAS is installed, you need to configure hdbuserstore to ensure that PAS and AAS are connected to the virtual hostname corresponding to the HAVIP of HANA.
su - s4tadm
hdbuserstore set default VDBS4T:30015 SAPHANADB "pasword"
hdbuserstore list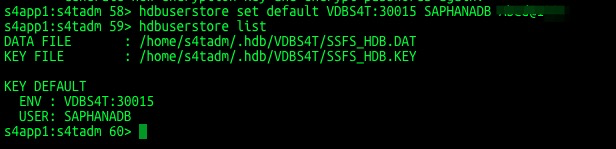
8. Perform a switching test
For more information, see SAP system high availability environment maintenance guide. For more information about daily management tasks and commands of SUSE HAE, visit Administration Guide.