You can use Smart Access Gateway (SAG) vCPE to connect a network deployed on Microsoft Azure to Alibaba Cloud, enabling resources on both cloud platforms to communicate.
Prerequisites
-
You have deployed cloud services on Microsoft Azure. For deployment details, see the Microsoft Azure documentation.
A VPC is created and cloud services are deployed in the VPC. For more information, see Create a VPC with an IPv4 CIDR block.
-
You are familiar with the security group rules for the cloud services in your Alibaba Cloud VPC and have confirmed that the rules allow resources in Azure to access resources in the VPC. For more information, see View security group rules and Add a security group rule.
-
You have created an ECS instance in the Alibaba Cloud VPC. For more information, see Create a subscription instance on the custom launch tab.
Scenario
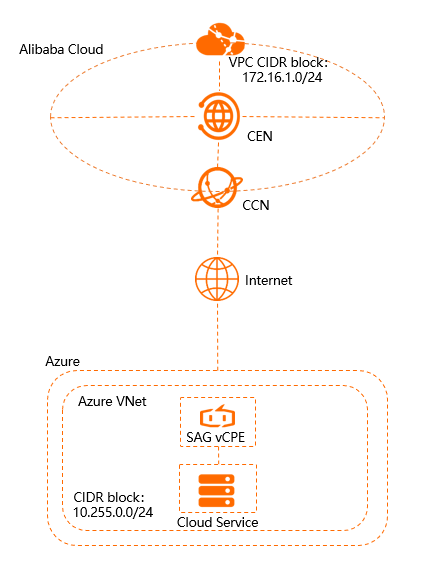
An enterprise has deployed cloud services in a European region on Azure and the China (Hangzhou) region on Alibaba Cloud, and uses SAG vCPE to connect the two platforms.
Deploy an SAG vCPE image on a virtual machine (VM) in an Azure virtual network (VNet). The VM acts as an SAG vCPE device that connects your network to Alibaba Cloud through a Cloud Connect Network (CCN) and Cloud Enterprise Network (CEN), enabling communication between resources in the Azure VNet and the Alibaba Cloud VPC.
Procedure
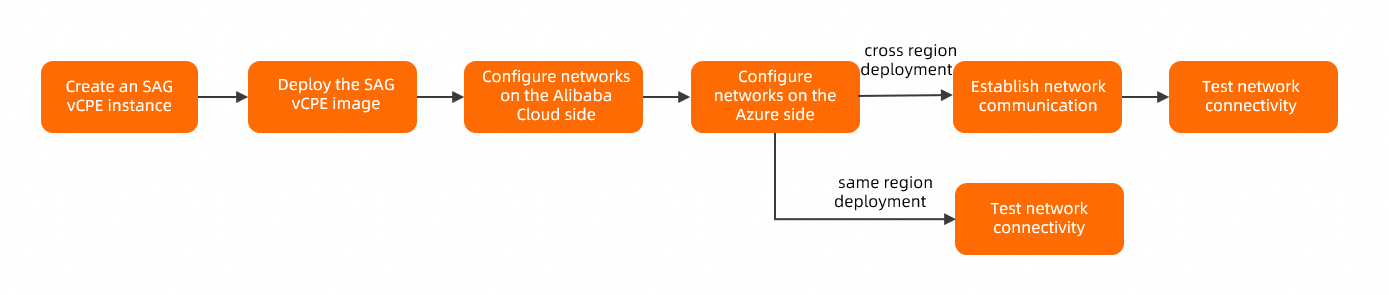
To connect cloud services on Azure to Alibaba Cloud services in the same region by using SAG vCPE, you do not need to set up an inter-region connection. This topic uses a cross-region scenario as an example.
Step 1: Create an SAG vCPE instance
Create an SAG vCPE instance on the SAG console to manage your SAG vCPE device.
Log on to the SAG console.
On the Smart Access Gateway page, choose .
-
On the SmartAG vCPE Software page, configure the SAG vCPE instance, and then click Buy Now and complete the payment.
Parameter
Description
Region
Select the region of the SAG vCPE instance. In this example, Germany (Frankfurt) is selected.
Instance Name
Enter a name for the SAG vCPE instance.
Instance Type
The default value is SAG-vCPE.
Version
The default value is Basic Edition.
Deployment mode
Select a deployment mode for the SAG vCPE device. The default value is Active-Standby.
In Active-Standby mode, an SAG vCPE instance can connect to two SAG vCPE devices by default. You can configure the two devices in active-standby mode to improve network availability. This topic uses only the active device.
Peak Bandwidth
The peak bandwidth for network communication. Unit: Mbit/s.
Quantity
Select the number of SAG vCPE instances that you want to create. In this example, 1 is selected.
Subscription Period
Select a subscription duration.
-
Return to the SAG console. In the top navigation bar, select the region where you created the instance.
-
In the left-side navigation pane, choose .
-
On the SAG page, click the ID of the instance that you created.
-
On the instance details page, click the Device Settings tab. View and record the serial number and key of the active device. These credentials are required to associate the SAG vCPE device with the SAG vCPE instance.
Step 2: Deploy the SAG vCPE image
Create a VM in your Azure VNet to host the SAG vCPE image. After deployment, this VM acts as an SAG vCPE device that connects your Azure services to Alibaba Cloud.
-
Create a VM in the Azure VNet.
For more information about how to create an Azure VM, see the Azure documentation. Make sure that the VM meets the following requirements:
-
Operating system: 64-bit Ubuntu 18.04.
-
Kernel version: 3.10.0-957.21.3.el7.x86_64 or later.
-
The VM has a dedicated network interface controller (NIC) that can connect to the Internet.
-
Remote logon is enabled for the VM.
-
No business systems are running on the VM.
-
The VM has at least 1 vCPU and at least 2 GB of memory.
We recommend that you use a VM with at least 2 vCPU cores and 4 GB of memory. This configuration can achieve an encrypted private bandwidth of 350 Mbit/s or higher based on 1024-byte packets.
-
-
Log on to the Azure VM and download the script to the /root directory. For more information, see the Azure documentation.
Important-
You can download the script to a custom directory. If you download the script to a custom directory, you must use the custom directory when you run the script.
-
Do not modify the content or name of the script after you download it.
-
If your VM is deployed in a region on the Chinese mainland, run the following command to download the script:
wget -O /root/sag_vcpe_v2.3.0_deployment.sh https://sdwan-oss-shanghai.oss-cn-shanghai.aliyuncs.com/vcpe_vm/sag_vcpe_v2.3.0_deployment.sh -
If your VM is deployed in a region outside the Chinese mainland, run the following command to download the script:
wget -O /root/sag_vcpe_v2.3.0_deployment.sh https://sdwan-oss-shanghai.oss-accelerate.aliyuncs.com/vcpe_vm/sag_vcpe_v2.3.0_deployment.sh
-
-
Grant the execute permission to the script.
chmod +x /root/sag_vcpe_v2.3.0_deployment.sh -
Run the script.
/root/sag_vcpe_v2.3.0_deployment.sh -n sage6nniq3**** -k **** -t azure -w eth0The following table describes the parameters. For more information about the script parameters, see Script parameters.
Parameter
Description
-n
The serial number of the SAG vCPE device.
-k
The key of the SAG vCPE device.
-t
The platform hosting the SAG vCPE image. Valid values:
-
aliyun (Default): The SAG vCPE image is deployed on an Alibaba Cloud ECS instance.
-
aws: The SAG vCPE image is deployed on an Amazon EC2 instance.
-
azure: The SAG vCPE image is deployed on a virtual machine on Microsoft Azure.
-
If you deploy the SAG vCPE image on a server in an on-premises network, you can set this parameter to any English string other than aliyun, ENS, aws, or azure.
-w
The NIC name of the WAN port. You can run the
ifconfigorip -br addresscommand to query the NIC name of the host. -
-
When you run the script, the system automatically checks if the deployment environment meets the requirements. If some required components are not installed, the following prompt appears. Enter
yes, and the system automatically installs the components.Missing dependency packages python3 telnet vim traceroute sshpass mtr docker inotify wget netifaces==0.10.9, are you sure want to install these packages? [yes|no] [no] >>> -
If the environment meets the requirements, the system starts to deploy the SAG vCPE image. After the deployment is complete, the following prompt appears.
2021-07-28 10:00:40 INFO: Install complete, please wait for few minutes to check state ============================================================================================= -
Check the deployment result.
After the deployment is complete, run the
docker pscommand to verify that the following two containers are running:root@test:~# docker ps CONTAINER ID IMAGE COMMAND CREATED STATUS PORTS NAMES 0cxxx99 vsag-core "sh -c 'mkdir -p /li…" 6 hours ago Up 6 hours vsag-core caxxx26 centos:7 "/sbin/init" 6 hours ago Up 6 hours vsag-manager-base root@test:~#If the vsag-core and vsag-manager-base containers are running, the deployment is successful.
Step 3: Configure Alibaba Cloud networks
After deploying the SAG vCPE image, configure its network settings on the SAG console to connect it to Alibaba Cloud.
-
Configure how to synchronize routes from Azure.
-
Log on to the SAG console.
-
In the top navigation bar, select the target region.
-
On the SAG page, find the target instance and click Network Configuration in the Actions column.
-
On the tab, click Add Static Route.
-
In the Add Static Route dialog box, enter the private CIDR block of the Azure VNet and click OK.
After adding the static route, the static route list displays the CIDR block
10.255.0.0/24.
-
-
Attach a CCN instance.
SAG uses Cloud Connect Network (CCN) to connect your network to Alibaba Cloud.
-
Create a CCN instance. For more information, see Create a CCN instance.
The CCN instance must be in the same region as the SAG vCPE instance.
-
In the left-side navigation pane, choose .
-
On the SAG page, find the target instance and click Network Configuration in the Operation column.
-
On the instance details page, click the tab.
-
In the Associated Instances Under Current Account section, click Add Network, select the CCN instance that you created, and then click OK.
-
After attaching the CCN instance, click the Device Settings tab. Check the VPN Status and Controller Status of the SAG vCPE device. If both statuses are Normal, the SAG vCPE device is connected to Alibaba Cloud.
-
-
Create and configure a CEN instance.
Attach both the SAG vCPE instance and the VPC instance to a Cloud Enterprise Network (CEN) instance. This allows the SAG vCPE instance and the Alibaba Cloud VPC to learn routes from each other, enabling communication between the SAG vCPE device and resources in the Alibaba Cloud VPC.
-
In the left-side navigation pane, click CCN.
-
On the CCN page, find the target CCN instance and click Bind CEN Instance in the Operation column.
-
In the CEN Instance panel, select the Cloud Enterprise Network (CEN) instance to bind, and then click OK.
You can select a CEN instance in one of the following ways. In this example, Create CEN is selected.
-
Existing CEN: If you have an existing CEN instance, click the text box and select the instance that you want to bind.
-
Create CEN: If you do not have a CEN instance, enter a name in the text box. The system creates a CEN instance and automatically binds it.
-
-
Attach the created Alibaba Cloud VPC instance to this CEN instance. For more information, see Create a VPC connection.
-
Step 4: Configure Azure networks
Configure networks on the Azure side to enable communication between Azure and Alibaba Cloud resources. For more information about the configuration commands or operations, see the Azure documentation.
-
Create a route table in Azure.
On the Route tables page, click + Create.
-
Associate the subnet of your Azure cloud service with the route table.
After the association is created, you can view information about the associated subnet on the Subnets page of the route table, such as the subnet name, address range, and the virtual network to which the subnet belongs.
-
Add a route to Alibaba Cloud to the Azure route table.
-
Address prefix: Enter the private CIDR block of the Alibaba Cloud service.
-
Next hop type: Select Virtual appliance.
-
Next hop IP address: Enter the private IP address of the VM on which the SAG vCPE image is deployed.
-
-
Find the private network interface of the VM on which the SAG vCPE image is deployed and enable IP forwarding.
Step 5: Establish inter-region connectivity
After configuring networks on the Azure side, purchase a bandwidth package for the CEN instance and create an inter-region connection. This enables the Alibaba Cloud China (Hangzhou) region to communicate with the Azure European region through SAG vCPE.
To connect cloud services on Azure to Alibaba Cloud services in the same region by using SAG vCPE, you do not need to perform this step.
-
Purchase a bandwidth package.
-
Log on to the CEN console.
-
On the CEN Instance page, find the target CEN instance and click its ID.
-
On the instance details page, click the tab, and then click Purchase Bandwidth Plan.
-
On the purchase page, configure the bandwidth package, and then click Buy Now and complete the payment.
Parameter
Description
CEN
Select the CEN instance for which you want to purchase a bandwidth package. In this example, the created CEN instance is selected.
Area A
Select the area where the network instance that you want to connect is located. In this example, Chinese Mainland is selected.
Area B
Select the area to which you want to create a connection. In this example, Europe is selected.
Billing method
The billing method of the bandwidth package. The default value is Pay-by-bandwidth.
Bandwidth
Select a bandwidth value for the bandwidth package. Unit: Mbit/s.
Bandwidth Plan Name
Enter a name for the bandwidth package.
Subscription Period
Select a subscription duration for the bandwidth package. The default value is 1 Month.
Select Auto-renewal to enable the auto-renewal feature for the bandwidth package.
-
-
Create an inter-region connection.
-
On the CEN Instance page, find the target CEN instance and click its ID.
-
On the instance details page, click the tab, and then click Purchase Bandwidth Plan.
-
On the Connection with Peer Network Instance page, configure the inter-region connection and click OK.
Parameter
Description
Instance Type
The type of the network instance to be connected. In this example, Cross-region is selected.
Region
Select the region to be connected. In this example, China (Hangzhou) is selected.
Transit Router
The system automatically displays the ID of the Transit Router instance in the region to be connected.
Connection Name
Enter a name for the inter-region connection.
Peer Region
Select the peer region to be connected. In this example, Germany(Frankfurt) is selected.
Transit Router
The system automatically displays the ID of the Transit Router instance in the peer region.
Bandwidth Allocation Mode
Inter-region connections support two bandwidth allocation methods: Allocate From Bandwidth Plan and Pay-By-Data-Transfer .
In this example, Allocate From Bandwidth Plan is selected.
Bandwidth Plan
Select the bandwidth package that is attached to the CEN instance. In this example, the created bandwidth package instance is selected.
Bandwidth
Enter a bandwidth value for the inter-region connection. Unit: Mbit/s.
Default Line Type
An inter-region connection supports multiple link types. Different link types provide different quality of data transmission.
Advanced Settings
Keep the default settings. All advanced settings are selected.
-
Step 6: Test connectivity
After completing the preceding steps, your resources in the Alibaba Cloud VPC can communicate with your resources on Azure. Test the connectivity as follows.
The ECS instance created in the Alibaba Cloud VPC runs Alibaba Cloud Linux. If you use another operating system, see the documentation of the operating system for more information about how to use the ping command.
-
Log on to the ECS instance in the Alibaba Cloud VPC. For more information, see Connection methods.
-
Run the ping command to ping a VM in the Azure VNet to verify communication between the two networks.
A reply similar to the following confirms that resources in the Alibaba Cloud VPC and Azure VNet can communicate.
[root@iZbp          mmSZ ~]# ping 10.255.0.6
PING 10.255.0.6 (10.255.0.6) 56(84) bytes of data.
64 bytes from 10.255.0.6: icmp_seq=1 ttl=61 time=231 ms
64 bytes from 10.255.0.6: icmp_seq=2 ttl=61 time=231 ms
64 bytes from 10.255.0.6: icmp_seq=3 ttl=61 time=231 ms
64 bytes from 10.255.0.6: icmp_seq=4 ttl=61 time=231 ms
^Z
[1]+  Stopped                 ping 10.255.0.6
[root@iZbp          rSZ ~]#