This topic describes how to use Alibaba Cloud Toolkit to deploy an application to Serverless App Engine (SAE) and monitor the application.
Prerequisites
- SAE is activated. For more information, see Activate SAE.
- Maven is downloaded and environment variables are configured.
- Java Development Kit (JDK) 1.8 or later is downloaded and installed.
- IntelliJ IDEA 2018.3 or later is downloaded and installed.Note The official server of the JetBrains plug-ins is deployed outside China. If you cannot download IntelliJ IDEA due to slow network responses, obtain the offline installation package for IntelliJ IDEA and install it. For more information, see Contact Us.
- Alibaba Cloud Toolkit is installed and configured in IntelliJ IDEA.
Step 1: Create demo applications in SAE
SAE allows you to deploy applications by using code packages and images. For more information, see Deploy a demo application on SAE.
In this example, JAR packages are used to create a provider application and a consumer application in SAE. For more information, see Deploy a microservices application by using a JAR package in the SAE console.
Step 2: Create a provider
Create a provider application project in an on-premises environment, add dependencies, enable service registration and discovery, and then specify the Nacos server as the service registry.
- Create a Maven project named
nacos-service-provider. - Add dependencies to the
pom.xmlfile.The following sample code provides an example on how to add the Spring Boot 2.1.4.RELEASE and Spring Cloud Greenwich.SR1 dependencies:
<parent>
    <groupId>org.springframework.boot</groupId>
    <artifactId>spring-boot-starter-parent</artifactId>
    <version>2.1.4.RELEASE</version>
    <relativePath/>
</parent>

<dependencies>
    <dependency>
        <groupId>com.alibaba.cloud</groupId>
        <artifactId>spring-cloud-starter-alibaba-nacos-discovery</artifactId>
        <version>2.1.1.RELEASE</version>
    </dependency>
    <dependency>
        <groupId>org.springframework.boot</groupId>
        <artifactId>spring-boot-starter-web</artifactId>
    </dependency>
</dependencies>

<dependencyManagement>
    <dependencies>
        <dependency>
            <groupId>org.springframework.cloud</groupId>
            <artifactId>spring-cloud-dependencies</artifactId>
            <version>Greenwich.SR1</version>
            <type>pom</type>
            <scope>import</scope>
        </dependency>
    </dependencies>
</dependencyManagement>

<build>
    <plugins>
        <plugin>
            <groupId>org.springframework.boot</groupId>
            <artifactId>spring-boot-maven-plugin</artifactId>
        </plugin>
    </plugins>
</build>
In this example, Spring Cloud Greenwich is used. The version of Spring Cloud Alibaba for Spring Cloud Greenwich is 2.1.1.RELEASE.
- The version of Spring Cloud Alibaba for Spring Cloud Finchley is 2.0.1.RELEASE.
- The version of Spring Cloud Alibaba for Spring Cloud Edgware is 1.5.1.RELEASE.
Note Spring Cloud Edgware is discontinued. We recommend that you do not use Spring Cloud Edgware to develop applications. - In
src\main\java, create a package named com.aliware.edas. - In the com.aliware.edas package, create a startup class named
ProviderApplicationfor the provider, and add the following sample code:The
@EnableDiscoveryClientannotation is used to enable the service registration and discovery feature for the provider application.package com.aliware.edas; import org.springframework.boot.SpringApplication; import org.springframework.boot.autoconfigure.SpringBootApplication; import org.springframework.cloud.client.discovery.EnableDiscoveryClient; @SpringBootApplication @EnableDiscoveryClient public class ProviderApplication { public static void main(String[] args) { SpringApplication.run(ProviderApplication.class, args); } } - In the
com.aliware.edaspackage, createEchoController, and specify/echo/{String}as the URL mapping and GET as the HTTP method. Obtain the method parameter from the URL path, and echo the received parameter.package com.aliware.edas; import org.springframework.web.bind.annotation.PathVariable; import org.springframework.web.bind.annotation.RequestMapping; import org.springframework.web.bind.annotation.RequestMethod; import org.springframework.web.bind.annotation.RestController; @RestController public class EchoController { @RequestMapping(value = "/echo/{string}", method = RequestMethod.GET) public String echo(@PathVariable String string) { return string; } } - In
src\main\resources, create a file named application.properties and add the following configuration to application.properties to specify the IP address of Nacos Server.spring.application.name=service-provider server.port=18081 spring.cloud.nacos.discovery.server-addr=127.0.0.1:8848In the preceding configuration,
127.0.0.1indicates the IP address of your Nacos Server. If your Nacos Server is deployed on another server, you must change the value to the IP address of the server.Note If your service registry is a self-managed service registry, replace127.0.0.1with the address of the self-managed service registry. - Verify the result.
Step 3: Create a consumer
This section describes the service registration feature, and how Nacos Server works with RestTemplate and FeignClient.
- Create a Maven project named
nacos-service-consumer. - Add dependencies to the
pom.xmlfile.<parent> <groupId>org.springframework.boot</groupId> <artifactId>spring-boot-starter-parent</artifactId> <version>2.1.4.RELEASE</version> <relativePath/> </parent> <dependencies> <dependency> <groupId>com.alibaba.cloud</groupId> <artifactId>spring-cloud-starter-alibaba-nacos-discovery</artifactId> <version>2.1.1.RELEASE</version> </dependency> <dependency> <groupId>org.springframework.boot</groupId> <artifactId>spring-boot-starter-web</artifactId> </dependency> <dependency> <groupId>org.springframework.cloud</groupId> <artifactId>spring-cloud-starter-openfeign</artifactId> </dependency> </dependencies> <dependencyManagement> <dependencies> <dependency> <groupId>org.springframework.cloud</groupId> <artifactId>spring-cloud-dependencies</artifactId> <version>Greenwich.SR1</version> <type>pom</type> <scope>import</scope> </dependency> </dependencies> </dependencyManagement> <build> <plugins> <plugin> <groupId>org.springframework.boot</groupId> <artifactId>spring-boot-maven-plugin</artifactId> </plugin> </plugins> </build> - In
src\main\java, create a package named com.aliware.edas. - In the
com.aliware.edaspackage, configure RestTemplate and FeignClient. - In the
com.aliware.edaspackage, create a class namedTestControllerto test and validate the service discovery feature.package com.aliware.edas; import org.springframework.beans.factory.annotation.Autowired; import org.springframework.web.bind.annotation.PathVariable; import org.springframework.web.bind.annotation.RequestMapping; import org.springframework.web.bind.annotation.RequestMethod; import org.springframework.web.bind.annotation.RestController; import org.springframework.web.client.RestTemplate; @RestController public class TestController { @Autowired private RestTemplate restTemplate; @Autowired private EchoService echoService; @RequestMapping(value = "/echo-rest/{str}", method = RequestMethod.GET) public String rest(@PathVariable String str) { return restTemplate.getForObject("http://service-provider/echo/" + str, String.class); } @RequestMapping(value = "/echo-feign/{str}", method = RequestMethod.GET) public String feign(@PathVariable String str) { return echoService.echo(str); } } - In
src\main\resources, create a file namedapplication.propertiesand add the following configuration toapplication.propertiesto specify the IP address of Nacos Server.spring.application.name=service-consumer server.port=18082 spring.cloud.nacos.discovery.server-addr=127.0.0.1:8848In the preceding configuration,
127.0.0.1indicates the IP address of your Nacos Server. If your Nacos Server is deployed on another server, you must change the value to the IP address of the server.Note If your service registry is a self-managed service registry, replace127.0.0.1:8848with the address of the self-managed service registry. - Verify the result.
Step 4: Test the services in an on-premises environment
Use the consumer to call the provider in an on-premises environment.
- For Linux, UNIX, or macOS, run the following commands:
curl http://127.0.0.1:18082/echo-rest/rest-rest curl http://127.0.0.1:18082/echo-feign/feign-rest - On Windows, enter http://127.0.0.1:18082/echo-rest/rest-rest and then http://127.0.0.1:18082/echo-feign/feign-rest in the address bar of a browser and the press Enter key.
In this example, services are tested on Windows.

The preceding figure shows that the microservices provider is called by the microservices consumer in an on-premises environment.
Step 5: Deploy the applications to SAE
After you develop an application, you must configure a deployment task in Alibaba Cloud Toolkit to publish your business code to the application that you created in Step 1: Create demo applications in SAE.
- Configure an account in Alibaba Cloud Toolkit.
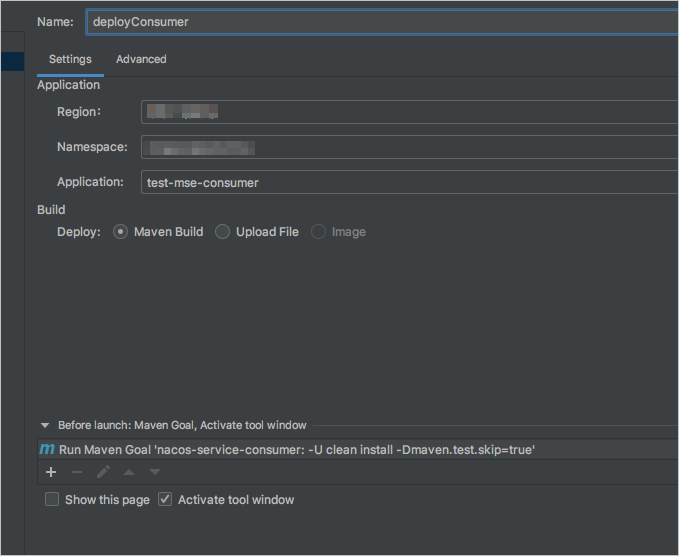
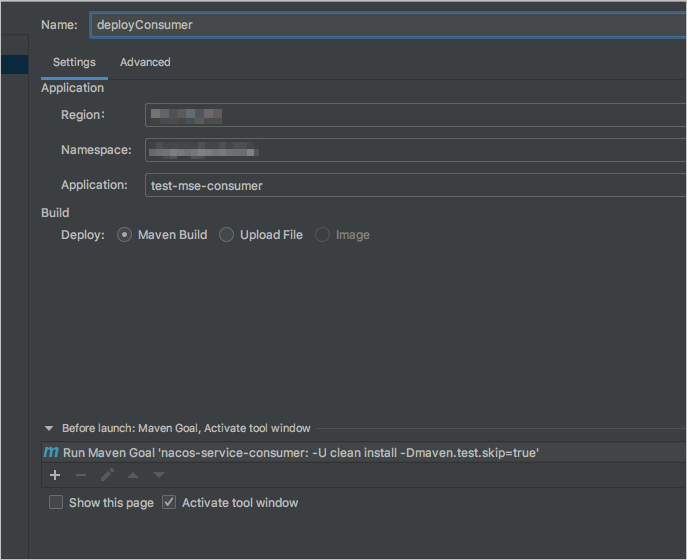
- Configure deployment tasks.
- Deploy the applications. Click Run to run the provider application, and then run the consumer application.

- Verify the result.


