This tutorial walks you through building two Spring Cloud microservices — a service provider and a service consumer — from scratch, testing them locally with Nacos service registration and discovery, then deploying both to Serverless App Engine (SAE).
By the end, the consumer will discover and call the provider through Nacos, running on SAE in production.
The complete source code is available on GitHub.
Who this tutorial is for
Find your starting point and begin from there:
| Your situation | Where to start |
|---|---|
| New to Spring Cloud | Follow every step. You will learn how Spring Cloud Alibaba Nacos Discovery implements service registration and discovery, and how to enable consumer-to-provider calls. |
| Familiar with Eureka, Consul, or ZooKeeper | Replace your existing service registry dependencies and configuration with Spring Cloud Alibaba Nacos Discovery. No code changes are required — Spring Cloud Alibaba implements the standard Spring Cloud Registry interfaces. |
| Already using open-source Spring Cloud Alibaba Nacos Discovery | Skip to Step 4: Deploy to SAE. |
If you want to skip local Nacos setup entirely, go directly to Step 4: Deploy to SAE and use the SAE built-in registry. No local Nacos Server is required in that path.
Prerequisites
Before you begin, ensure that you have:
Maven installed and added to your PATH
A running Nacos Server (required for Steps 1–3; not required if you skip to Step 4)
To start a local Nacos Server:
Download and extract the Nacos Server package.
Start Nacos in standalone mode:
Linux, Unix, or macOS:
sudo sh startup.sh -m standaloneWindows:
startup.cmd -m standalone
The-m standaloneflag starts Nacos in standalone mode instead of cluster mode. On Windows, double-clickingstartup.cmdstarts it in cluster mode by default, which fails without a cluster configuration. If you see a startup error, openstartup.cmdin a text editor, setMODE="standalone", and run the file again. For more details, see Quick Start for Nacos.
Choose a service registry
SAE supports three service registry options, listed from most to least recommended:
| Option | Best for | Notes |
|---|---|---|
| Microservices Engine (MSE) (recommended) | Production workloads with many microservices | Fully managed commercial Nacos; see Use an MSE Nacos registry |
| Self-managed registry | Teams that need full control | Requires network connectivity between SAE and your Nacos cluster; see Self-managed registry notes below |
| SAE built-in registry | Getting started or simple workloads | Zero configuration; SAE auto-injects the Nacos Server address, port, namespace, AccessKey, and Context-path at deployment time |

SAE built-in registry
SAE provides automatic Nacos Server addressing for Java microservice applications. Configure it through the service registration and discovery feature in the SAE console. For setup instructions, see Use the SAE built-in Nacos registry.

Self-managed registry notes

When using a self-managed Nacos registry with SAE, deploy your application as an image or JAR package and add these startup parameters before -jar:
-Dnacos.use.endpoint.parsing.rule=false -Dnacos.use.cloud.namespace.parsing=falseDo not mix -D and -XX JVM parameters in the same argument — this causes the command to fail. Incorrect: Correct:
java -Dalicloud.deployment.mode=EDAS_MANAGED -XX:+UseContainerSupport -XX:InitialRAMPercentage=70.0 ... -jar /home/admin/app/xx-server.jarjava -XX:+UseContainerSupport -XX:InitialRAMPercentage=70.0 ... -Dnacos.use.endpoint.parsing.rule=false -Dnacos.use.cloud.namespace.parsing=false -jar /home/admin/app/xx-server.jarFor image deployments: Add the parameters to the image startup command:
RUN echo 'eval exec java -Dnacos.use.endpoint.parsing.rule=false -Dnacos.use.cloud.namespace.parsing=false -jar $CATALINA_OPTS /home/admin/app/hello-edas-0.0.1-SNAPSHOT.jar'> /home/admin/start.sh && chmod +x /home/admin/start.shFor guidance on creating a Docker image, see Example of image creation.
For JAR package deployments: In the SAE console, go to Startup Command Settings and enter the parameters in the options Settings field.
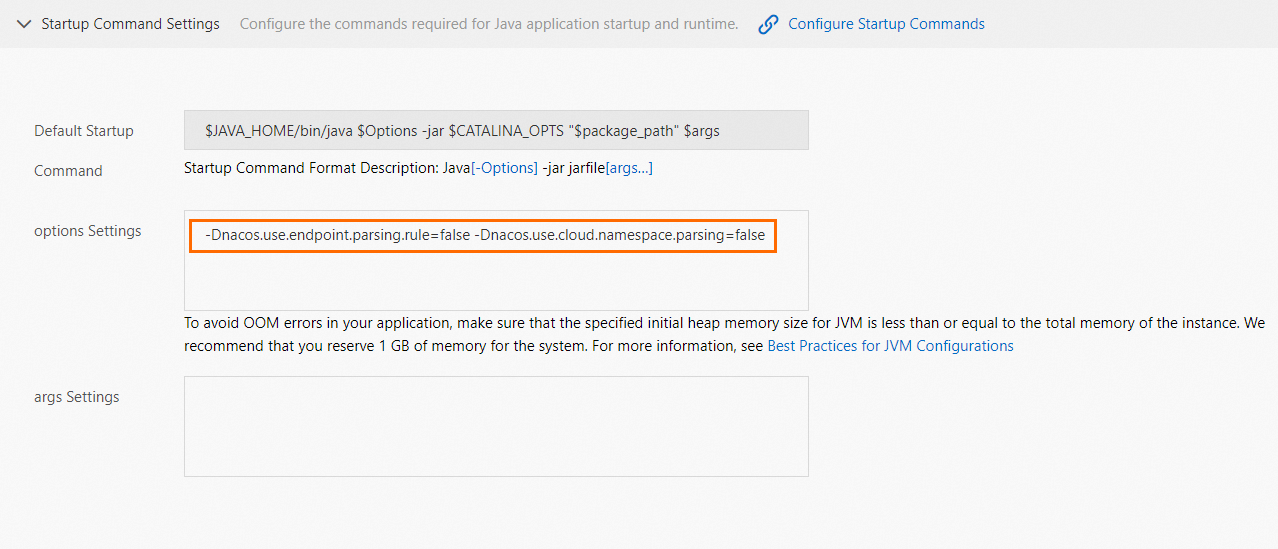
For more details, see Configure a startup command.
Step 1: Create the service provider
The service provider registers with Nacos and exposes an echo endpoint. This example uses Spring Boot 2.1.4.RELEASE and Spring Cloud Greenwich.SR1.
Spring Boot 2.4 and later are not supported. If you use Spring Cloud Alibaba 2.2.6.RELEASE, the required client version is 1.4.2.
Create a Maven project named
nacos-service-provider.Add the following to
pom.xml:Spring Cloud Edgware has reached end of life. Use Greenwich or later for new projects.
Spring Cloud version Spring Cloud Alibaba version Greenwich (used in this example) 2.1.1.RELEASE Finchley 2.0.1.RELEASE Edgware (end of life) 1.5.1.RELEASE <parent> <groupId>org.springframework.boot</groupId> <artifactId>spring-boot-starter-parent</artifactId> <version>2.1.4.RELEASE</version> <relativePath/> </parent> <dependencies> <dependency> <groupId>com.alibaba.cloud</groupId> <artifactId>spring-cloud-starter-alibaba-nacos-discovery</artifactId> <version>2.1.0.RELEASE</version> </dependency> <dependency> <groupId>org.springframework.boot</groupId> <artifactId>spring-boot-starter-web</artifactId> </dependency> </dependencies> <dependencyManagement> <dependencies> <dependency> <groupId>org.springframework.cloud</groupId> <artifactId>spring-cloud-dependencies</artifactId> <version>Greenwich.SR1</version> <type>pom</type> <scope>import</scope> </dependency> </dependencies> </dependencyManagement> <build> <plugins> <plugin> <groupId>org.springframework.boot</groupId> <artifactId>spring-boot-maven-plugin</artifactId> </plugin> </plugins> </build>Version compatibility: Match your Spring Cloud version to the correct Spring Cloud Alibaba release:
In
src/main/java, create the packagecom.aliware.edas.In
com.aliware.edas, create the startup classProviderApplication. The@EnableDiscoveryClientannotation activates service registration and discovery:package com.aliware.edas; import org.springframework.boot.SpringApplication; import org.springframework.boot.autoconfigure.SpringBootApplication; import org.springframework.cloud.client.discovery.EnableDiscoveryClient; @SpringBootApplication @EnableDiscoveryClient public class ProviderApplication { public static void main(String[] args) { SpringApplication.run(ProviderApplication.class, args); } }In
com.aliware.edas, createEchoController. It maps GET requests to/echo/{string}and returns the path variable:package com.aliware.edas; import org.springframework.web.bind.annotation.PathVariable; import org.springframework.web.bind.annotation.RequestMapping; import org.springframework.web.bind.annotation.RequestMethod; import org.springframework.web.bind.annotation.RestController; @RestController public class EchoController { @RequestMapping(value = "/echo/{string}", method = RequestMethod.GET) public String echo(@PathVariable String string) { return string; } }In
src/main/resources, createapplication.propertiesand point it at the local Nacos Server:spring.application.name=service-provider server.port=18081 spring.cloud.nacos.discovery.server-addr=127.0.0.1:8848If your Nacos Server runs on a different host, replace
127.0.0.1with its IP address. For all available configuration options, see the Configuration reference.Verify the registration:
Run the
mainmethod ofProviderApplication.Open
http://127.0.0.1:8848/nacosin a browser. The default username and password are bothnacos.In the left navigation pane, choose Service Management > Service List.
service-providershould appear in the list. Click Details to confirm.
Step 2: Create the service consumer
The service consumer registers with Nacos and calls the provider using two mechanisms: RestTemplate (with client-side load balancing) and FeignClient (declarative HTTP).
Create a Maven project named
nacos-service-consumer.Add the following to
pom.xml. The consumer addsspring-cloud-starter-openfeignon top of the provider's dependencies:<parent> <groupId>org.springframework.boot</groupId> <artifactId>spring-boot-starter-parent</artifactId> <version>2.1.4.RELEASE</version> <relativePath/> </parent> <dependencies> <dependency> <groupId>com.alibaba.cloud</groupId> <artifactId>spring-cloud-starter-alibaba-nacos-discovery</artifactId> <version>2.1.0.RELEASE</version> </dependency> <dependency> <groupId>org.springframework.boot</groupId> <artifactId>spring-boot-starter-web</artifactId> </dependency> <dependency> <groupId>org.springframework.cloud</groupId> <artifactId>spring-cloud-starter-openfeign</artifactId> </dependency> </dependencies> <dependencyManagement> <dependencies> <dependency> <groupId>org.springframework.cloud</groupId> <artifactId>spring-cloud-dependencies</artifactId> <version>Greenwich.SR1</version> <type>pom</type> <scope>import</scope> </dependency> </dependencies> </dependencyManagement> <build> <plugins> <plugin> <groupId>org.springframework.boot</groupId> <artifactId>spring-boot-maven-plugin</artifactId> </plugin> </plugins> </build>In
src/main/java, create the packagecom.aliware.edas.In
com.aliware.edas, create theEchoServiceinterface. The@FeignClientannotation binds it to theservice-providerservice registered in Nacos:package com.aliware.edas; import org.springframework.cloud.openfeign.FeignClient; import org.springframework.web.bind.annotation.PathVariable; import org.springframework.web.bind.annotation.RequestMapping; import org.springframework.web.bind.annotation.RequestMethod; @FeignClient(name = "service-provider") public interface EchoService { @RequestMapping(value = "/echo/{str}", method = RequestMethod.GET) String echo(@PathVariable("str") String str); }In
com.aliware.edas, create the startup classConsumerApplication:@EnableDiscoveryClient— registers the consumer with Nacos@EnableFeignClients— activates FeignClient scanning@LoadBalancedon theRestTemplatebean — enables client-side load balancing through Nacos
package com.aliware.edas;

import org.springframework.boot.SpringApplication;
import org.springframework.boot.autoconfigure.SpringBootApplication;
import org.springframework.cloud.client.discovery.EnableDiscoveryClient;
import org.springframework.cloud.client.loadbalancer.LoadBalanced;
import org.springframework.cloud.openfeign.EnableFeignClients;
import org.springframework.context.annotation.Bean;
import org.springframework.web.client.RestTemplate;

@SpringBootApplication
@EnableDiscoveryClient
@EnableFeignClients
public class ConsumerApplication {

    @LoadBalanced
    @Bean
    public RestTemplate restTemplate() {
        return new RestTemplate();
    }

    public static void main(String[] args) {
        SpringApplication.run(ConsumerApplication.class, args);
    }
}
In
com.aliware.edas, createTestControllerto expose two endpoints — one for each calling method:package com.aliware.edas; import org.springframework.beans.factory.annotation.Autowired; import org.springframework.web.bind.annotation.PathVariable; import org.springframework.web.bind.annotation.RequestMapping; import org.springframework.web.bind.annotation.RequestMethod; import org.springframework.web.bind.annotation.RestController; import org.springframework.web.client.RestTemplate; @RestController public class TestController { @Autowired private RestTemplate restTemplate; @Autowired private EchoService echoService; // Calls the provider via RestTemplate with load balancing @RequestMapping(value = "/echo-rest/{str}", method = RequestMethod.GET) public String rest(@PathVariable String str) { return restTemplate.getForObject("http://service-provider/echo/" + str, String.class); } // Calls the provider via FeignClient @RequestMapping(value = "/echo-feign/{str}", method = RequestMethod.GET) public String feign(@PathVariable String str) { return echoService.echo(str); } }In
src/main/resources, createapplication.properties:spring.application.name=service-consumer server.port=18082 spring.cloud.nacos.discovery.server-addr=127.0.0.1:8848Verify the registration:
Run the
mainmethod ofConsumerApplication.Open
http://127.0.0.1:8848/nacos(username and password:nacos).Choose Service Management > Service List. Confirm that
service-consumerappears in the list.
Step 3: Test locally
With both services running, send test requests from the consumer to the provider.
Linux, Unix, or macOS:
curl http://127.0.0.1:18082/echo-rest/rest-rest
curl http://127.0.0.1:18082/echo-feign/feign-rest
Windows: Enter the following URLs in a browser:
http://127.0.0.1:18082/echo-rest/rest-rest
http://127.0.0.1:18082/echo-feign/feign-rest
Both endpoints return the path parameter as the response body, confirming that the consumer discovered and called the provider successfully.
Step 4: Deploy to SAE
Deploy nacos-service-provider and nacos-service-consumer as two separate applications. Both must be in the same region and namespace for service discovery to work.
For step-by-step deployment instructions, see Deploy a Java application.
Set the Application runtime environment based on your package type:
| Package type | Application runtime environment |
|---|---|
| JAR package | Standard Java Application Runtime Environment |
| WAR package | apache-tomcat-XXX |
When the application starts on SAE, the built-in service registry automatically injects the Nacos Server address, service port, namespace, AccessKey, and Context-path. These values take precedence over any settings in application.properties. Your original configuration can stay in place or be removed — either works.
Step 5: Verify the deployment
Bind a public-facing Classic Load Balancer (CLB) to the
nacos-service-consumerapplication. When configuring public access, set Network Protocol to HTTP, HTTP Port to80, and Container Port to18082. For details, see Bind a CLB to an application.In a browser, enter the CLB's public IP address in one of these formats:
http://<public-IP-address>/echo-rest/rest-rest
http://<public-IP-address>/echo-feign/feign-rest
A response returned on the page confirms the deployment is working.
Configuration reference
Spring Cloud Alibaba Nacos Discovery configuration properties for application.properties:
| Key | Default | Description |
|---|---|---|
spring.cloud.nacos.discovery.server-addr | None | IP address and port of Nacos Server |
spring.cloud.nacos.discovery.service | ${spring.application.name} | Name under which the service registers |
spring.cloud.nacos.discovery.network-interface | None | Network interface to use for registration; falls back to the first available interface if not set |
spring.cloud.nacos.discovery.ip | None | Explicit IP address to register (takes precedence over interface detection) |
spring.cloud.nacos.discovery.port | -1 | Port to register; auto-detected if not specified |
spring.cloud.nacos.discovery.namespace | None | Namespace for environment isolation (for example, separating development from production) |
spring.cloud.nacos.discovery.metadata | None | Custom metadata in map format |
spring.cloud.nacos.discovery.cluster-name | DEFAULT | Nacos cluster name |
spring.cloud.nacos.discovery.endpoint | None | Domain name for dynamic Nacos Server address resolution; not required when deploying to SAE |
ribbon.nacos.enabled | true | Enables Ribbon integration with Nacos; do not change unless required |
For the full list of configuration options, see Nacos Discovery.