This tutorial walks you through building a Spring Cloud microservices application with Nacos-based service discovery, then deploying it to Serverless App Engine (SAE) directly from IntelliJ IDEA using the Alibaba Cloud Toolkit plug-in — no separate CI/CD pipeline required.
How it works
The application consists of two services that communicate through a local Nacos Server acting as the service registry:
Provider (
nacos-service-provider): ExposesGET /echo/{string}and registers itself with Nacos on startup.Consumer (
nacos-service-consumer): Discovers the provider through Nacos and calls it using either RestTemplate or FeignClient.
IntelliJ IDEA
    └── Alibaba Cloud Toolkit plug-in
            │
            ├── Deploy ──► SAE Application: nacos-service-provider (port 18081)
            │                   └── registers as "service-provider" in Nacos
            │
            └── Deploy ──► SAE Application: nacos-service-consumer (port 18082)
                                └── discovers "service-provider" via Nacos
                                └── exposes /echo-rest/{str} and /echo-feign/{str}
During development, both services run locally against an on-premises Nacos Server. After local validation, Alibaba Cloud Toolkit builds and deploys them as SAE applications directly from IntelliJ IDEA.
Prerequisites
Before you begin, ensure that you have:
An activated SAE account. See Activate SAE
Maven installed with environment variables configured
JDK 1.8 or later installed
IntelliJ IDEA 2018.3 or later installed
Alibaba Cloud Toolkit installed and configured in IntelliJ IDEA
The JetBrains plug-in server is hosted outside China. If the download is slow, get the offline installation package from the JetBrains website and install it manually. For help, see Contact us.
Step 1: Create placeholder applications in SAE
SAE supports deploying applications from JAR packages and container images. This tutorial uses JAR packages.
Create a provider application and a consumer application in SAE. For step-by-step instructions, see Deploy a microservices application by using a JAR package in the SAE console.
You will publish your local code to these applications in Step 5.
Step 2: Create the provider
Create a Spring Boot project that registers with Nacos as a service provider.
Create a Maven project named
nacos-service-provider.Add the following dependencies to
pom.xml:Spring Cloud Edgware is discontinued. Use Greenwich or later for new projects.
Spring Cloud version Spring Cloud Alibaba version Greenwich 2.1.1.RELEASE Finchley 2.0.1.RELEASE Edgware 1.5.1.RELEASE <parent> <groupId>org.springframework.boot</groupId> <artifactId>spring-boot-starter-parent</artifactId> <version>2.1.4.RELEASE</version> <relativePath/> </parent> <dependencies> <dependency> <groupId>com.alibaba.cloud</groupId> <artifactId>spring-cloud-starter-alibaba-nacos-discovery</artifactId> <version>2.1.1.RELEASE</version> </dependency> <dependency> <groupId>org.springframework.boot</groupId> <artifactId>spring-boot-starter-web</artifactId> </dependency> </dependencies> <dependencyManagement> <dependencies> <dependency> <groupId>org.springframework.cloud</groupId> <artifactId>spring-cloud-dependencies</artifactId> <version>Greenwich.SR1</version> <type>pom</type> <scope>import</scope> </dependency> </dependencies> </dependencyManagement> <build> <plugins> <plugin> <groupId>org.springframework.boot</groupId> <artifactId>spring-boot-maven-plugin</artifactId> </plugin> </plugins> </build>This example uses Spring Cloud Greenwich.SR1 with Spring Cloud Alibaba 2.1.1.RELEASE. If your project targets a different Spring Cloud version, use the corresponding Spring Cloud Alibaba version:
In
src/main/java, create a package namedcom.aliware.edas.In
com.aliware.edas, create the startup classProviderApplication. The@EnableDiscoveryClientannotation enables service registration and discovery:package com.aliware.edas; import org.springframework.boot.SpringApplication; import org.springframework.boot.autoconfigure.SpringBootApplication; import org.springframework.cloud.client.discovery.EnableDiscoveryClient; @SpringBootApplication @EnableDiscoveryClient public class ProviderApplication { public static void main(String[] args) { SpringApplication.run(ProviderApplication.class, args); } }In
com.aliware.edas, createEchoControllerto expose the provider endpoint:package com.aliware.edas; import org.springframework.web.bind.annotation.PathVariable; import org.springframework.web.bind.annotation.RequestMapping; import org.springframework.web.bind.annotation.RequestMethod; import org.springframework.web.bind.annotation.RestController; @RestController public class EchoController { @RequestMapping(value = "/echo/{string}", method = RequestMethod.GET) public String echo(@PathVariable String string) { return string; } }In
src/main/resources, createapplication.propertiesand set the Nacos server address:If your service registry is a self-managed service registry, replace
127.0.0.1with the address of the self-managed service registry.spring.application.name=service-provider server.port=18081 spring.cloud.nacos.discovery.server-addr=127.0.0.1:8848Verify the provider registration:
Run the
mainmethod ofProviderApplicationto start the provider.Open the Nacos console at
http://127.0.0.1:8848/nacos. The default username and password are bothnacos.In the left-side navigation pane, choose Service Management > Services. Confirm that service-provider appears in the service list.
Step 3: Create the consumer
Create a Spring Boot project that discovers the provider through Nacos and calls it using RestTemplate and FeignClient.
Create a Maven project named
nacos-service-consumer.Add the following dependencies to
pom.xml. The consumer requires the same parent and dependency management as the provider, plusspring-cloud-starter-openfeign:<parent> <groupId>org.springframework.boot</groupId> <artifactId>spring-boot-starter-parent</artifactId> <version>2.1.4.RELEASE</version> <relativePath/> </parent> <dependencies> <dependency> <groupId>com.alibaba.cloud</groupId> <artifactId>spring-cloud-starter-alibaba-nacos-discovery</artifactId> <version>2.1.1.RELEASE</version> </dependency> <dependency> <groupId>org.springframework.boot</groupId> <artifactId>spring-boot-starter-web</artifactId> </dependency> <dependency> <groupId>org.springframework.cloud</groupId> <artifactId>spring-cloud-starter-openfeign</artifactId> </dependency> </dependencies> <dependencyManagement> <dependencies> <dependency> <groupId>org.springframework.cloud</groupId> <artifactId>spring-cloud-dependencies</artifactId> <version>Greenwich.SR1</version> <type>pom</type> <scope>import</scope> </dependency> </dependencies> </dependencyManagement> <build> <plugins> <plugin> <groupId>org.springframework.boot</groupId> <artifactId>spring-boot-maven-plugin</artifactId> </plugin> </plugins> </build>In
src/main/java, create a package namedcom.aliware.edas.In
com.aliware.edas, create the FeignClient interfaceEchoService:package com.aliware.edas; import org.springframework.cloud.openfeign.FeignClient; import org.springframework.web.bind.annotation.PathVariable; import org.springframework.web.bind.annotation.RequestMapping; import org.springframework.web.bind.annotation.RequestMethod; // Binds this FeignClient to the "service-provider" service in Nacos @FeignClient(name = "service-provider") public interface EchoService { @RequestMapping(value = "/echo/{str}", method = RequestMethod.GET) String echo(@PathVariable("str") String str); }In
com.aliware.edas, create the startup classConsumerApplication:@EnableDiscoveryClientenables service registration and discovery.@EnableFeignClientsenables FeignClient.@LoadBalancedintegrates RestTemplate with service discovery so it can resolveservice-providerby name.
package com.aliware.edas;

import org.springframework.boot.SpringApplication;
import org.springframework.boot.autoconfigure.SpringBootApplication;
import org.springframework.cloud.client.discovery.EnableDiscoveryClient;
import org.springframework.cloud.client.loadbalancer.LoadBalanced;
import org.springframework.cloud.openfeign.EnableFeignClients;
import org.springframework.context.annotation.Bean;
import org.springframework.web.client.RestTemplate;

@SpringBootApplication
@EnableDiscoveryClient
@EnableFeignClients
public class ConsumerApplication {

    @LoadBalanced
    @Bean
    public RestTemplate restTemplate() {
        return new RestTemplate();
    }

    public static void main(String[] args) {
        SpringApplication.run(ConsumerApplication.class, args);
    }
}
In
com.aliware.edas, createTestControllerto expose two endpoints — one that calls the provider via RestTemplate and one via FeignClient:package com.aliware.edas; import org.springframework.beans.factory.annotation.Autowired; import org.springframework.web.bind.annotation.PathVariable; import org.springframework.web.bind.annotation.RequestMapping; import org.springframework.web.bind.annotation.RequestMethod; import org.springframework.web.bind.annotation.RestController; import org.springframework.web.client.RestTemplate; @RestController public class TestController { @Autowired private RestTemplate restTemplate; @Autowired private EchoService echoService; // Calls service-provider via RestTemplate @RequestMapping(value = "/echo-rest/{str}", method = RequestMethod.GET) public String rest(@PathVariable String str) { return restTemplate.getForObject("http://service-provider/echo/" + str, String.class); } // Calls service-provider via FeignClient @RequestMapping(value = "/echo-feign/{str}", method = RequestMethod.GET) public String feign(@PathVariable String str) { return echoService.echo(str); } }In
src/main/resources, createapplication.properties:If your service registry is a self-managed service registry, replace
127.0.0.1:8848with the address of the self-managed service registry.spring.application.name=service-consumer server.port=18082 spring.cloud.nacos.discovery.server-addr=127.0.0.1:8848Verify the consumer registration:
Run the
mainmethod ofConsumerApplicationto start the consumer.Open the Nacos console at
http://127.0.0.1:8848/nacos.In the left-side navigation pane, choose Service Management > Services. Confirm that service-consumer appears in the service list.
Step 4: Test the services locally
With both services running, call the consumer to confirm it successfully reaches the provider.
On Linux, Unix, or macOS:
curl http://127.0.0.1:18082/echo-rest/rest-rest
curl http://127.0.0.1:18082/echo-feign/feign-rest
On Windows, open a browser and navigate to:
http://127.0.0.1:18082/echo-rest/rest-rest
http://127.0.0.1:18082/echo-feign/feign-rest
Each request returns the string you passed in the URL path, confirming the consumer is discovering and calling the provider through Nacos.

Step 5: Deploy the applications to SAE
Configure Alibaba Cloud Toolkit in IntelliJ IDEA to build and deploy both applications to the SAE applications you created in Step 1.
Configure your Alibaba Cloud account
Click the Alibaba Cloud Toolkit icon
 in the toolbar and select Preference… from the drop-down list.
In the left-side navigation pane of the Settings page, choose Alibaba Cloud Toolkit > Accounts.
Enter your Access Key ID and Access Key Secret, then click OK.
To get your Access Key ID and Access Key Secret, click Get existing AK/SK on the Accounts page. This opens the Alibaba Cloud sign-in page. After signing in, go to the Security Management page to retrieve your credentials.
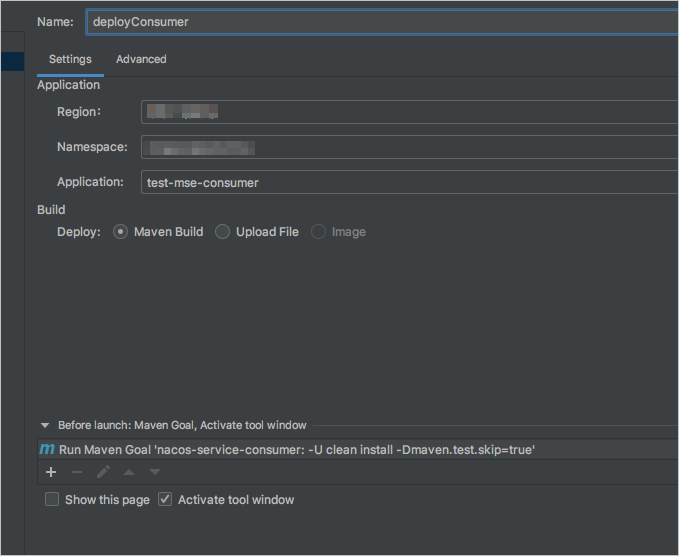
Configure and run the deployment tasks
Click the Alibaba Cloud Toolkit icon
and select Deploy to SAE from the drop-down list.On the Deploy to SAE page, configure the settings for the provider application: Click Apply to save.
In the Application section, select the region, namespace, and application name that match the provider application you created in Step 1. The Name field refers to the deployment configuration name, not the SAE application name — you typically do not need to change it.
Repeat the previous step for the consumer application, selecting the corresponding region, namespace, and application name. Click Apply to save.
If you use a self-managed service registry, add the following startup commands on the Advanced tab before saving:
-Dnacos.use.endpoint.parsing.rule=falseand-Dnacos.use.cloud.namespace.parsing=false.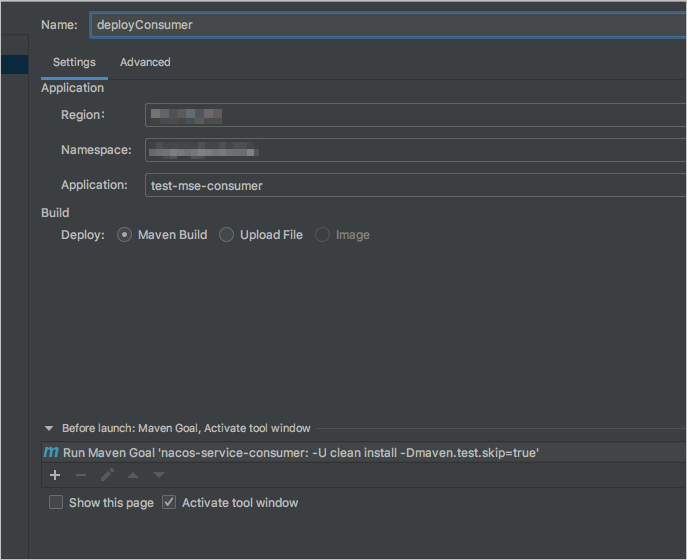
Click Run to deploy the provider, then repeat to deploy the consumer.

Verify the deployment
Bind a Server Load Balancer (SLB) instance to the consumer application to expose it publicly. See Bind an SLB instance to an application.

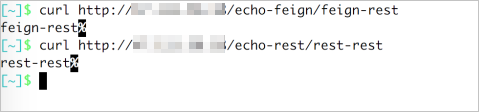
Send HTTP requests to the consumer using the SLB public IP address (for example,
47.111.XX.XX):# Call via FeignClient curl http://47.111.XX.XX/echo-feign/feign-rest # Call via RestTemplate curl http://47.111.XX.XX/echo-rest/rest-restBoth requests return the string from the URL path, confirming that the consumer on SAE is discovering and calling the provider through Nacos.
View the call data on the related Application Monitoring dashboards.
What's next
Deploy a Java application to SAE 1.0 — other deployment methods supported by SAE
Bind an SLB instance to an application — expose your application to external traffic