This topic describes health checks, provides recommended configurations, and offers detailed descriptions of the health check parameters.
Background information
Kubernetes (K8s) provides two main types of health checks:
Liveness: A liveness probe determines whether a container needs to be restarted.
Readiness: A readiness probe determines if a container is ready to accept traffic.
Core parameters:
Probe type: TCP, HTTP, or CMD.
Initial delay: The amount of time to wait after a container starts before the first probe is initiated.
Period: The frequency at which the probe is performed. This parameter affects the sensitivity of the health check.
Timeout: The number of seconds after which the probe times out.
Success threshold: The minimum number of consecutive successes required for a failed probe to be considered successful again. For a liveness probe, this value must be 1.
Failure threshold: The number of consecutive failures after which the probe is considered to have failed.
Recommended configurations (quick setup)
Parameter | Description |
Liveness | Use a TCP probe. Set the initial delay close to the application startup time. Set the success threshold to 1 and the failure threshold to 3. |
Readiness | Use an HTTP probe. Set the initial delay to be longer than the application startup time. Set the success threshold to 1 and the failure threshold to 1. |
Timeout | The default of 1 second is usually enough. If the endpoint you access is expected to take longer than 1 second to respond, increase the timeout value. |
Period | The period controls the probe's sensitivity. A shorter period is better if frequent probes do not affect your application. However, a period that is too short for a liveness probe can cause the application container to restart too often. Use this formula to determine the liveness probe period: (Maximum tolerable failure time for a node) / 3. For example, if a failed instance can go 30 seconds without a restart, set the period to 10 seconds. You can set the readiness probe period to 1 second. Set the liveness probe period as needed. If you have no special requirements, keep the default of 30 seconds. |
Detailed parameters (advanced)
Initial delay
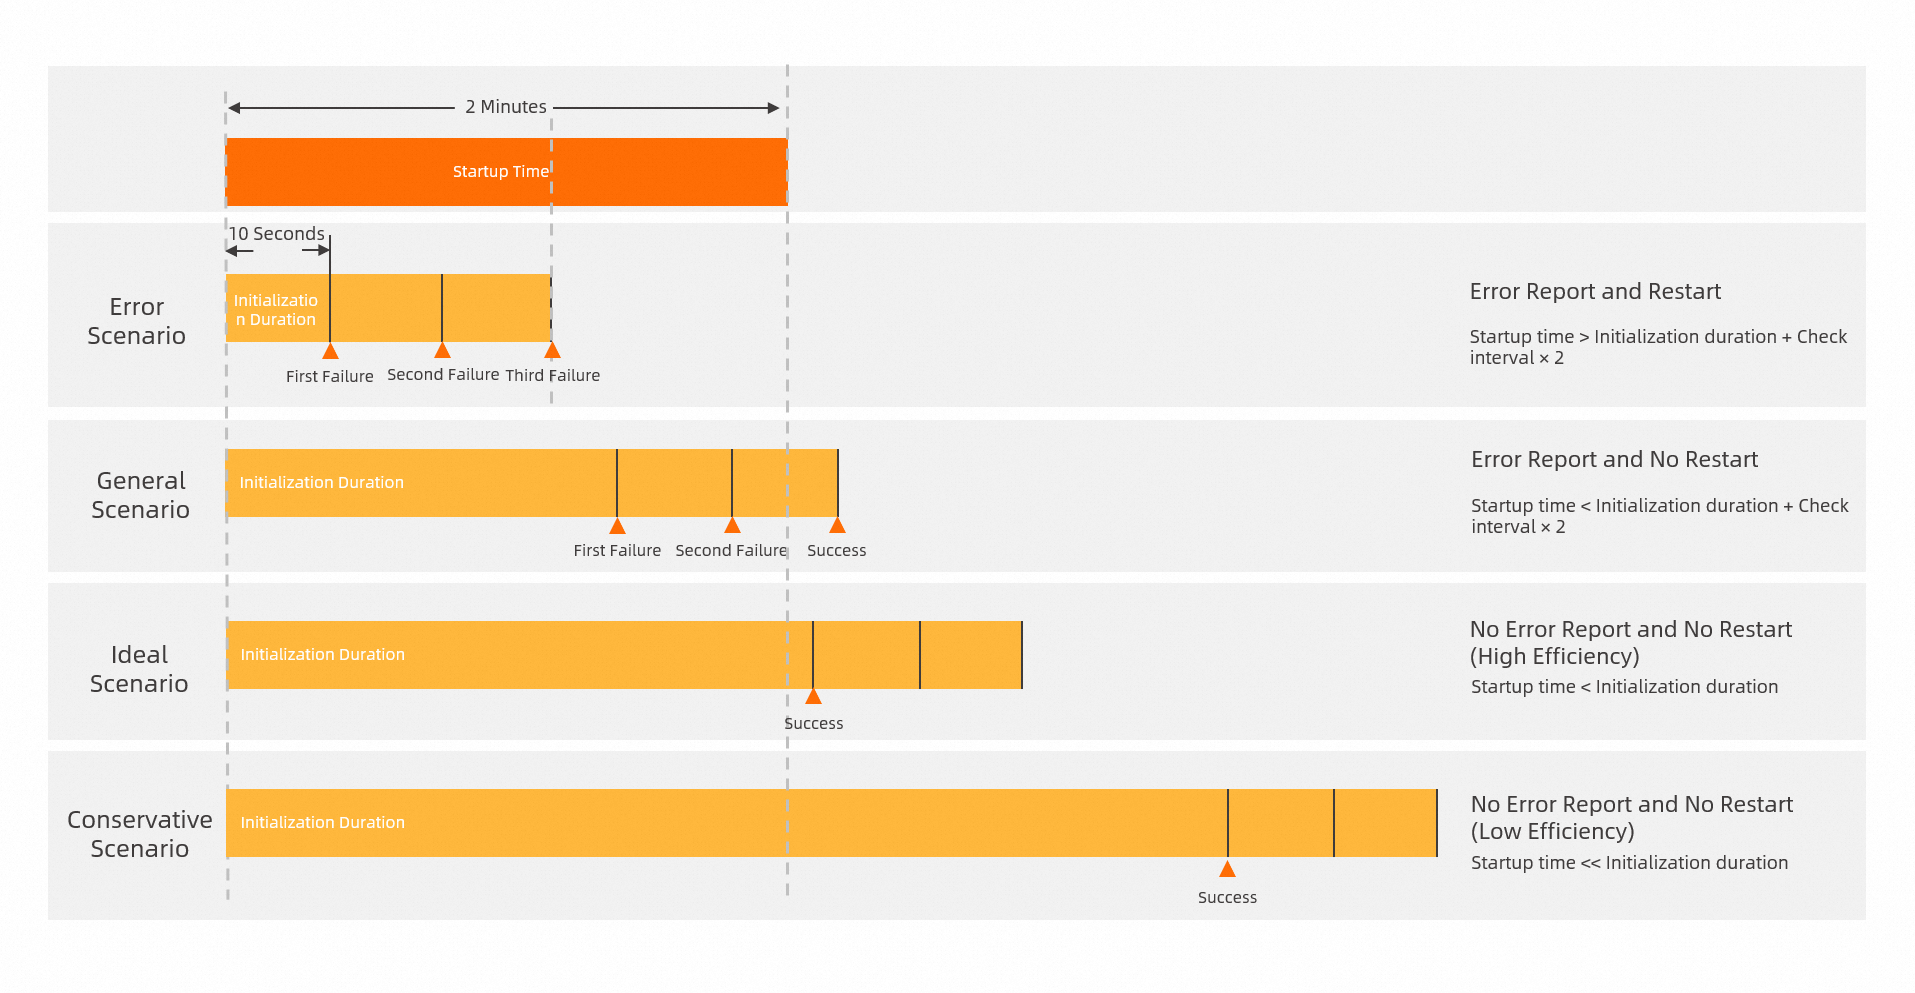
When you configure a liveness probe, understanding the initial delay parameter is critical. This parameter ensures that the health check probe checks the status of the application container at the appropriate time. If the initial delay is too short, the liveness probe runs before the application is ready, which can cause a serious problem: constant restarts.
For example, a Java application might take 2 minutes to start. If you use the default configuration with an initial delay of 10 seconds, a period of 30 seconds, and a failure threshold of 3, the application will never start. This is because the liveness probe performs three checks before the application finishes starting. Probing before the application is ready always results in failure. As a result, the application restarts continuously.
When you first deploy an application, if you are unsure of the startup time, set a longer initial delay, such as 5 minutes. After the application starts, you can check the application logs to determine the approximate startup time. Then, you can adjust the initial delay. Note that a long initial delay has a downside because it can increase the total deployment time.
Choosing between TCP and HTTP probes
The probe type is another common issue with liveness probes. You should configure different probe types for readiness and liveness probes. However, for convenience, many users use the same probe for both, which is a dangerous practice. Liveness and readiness probes are different and serve different purposes. Sometimes, an application becomes unavailable due to traffic congestion. In this case, you only need to remove the instance from the traffic pool, not restart the container. After the current requests are processed, the instance can accept traffic again. If you restart the container instead, it can cause the following problems:
Existing requests might not be processed.
The instance restart causes a longer period of downtime, which can lead to a cascading failure.
For example, the Spring Boot framework for Java applications provides a built-in health check. This check monitors the status of multiple components. It checks whether connections and heartbeats to components such as Redis and Nacos are normal. It then determines whether the application needs to be restarted. However, you cannot rely on these checks to decide whether to restart the application. This is because of issues such as network jitter and the uncertain availability of downstream services.
To prevent unexpected restarts caused by downstream network jitter, you must use different probes for liveness and readiness. If you cannot implement a separate endpoint to check the application's status, use a TCP probe for liveness and an HTTP probe for readiness. A restart is a significant action. The more fault-tolerant TCP probe is better for liveness checks. An HTTP probe better reflects the application's ability to handle requests, which makes it ideal for readiness checks.
For example, a TCP connection to a port can succeed even if an HTTP request to that port does not return the expected 200 status code.
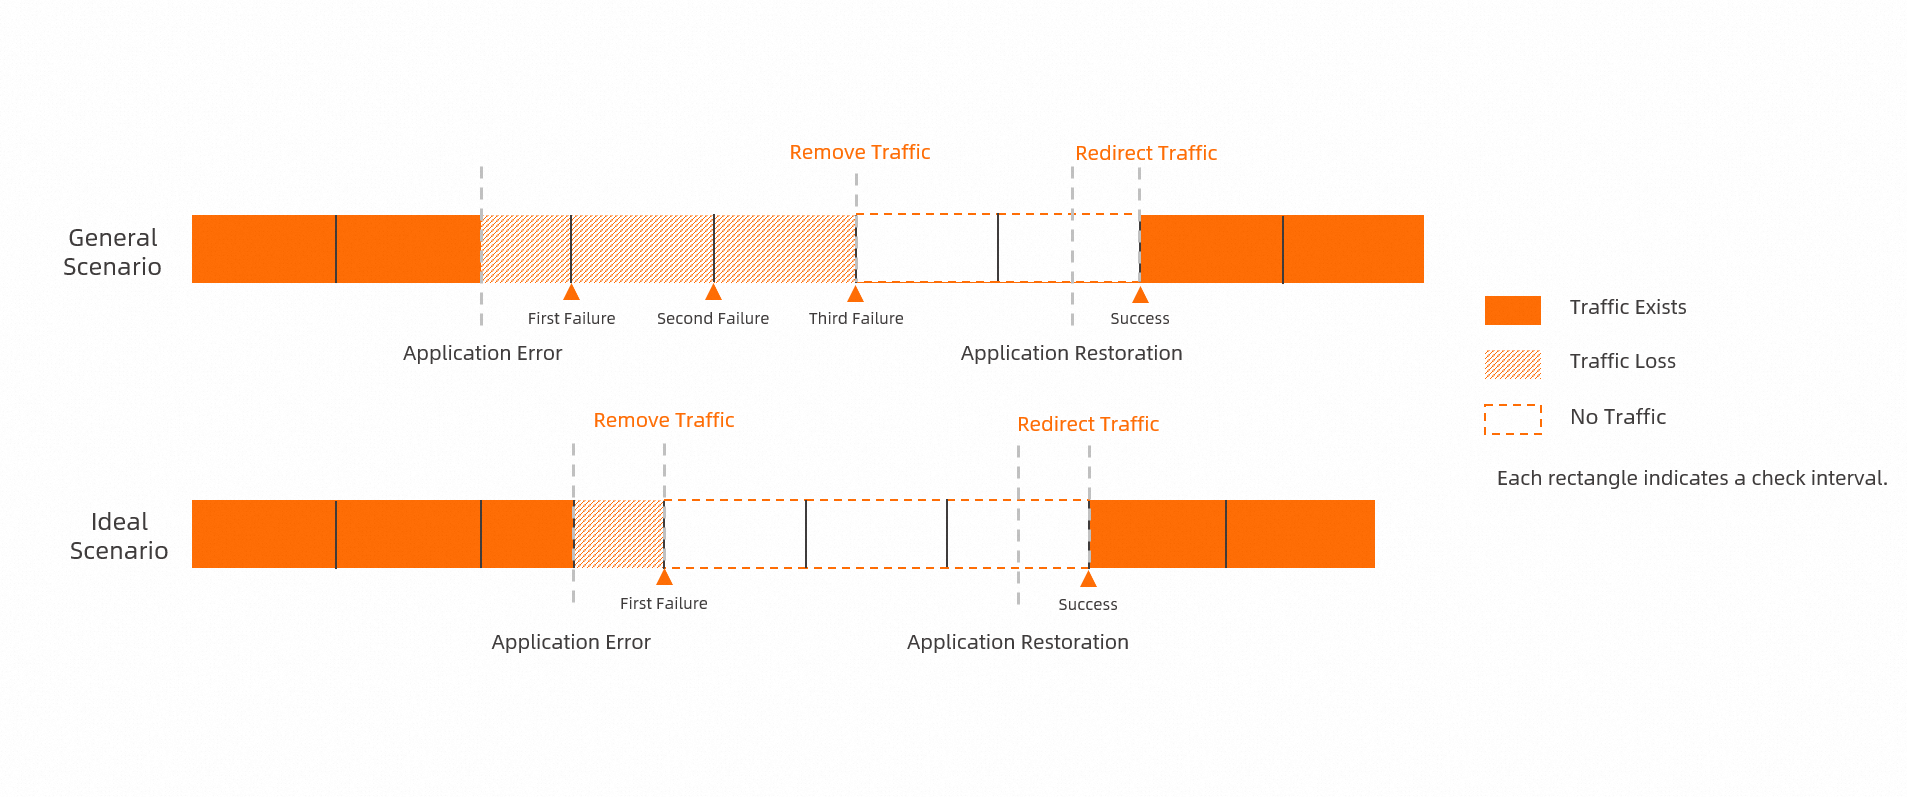
Failure and success thresholds
A liveness probe has only one action: restarting the container when the probe fails. Therefore, the success threshold is fixed at 1 and cannot be changed. A success threshold greater than 1 is not useful because a successful probe does not trigger any action. The default failure threshold is 3. This means the container restarts after three consecutive failed probes.
A readiness probe has two actions: adding the container to the service endpoint on success and removing it on failure. To ensure availability, you can set both the success and failure thresholds to 1. This setting immediately removes a failed container from service to prevent traffic loss. It also immediately adds a healthy container back to service as soon as it is ready. However, this rapid switching can increase the average network load on the remaining instances. We recommend using this setting in conjunction with metric-based autoscaling.
This traffic refers to traffic from an SLB instance to an SAE application. Traffic control for internal microservice calls is a separate system.