The Alibaba Cloud Toolkit for Eclipse plug-in lets you deploy applications to Serverless App Engine (SAE) directly from your Eclipse workspace — without switching to the console. This topic covers installing the plug-in, configuring your Alibaba Cloud credentials, and deploying an application.
Prerequisites
Before you begin, ensure that you have:
Java Development Kit (JDK) 1.8 or later installed
Eclipse integrated development environment (IDE) 4.5.0 (code: Mars) or later installed
An Alibaba Cloud account with an AccessKey pair (AccessKey ID and AccessKey secret)
An application already created in SAE. If you haven't created one yet, go to the SAE console to create it before proceeding.
Install Alibaba Cloud Toolkit
Start Eclipse.
In the top navigation bar, choose Help > Install New Software.
In the Available Software dialog box, enter the following URL in the Work with field:
http://toolkit.aliyun.com/eclipse/Press Enter.
Configure components:
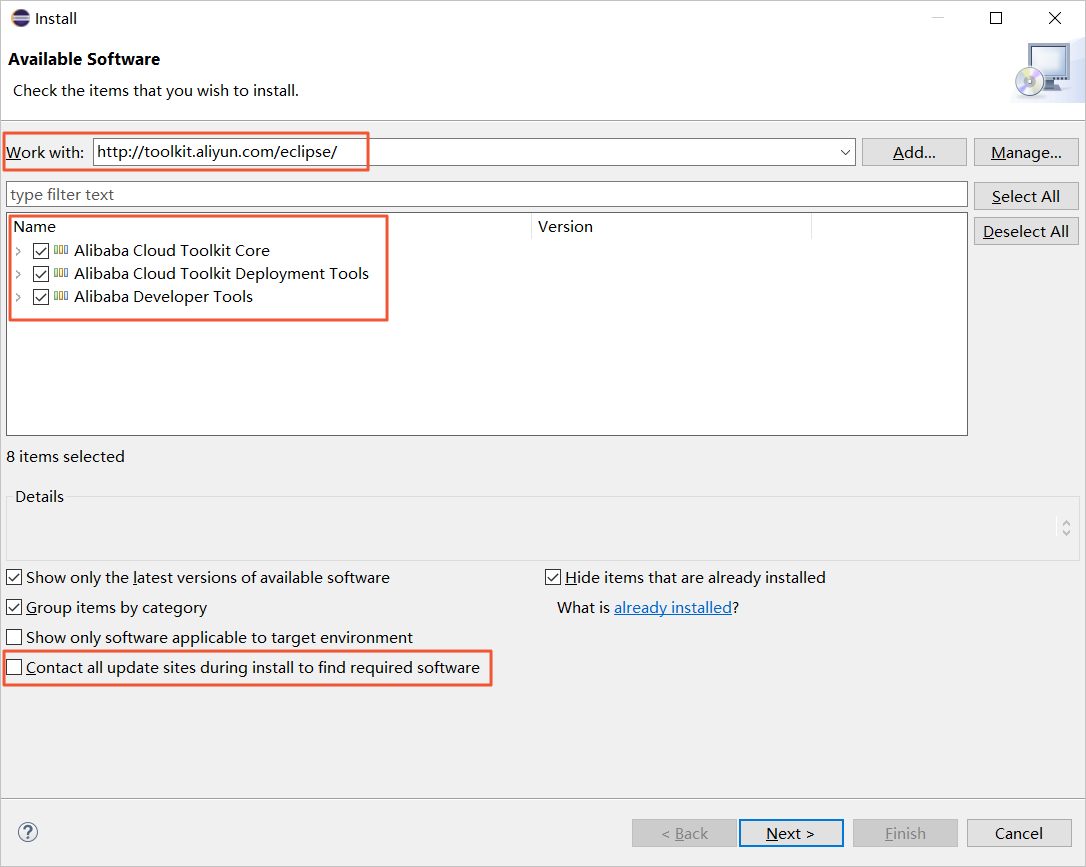
In the type filter text list, select the components you want to install.
In the Details section, clear Contact all update sites during install to find required software.
Click Next.
Follow the prompts on the installation page to complete the installation.
ImportantIf a message indicating that no digital signature exists appears, select Install anyway.
Restart Eclipse.
After Eclipse restarts, the Alibaba Cloud Toolkit icon appears in the toolbar.

Configure your Alibaba Cloud account
Alibaba Cloud Toolkit calls Alibaba Cloud API operations to deploy your application. These calls require an AccessKey pair for authentication.
Start Eclipse.
In the top navigation bar, choose Windows > Preferences.
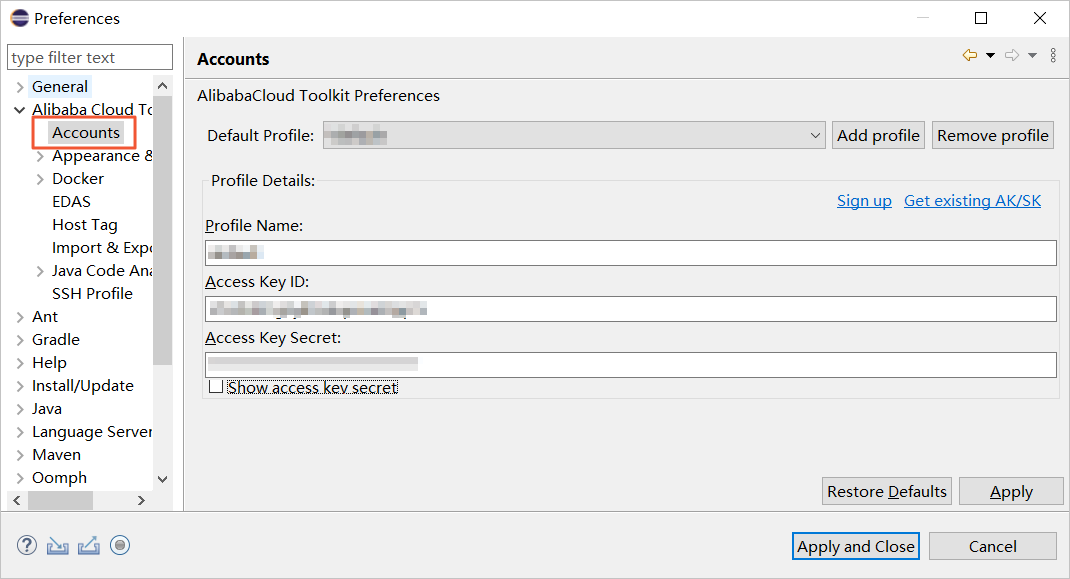
In the left-side navigation pane of the Preferences page, choose Alibaba Cloud Toolkit > Accounts.
On the Accounts page, enter your Access Key ID and Access Key Secret, then click Apply and Close.
Deploy an application to SAE
Alibaba Cloud Toolkit supports three deployment methods: WAR packages, JAR packages, and images.
In the Package Explorer section on the left side of Eclipse, right-click your application project and choose Alibaba Cloud > Deploy to SAE....
In the Deploy to SAE dialog box, set the Region, Namespace, and Application parameters, then select a deployment method. The following table describes the deployment parameters.
NoteIf you haven't created an application in SAE yet, click Create Serverless Application on SAE console in the upper-right corner of the dialog box to go to the SAE console.
NoteThe deployment method you select must match how the application was originally deployed in the SAE console. If you used a JAR or WAR package in the console, select Maven Build or Upload File. If you used an image, select Image Address.
Category Parameter Description Application Region The region where the application resides. Namespace The namespace to which the application belongs. Application The name of the application. Deploy file Maven Build Adds a Maven job to build the deployment package. Select this option if you deployed the application in SAE using a JAR or WAR package. Upload File Uploads a WAR or JAR package directly to deploy. Select this option if you deployed the application in SAE using a JAR or WAR package. Image Address Enter an image address to deploy. Select this option if you deployed the application in SAE using an image. Click Deploy.
After deployment starts, Eclipse prints logs in the Console section. You can view the logs to check whether the deployment is successful. To confirm, log in to the SAE console and check the Change Records page for the application's latest change entry.
Stop the plug-in
To stop a deployment in progress, go to the Progress page in Eclipse and stop the SAE-deploy process.
Deploy a multi-module project
For projects with multiple modules, use the toolkit-maven-plugin plug-in. Two methods are available:
Method 1: Run commands from the parent project
This method requires toolkit-maven-plugin V1.0.3 or later.
Run the toolkit:deploy command from the parent project directory and use the -Ddeploy_artifacts parameter to specify which submodules to deploy. Separate multiple submodule artifact IDs with commas.
For example, given the following project structure:
carshop
   itemcenter-api
   itemcenter
   detail
To deploy itemcenter and detail, run the following command from the carshop directory:
mvn clean package toolkit:deploy -Ddeploy_artifacts=itemcenter,detailBy default, the plug-in deploys each specified submodule using its .edas_config.yaml configuration file. To use a custom configuration file, add the -Dedas_config parameter.
Method 2: Run commands from the submodule directory
All versions of toolkit-maven-plugin support this method.
Run
installin the parent project to install submodule dependencies to your Maven local repository.Go to the directory of the submodule you want to deploy.
Run
toolkit:deploy.
What's next
After deploying your application, you can manage and monitor it from the SAE console:
| Task | Reference |
|---|---|
| Update, start, stop, delete, or scale an application | Manage the lifecycle of an application |
| Configure auto scaling | Configure an auto scaling policy |
| Bind an SLB instance to your application | Bind an SLB instance to an application |
| Start or stop multiple applications at once | Use the one-click start and stop feature to manage applications |
| Manage application configuration | Configuration management |
| Change instance specifications | Change the instance specifications of an application |
| View logs | Log management |
| Set up monitoring | Monitoring management |
| View application events | View application events |
| View change records | View change records |
| Diagnose application health | Use webshells to diagnose applications |