This topic describes how to add a contact for a resource directory, bind the contact to a member in the resource directory, unbind the contact from the member, modify the information about the contact, and delete the contact.
Overview
Before Resource Management provides the contact management feature for members, you must log on to the Message Center console to configure and manage contacts for each member in your resource directory. This requires repeated and complex operations. In addition, if you do not configure contacts for a new member in the resource directory, messages for the member cannot be received.
After Resource Management is integrated with Alibaba Cloud Message Center, you can create and manage contacts for members in your resource directory in a centralized manner by using the management account of the resource directory, and bind contacts to a specified member or folder in the resource directory, or to the entire resource directory.
If you bind a contact to a resource directory or a folder in the resource directory, the contact takes effect for all members in the resource directory or all members in the folder. The following descriptions provide details:
If a new member joins the resource directory or the folder, the system automatically binds the contact to the new member.
If you remove a member from the resource directory or the folder, the system does not automatically unbind the contact from the member.
If you bind two different contacts to Folder A and Folder B in the resource directory and you move a member from Folder A to Folder B, the system unbinds the contact that is inherited from Folder A from the member and then binds the contact that is inherited from Folder B to the member.
ImportantYou cannot move a member when a contact is being unbound from a parent folder of the member. You can move the member only after the unbind operation is complete.
Limits
You can add a maximum of 20 contacts in a resource directory.
You can log on to the Quota Center console to apply for a quota increase for your Alibaba Cloud account.
One contact can be bound to a maximum of 10 objects. The objects include the root node, folders, and members in a resource directory.
A maximum of 100 verification messages for security can be sent to different email addresses every day.
A maximum of 10 verification messages can be sent to the same email address within 1 minute.
The message receiving rules that you configure for a member in a resource directory are synchronized to Alibaba Cloud Message Center. However, if the member logs on to the Message Center console and modifies the rules, the modifications are not synchronized to the resource directory.
For example, you bind two contacts Alice and Tom to Member A in a resource directory to receive financial messages. Later, Member A logs on to the Message Center console and deletes the contact Alice. In this case, the contact information configured for Member A is not changed in the Resource Management console, and the contacts that you bind to Member A are still Alice and Tom.
Add a contact
Log on to the Resource Management console.
In the left-side navigation pane, choose .
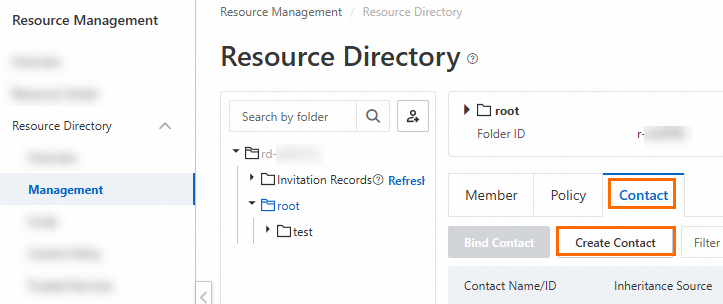
On the page that appears, click Resource Organization View in the upper-right corner and click the Contact tab. Then, click Create Contact.
In the Add Contact panel, configure the following contact information and click OK.
Contact Name: the name of the contact. The name must be 2 to 12 characters in length and can contain only letters.
Email Address: the email address that is used to receive messages.
Title: We recommend that you set this parameter to the job title of the contact.
Message Type: We recommend that you configure this parameter based on the value of the Title parameter. For example, if you select O&M Owner for the Title parameter, you can select Product, Security, Fault, and Service for the Message Type parameter. Resource Management and Message Center support the same message types. You can go to the Common Settings page in the Message Center console to view the message types that are supported by Message Center.
Inform the contact to check the verification message and pass the verification.
The system automatically sends a verification message to the email address of the contact. The contact must complete the verification within seven days. Otherwise, the verification message becomes invalid, and another verification message is required.
After the contact passes the verification, the state of the contact becomes Valid.
Bind a contact to an object
After the added contact takes effect, you can bind the contact to the resource directory, a folder in the resource directory, or a member in a folder in the resource directory on the contact list page, the details page of a contact, or the details page of a folder. After the contact is bound to an object, the contact can receive messages for the object.
This section describes how to bind a contact to an object on the contact list page.
On the Contact tab, click Contacts on the right side.

On the Contact page, click Bind in the Actions column of the contact that you want to bind.
In the Select Objects panel, select an object from the list on the left. Then, click OK. The following types of objects are supported:
Root node of the resource directory: If you select the root node, the contact is bound to the root node, and all members in the resource directory inherit the contact from the root node.
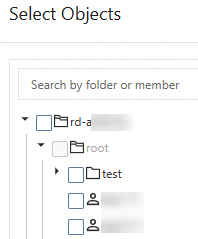
Folder: If you select a folder, the contact is bound to the folder, and all members in the folder inherit the contact from the folder.
Member: If you select a member, the contact is bound to the member.
Unbind a contact from an object
You can unbind a contact from an object on the details page of the contact or a folder. After the contact is unbound from the object, the contact can no longer receive messages for the object.
If the contact that is unbound from a member in a resource directory is the only recipient of a specific type of message for the member, the unbind operation is successful only in the resource directory. The contact is still the recipient for the member outside the resource directory. This prevents important messages from being missed.
This section describes how to unbind a contact from an object on the details page of the contact.
On the Contact tab, click Contacts on the right side.
On the Contact page, click the ID of the contact that you want to unbind.

In the Effective Scope section of the contact details page, click Unbind in the Actions column of the object from which you want to unbind the contact.

Modify the information about a contact
You can modify the information about a contact, such as the name, email address, and job title, and the types of messages that you want the contact to receive, based on your business requirements. After you modify the information about a contact, the information about the contact that is bound to an object is updated.
On the Contact tab, click Contacts on the right side.
On the Contact page, click Modify in the Actions column of the contact whose information you want to modify.
In the Modify Contact panel, modify the information about the contact and click OK.
If you modify the name and job title of the contact and the types of messages that you want the contact to receive, the modifications immediately take effect.
If you modify the email address of the contact, verification is required. After the verification is successful, the modification takes effect. Before the modification takes effect, messages are still sent to the original email address.
Delete a contact
On the Contact tab, click Contacts on the right side.
On the Contact page, click Delete in the Actions column of the contact that you want to delete.
In the Delete Contact dialog box, confirm the information and click OK.
You can directly delete a contact that does not take effect.
You can directly delete a contact that is not bound to an object.
If you want to delete a contact that is bound to objects, you must specify whether to unbind the contact from the objects before you can delete the contact.
Still Receive Messages for Related Objects: If you select this option when you delete the contact, the system does not unbind the contact from the objects, and the contact can still receive messages for the objects.
No Longer Receive Messages for Related Objects: If you select this option when you delete the contact, the system unbinds the contact from the objects, and the contact can no longer receive messages for the objects.
ImportantIf you want to delete a contact that is bound to multiple members, the delete operation may require a few minutes or even dozens of minutes to complete. During the deletion, we recommend that you do not use a member to log on to the Message Center console to change the contact for the member.
If the contact that is deleted for a member in a resource directory is the only recipient of a specific type of message for the member, the delete operation is successful only in the resource directory. The contact is still the recipient for the member outside the resource directory. This prevents important messages from being missed.