By integrating Tag Policies with CloudMonitor, you can automatically receive notifications via email or other methods whenever a resource is found to be non-compliant with your resource directory's tag policies.
Step 1: Enable event generation for tag policies
Log on to the Resource Management console.
In the left-side navigation pane, choose .
On the Settings for Current Account or Settings for Resource Directory tab, set Notifications for resources with non-compliant tag policies to Enable.
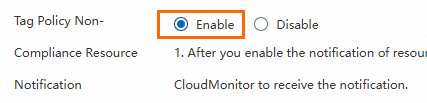
If you enable this feature for the current account, CloudMonitor will receive events for non-compliant resources within this account.
If you enable this feature for the resource directory, CloudMonitor will receive events for non-compliant resources from all member accounts in the resource directory.
Step 2: Configure alert rules in CloudMonitor
Log on to the Cloud Monitor console.
Create an alert contact.
In the left-side navigation pane, choose .
On the Alert Contacts tab, click Create Alert Contact.

In the Set Alert Contact panel, enter the name and email address of the alert contact.
NoteFor more information about how to configure DingTalk, Lark, WeCom, and Slack webhooks, see Create an alert contact.
After you confirm that the information is correct, click OK.
Activate the email address of the alert contact.
If you specify an email address for the alert contact, the email address is in the Pending Activation state by default. The alert contact must click the activation link in the email within 24 hours to activate the email address. Otherwise, the alert contact cannot receive alert notifications. After activation, you can view the email address of the alert contact in the alert contact list.
Create an alert contact group.
On the Alert Contacts page, click the Alert Contact Group tab.
On the Alert Contact Group tab, click Create Alert Contact Group.

In the Create Alert Contact Group panel, enter a name for the alert contact group and add alert contacts to the group.
Click Confirm.
Create a notification configuration policy.
In the left-side navigation pane, choose .
On the Notification Configuration page, click Create policy.

In the Create Policy panel, configure the parameters.
Parameter
Description
Name
The name of the notification configuration policy.
Description
The description of the notification configuration policy.
Notification Settings
Set Notification Group Directly: Select an alert contact group. In this example, select the alert contact group you created in Step 3.
Set Notification Group by Severity: Select an alert contact group for each of the following severity levels: Critical, Warning, Notification (Info), and Resolved.
Create a event subscription policy.
In the left-side navigation pane, choose .
On the Subscription Policy tab, click Create Subscription Policy.

On the Create Subscription Policy page, configure the parameters.
Basic Information: Enter a name and description for the subscription policy.
Alert Subscription: Specify the subscription type and scope.
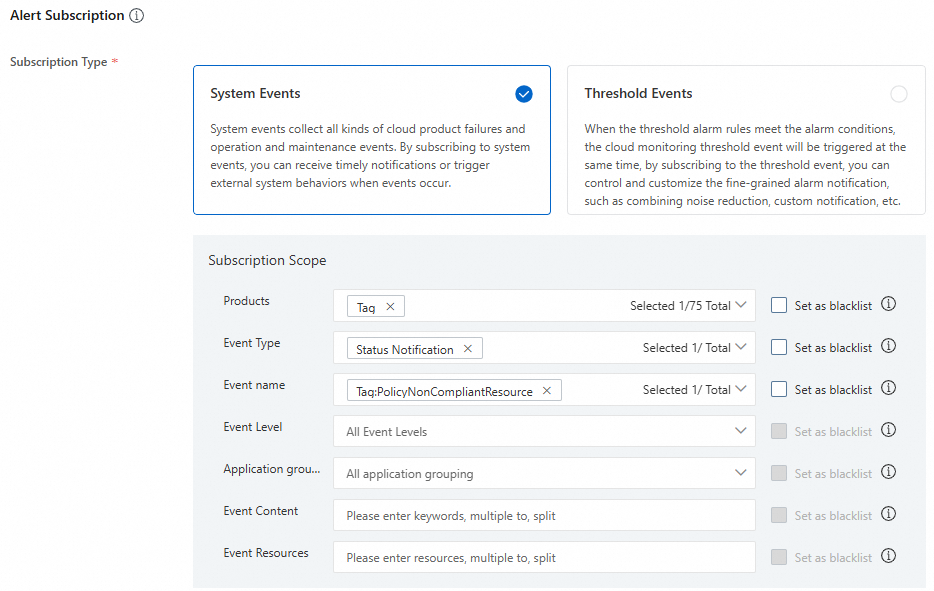
Select System Events for Subscription Type.
Subscription Scope:
Products: Select Tag.
Event Type: Select Status Notification.
Event Name: Select Tag:PolicyNonCompliantResource.
Event Level (optional): Configure this parameter as needed. In this example, the default setting is used.
Application Grouping (optional): Configure this parameter as needed. In this example, the default setting is used.
Event Content (optional): Configure this parameter as needed. For example, to receive notifications only for events containing the word "department", enter "department" here. If left empty, the policy will match all non-compliance events.
Event Resources (optional): Configure this parameter as needed. In this example, the default setting is used.
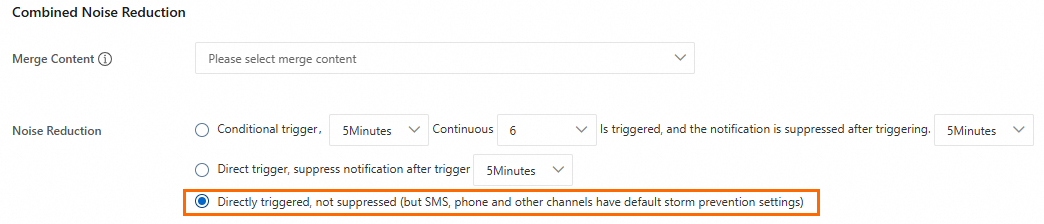
Combined Noise Reduction (optional): Configure this parameter as needed. Choose a trigger method based on your needs:
For frequent policy changes
Each time a tag policy is modified, a full scan of all resources is triggered, which can generate a high volume of alerts. To avoid this, select Direct trigger, suppress notification after trigger X minutes. This merges multiple notifications within the specified time period into a single alert.
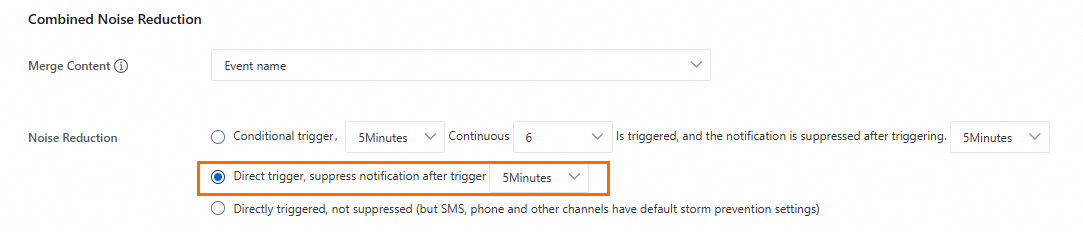
For stable policy environments
If your policies rarely change, scans are primarily incremental (checking new resources). Select Directly triggered, not suppressed to receive immediate notifications for any newly non-compliant resources.
Notification: Select the notification configuration policy created in Step 4 and set notification methods such as email.

Push and Integration (optional): Configure this parameter as needed. In this example, leave it empty.
Click Submit.
Step 3: Verify the notification
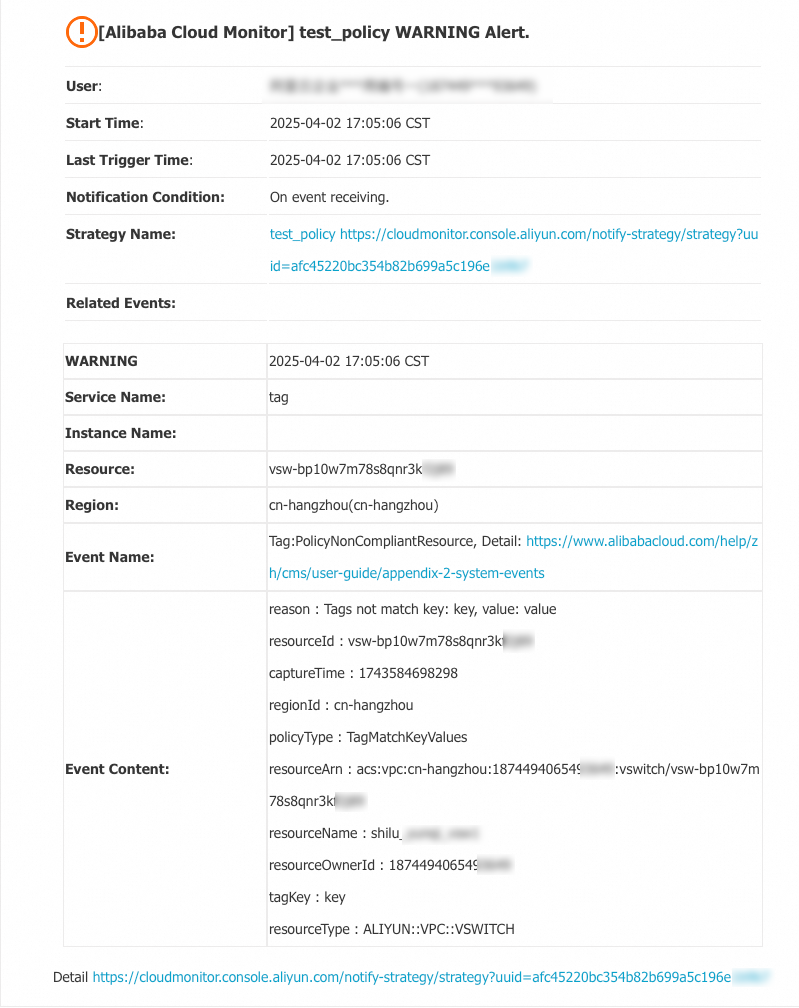
When a tag policy detects non-compliant resources, you will receive notifications through the configured methods. The following figure shows an example of an email notification.