You must register a user-defined function (UDF) before you can use the UDF in a SQL deployment. This topic describes how to register, update, and delete a UDF.
Precautions
If you want to use a RAM user or a RAM role to perform operations, such as UDF management, in a namespace, you must make sure that the RAM user or RAM role is granted the access permissions on the namespace. For more information, see Grant namespace permissions.
To prevent conflicts between JAR file dependencies, take note of the following items when you develop UDFs:
Make sure that the Flink version that you select on the SQL Editor page is the same as the Flink version that is specified in the POM dependency.
Specify
<scope>provided</scope>for Flink-related dependencies.Use the Shade plug-in to package other third-party dependencies. For more information, see Apache Maven Shade plug-in.
NoteFor more information about how to handle Flink dependency conflicts between JAR files, see How do I troubleshoot dependency conflicts of Flink?
Register a UDF
Register a catalog UDF
Go to the Register UDF Artifact dialog box.
Log on to the Realtime Compute for Apache Flink console.
Find the workspace that you want to manage and click Console in the Actions column.
In the left-side navigation pane, click .
On the left side of the SQL Editor page, click the UDFs tab.
Click Register UDF Artifact.
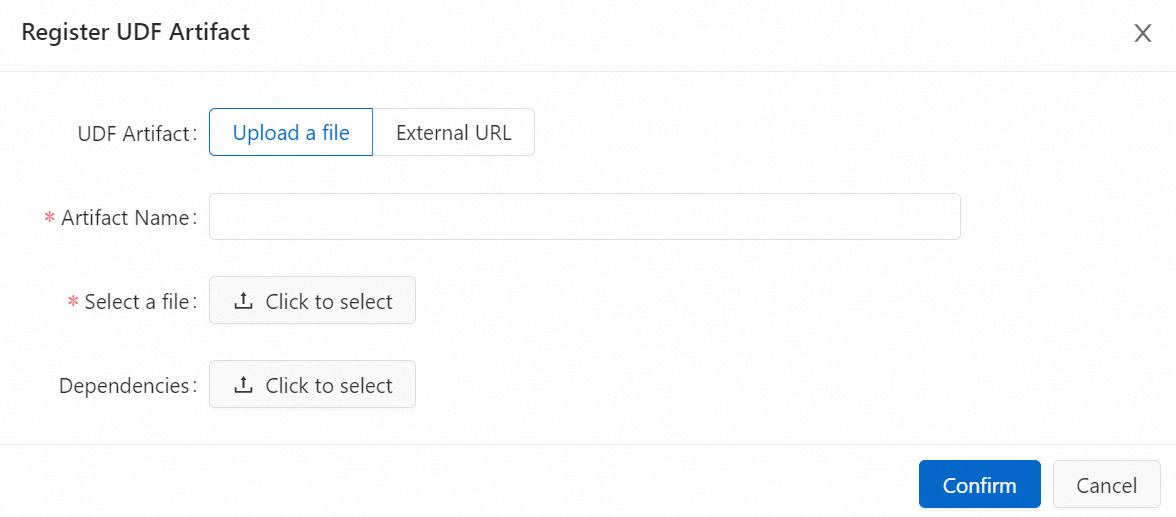
In the Register UDF Artifact dialog box, upload a UDF JAR file.

You can use one of the following methods to upload a UDF JAR file:
Upload a file: Click Click to select next to Select a file to upload the UDF JAR file that you want to upload. If you want to upload a dependency file, click Click to select next to Dependencies to upload the file that your UDF JAR file depends on.
NoteYour UDF JAR file is uploaded and stored in the sql-artifacts directory of the Object Storage Service (OSS) bucket that you select.
The dependency of a Java UDF can be packaged into the UDF JAR file or separately uploaded as a dependency file. For a Python UDF, we recommend that you separately upload the dependency as a dependency file.
External URL: Enter an external URL. If you want to use a UDF JAR file that is used by another service, you can use the external URL to obtain the UDF file.
NoteOnly the following two types of external URLs are supported:
The endpoint of an Object Storage Service (OSS) bucket that you specify when you purchase a Realtime Compute for Apache Flink workspace. You can view the endpoint of the OSS bucket that you specify in the Workspace Details message in the management console of Realtime Compute for Apache Flink .
The endpoint of another external storage system that can be accessed by Realtime Compute for Apache Flink. The access control list (ACL) of the external storage system is public-read or Realtime Compute for Apache Flink is granted the permissions to access the external storage system.
Click Confirm.
In the Available Functions section of the Manage Functions dialog box, select one or more UDFs that you want to register and click Create Functions.
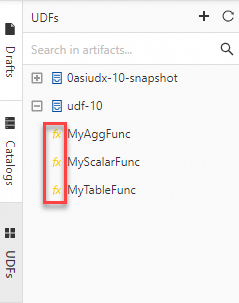
In the console of fully managed Flink, Flink parses the UDF JAR file and checks whether classes of the UDF, user-defined aggregate function (UDAF), and user-defined table-valued function (UDTF) interfaces of Flink are used in the file. Then, Flink automatically extracts the class names and fills the class names in the Function Name column in the Manage Functions dialog box. After UDFs are registered, you can view all UDFs that you registered in the UDFs pane on the left side of the SQL Editor page. The fx characters that are highlighted in yellow are displayed on the left side of the name of each UDF that you registered.
 Note
NoteBy default, the latest version of Realtime Compute for Apache Flink is used for data parsing when you register a catalog UDF. If you use a catalog UDF in a deployment and select an earlier engine version of Realtime Compute for Apache Flink in the Basic section of the Configuration tab, an incompatibility issue may occur. To resolve this issue, you can implement UDF code based on the engine version that is required by your deployment and use deployment-level UDFs. For more information, see Register a deployment-level UDF.
Register a deployment-level UDF
Only Realtime Compute for Apache Flink that uses Ververica Runtime (VVR) 8.0.3 or later supports deployment-level Python UDFs.
If you use a deployment-level Python UDF, you can configure parameters such as python.files or python.archives in the Parameters section of the Configuration tab to specify the related dependency file.
If you use a deployment-level Python UDF, you cannot perform a syntax check on a draft. You must skip the syntax check before you deploy a draft as a deployment.
To register a deployment-level UDF, perform the following steps:
Upload the JAR or Python file of the UDF.
In the left-side navigation pane, click Artifacts. On the Artifacts page, click Upload Artifact to upload the JAR or Python file of the UDF.
Specify a deployment-level UDF in your deployment.
On the Configurations tab of the SQL Editor page, select the JAR or Python file of the UDF from Additional Dependencies.
Register a deployment-level UDF.
Java UDF
CREATE TEMPORARY FUNCTION yourfunctionname;Python UDF
CREATE TEMPORARY FUNCTION yourfunctionname LANGUAGE Python;
Update a UDF
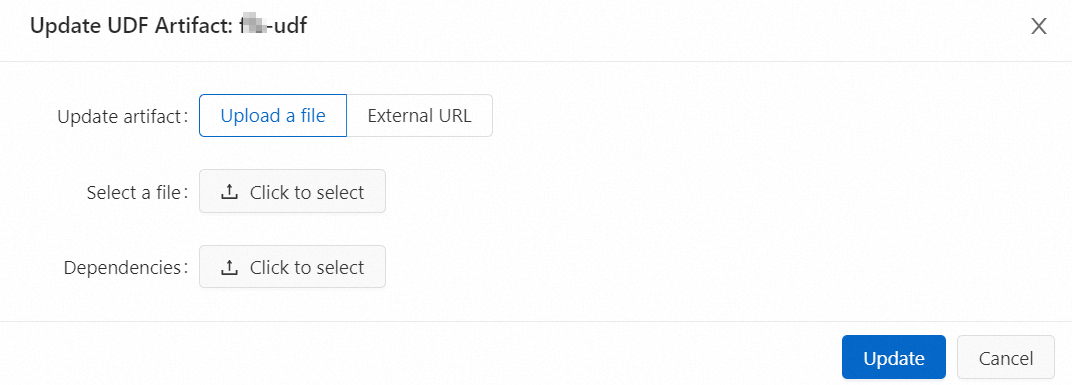
If you add a UDF to a UDF JAR file or change the code of a registered UDF in the file, you can perform the following operations to update the UDF JAR file:
Go to the Register UDF Artifact dialog box.
Log on to the Realtime Compute for Apache Flink console.
Find the workspace that you want to manage and click Console in the Actions column.
In the left-side navigation pane, click .
On the left side of the SQL Editor page, click the UDFs tab.
In the UDFs pane on the left side of the SQL Editor page, move the pointer over the name of the UDF whose JAR file you want to update and click the
 icon.
icon. In the Register UDF Artifact dialog box, upload a UDF JAR file.
 Important
The UDF JAR file that you upload must contain all the classes of the registered UDFs.
The code in the new UDF JAR file takes effect only when you restart the draft for the deployment or publish a new draft. The code in the new UDF JAR file does not take effect on jobs that are running. The jobs that are running continue to use the original UDF JAR file.
Click Update.
Delete a UDF
Before you delete a UDF JAR file, make sure that the UDF that is registered by using the UDF JAR file is not referenced by a deployment or a SQL file.
If you no longer need a UDF JAR file, perform the following operations to delete the UDF JAR file:
Go to the Register UDF Artifact dialog box.
Log on to the Realtime Compute for Apache Flink console.
Find the workspace that you want to manage and click Console in the Actions column.
In the left-side navigation pane, click .
On the left side of the SQL Editor page, click the UDFs tab.
In the UDFs pane on the left side of the SQL Editor page, move the pointer over the name of the UDF JAR file that you want to delete and click the
 icon.
icon. Select Delete associated files.
If you want to delete the UDF JAR file, you must delete all registered UDFs from the file to avoid dirty data.
Click Confirm.
References
For more information about the classification of Java UDFs, how to pass Java UDF parameters in the Realtime Compute for Apache Flink console, and how to develop and use Java UDFs, see Java and UDAFs.
For more information about the classification and dependency of Python UDFs and how to debug, tune, develop, and use Python UDFs, see Python and UDAFs.
For more information about how to use a UDAF to sort and aggregate data, see Use a UDAF to sort and aggregate data.