Connect your application to an RDS Supabase project using the official Supabase client SDK. This guide covers installation and initialization for JavaScript, Python, Flutter, Swift, C#, and Kotlin.
Jump to your language: JavaScript · Python · Flutter · Swift · C# · Kotlin
Prerequisites
Before you begin, ensure that you have:
An RDS Supabase project
The project's Supabase URL and Supabase Key (see Get the Supabase URL and key)
Get the Supabase URL and key
Go to the RDS console. In the navigation pane, click AI Application Development.
Select a region. In the RDS Supabase list, click View Details in the Actions column for your project.
On the Basic Information page, go to the Whitelist Information section and click Add Whitelist Group to add your client's IP address to the whitelist.
In the Network Information section, click Public Endpoint to open the RDS Supabase logon page.
Enter the default username supabase and your password to log on.
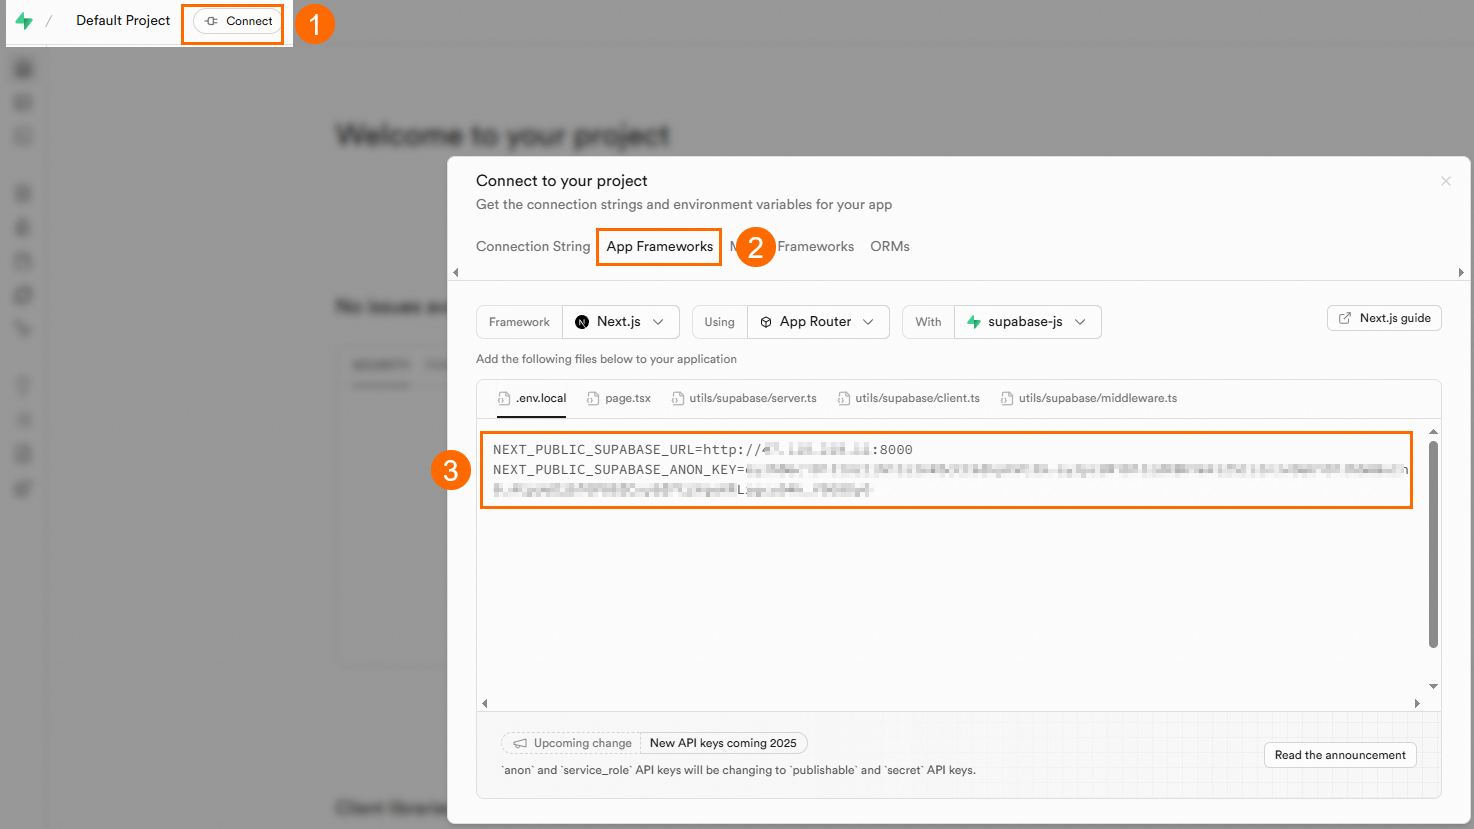
Click Connect. On the Connect to your project page, click App Frameworks to retrieve the Supabase URL and Supabase Key.
Store the URL and key as environment variables before proceeding:
export SUPABASE_URL=<your-supabase-url>
export SUPABASE_KEY=<your-supabase-key>
SDK usage guide
JavaScript
Install the package:
npm install @supabase/supabase-jsInitialize the client:
import { createClient } from "@supabase/supabase-js";

const supabaseUrl = process.env.SUPABASE_URL;
const supabaseKey = process.env.SUPABASE_KEY;

const supabase = createClient(supabaseUrl, supabaseKey);
Python
Install the package:
pip install supabaseInitialize the client:
import os
from supabase import create_client, Client

url: str = os.environ.get("SUPABASE_URL")
key: str = os.environ.get("SUPABASE_KEY")
supabase: Client = create_client(url, key)
Flutter
Install the package:
flutter pub add supabase_flutterInitialize the client:
Future<void> main() async {
  await Supabase.initialize(
    url: '<your-supabase-url>',
    anonKey: '<your-supabase-key>',
  );

  runApp(MyApp());
}

// Get a reference to your Supabase client
final supabase = Supabase.instance.client;
Replace <your-supabase-url> and <your-supabase-key> with the values from the Connect to your project page.
Swift
Install the package using Swift Package Manager. Add the following dependency to your Package.swift:
let package = Package(
    ...
    dependencies: [
        ...
        .package(
            url: "https://github.com/supabase/supabase-swift.git",
            from: "2.0.0"
        ),
    ],
    targets: [
        .target(
            name: "YourTargetName",
            dependencies: [
                .product(
                    name: "Supabase", // Auth, Realtime, PostgREST, Functions, or Storage
                    package: "supabase-swift"
                ),
            ]
        )
    ]
)
Initialize the client:
import Supabase

let client = SupabaseClient(
    supabaseURL: URL(string: "<your-supabase-url>")!,
    supabaseKey: "<your-supabase-key>"
)
Replace <your-supabase-url> and <your-supabase-key> with the values from the Connect to your project page.
C#
Install the package:
dotnet add package supabaseInitialize the client:
var url = Environment.GetEnvironmentVariable("SUPABASE_URL");
var key = Environment.GetEnvironmentVariable("SUPABASE_KEY");

var options = new Supabase.SupabaseOptions
{
    AutoConnectRealtime = true
};

var supabase = new Supabase.Client(url, key, options);
await supabase.InitializeAsync();
Kotlin
Initialize the client:
val supabase = createSupabaseClient(
    supabaseUrl = "<your-supabase-url>",
    supabaseKey = "<your-supabase-key>"
) {
    install(Auth)
    install(Postgrest)
    // Install other modules as needed
}
Replace <your-supabase-url> and <your-supabase-key> with the values from the Connect to your project page.
What's next
Explore the full Supabase SDK documentation at <https://supabase.com/docs>