The full data backup feature cannot be disabled for an ApsaraDB RDS for MySQL instance, and the full data backup process requires a long period of time to complete and consumes a large number of storage resources. If a large amount of data exists in your database system and needs to be frequently backed up, you can use Data Disaster Recovery to back up core databases and tables. This reduces the full backup frequency, backup time, and storage costs. If your core data is damaged, you can use the backup files of databases and tables to quickly restore the data.
Billing rules
When you create an RDS instance, you are charged based on the instance type and storage capacity that you use. For more information, see Billable items.
When you use Data Disaster Recovery to back up databases and tables, you are charged for the backup schedule specifications and the storage capacity that you use. For more information, see Backup fees and Storage costs.
Preparations
To use the backup and restoration feature for individual databases and tables, you must create and configure an RDS instance. The following section describes how to create and configure an RDS instance:
1. Back up individual databases and tables
ApsaraDB RDS allows you to use the default backup feature to back up databases and tables. You can also create and configure a backup schedule to automatically back up databases and tables. The following table compares the two backup methods. For more information, see Differences between default RDS backups and advanced backups.
Backup method | Backup mode | Backup of individual databases and tables |
Default backup of ApsaraDB RDS | Automatic | Not supported. |
Manual | You can back up specific databases, but cannot back up specific tables. Supported for RDS instances that run MySQL 8.0, MySQL 5.7, or MySQL 5.6 on RDS High-availability Edition and use local disks. | |
Data Disaster Recovery backup | Automatic | You can back up specific databases and tables. |
This topic describes how to create and configure a backup schedule to back up databases and tables.
Data Disaster Recovery is a cost-effective and highly reliable cloud native database backup platform that is provided by Alibaba Cloud. It supports nearly 10 types of data sources, such as MySQL, SQL Server, PostgreSQL, and Oracle databases. This platform also supports various environments in which databases are deployed, such as ApsaraDB RDS instances, Elastic Compute Service (ECS) instances, data centers, and cloud platforms provided by other cloud service providers. You can access Data Disaster Recovery by using methods such as database gateway (DG), private network, VPN gateway, and Express Connect circuits. This reduces the backup time and costs.
1.1 Purchase a backup schedule
Go to the Database Backup buy page. Set the Region for Backup Instance parameter to the region in which the RDS instance resides, the Product Type parameter to Backup Instance (Subscription), the Data Source Type parameter to MySQL, the Specification parameter to micro, and the Subscription Duration parameter to 1 Month. Then, click Buy Now and complete the payment.
ImportantYou can create only subscription backup schedules in the Data Disaster Recovery console.
After you use the backup schedule experience the backup and restoration feature for individual databases and tables, you can unsubscribe from the backup schedule to reduce costs. You are charged based on your usage.
After you purchase a backup schedule, you can view the backup schedule in the Data Disaster Recovery console.
1.2 Configure a backup schedule
After you purchase a backup schedule, you must configure the backup schedule to implement automatic backup of databases and tables. In this topic, the table_test1 table in the dbtest database is backed up.
In the Data Disaster Recovery console, find the backup schedule that you want to configure and click Configure Backup Schedule in the Actions column.
In the Configure Backup Source and Destination step, set the Database Location parameter to RDS Instance and enter the ID of the RDS instance and the username and password of the privileged account that are created in the Preparations section of this topic. The username of the privileged account is
dbuser. Then, click Next.In the Edit Backup Objects step, find the
table_test1table in thedbtestdatabase in the Available section and click the icon to add the table to the Selected section. Then, click Next.
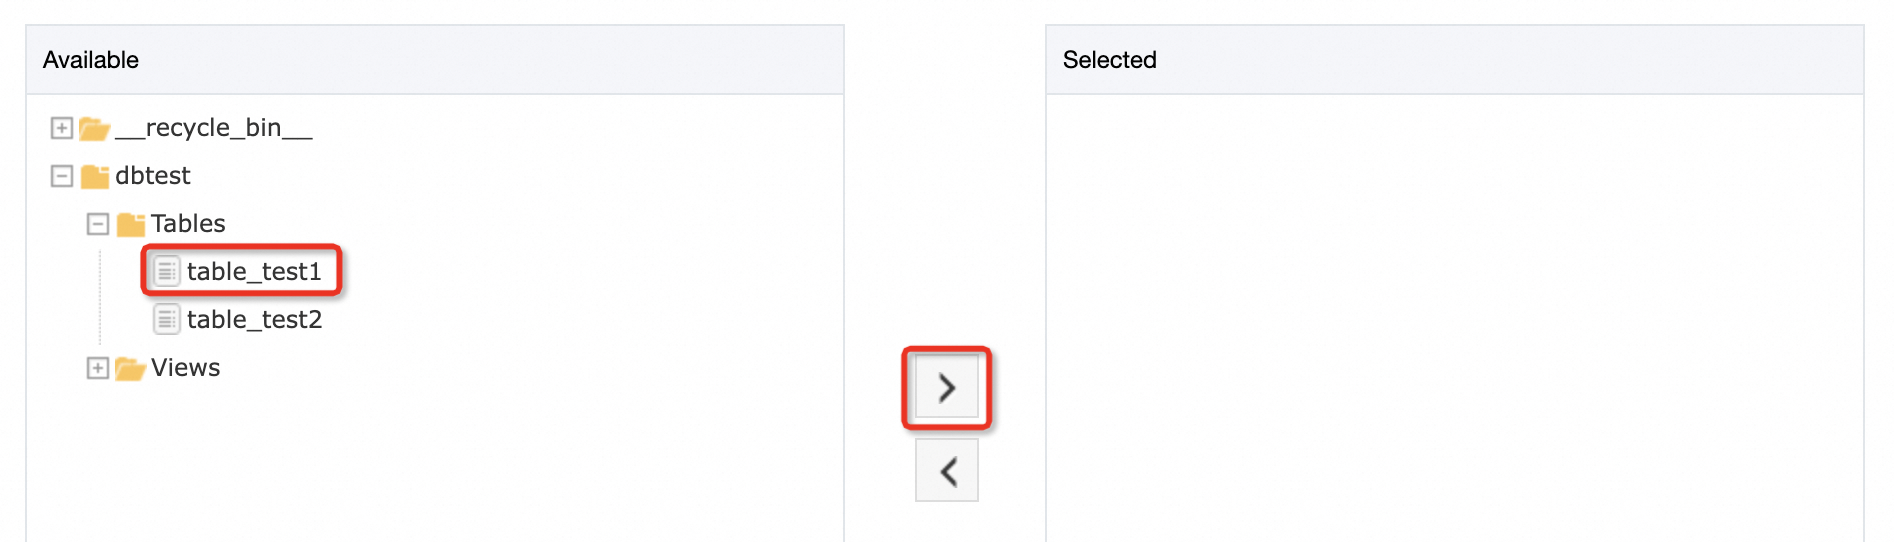
In the Configure Backup Time step, select Single Backup and use the default settings for other parameters. Then, click Next.
In the Edit Lifecycle step, use the default settings for all parameters and click Precheck.
1.3 View the backup status
In the Data Disaster Recovery console, click the ID of the backup schedule to go to the details page of the backup schedule. In the left-side navigation pane, click Full Data. If the status of the backup set is Completed, the backup schedule that is created in the previous step is started and a single backup is complete.
Click the ID of the backup set to go to the details page of the backup set.
In the left-side navigation pane, click Back Up Schema to view the schema information about the database and table.
Click Back Up Data to view the data backup information about the database and table.
2. Restore individual databases or tables
If you unexpectedly delete specific databases and tables or want to view the data at a specific point in time in the past, you can use the backup files that are generated in the previous step to restore the data. In this topic, the table_test1 table is restored to the original RDS instance:
2.1 Create a restoration task
In the Data Disaster Recovery console, click the ID of the backup schedule that you want to use. In the upper-right corner of the page that appears, click Restore Database.
In the Set Time Restored To step, specify the point in time at which the backup file is created, set the Target database instance type parameter to Use Exists and the Database Location parameter to RDS Instance, and then enter the ID of the RDS instance and the username and password of the privileged account that are created in the Preparations section of this topic. The username of the privileged account is
dbuser. Then, click Next.In the Configure Objects to Restore step, select the
table_test1table in thedbtestdatabase, click the icon to add the table to the Selected section, and then click Precheck. ImportantIf the name of the table that you want to restore is the same as the name of an existing table on the RDS instance, a suffix in the
_<Restoration task ID >_<Timestamp>format is added to the name of the table that you want to restore. Then, the system restores the data. Example:table_test1_dbs_sw***_2024***.
2.2 View restoration results
Go to the Restore Task page. If the status of the restoration task is Completed, the database and table are restored to the RDS instance.

Log on to the ApsaraDB RDS console, find the required RDS instance, and then log on to the RDS instance. In the left-side navigation pane of the DMS console, double-click the
dbtestdatabase to view the tables in the database.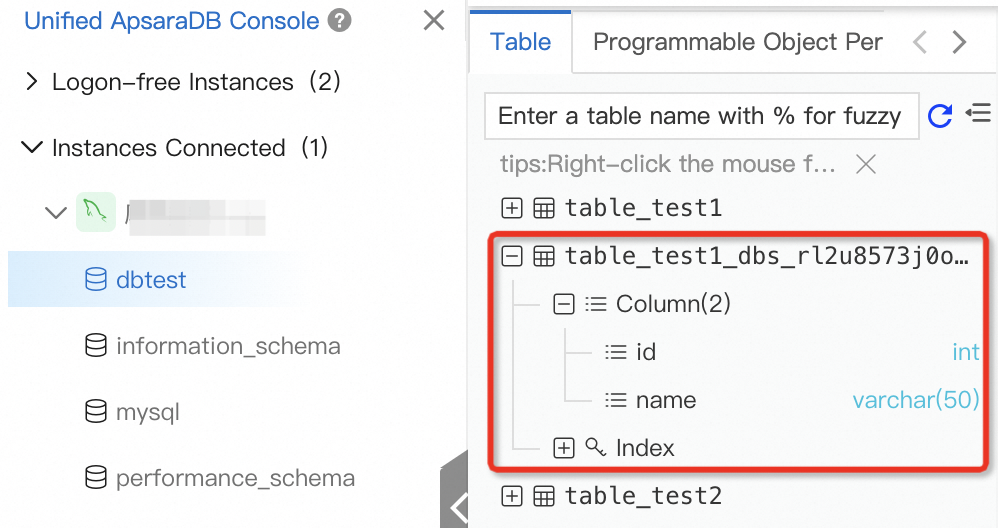
If you want to view the data in a table, execute the following SQL statement in the SQL window:
-- Specify the name of the table that you want to restore in the SQL statement.
SELECT * FROM table_test1_************;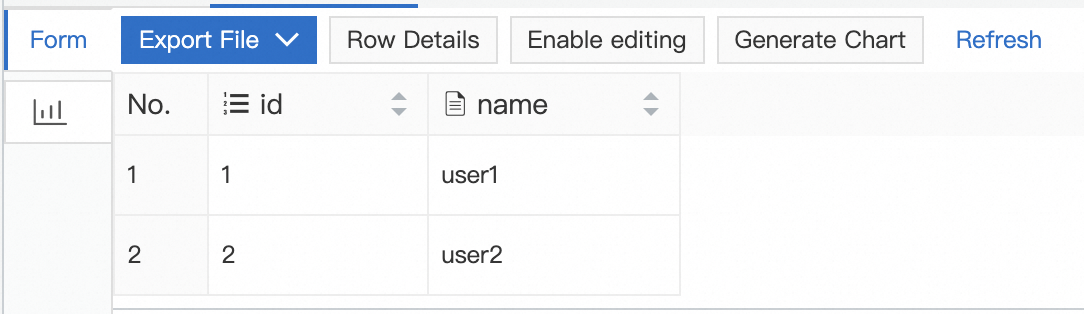
3. Release and unsubscribe from resources
Release the RDS instance: Log on to the ApsaraDB RDS console, find the required RDS instance, and then choose in the Actions column.
Unsubscribe from a Data Disaster Recovery backup schedule: Log on to the Data Disaster Recovery console, find the required backup schedule, and then choose in the Actions column.
References
For more information about backup solutions, see Overview of backup methods.
For more information about restoration solutions, see Overview of data restoration methods.