Use Data Management (DMS) to import an Excel file into an ApsaraDB RDS for MySQL table. This method is suited for one-time or occasional imports of files up to 5 GB through a GUI workflow that includes an optional approval step.
Before you begin
Before you start, ensure that you have:
-
An ApsaraDB RDS for MySQL instance
-
Access to DMS with permission to log on to the target database
-
The Excel file ready to convert to CSV format
Step 1: Prepare the CSV file
-
Open the Excel file and rename any column headers that contain special characters, spaces, or reserved words to valid database column names.
If the file has no column that uniquely identifies each row, add one to use as the primary key. For example, insert a sequence of IDs in column A.
-
Save the file in CSV format. DMS reads CSV files with comma (
,) delimiters.
Step 2: Create the destination table
-
Log on to your RDS instance using DMS. For details, see Use DMS to log on to an ApsaraDB RDS for MySQL instance.
-
Select the target database, open the SQL Console tab, and run a
CREATE TABLEstatement whose columns match those in your CSV file.The table schema must match your CSV file. Column names, order, and data types must align.
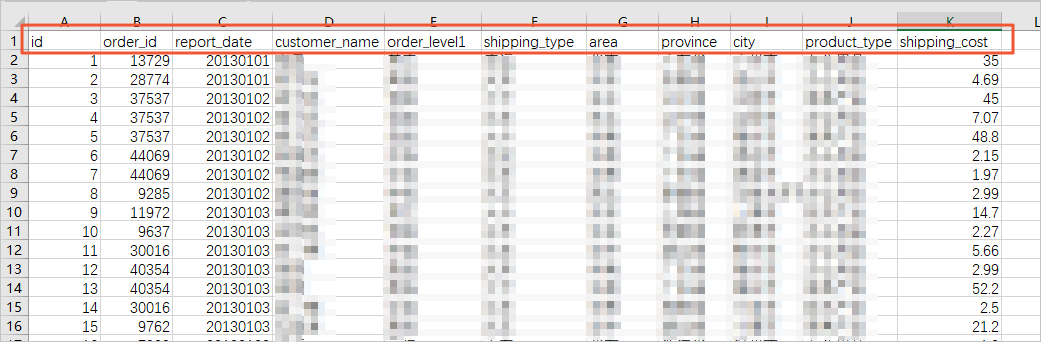
CREATE TABLE `test1` (
  `id` int(11) NOT NULL,
  `order_id` int(11) DEFAULT NULL,
  `report_date` varchar(32) DEFAULT NULL,
  `customer_name` varchar(32) DEFAULT NULL,
  `order_level1` varchar(32) DEFAULT NULL,
  `shipping_type` varchar(32) DEFAULT NULL,
  `area` varchar(32) DEFAULT NULL,
  `province` varchar(32) DEFAULT NULL,
  `city` varchar(32) DEFAULT NULL,
  `product_type` varchar(32) DEFAULT NULL,
  `shipping_cost` float(10,2) DEFAULT NULL,
  PRIMARY KEY (`id`)
) ENGINE=InnoDB DEFAULT CHARSET=utf8
Step 3: Submit the data import ticket
-
In the DMS console top navigation bar, choose Database Development > Data Change > Data Import.
If the DMS console is in simple mode, click the
 icon in the upper-right corner to exit simple mode. For more information, see Simple mode.
 -
On the Ticket Application page, configure the parameters in the Apply section.
Parameter Description Database The destination database. If the database is managed in Flexible Management or Stable Change mode, log on to it first — otherwise it will not appear in the list. File encoding The character set of the CSV file. Select Automatic Identification if you are unsure. Options: UTF-8, GBK, ISO-8859-1, Automatic Identification. Import mode Controls how DMS processes the file. See Import mode options below. File type Select CSV. The CSV file must use comma ( ,) as the delimiter.Target table name The name of the table you created in step 4. Data location What the first row of your CSV file contains. Select 1st behavioral attributes if the first row holds column names, or 1st behavioral data if it holds data. Write mode How DMS handles duplicate records. See Write mode options below. Attachment Click Upload a file and select your CSV file. Supported types: SQL, CSV, TXT, XLSX, ZIP. Maximum size: 5 GB. Other options Select Skip errors to continue importing when DMS encounters an error. By default, DMS stops and reports the error.
Import mode options
| Mode | How it works | When to use |
|---|---|---|
| Speed mode | Reads SQL statements from the file and executes them directly in the Execute step. | Use for faster imports when strict security controls are not required. |
| Security mode | Parses the file and caches SQL statements or CSV data in the Precheck step, then executes the cached data in the Execute step. | Use when your organization requires an audit trail or approval before data reaches the database. |
Speed mode is disabled by default for database instances managed in Security Collaboration mode. To enable it, go to the Details page of the applied security rule set, click the SQL Correct tab, and modify the Whether data import supports selecting speed mode setting under the Basic Configuration Item checkpoint.
Write mode options
| Write mode | Behavior | When to use |
|---|---|---|
| INSERT | Checks the primary key on each row. Returns an error if a duplicate primary key exists. | First-time import of new data with no existing records in the table. |
| INSERT_IGNORE | Skips imported rows that duplicate existing records. | Re-importing data that may overlap with existing records; existing data stays unchanged. |
| REPLACE_INTO | Deletes the existing row when a duplicate primary key or unique index is found, then inserts the new row. | Updating existing records with newer data from the file. |
INSERT INTO,INSERT IGNORE, andREPLACE INTOare all supported for ApsaraDB RDS for MySQL, PolarDB for MySQL, PolarDB-X, AnalyticDB for MySQL, and ApsaraDB for OceanBase instances. For other database types, onlyINSERT INTOis supported.
Step 4: Run the import
-
Click Submit and wait for the precheck to complete. If the precheck fails, fix the reported issues and submit the ticket again.
-
In the Approval step, click Submit for Approval. When prompted, click OK.
-
(Optional) In the Execute step, click Execute Change.
-
In the Task Settings dialog box, set the execution strategy:
-
Running immediately — click Confirm Execution to start the import now.
-
Schedule — specify a start time, then click Confirm Execution to run the import at that time.
DMS reads SQL statements in streaming mode and executes them in 1 MB batches. During execution, you can monitor task status, SQL check details, and scheduling logs in the Execute step.
-
Step 5: Verify the import
After the task completes, open the SQL Console tab for the destination database and run a query to confirm the data was imported correctly.
SELECT * FROM test1 LIMIT 10;