ApsaraDB RDS for MySQL supports native replication instances — cloud-hosted MySQL instances that act as read-only secondary databases for your self-managed MySQL primary. This topic walks through three solutions for taking a full backup, importing it into an RDS native replication instance, and establishing a live replication channel from your self-managed database to the cloud.
Prerequisites
Before you begin, make sure you have:
-
An RDS for MySQL instance with native replication enabled. Create a new instance or upgrade an existing one. The instance must meet all of the following conditions, which you can verify on the Basic Information page:
-
Database version: MySQL 5.7 (minor version 20240930 or later) or MySQL 8.0 (minor version 20250531 or later)
-
Product series: Basic Edition
-
Billing method: subscription or pay-as-you-go
-
Region: China (Shanghai), China (Beijing), China (Shenzhen), China (Guangzhou), or China (Chengdu)
-
Native replication is currently available only in the five regions listed above. If you need this feature in a region not yet supported, submit a ticket.
-
A privileged account on the RDS for MySQL instance.
-
A network connection between your self-managed MySQL database and the RDS for MySQL instance. See Network configurations.
-
A replication user on the self-managed MySQL database with the
REPLICATION CLIENTandREPLICATION SLAVEprivileges. Run the following commands on your self-managed MySQL to create one:CREATE USER 'repl_user'@'<rds_instance_ip>' IDENTIFIED BY '<replication_password>'; GRANT REPLICATION CLIENT, REPLICATION SLAVE ON *.* TO 'repl_user'@'<rds_instance_ip>'; FLUSH PRIVILEGES;
Choose a solution
Select the solution that best fits your situation:
| Solution | Transfer method | Best for | OSS required |
|---|---|---|---|
| Solution 1: XtraBackup + OSS import | Upload backup to OSS, then import from the console | Large databases; need server-side encryption or point-in-time rebuild | Yes |
| Solution 2: XtraBackup + direct stream transfer | Stream backup directly to RDS via the backup-helper tool | Simpler setup without OSS | No |
| Solution 3: mysqldump + Data Management Service import | Logical SQL dump imported through DMS | Small databases; no XtraBackup available | No |
All three solutions follow the same overall workflow:
-
Take a full backup of the self-managed MySQL database.
-
Import the backup into the RDS native replication instance.
-
Set up a replication channel from the self-managed database to RDS.
Solution 1: XtraBackup stream backup and OSS import
Advantages
RDS for MySQL native replication instances are fully compatible with XtraBackup physical backups and support the following features:
-
Automatically detects the GTID in the backup file to align the offset for setting up the replication channel.
-
You can upload backup files to Object Storage Service (OSS) and enable server-side encryption to ensure data security.
-
You can rebuild the native replication instance from a selected backup set, which helps resolve complex replication break issues.
Billing
-
Creating a new instance with native replication enabled incurs instance fees. Upgrading an existing instance does not.
-
Storing the backup file in Object Storage Service (OSS) incurs OSS storage fees.
Step 1: Install XtraBackup on the self-managed database host
On CentOS:
For MySQL 5.7:
wget https://downloads.percona.com/downloads/Percona-XtraBackup-2.4/Percona-XtraBackup-2.4.29/binary/redhat/8/x86_64/percona-xtrabackup-24-2.4.29-1.el8.x86_64.rpm
yum localinstall percona-xtrabackup-24-2.4.29-1.el8.x86_64.rpm
For MySQL 8.0:
wget https://downloads.percona.com/downloads/Percona-XtraBackup-8.0/Percona-XtraBackup-8.0.35-31/binary/redhat/8/x86_64/percona-xtrabackup-80-8.0.35-31.1.el8.x86_64.rpm
yum localinstall percona-xtrabackup-80-8.0.35-31.1.el8.x86_64.rpm
On Ubuntu:
For MySQL 5.7:
wget https://downloads.percona.com/downloads/Percona-XtraBackup-2.4/Percona-XtraBackup-2.4.29/binary/redhat/8/x86_64/percona-xtrabackup-24-2.4.29-1.el8.x86_64.rpm
yum localinstall percona-xtrabackup-24-2.4.29-1.el8.x86_64.rpm
For MySQL 8.0:
wget https://downloads.percona.com/downloads/Percona-XtraBackup-8.0/Percona-XtraBackup-8.0.35-31/binary/redhat/8/x86_64/percona-xtrabackup-80-8.0.35-31.1.el8.x86_64.rpm
yum localinstall percona-xtrabackup-80-8.0.35-31.1.el8.x86_64.rpm
Then install qpress (Ubuntu only — not bundled with XtraBackup on Ubuntu):
sudo apt-get install -y qpressStep 2: Take a full backup
The following commands are for databases that use InnoDB as the primary storage engine. If your database contains MyISAM tables, use innobackupex instead of xtrabackup.
Choose one compression method:
Method 1: Default qpress compression (.xb output)
xtrabackup --backup \
  --host=127.0.0.1 \
  --port=3306 \
  --user=<user_of_self-managed_MySQL> \
  --password=<password> \
  --stream=xbstream \
  --compress > ./<backup_file_name_such_as_backup_1206.xb>
Method 2: QuickLZ compression (_qp.xb output) — requires XtraBackup 8.0.34-29 or earlier
xtrabackup --backup \
  --host=127.0.0.1 \
  --port=3306 \
  --user=<user_of_self-managed_MySQL> \
  --password=<password> \
  --stream=xbstream \
  --compress > ./<backup_file_name_such_as_backup_1206_qp.xb>
For more information, see the official Percona XtraBackup tutorial.
Method 3: External zstd compression (.xb.zstd output)
xtrabackup --backup \
  --host=127.0.0.1 \
  --port=3306 \
  --user=<user_of_self-managed_MySQL> \
  --password=<password> \
  --stream=xbstream \
  | zstd -q - > ./<backup_file_name_such_as_backup_1206.xb.zstd>
Key flags used in all three commands:
| Flag | Purpose |
|---|---|
--stream=xbstream |
Streams the backup to stdout as an xbstream archive rather than writing to individual files |
--compress |
Compresses backup data before streaming, reducing transfer size |
Step 3: Upload the backup to OSS
The OSS bucket must be in the same region as your RDS for MySQL instance. Otherwise, RDS cannot retrieve the backup file.
Install ossutil:
yum install -y unzip
sudo -v ; curl https://gosspublic.alicdn.com/ossutil/install.sh | sudo bash
ossutil config
Upload the backup file:
ossutil -e <OSS_Endpoint> -i <your_AccessKeyId> -k <your_AccessKeySecret> cp <backup_file_name> oss://<Bucket_name>/Replace the placeholders with actual values:
| Placeholder | Description | Example |
|---|---|---|
<OSS_Endpoint> |
OSS endpoint for your region | oss-cn-shanghai.aliyuncs.com |
<your_AccessKeyId> |
Your Alibaba Cloud AccessKey ID | LTAI5tXxx... |
<your_AccessKeySecret> |
Your Alibaba Cloud AccessKey secret | xXxXxXx... |
<backup_file_name> |
Local path to the backup file | ./backup_1206.xb |
<Bucket_name> |
Name of your OSS bucket | my-rds-backup-bucket |
Step 4: Import the backup and set up the replication channel
-
Go to the RDS Instances list, select a region, and click the ID of the target instance.
-
In the left navigation pane, click Native Replication.
-
Click Import Full Data, configure the parameters below, and click OK.
Backup upload method (required)
| Parameter | Description |
|---|---|
| MySQL Version | Automatically populated with 5.7 or 8.0. No action required. |
| Import Method | Select Import from OSS. |
| OSS Bucket | Select the bucket where the backup file is stored. |
| OSS File Name | Select the backup file. If the file is in a subdirectory, enter the full path manually. Supported formats: .xb (xbstream), _qp.xb (QuickLZ), .xb.zst (zstd). |
Automatic replication channel configuration (optional but recommended)
| Parameter | Description |
|---|---|
| Auto Replication Building | Turn on to have RDS automatically set up the replication channel after import. If disabled, set up the channel manually after import completes. |
| Source IP Address | IP address of the self-managed MySQL database. |
| Source Port | Port of the self-managed MySQL database. |
| Source Account | Replication user on the self-managed MySQL database (must have REPLICATION CLIENT and REPLICATION SLAVE privileges). |
| Account Password | Password for the replication user. |
Verify replication status
After clicking OK, return to the Native Replication page. When the replication status changes to Running, the channel is established and data is flowing from your self-managed database to RDS.
If the status shows Error, check:
-
Network connectivity between the self-managed database and the RDS instance
-
That the replication user has the correct privileges
-
That the correct OSS bucket region and file path were specified
Solution 2: XtraBackup stream backup and direct transfer
This solution streams the backup directly from your self-managed database to RDS using the backup-helper tool, with no OSS bucket required.
Billing
Creating a new instance with native replication enabled incurs instance fees. Upgrading an existing instance does not.
Step 1: Install XtraBackup on the self-managed database host
Follow the same instructions as Step 1 in Solution 1.
Step 2: Install backup-helper and start the backup stream
On the self-managed database host, download and run the backup-helper tool:
# Download and make backup-helper executable
wget -O backup-helper https://mysql-backup-helper.oss-cn-beijing.aliyuncs.com/v1.0.0-alpha/backup-helper && chmod +x backup-helper

# Start the backup stream
./backup-helper --backup --mode=stream \
  --host=<MySQL_IP> \
  --port=<MySQL_port> \
  --user=<MySQL_account> \
  --password=<MySQL_password>
The tool starts a listener on port 9999 by default and waits for RDS to connect and pull the backup stream.
Step 3: Import the backup stream into RDS
-
Log on to the ApsaraDB RDS console, select a region, and click the instance ID.
-
In the left navigation pane, click Native Replication.
-
Click Import Full Data, configure the parameters below, and click OK.
Backup upload method (required)
| Parameter | Description |
|---|---|
| MySQL Version | Automatically populated with 5.7 or 8.0. No action required. |
| Import Method | Select Direct Stream Backup. |
| Source Backup IP Address | IP address of the backup-helper listener (the self-managed database host). |
| Source Backup Port | Port of the backup-helper listener. Default: 9999. |
Automatic replication channel configuration (optional but recommended)
| Parameter | Description |
|---|---|
| Auto Replication Building | Turn on to have RDS automatically set up the replication channel after import. If disabled, set up the channel manually after import completes. |
| Source IP Address | IP address of the self-managed MySQL database. |
| Source Port | Port of the self-managed MySQL database. |
| Source Account | Replication user (must have REPLICATION CLIENT and REPLICATION SLAVE privileges). |
| Account Password | Password for the replication user. |
Verify replication status
After clicking OK, return to the Native Replication page. When the replication status changes to Running, the channel is active.
If the status shows Error, check:
-
That backup-helper is still running on the self-managed host
-
Network connectivity between the self-managed host and the RDS instance on port 9999
-
That the replication user has the correct privileges
Solution 3: mysqldump and DMS import
This solution uses a logical SQL dump and imports it through Data Management Service (DMS). It is suitable for smaller databases and does not require XtraBackup.
Billing
Creating a new RDS for MySQL instance incurs RDS instance fees and storage fees.
Step 1: Take a logical backup with mysqldump
mysqldump --all-databases \
    --single-transaction \
    --order-by-primary \
    --set-gtid-purged=off \
    --master-data=2 \
    -u local_user \
    -p local_password \
    -h 127.0.0.1 \
    -P 3306 > data.sql
Key flags:
| Flag | Purpose |
|---|---|
--single-transaction |
Takes a consistent snapshot of InnoDB tables without locking them, keeping the database available during the dump |
--order-by-primary |
Sorts each table's rows by primary key, which speeds up import |
--set-gtid-purged=off |
Omits SET @@GLOBAL.GTID_PURGED from the dump. RDS for MySQL does not grant the permission to modify GTID_PURGED, so including this statement causes import errors |
--master-data=2 |
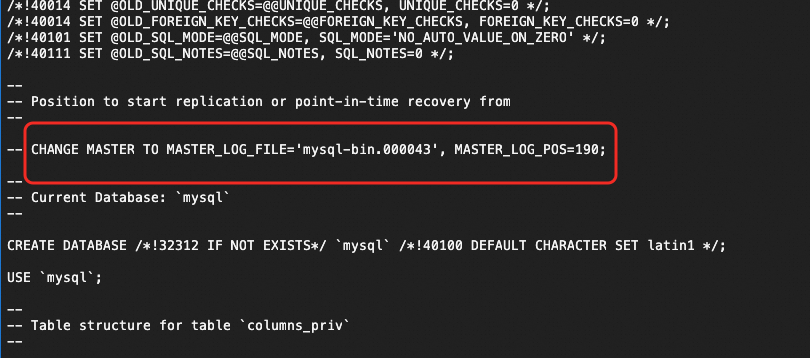
Adds a commented CHANGE MASTER TO statement to the dump with the binary log file name and position at the time of the snapshot. This lets you set up replication without querying the primary manually |
The --master-data=2 output looks like this in the SQL file:
Step 2: Import the SQL dump using DMS
-
Log on to the RDS for MySQL database using DMS with your privileged account.
-
Click the
 icon in the upper-left corner and choose All Features > Database Development > Data Change > Data Import.Note In non-streamlined mode, choose Database Development > Data Change > Data Import from the top menu bar.
 -
On the Ticket Application page, select Large Data Import, specify the target RDS for MySQL database, and upload the
data.sqlfile. For other configuration options, see Data Import.
Step 3: Set up the replication channel
Importing a logical backup through DMS generates its own binary log entries and GTIDs on the RDS secondary. If you later promote this secondary to a primary, these extra GTIDs can propagate to other replicas and break replication. Before setting up the replication channel, do one of the following to avoid this:
-
Disable and then re-enable native replication on the RDS instance. This runs
RESET MASTERand clears the extra GTIDs. -
Insert empty transactions on all other nodes in your replication topology to absorb the redundant GTIDs.
Run the following commands in DMS on the RDS secondary instance. Find the binary log file name and position from the commented CHANGE MASTER TO line in your data.sql file.
-- Set up the replication channel
CHANGE MASTER TO
  MASTER_HOST = '<source_host_IP>',
  MASTER_USER = '<replication_user>',
  MASTER_PASSWORD = '<replication_password>',
  MASTER_PORT = 3306,
  MASTER_LOG_FILE = '<binlog_file_name>',
  MASTER_LOG_POS = 190;

-- Start replication
START SLAVE;

-- Check replication status
SHOW SLAVE STATUS\GCHANGE MASTER TO, START SLAVE, and SHOW SLAVE STATUS are compatible with MySQL 5.7. For MySQL 8.0.22 and later, the preferred syntax is CHANGE REPLICATION SOURCE TO, START REPLICA, and SHOW REPLICA STATUS. Both forms work on MySQL 8.0 instances but the newer syntax is recommended for 8.0.Verify replication status
In the SHOW SLAVE STATUS\G output, confirm the following:
| Field | Expected value | Meaning |
|---|---|---|
Slave_IO_Running |
Yes |
The I/O thread is connected to the source and receiving binary log events |
Slave_SQL_Running |
Yes |
The SQL thread is applying those events |
Seconds_Behind_Master |
A decreasing number | Replication lag; a high value initially is normal as the secondary catches up |
If either thread shows No, check Last_IO_Error or Last_SQL_Error in the output for the specific error message.
Alternatively, return to the Native Replication page in the RDS console. When the replication status shows Running, the channel is established.