Required operations to use the mini program SDK. If any of the operations is missing, data will be missing.
Basic SDK information
SDK name | Version number | The md5 value. |
QuickTracking Mini SDK | Latest version: 2.4.16 Update logs: Mini Program SDK update logs | qt_mini.umd.js:c09275a732ef4cbb9dcb8c422a579372 qt_mini.cjs.js:a89c922a2c0c6eb9688d2e748280b8b4 qt_mini.esm.js:02b33fe908628a88c3465d3c961fc14d |
Operating Instructions
1. Quick integration
In the background of QuickTracking, dedicated integration code is generated for each mini program, which can be integrated according to the guidance in the product.
Product Path
Quick Tracking "Home"-"management console", "management console" on the "management console" to go to the "organization list" function, the organization list displays the currently created organization, find the organization to which the application belongs, click the "management application" function to jump to the "application management] page, click the created application to go to the" integration ". 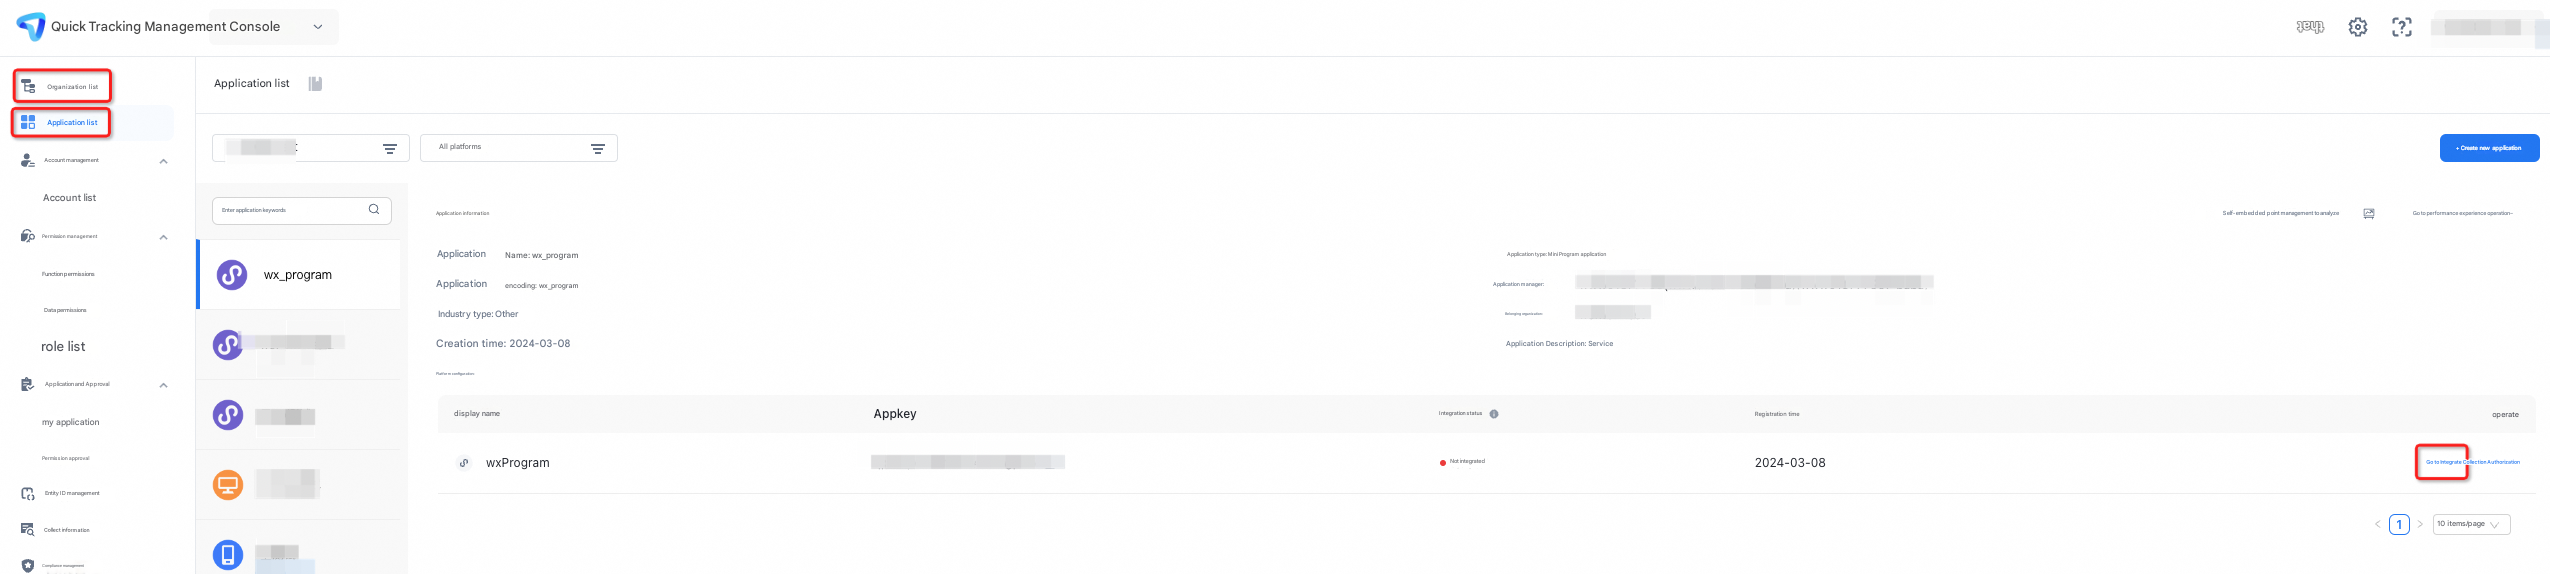
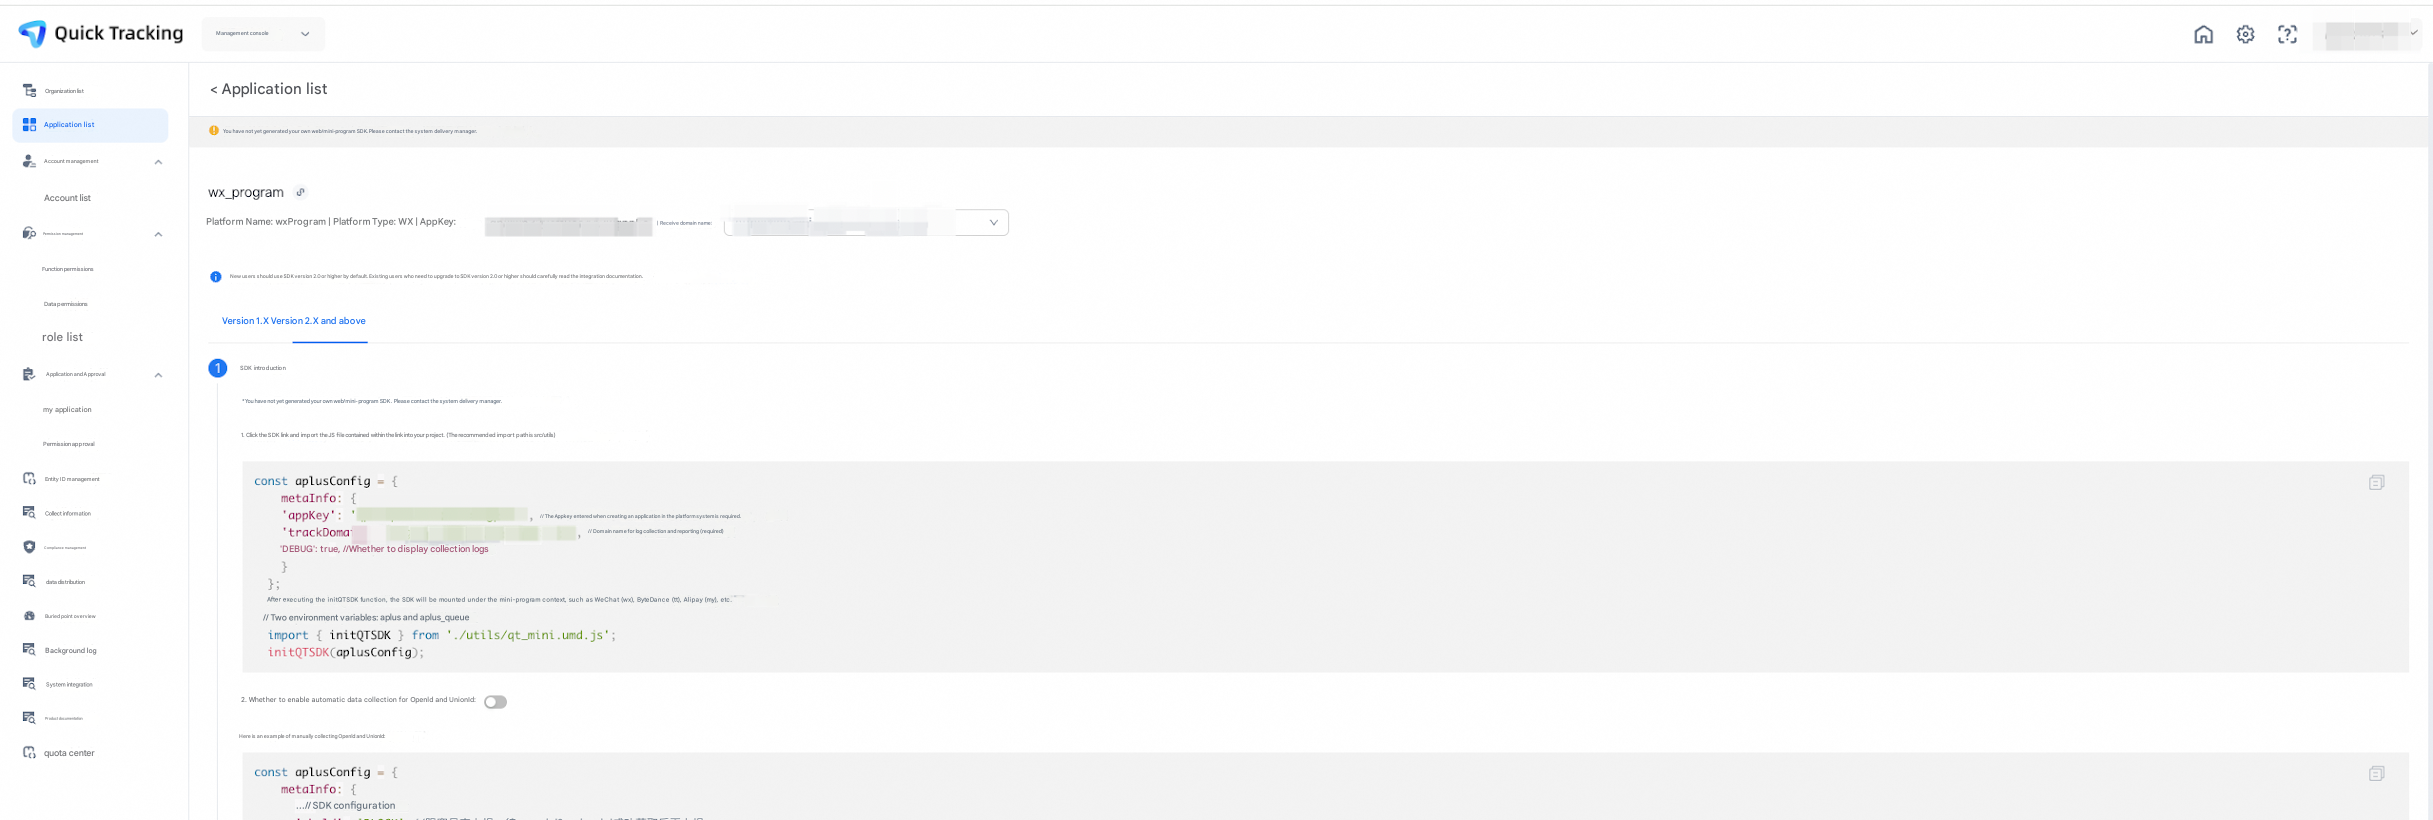
Click the "Deintegrate" button to jump to the new page to obtain the dedicated integration code, click Next and press the guide to enter the "integration verification" to check whether the integration is successful.
2 Integration code details
If the preceding page cannot be reached due to specific reasons, you need to view the document before you can integrate it. The specific integration code is as follows:
2.1 Parameter Preparation
appkey: obtained from the application list
Collection domain name: obtained in the "Management Console-Collect Information" module
SDK link: obtained in the management console-collect information module
2.2 SDK introduction
Click the SDK link to import the JS file in the link to the project. (Recommended import path is src/utils)
const aplusConfig = {
  metaInfo: {
    'appKey': "", // The Appkey that you enter when you create an application in the platform system. This parameter is required.
    'trackDomain': "", // Required. The domain name for log collection and reporting.
    'DEBUG': true, // Specifies whether to display collection logs.
  },
};
// After the initQTSDK function is executed, the SDK is mounted under the context of the mini program, such as WeChat wx, byte tt, and Alipay my.
// The aplus and aplus_queue environment variables
import { initQTSDK } from "./utils/qt_mini.umd.js";
initQTSDK(aplusConfig);
Note: Place the initialization code in the entry file, not in the lifecycle function.
2.3 Set Device ID
Due to the restrictions of the mini program framework, the QuickTracking SDK does not automatically generate any device ID. You need to authorize the developer to automatically obtain the openid, or manually upload the official mini program ID such as openid/unionid as the device ID. Otherwise, the QT SDK will not be able to report any logs.
You can use one of the following methods to manually upload data:
Note: The sample code is used to call WeChat mini programs. Other mini programs have similar platform logic.
const aplusConfig = {
  metaInfo: {
  ... // Configure the SDK.
  '_hold': 'BLOCK' // The blocking log is reported after the openid and unionid are obtained.
  ... // Configure the SDK.
  }
};
// After the initQTSDK function is executed, the SDK is mounted under the context of the mini program, such as WeChat wx, byte tt, and Alipay my.
// The aplus and aplus_queue environment variables
import { initQTSDK } from "./utils/qt_mini.umd.js";
initQTSDK(aplusConfig);

wx.login({
  success: (res) => {
    // Use the code to exchange the OpenID.
    if (res.code) {
      wx.request({
        url: the interface used by the backend on the customer service side to obtain the openid,
        method: "post",
        data: {
          code: res.code,
        },
        success: (res) => {
          if (res.data && res.data.openid) {
            // Store the obtained OpenID to storage for later use.
            wx.setStorageSync("openId", res.data.openid);
            wx.setStorageSync("unionId", res.data.unionid);

            wx.aplus_queue.push({
              action: "aplus.setMetaInfo",
              arguments: ["_anony_id", res.data.openid],
            });
          } else {
            wx.aplus_queue.push({
              action: "aplus.setMetaInfo",
              arguments: ["_anony_id", the pseudo-id to be implemented on the business side],
            });
          }
        },
      });
    }
  },
  fail: () => {
    // The failure message.
  },
  complete: () => {
    wx.aplus_queue.push({
      action: "aplus.setMetaInfo",
      arguments: ["_hold", "START"],
    });
  },
});
The following example shows how to automatically obtain the OpenID of the WeChat mini program:
Currently, QuickTracking supports automatic collection of WeChat mini program openid, which needs to be authorized in the product. The authorization method is as follows. Click and fill in the content as required. 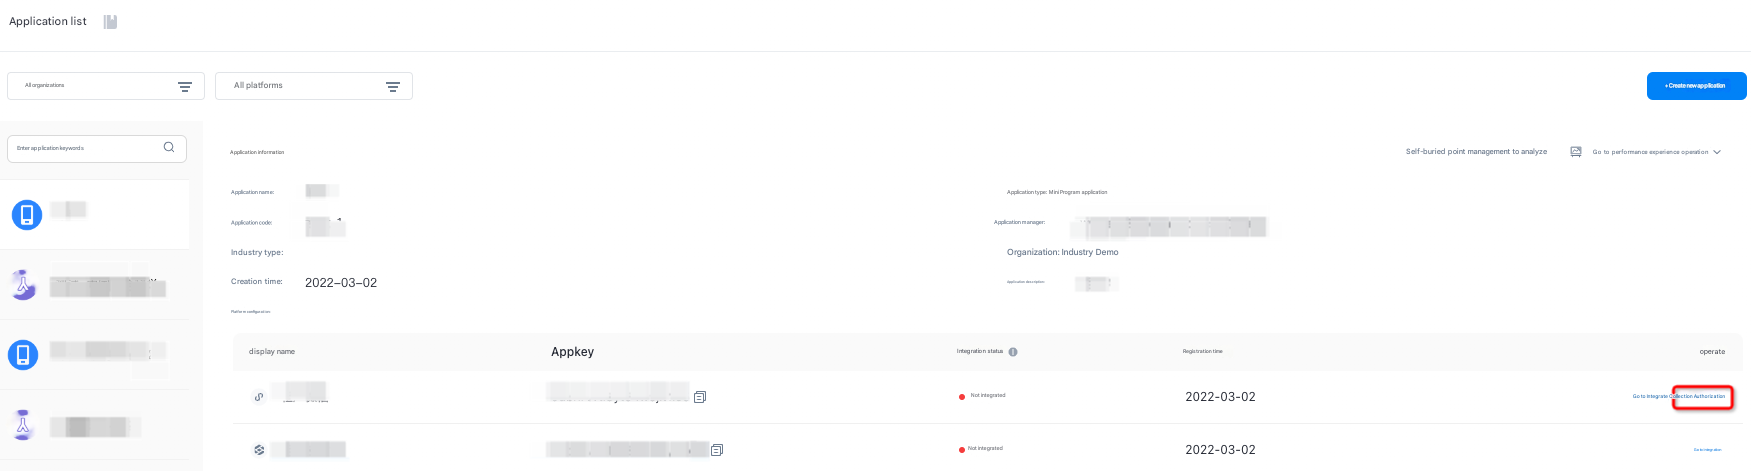

After authorization, set the device ID code mode to:
const aplusConfig = {
  metaInfo: {
  ... // Configure the SDK.
  'autoGetOpenid': true // Enable automatic collection of OpenID
  ... // Configure the SDK.
  }
};

// After the initQTSDK function is executed, the SDK is mounted under the context of the mini program, such as WeChat wx, byte tt, and Alipay my.
// The aplus and aplus_queue environment variables
import { initQTSDK } from './utils/qt_mini.umd.js';
initQTSDK(aplusConfig);
If manual openid has been used before, and now you want to change to the above QuickTracking to automatically collect WeChat applet openid, you also need to pay attention to the following:
Remove the SDK blocking reporting logic with_hold=BLOCK in metainfo
Comment out the logic code for manually setting "_anony_id=openid" before, that is, remove the code for getting openid from wx.login.
Note that it is important to ensure that the content about setting appKey and receiving domain name is not affected.
The sample code is as follows:
// inside app.js
const aplusConfig = {
  metaInfo: {
  ... // Configure the SDK.

  //1. Remove the SDK blocking reporting logic with_hold=BLOCK
  //'_hold: 'BLOCK' // The blocking log is reported after the openid and unionid are obtained.

  ... // Configure the SDK.
  }
};
// After the initQTSDK function is executed, the SDK is mounted under the context of the mini program, such as WeChat wx, byte tt, and Alipay my.
// The aplus and aplus_queue environment variables
import { initQTSDK } from './utils/qt_mini.umd.js';
initQTSDK(aplusConfig);

/**
2. Remove the code related to obtaining openid in wx.login.
wx.login({
  success: (res) => {
  // Use the code to exchange the OpenID.
  if (res.code) {
  wx.request({
  url: the interface used by the backend on the customer service side to obtain the openid,
  method: "post",
  data: {
  code: res.code,
  },
  success: (res) => {
  if (res.data && res.data.openid) {
  // Store the obtained OpenID to storage for later use.
  wx.setStorageSync("openId", res.data.openid);
  wx.setStorageSync("unionId", res.data.unionid);

  wx.aplus_queue.push({
  action: 'aplus.setMetaInfo',
  arguments: ['_anony_id', res.data.openid]
  });

  } else {
  wx.aplus_queue.push({
  action: 'aplus.setMetaInfo',
  arguments: ['_anony_id', the pseudo-id to be implemented by the business side]
  });
  }
  },
  });
  }
  },
  fail: () => {
  // The failure message.
  },
  complete: () => {
  wx.aplus_queue.push({
  action: 'aplus.setMetaInfo',
  arguments: ['_hold', 'START']
  });
  },
});
*/To authorize a WeChat mini program, you must provide the AppID and AppSecret of the mini program. You can obtain the AppID and AppSecret from the Develop-Develop Management-Develop Settings page in the WeChat mini program management background. 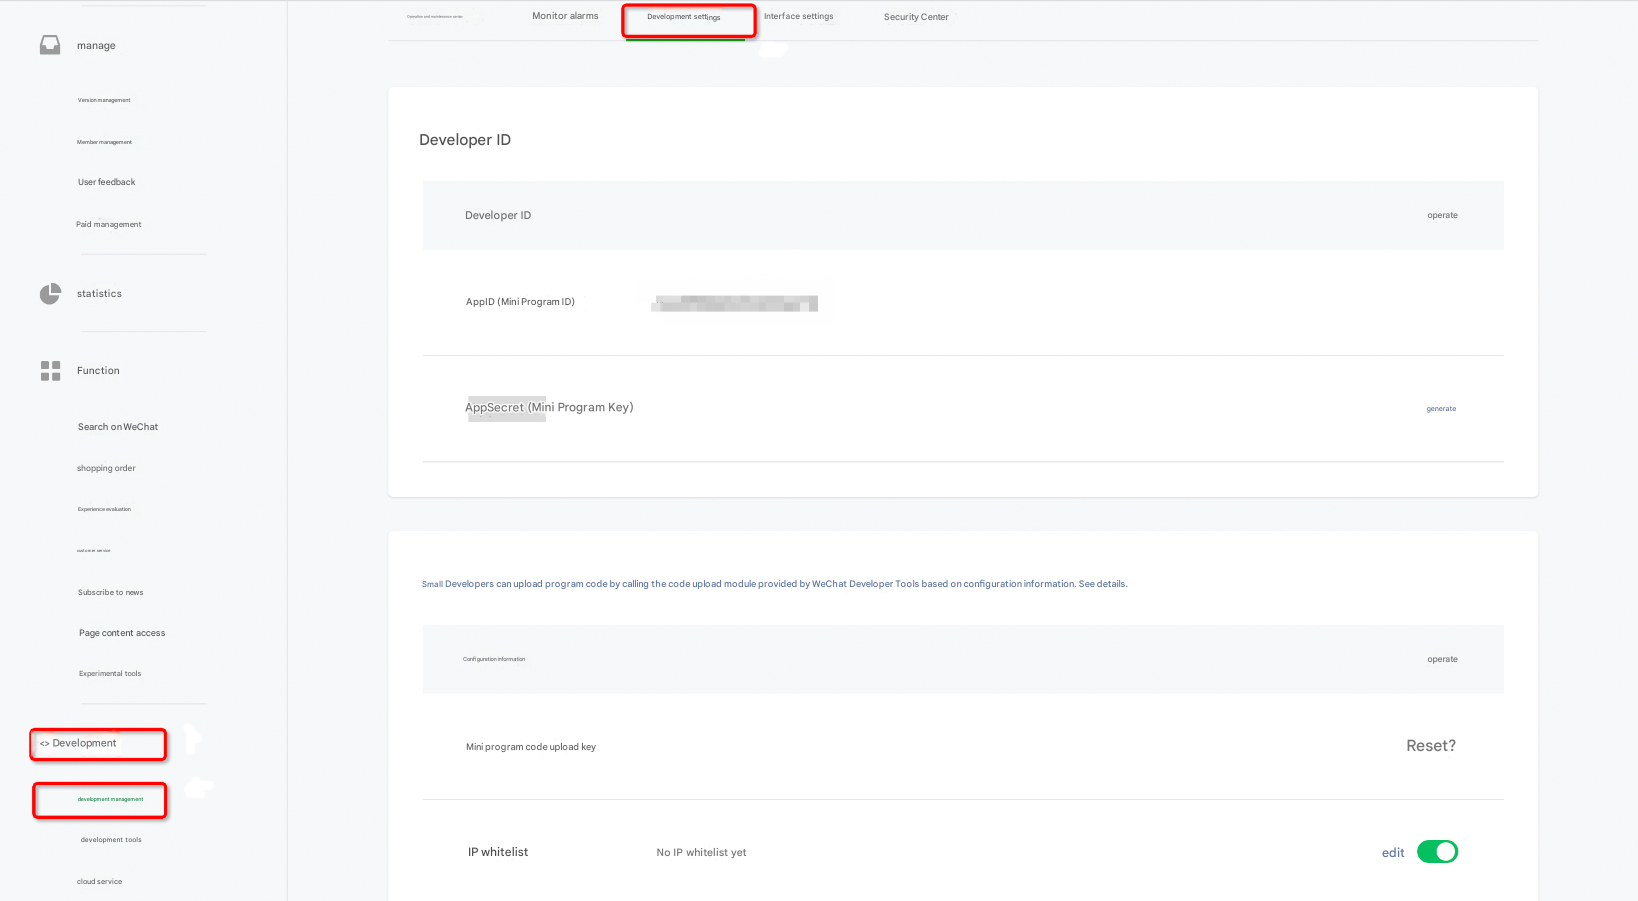
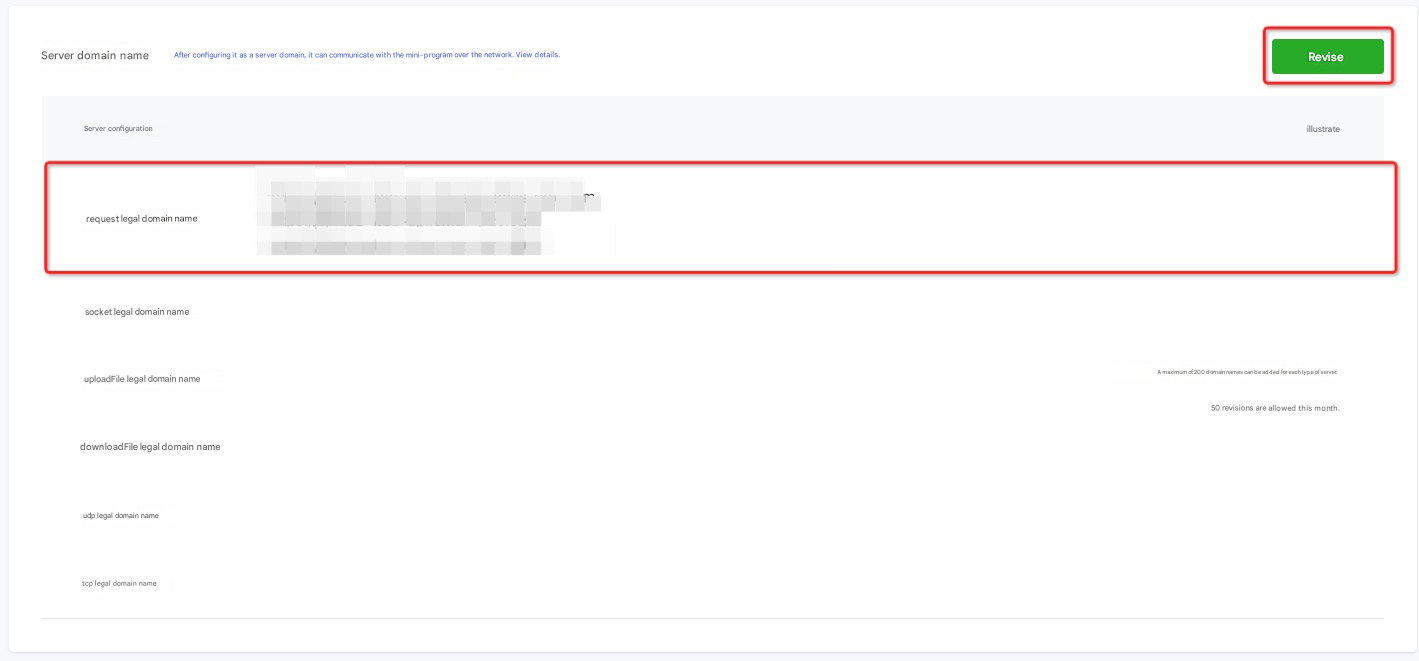
2.4 domain name whitelist
Take the WeChat mini program as an example: Log on to the background of the mini program, go to the Development Settings> Server Domain Name Whitelist, and add your domain name to the whitelist
3 FAQ
3.1 How do I obtain the offline SDK?
After obtaining the SDK link in the management console-collect information module in the background of QuickTracking, click the SDK link and "ctrl + s" or "command + s" to download and save it.