In order to avoid dirty data entry and ensure data accuracy, data can be verified and entered after approval through the receipt approval function.
Limits
Only the Professional Edition supports warehousing approval.
1. Approval precondition
1.1 System approval enabled
1.1.1 Operation entry
Enable the approval process, and select the corresponding Application Settings, Approval Channel, and Default Approver. Then, you can configure the receipt approval settings on the Operation Data Filling page.
1.2 Receipt Approval
1.2.1 Receipt approval for a single data form setting
1.2.1.1 Limits
Only the workspace administrator and the owner of the form can view and configure the approval settings.
1.2.1.2 Procedure
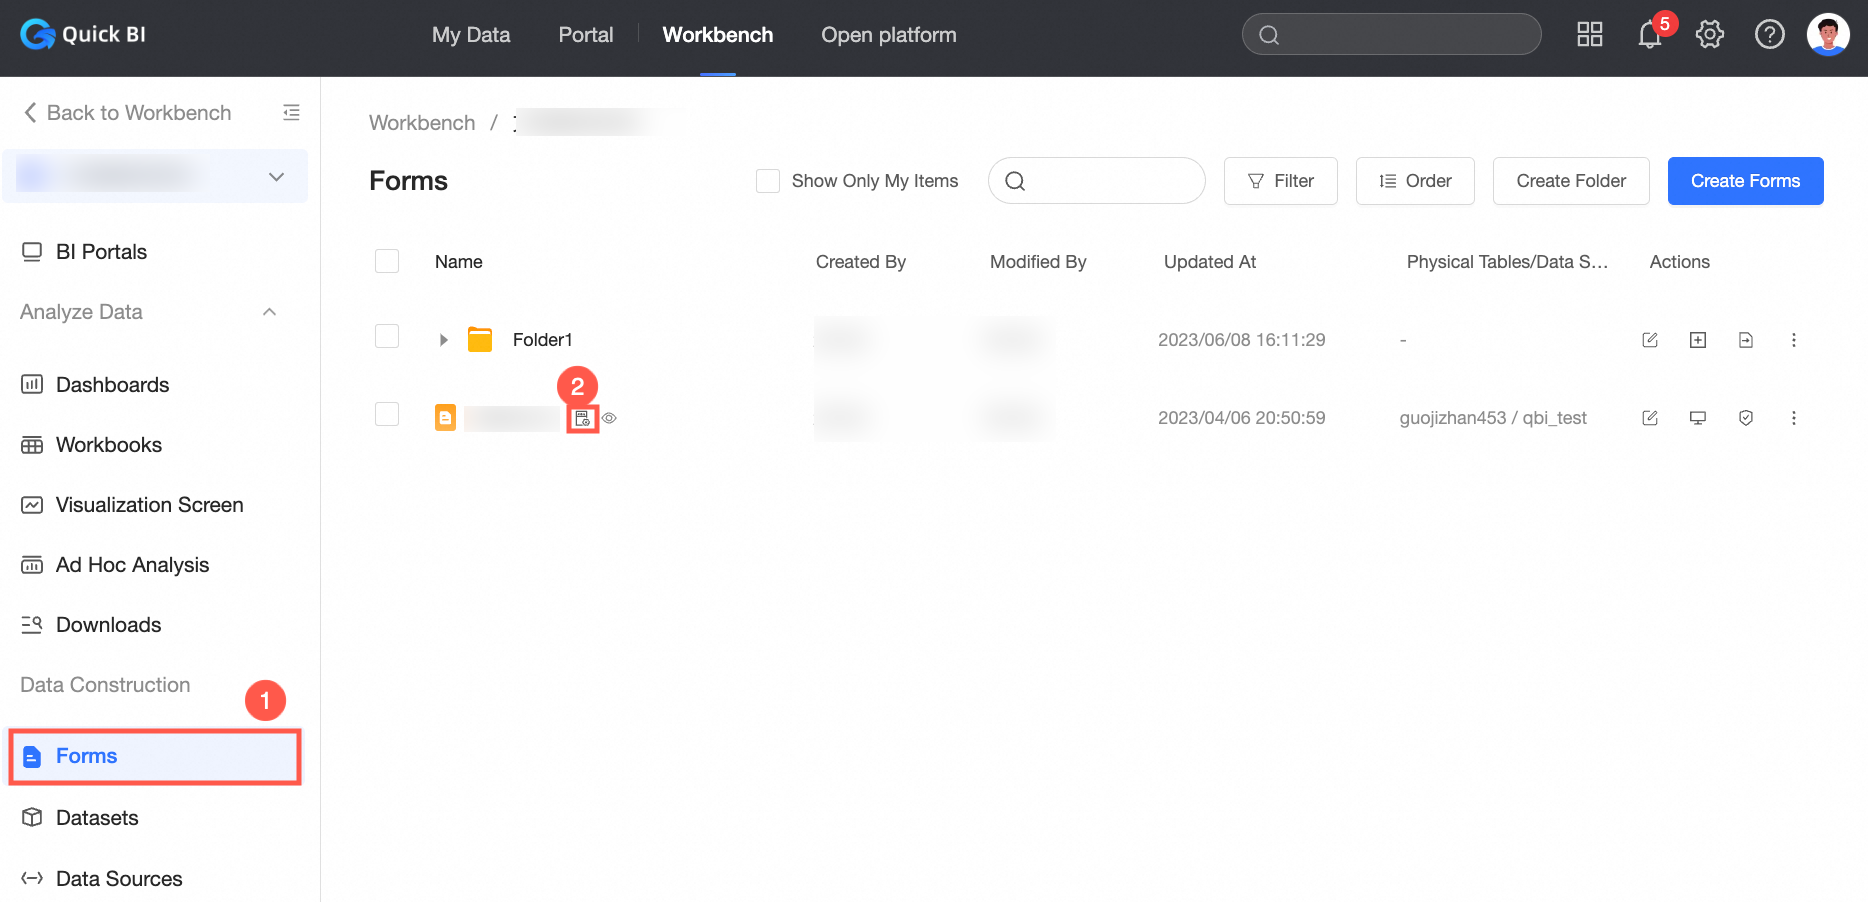
Step 1: Click console. In the left-side navigation pane, select a group workspace.
Step 2: In the left-side navigation pane, click Forms.
3. Use the dig command to obtain the result of resolving a domain name. Expected result 2 is displayed.
Select the form that you want to configure, click the icon in the Actions column
 , and then click Receipt Review.
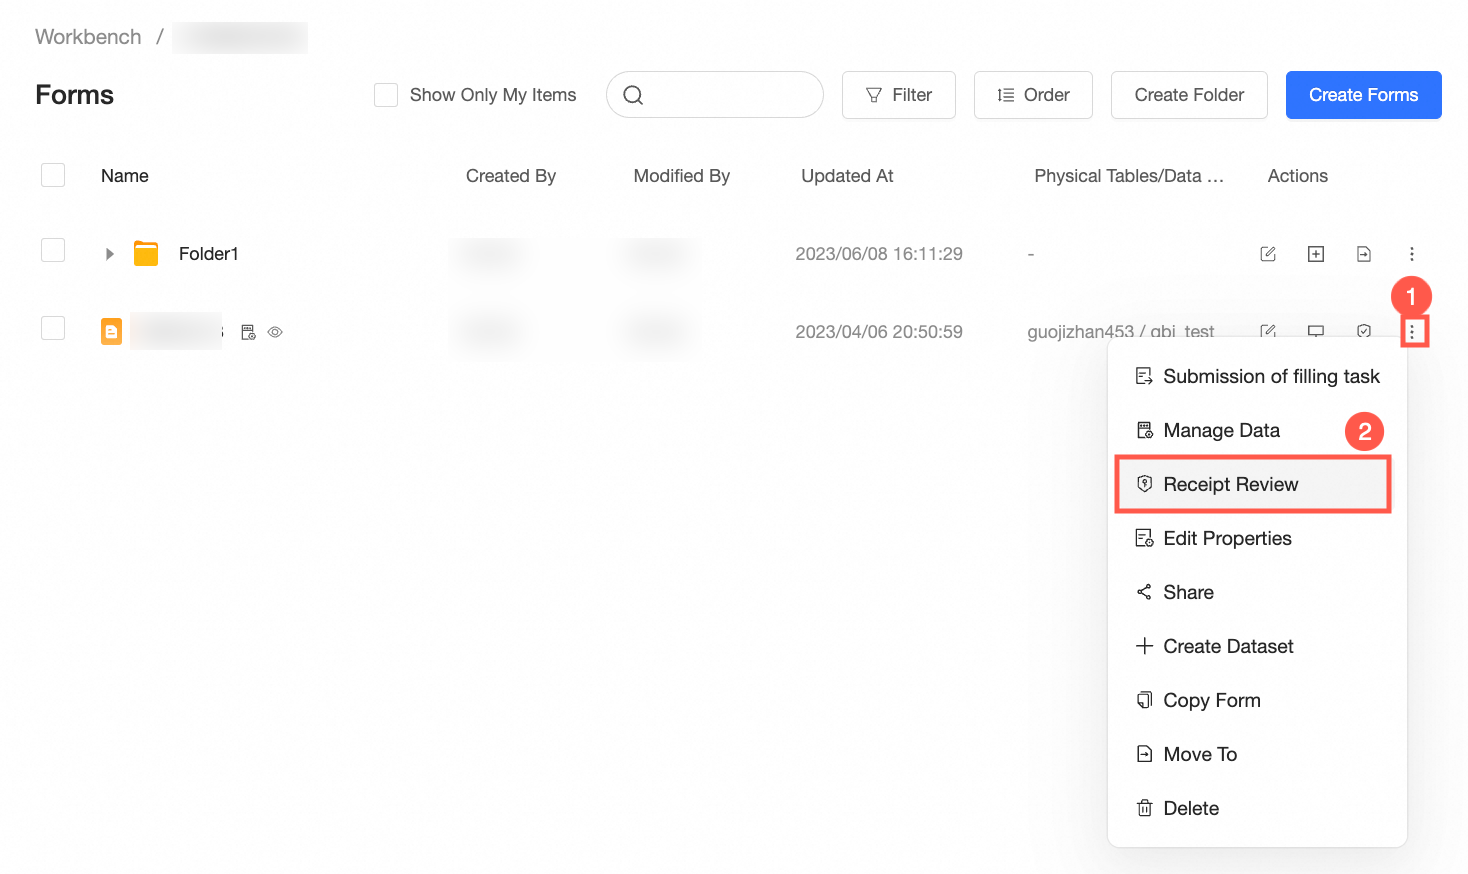
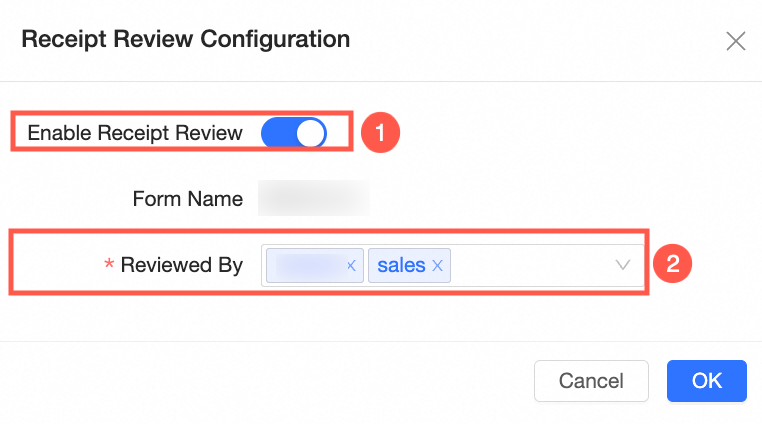
Step 4: On the Receipt Approval Configuration page, click Enable Receipt Review. In the dialog box that appears, select Reviewed By (Multiple choices allowed) and click OK.
Note: The Approver Range parameter specifies all internal users in the current organization.
2. Trigger approval
2.1 Submission for approval
2.1.1 Prerequisites
Receipt approval settings have been enabled for the current data filling form.
2.1.2 Procedure
Step 1: Enter the information on the Form Filling page.

Step 2: Click Submit.(①) The Select a reviewer(②) dialog box appears. If you select multiple approvers when you set the warehousing approval parameter, you must select one approver from the drop-down list. Click OK. (③)
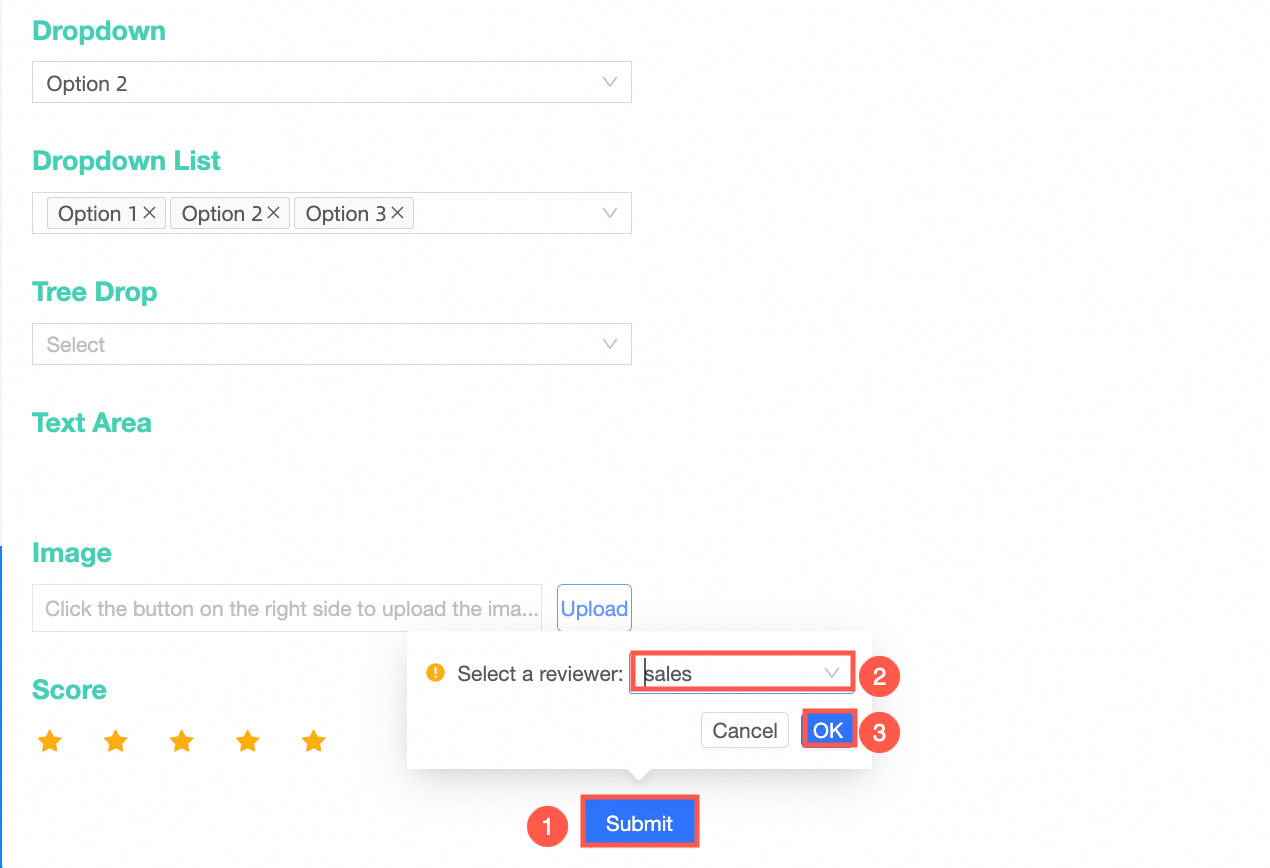
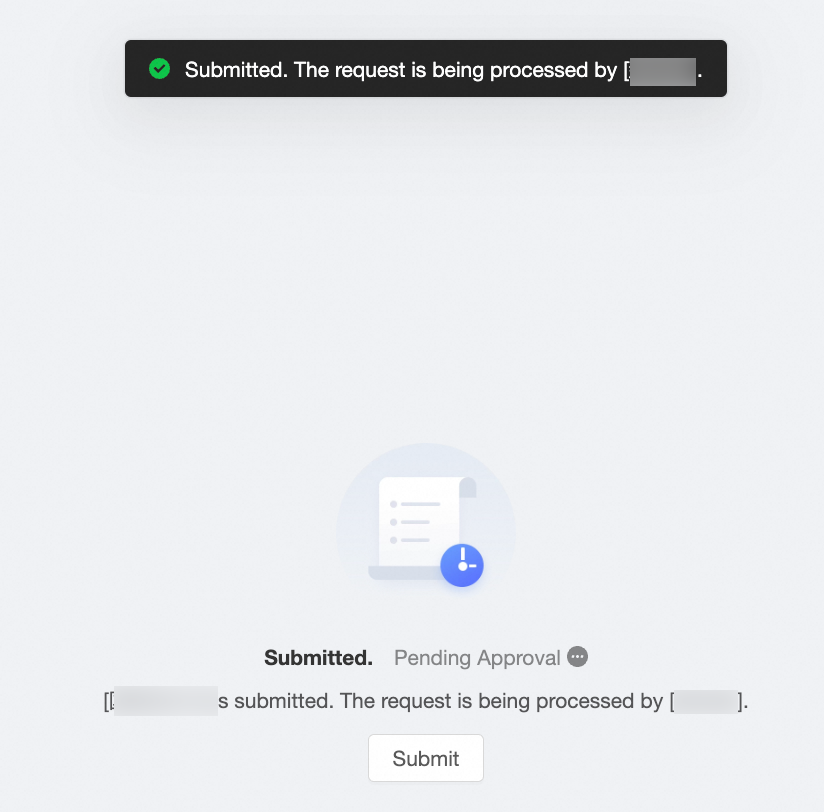
Step 3: Click OK. The Submitted for Approval page appears. Click Submit to continue to enter the Submit page of the form.
2.2 Data management page for approval
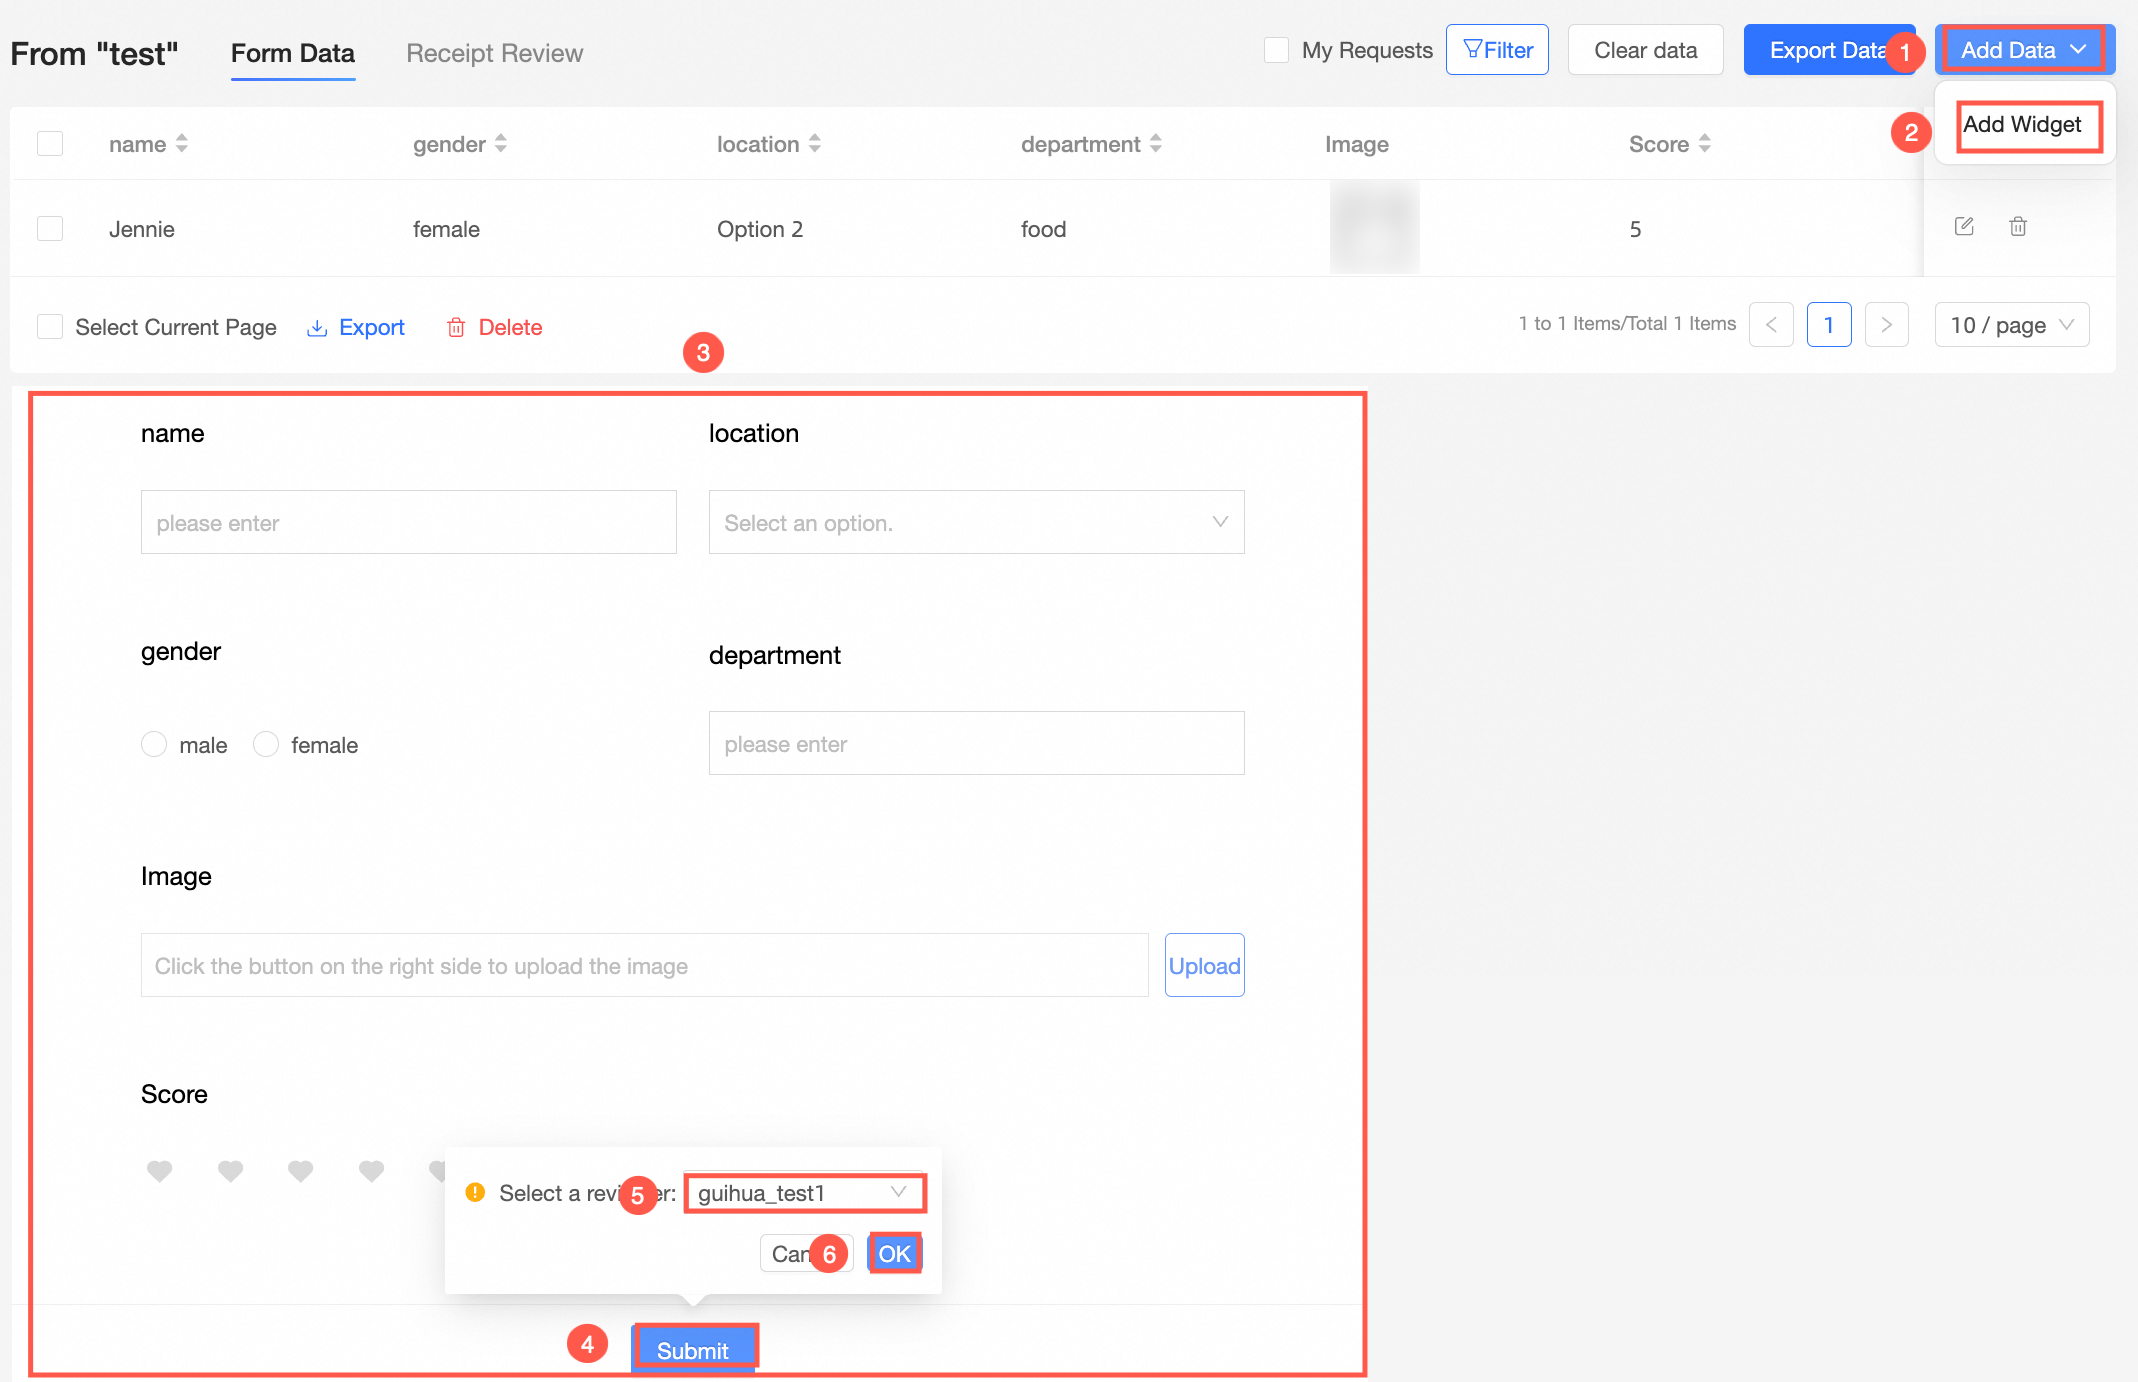
When you add, delete, or modify data on the Data Management page, you must submit a receipt for approval.
2.2.1 Management page entry
2.2.2 Add data
Step 1: Click Add Data(①). We select Add Widget (②)in this example.
Step 2: After you select this option, the Fill in Form dialog box appears. (③)
Step 3: Click Submit.(④) In the Select a reviewer(⑤)dialog box, select one of the approvers. Click OK. (⑥)
2.2.3 Modify data
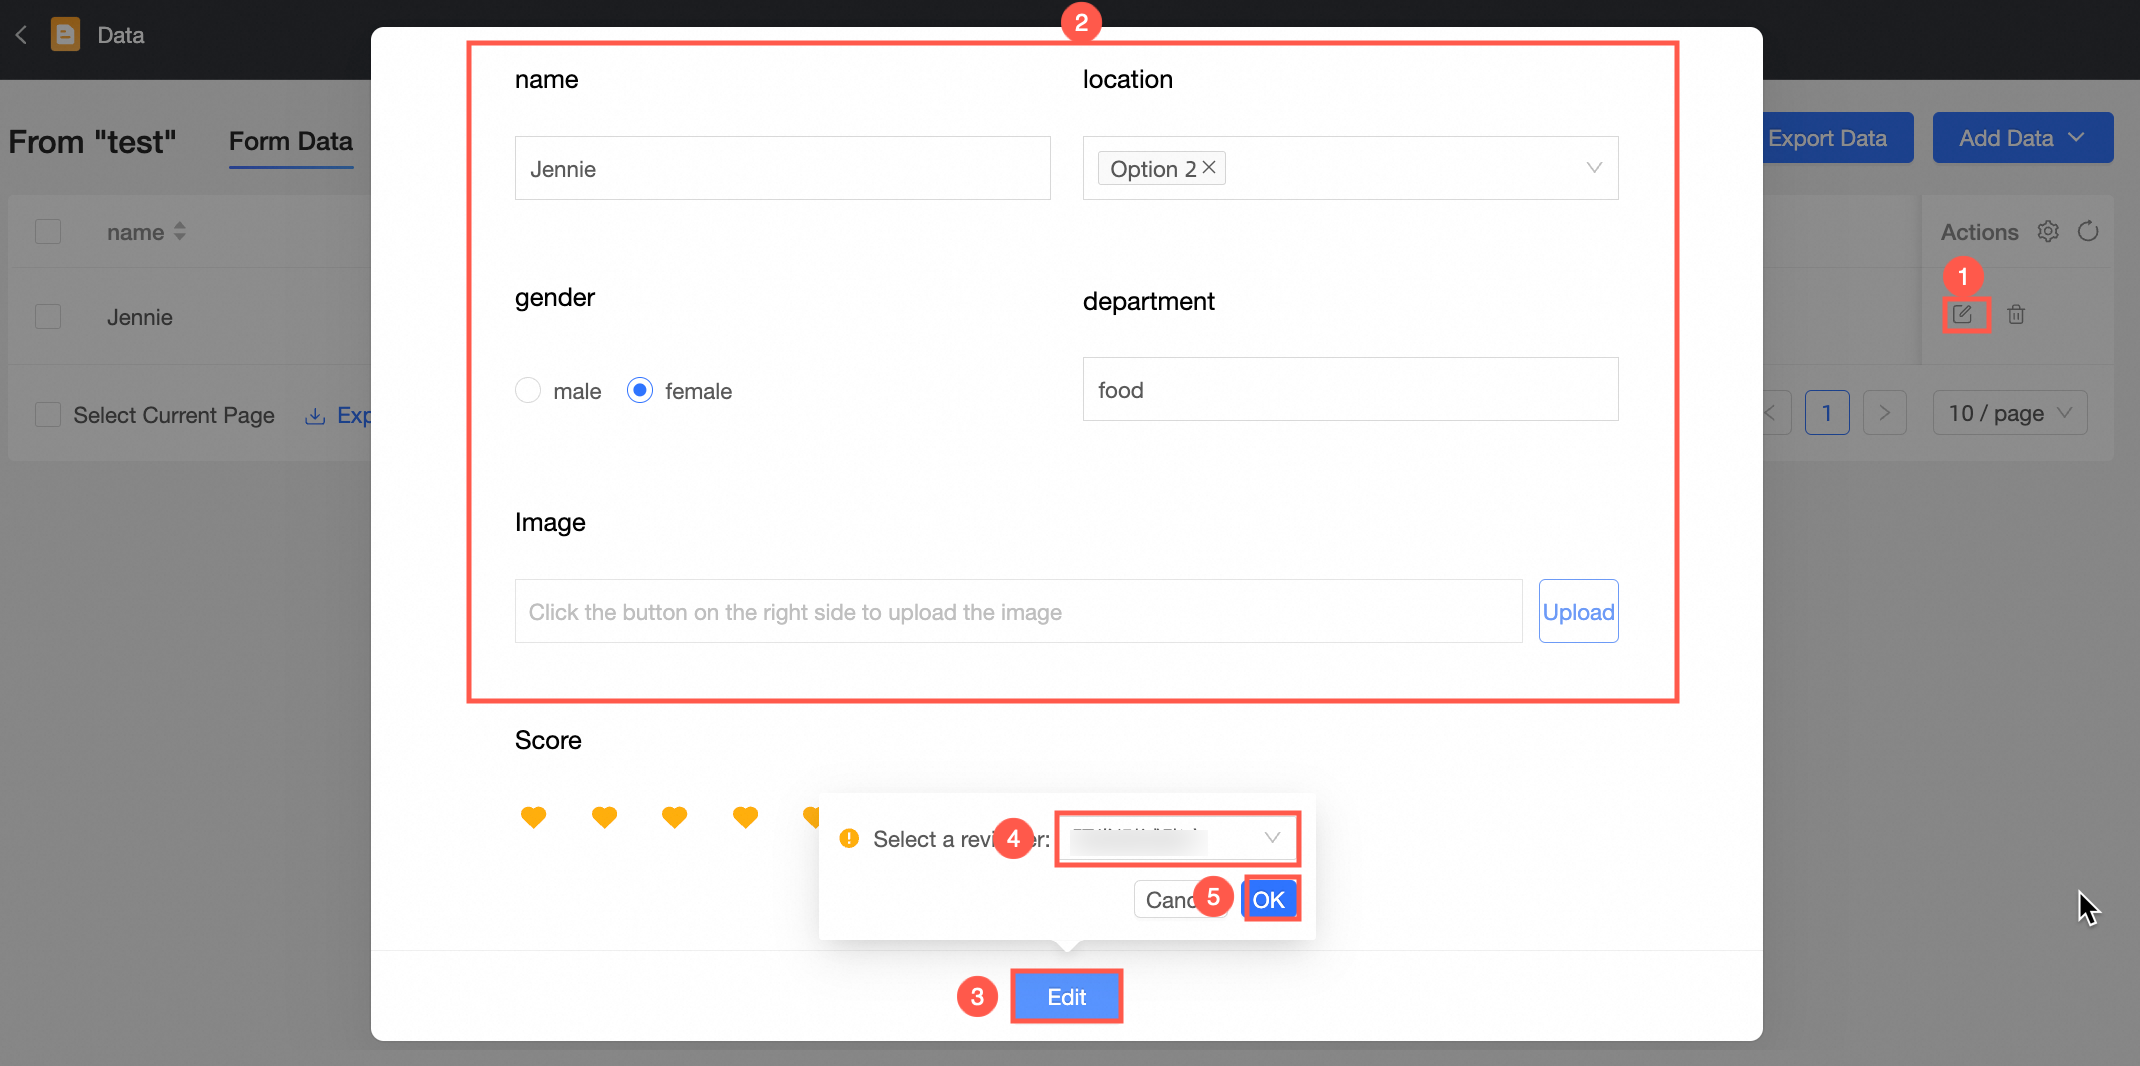
Step 1: Select the corresponding data in the form data, and click the icon in the ![]() Actions column to modify the data. (①)
Actions column to modify the data. (①)
Step 2: In the dialog box that appears, modify the information. (②)
Step 3: Click Submit. (③)In the dialog box that appears,Select a reviewer. (④)Click OK. (⑤)
2.2.3 Delete data
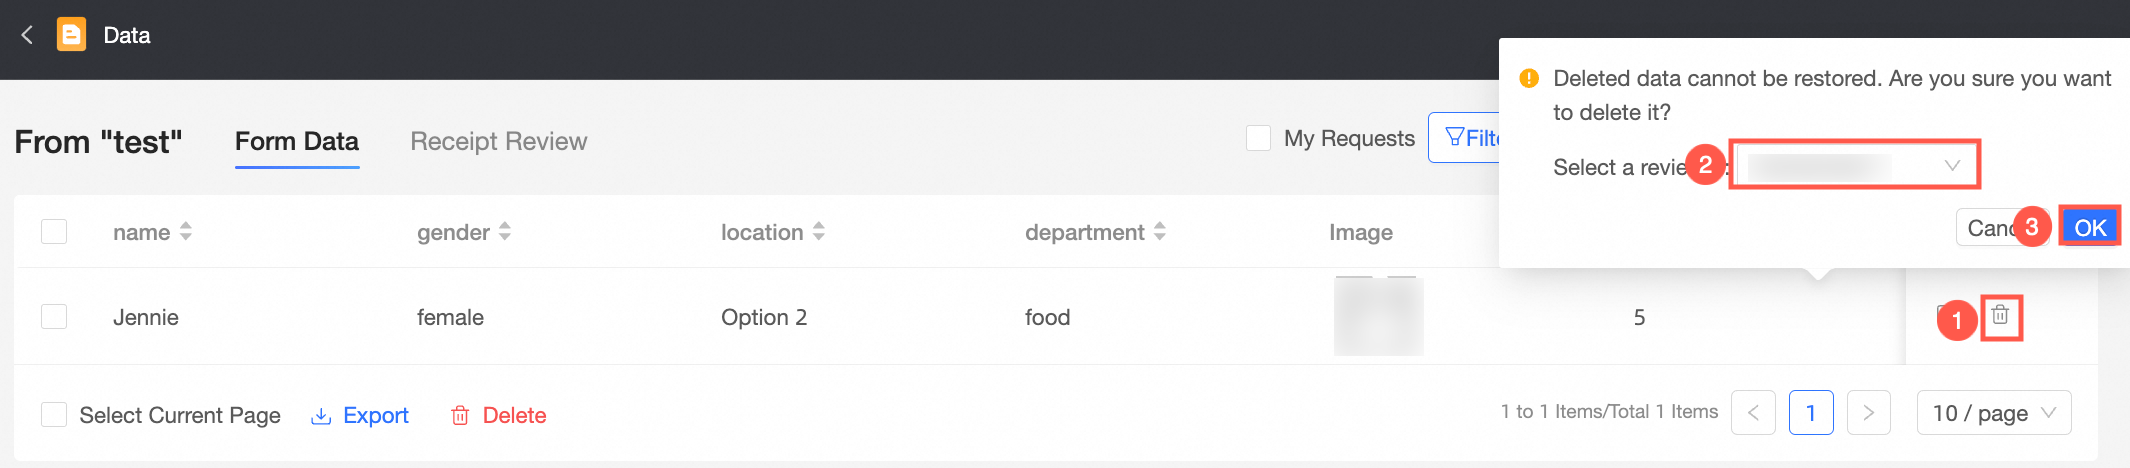
Step 1: Select the corresponding data in the form data, and click the icon in the ![]() Actions column to delete the data.
Actions column to delete the data.
Step 2: The Approval dialog box appears. Select an approver from the Select a reviewer drop-down list and click OK.
3. Process approval
The Data Management page contains two tabs: Form Data and Receipt Review You can click Select a reviewer to perform operations on the receipt approval information that I submit and the receipt approval information that requires I approved.
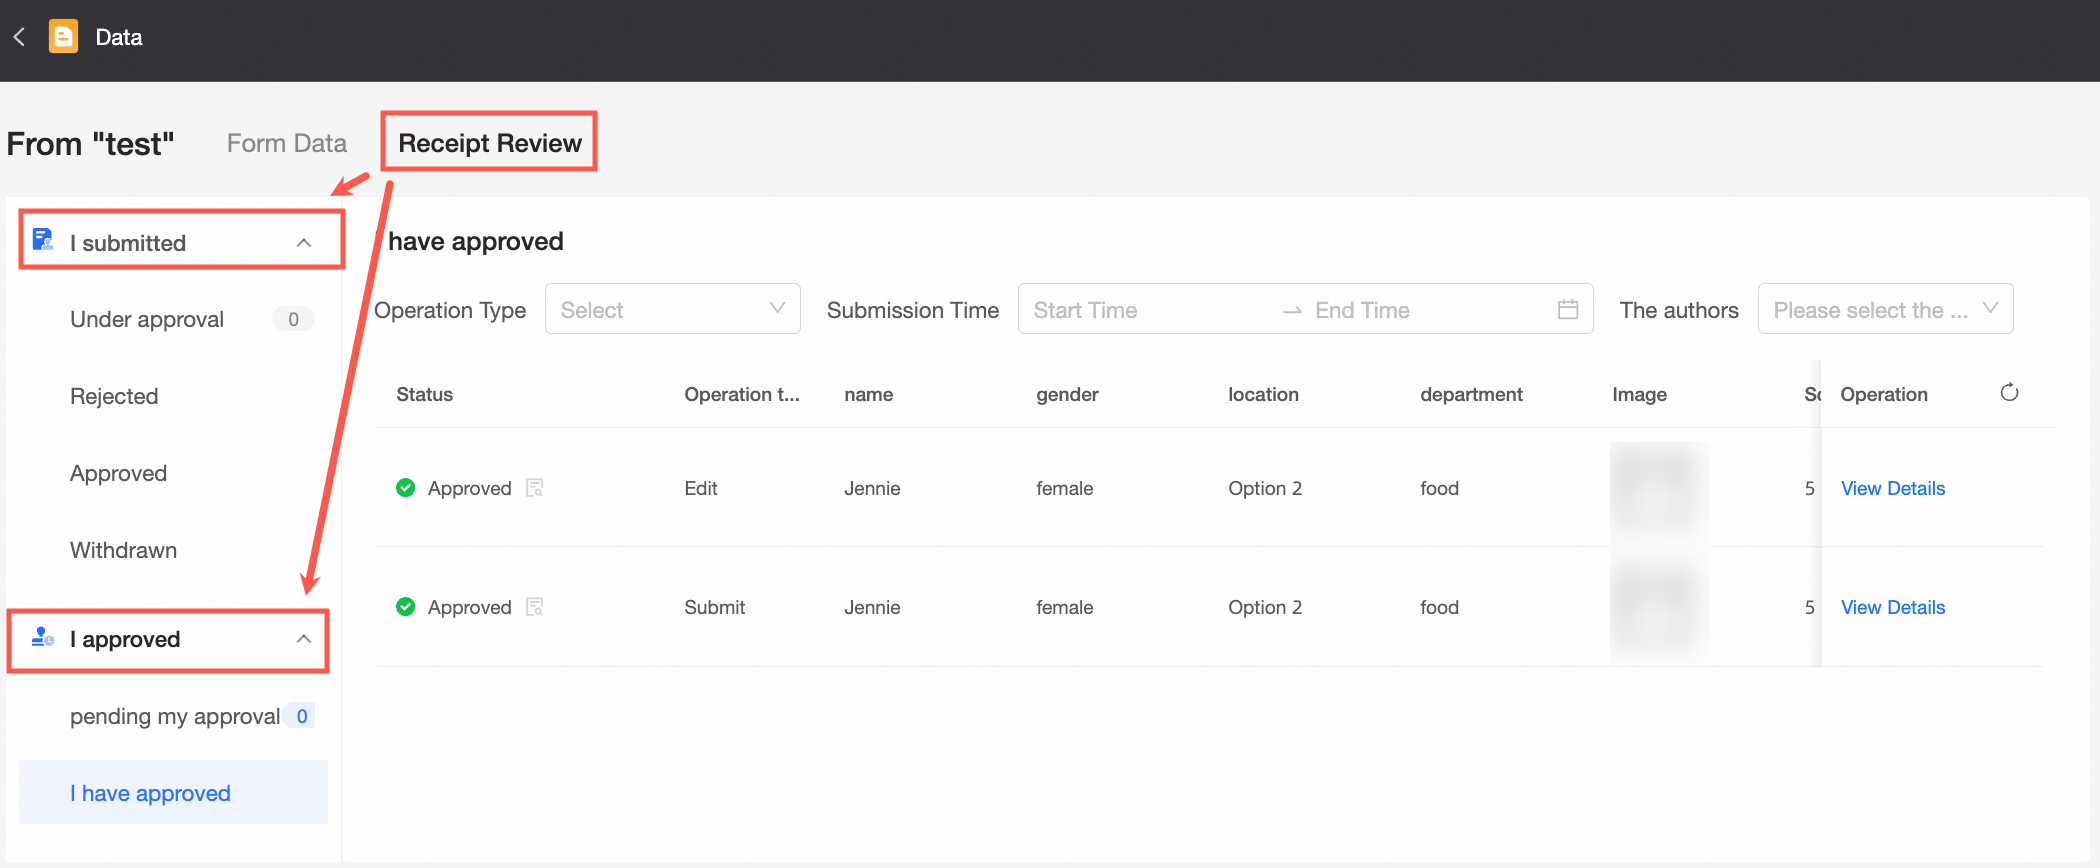
3.1 I submitted
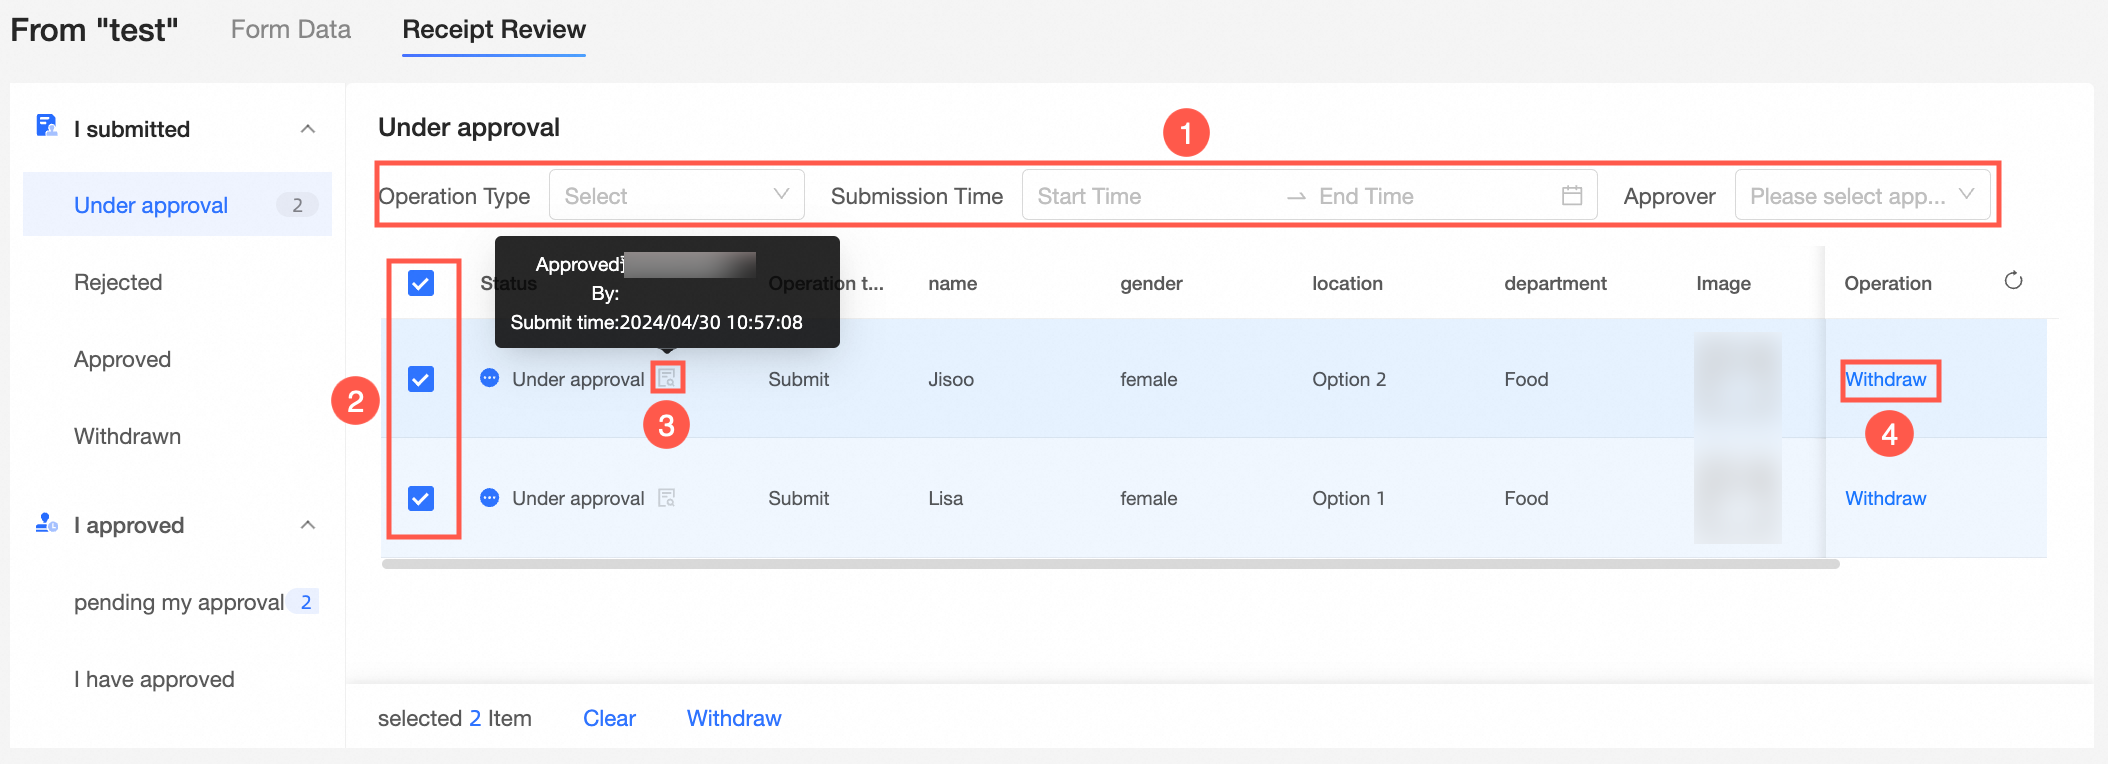
3.1.1 Pending Approval
The Approved page displays a list of forms whose approval status is Pending Receipt Approval.
(1) Top Filter Box: You can filter by Operation Type (Edit, Submit, and Delete), Submission Time, and Approver.
(2) Batch operation: You can select and withdraw multiple approval forms from the list.
(3) Hover approval status display details: Hover the approval status ![]() icon to display the details (approver and submission time).
icon to display the details (approver and submission time).
(4) Withdraw: Click Withdraw in the Actions column to withdraw the approval. You can view the approval on the Withdrawn page.
3.1.2 Rejected
The Rejected page displays a list of forms whose approval status is Rejected Receipt Approval.
(1) Top Filter Box: You can filter by Operation Type (Edit, Submit, and Delete), Submission Time, and Approver.
(2) Approval status hover display details: Move the pointer over the approval status ![]() icon to display the details (approver, approval time, approval comment ).
icon to display the details (approver, approval time, approval comment ).
(③) Re-submit: Click Re-submit in the Actions column to submit the form again after you modify the form based on the comments of the approver.

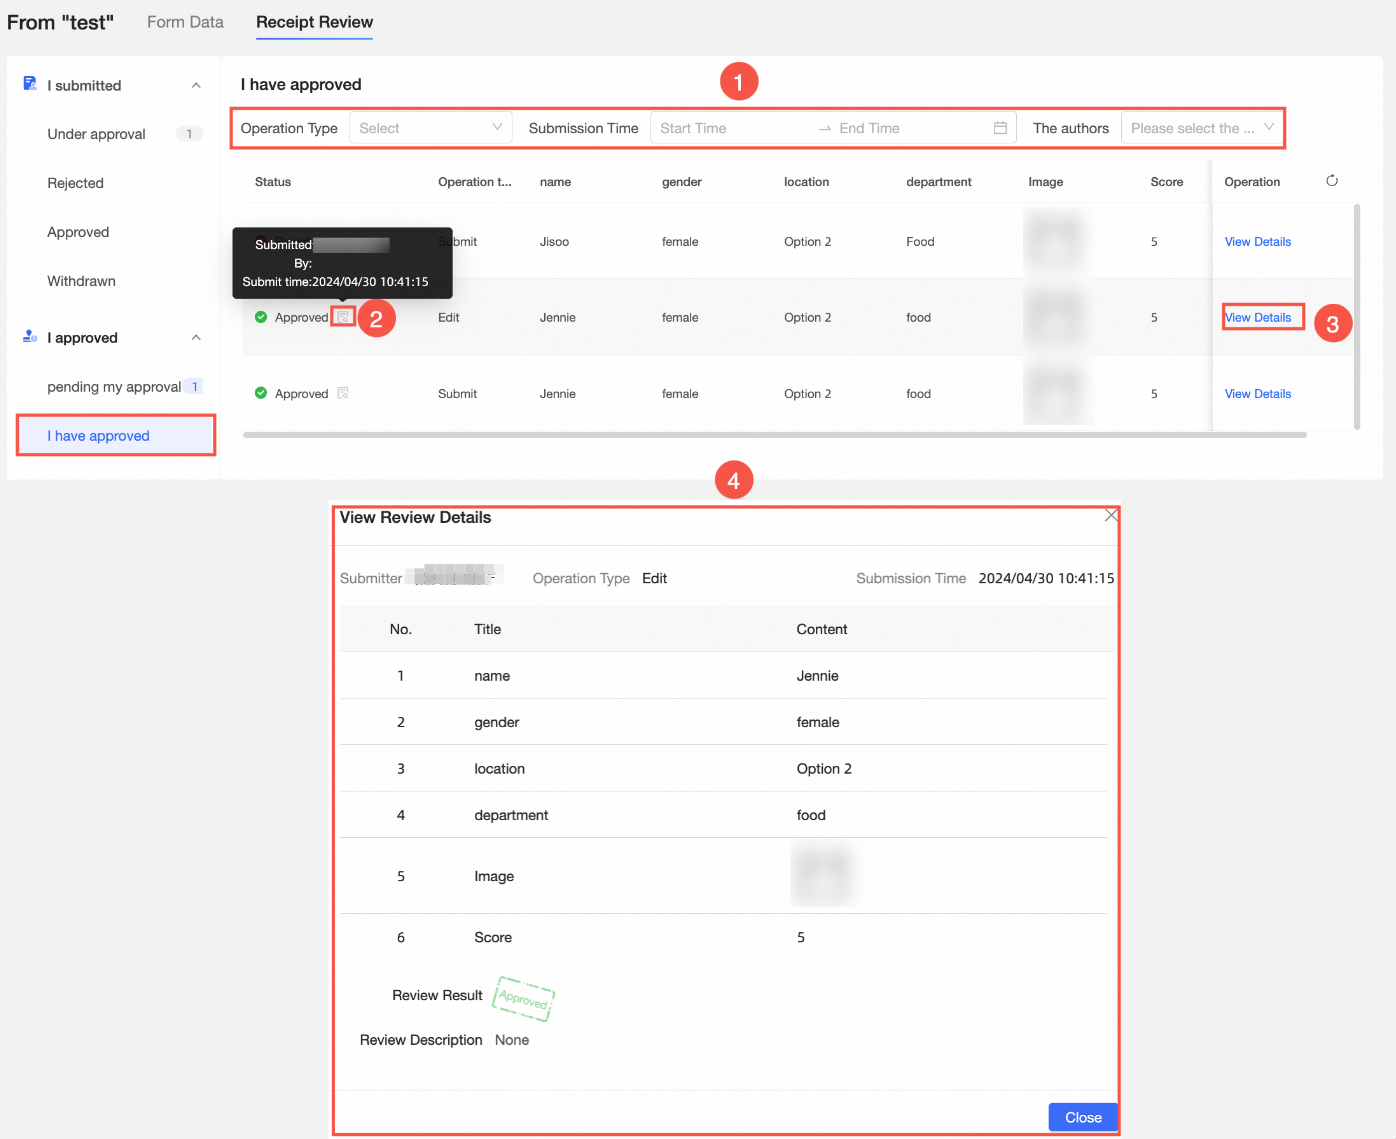
3.1.3 Approved
The Approved page displays a list of forms whose approval status is Approved Receipt Approval.
(1) Top Filter Box: You can filter by Operation Type (Edit, Submit, and Delete), Submission Time, and Approver.
(2) Approval status hover display details: Move the pointer over the approval status ![]() icon to display the details (approver, approval time, approval comment ).
icon to display the details (approver, approval time, approval comment ).
(③) View details: Click View Details in the Actions column. The View Approval Details dialog box appears.
(4) View approval details: A pop-up window displays the information about the approval form, including Submitted by, Operation Type, Submission Time, Form Details, Approval Result, and Approval Remarks.

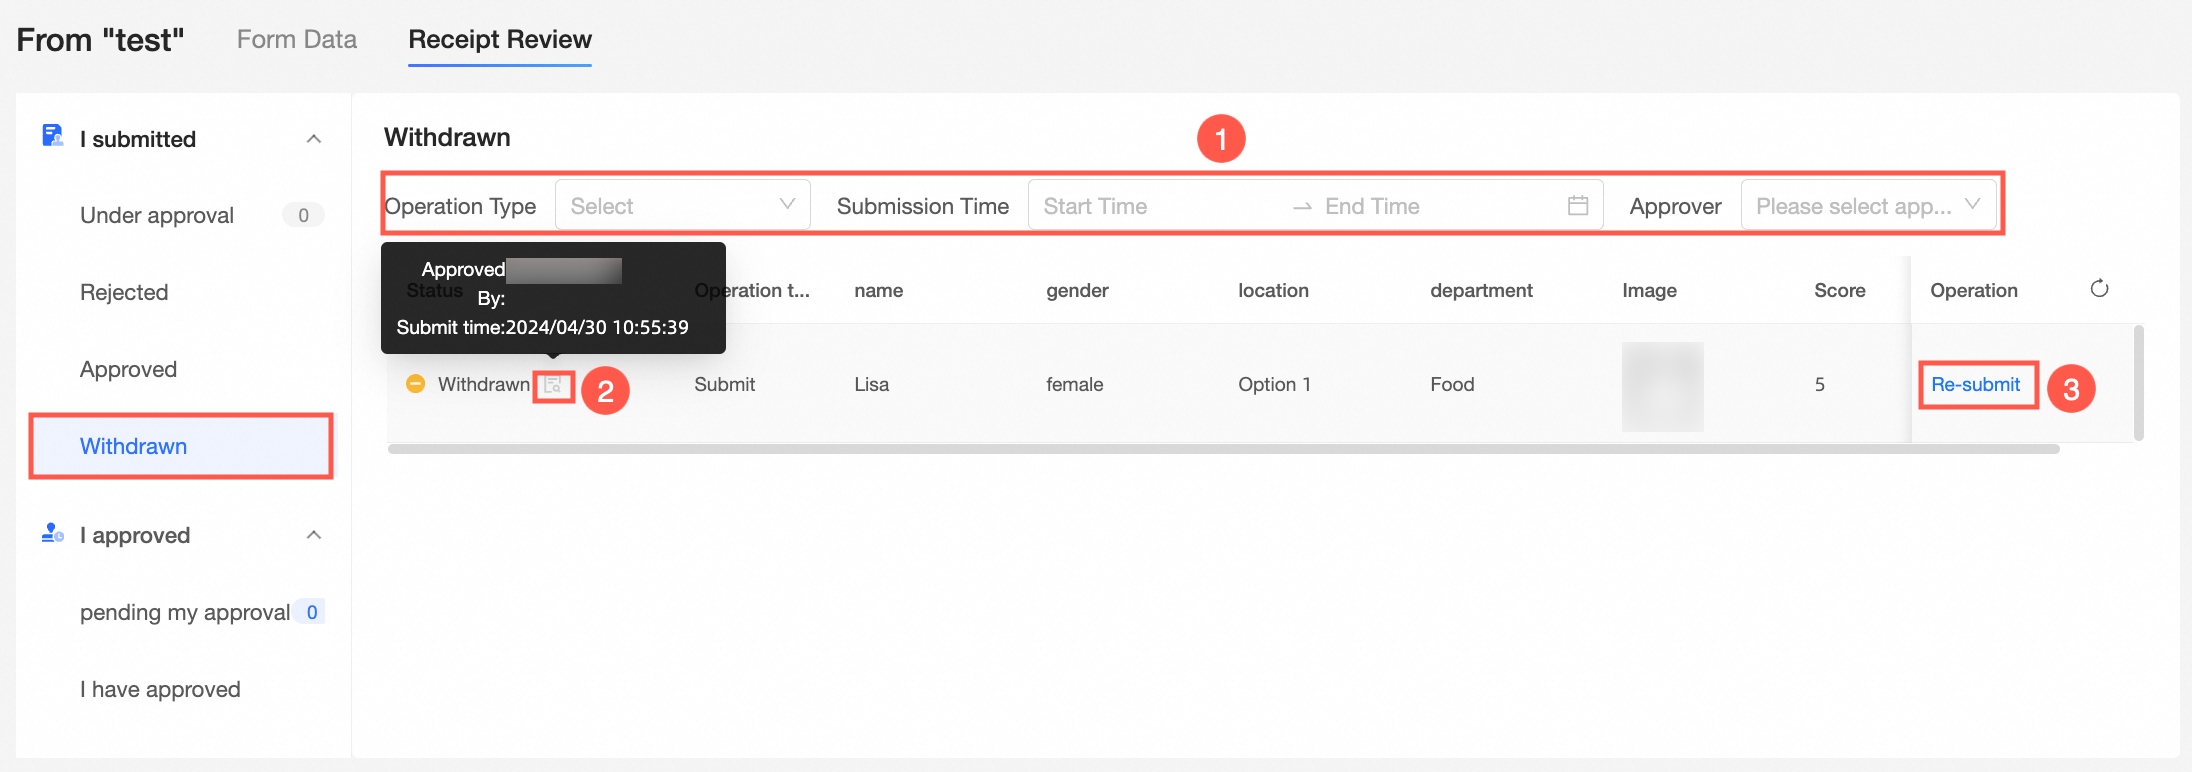
3.1.4 Withdrawn
The Withdrawn page displays a list of forms whose approval status is Withdrawn (Submitted Operation) Receipt Approval.
(1) Top Filter Box: You can filter by Operation Type (Edit, Submit, and Delete), Submission Time, and Approver.
(2) Approval Status Hover Details: Hover the approval status ![]() icon to display the details (Approver and Submission Time ).
icon to display the details (Approver and Submission Time ).
(③) Re-submit: Click Re-submit in the Actions column corresponding to the form.
3.2 I approved
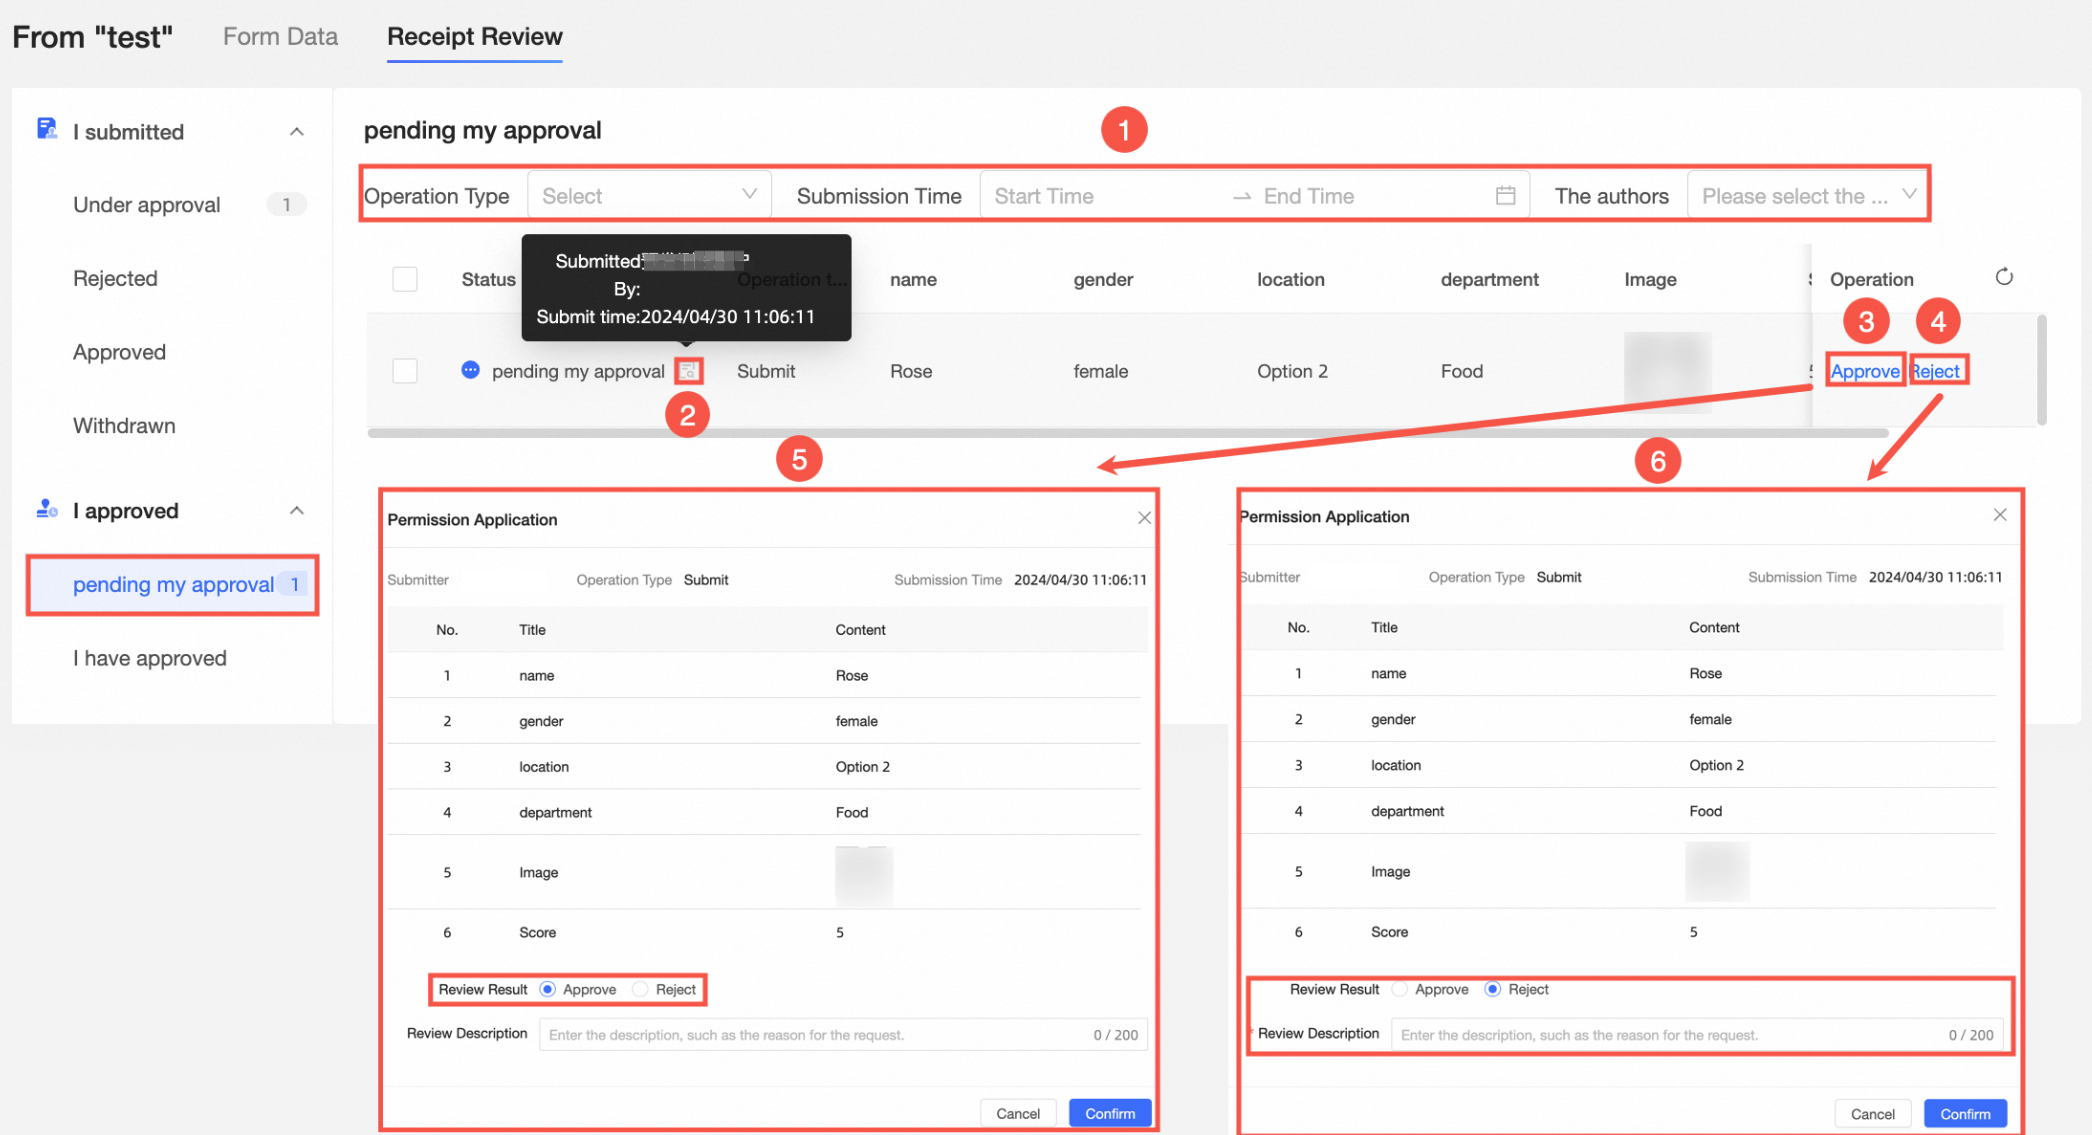
3.2.1 Pending My Approval
The Pending My Approval page displays a list of forms whose approval status is Pending Receipt Approval. Approval is required.
(1) Top Filter: Operation Type (Edit, Submit, and Delete), Submission Time, and Submitted By.
(2) Approval Status Hover Details: Hover the approval status ![]() icon to display the details (Submitted by, Submitted at ).
icon to display the details (Submitted by, Submitted at ).
(③) Approve: Click Approve in the Actions column to view the Approve dialog box. Approve is selected by default.
(⑤) Approval and approval: the pop-up page includes the submitters, operation types, submission time, form details, and approval results and approval remarks. By default, Approve is selected for the approval result. Approval remarks are optional. Then, click OK.
(4) Reject: Click Reject on the right side of the list. The Approval pop-up window appears. By default, Reject is selected.
(⑥) Rejected Approval: A pop-up window displays the information about the approved form, including the submitter, operation type, submission time, form details, approval result, and Approval Remarks. By default, Approve is selected for the approval result. Approval remarks are required. Click OK.
3.2.2 I Approved
The My Approval page displays a list of forms whose approval status is Approved or Rejected.
(1) Top Filter: Operation Type (Edit, Submit, and Delete), Submission Time, and Submitted By.
(2) Approval Status Hover Details: Hover the approval status ![]() icon to display the details (Submitted by, Submitted at ).
icon to display the details (Submitted by, Submitted at ).
(③) View details: Click View Details in the Actions column. The View Approval Details dialog box appears.
(4) View approval details: A pop-up window displays the information about the approval form, including Submitted by, Operation Type, Submission Time, Form Details, Approval Result, and Approval Remarks.