PolarDB for Xscale supports connections through Data Management (DMS), MySQL command line, third-party clients, and third-party program code that complies with the official MySQL interaction protocol.
Choose your connection method based on your goal:
Testing connectivity or running quick queries — MySQL command line
Managing data with a GUI — Data Management Service (DMS) or a third-party client
Connecting from an application — Java, Python, or Go
Prerequisites
Before you begin, ensure that you have:
The instance endpoint and port (see step 1 below)
A database account (create one if you haven't done so)
Your IP address added to the instance whitelist (see step 3 below)
Step 1: Get your endpoint and port
In the PolarDB Distributed Edition console, click the instance ID in Instance List to open the instance page. In Connection Information, copy the endpoint and port.

Select Private Network or Public Network based on your access environment:
Private Network — use this when your Elastic Compute Service (ECS) instance and PolarDB for Xscale are in the same Virtual Private Cloud (VPC). This gives the best performance.
Public Network — use this when connecting from a local environment, or when ECS and PolarDB for Xscale are in different VPCs. Click Request Public Network Address to enable a public endpoint. Public network connections have higher latency than private network connections. Virtual hosts and lightweight servers cannot connect using a private network address.
Step 2: Create a database account
Create a database account for the instance if you haven't done so.
Step 3: Configure the IP whitelist
In the console, go to Configuration And Management > Security Management and add your IP address to the whitelist. For detailed steps, see Set whitelist.

Configure the whitelist based on your network environment:
Environment Action ECS in the same VPC as PolarDB for Xscale Skip this step. The system automatically adds the VPC CIDR block to the default whitelist group. ECS in a different VPC Add the public IP address of ECS, or add the ECS security group to the instance whitelist. Local environment Add your local public IP address to a new IP whitelist group. To find your public IP address:
Linux or macOS: run
curl ifconfig.mein a terminal.Windows: run
curl ip.mein a command prompt.
If your network uses a proxy, the command above may not return your real public IP. In that case, temporarily add the CIDR block
0.0.0.0/0to the whitelist, connect to the instance, runSHOW PROCESSLIST;to get your real IP, add it to the whitelist, then remove0.0.0.0/0.WarningThe CIDR block
0.0.0.0/0allows access from all sources. Only use it temporarily during troubleshooting, then remove it immediately after you identify your real IP.
Use DMS
Data Management Service (DMS) is Alibaba Cloud's graphical data management tool. It integrates data management, structure management, user authorization, security audit, data trend, data tracking, BI chart, performance and optimization, and server management.
In the PolarDB Distributed Edition console, click the instance ID in Instance List, then click Log On To Database in the upper-right corner.

Enter the Database Account and Database Password, then click Log On.
The first time you log on through DMS, the control mode defaults to Flexible Management. To change it later, see Edit instance information and Control modes. Click Test Connection in the lower-left corner to verify credentials before logging on. If the test fails, check the account name and password. DMS automatically tries to add its server address to the instance whitelist. If the automatic addition fails, add it manually.

After logging on, the instance appears under Logged-in Instances in the left navigation pane.

Use a third-party client
PolarDB for Xscale supports the following GUI clients. Download your preferred client from its official website.
MySQL Workbench (recommended)
SQLyog
Sequel Pro
Navicat for MySQL
Third-party clients support basic operations — data insert, update, delete, query, and DDL. Advanced tool-specific features may not be fully supported by PolarDB for Xscale.
The following steps use MySQL Workbench 8.0.29 as an example. Other clients follow a similar process.
Download and install MySQL Workbench.
Open MySQL Workbench and go to Database > Connect to Database.
Enter the connection details and click OK.
Parameter Description Example Hostname The instance endpoint. pxc-xxx.polarx.rds.aliyuncs.comPort The port number. Default: 3306.3306Username The database account. polardb_x_userPassword The database account password. Pass***233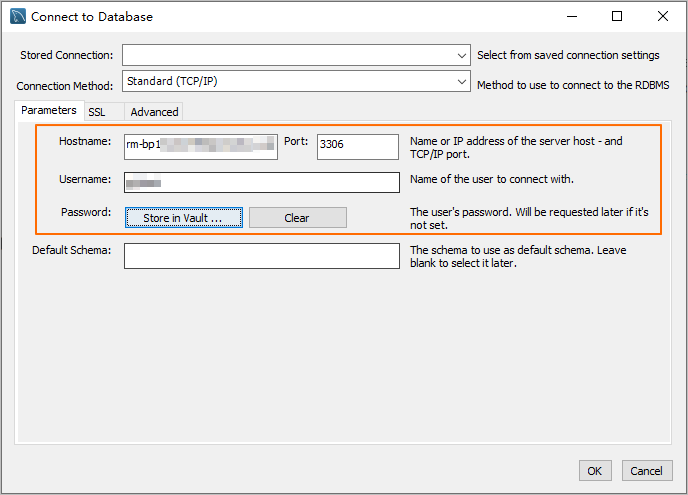
Use the MySQL command line
If the MySQL client is installed on your server, connect directly from the command line.
Syntax:
mysql -h<endpoint> -P<port> -u<username> -p<password> -D<database>Example:
mysql -hpxc-xxx.polarx.rds.aliyuncs.com -P3306 -upolardb_mysql_user -pPass***233 -Dtest_db| Parameter | Description | Example |
|---|---|---|
-h | The instance endpoint. | pxc-xxx.polarx.rds.aliyuncs.com |
-P | The port number. Default: 3306. Can be omitted when using the default port. | 3306 |
-u | The database account. | polardb_x_user |
-p | The database account password. No space between -p and the password. If omitted, you are prompted to enter the password after Enter password:. | Pass***233 |
-D | The database name. Optional. | test_db |
Connect from an application
PolarDB for Xscale uses the same connection interface as MySQL. Replace the endpoint, port, account, and password in your existing MySQL connection code.
Java
This example uses a Maven project with the MySQL JDBC driver (MySQL Connector/J).
Add the MySQL JDBC driver dependency to
pom.xml:<dependency> <groupId>mysql</groupId> <artifactId>mysql-connector-java</artifactId> <version>8.0.27</version> </dependency>Replace
<HOST>,<USER>,<PASSWORD>,<DATABASE>,<YOUR_TABLE_NAME>, and<YOUR_TABLE_COLUMN_NAME>with your actual values:import java.sql.Connection; import java.sql.DriverManager; import java.sql.ResultSet; import java.sql.Statement; public class DatabaseConnection { public DatabaseConnection() { } public static void main(String[] args) { // PolarDB instance connection address, port, and database name to connect to String url = "jdbc:mysql://<HOST>:3306/<DATABASE>?useSSL=false&serverTimezone=UTC"; // Database account String user = "<USER>"; // Password of the database account String password = "<PASSWORD>"; try { Class.forName("com.mysql.cj.jdbc.Driver"); Connection conn = DriverManager.getConnection(url, user, password); Statement stmt = conn.createStatement(); // Name of the data table to retrieve ResultSet rs = stmt.executeQuery("SELECT * FROM `<YOUR_TABLE_NAME>`"); while(rs.next()) { // Name of the column in the data table to retrieve System.out.println(rs.getString("<YOUR_TABLE_COLUMN_NAME>")); } rs.close(); stmt.close(); conn.close(); } catch (Exception var7) { var7.printStackTrace(); } } }
Python
This example uses Python 3 with the PyMySQL library.
Install PyMySQL:
pip3 install PyMySQLReplace
<HOST>,<USER>,<PASSWORD>,<DATABASE>, and<YOUR_TABLE_NAME>with your actual values:import pymysql # Database connection parameters host = '<HOST>' # PolarDB instance connection address port = 3306 # Default port 3306 user = '<USER>' # Database account password = '<PASSWORD>' # Password of the database account database = '<DATABASE>' # Database name to connect to try: # Create a database connection connection = pymysql.connect( host=host, port=port, user=user, passwd=password, db=database ) # Obtain the operation cursor with connection.cursor() as cursor: # Execute SQL query sql = "SELECT * FROM `<YOUR_TABLE_NAME>`" # Name of the data table to retrieve cursor.execute(sql) # Obtain query results results = cursor.fetchall() for row in results: print(row) finally: # Close the database connection if 'connection' in locals() and connection.open: connection.close()
Go
This example uses Go 1.23.0 with the database/sql package and the go-sql-driver/mysql driver.
Install the MySQL driver:
go get -u github.com/go-sql-driver/mysqlReplace
<HOST>,<USER>,<PASSWORD>,<DATABASE>, and<YOUR_TABLE_NAME>with your actual values:package main import ( "database/sql" "fmt" "log" _ "github.com/go-sql-driver/mysql" ) func main() { // Database connection parameters dbHost := "<HOST>" // PolarDB instance connection address dbPort := "3306" // Default port 3306 dbUser := "<USER>" // Database account dbPass := "<PASSWORD>" // Password of the database account dbName := "<DATABASE>" // Database name to connect to // Construct DSN (Data Source Name) dsn := fmt.Sprintf("%s:%s@tcp(%s:%s)/%s?charset=utf8mb4&parseTime=True&loc=Local", dbUser, dbPass, dbHost, dbPort, dbName) // Open the database connection db, err := sql.Open("mysql", dsn) if err != nil { log.Fatalf("Failed to connect to database: %v", err) } defer db.Close() // Test the connection err = db.Ping() if err != nil { log.Fatalf("Failed to ping database: %v", err) } // Create an operation cursor var result string err = db.QueryRow("SELECT VERSION()").Scan(&result) if err != nil { log.Fatalf("Failed to execute query: %v", err) } // Output the database version fmt.Printf("Connected to database, version: %s\n", result) // Execute SQL query rows, err := db.Query("SELECT * FROM `<YOUR_TABLE_NAME>`") // Name of the data table to retrieve if err != nil { log.Fatalf("Failed to execute query: %v", err) } defer rows.Close() // Process query results for rows.Next() { var id int var name string if err := rows.Scan(&id, &name); err != nil { log.Fatalf("Failed to scan row: %v", err) } fmt.Printf("ID: %d, Name: %s\n", id, name) } // Check for errors if err := rows.Err(); err != nil { log.Fatalf("Error during iteration: %v", err) } }
Timeout best practices
Troubleshooting
Local environment cannot connect to the instance
Work through the following checks in order:
Verify the instance status is Running in the console.
Confirm you are using the Public Network endpoint, not the private network endpoint. Copy it from Basic Information > Connection Information.
Confirm the port, account, and password are correct.
Test network connectivity from your local environment:
ping <endpoint> telnet <endpoint> <port>Verify your local public IP address has been added to the instance whitelist. To find your public IP: If your network uses a proxy, the command may not return your real public IP. Temporarily add
0.0.0.0/0to the whitelist, connect, runSHOW PROCESSLIST;to get your real IP, add it to the whitelist, then remove0.0.0.0/0.Linux or macOS: run
curl ifconfig.me.Windows: run
curl ip.me.
Error:Access denied for user 'xxx'@'xxx' (using password: YES)
Error:Unknown MySQL server host 'xxx'
Error:Can't connect to MySQL server on 'xxx'orConnection timed out
Your current IP address is not in the instance whitelist, or the IP address you added contains a typo. To find your public IP address:
Linux or macOS: run
curl ifconfig.me.Windows: run
curl ip.me.
If your network uses a proxy, the command may not return your real public IP. Temporarily add 0.0.0.0/0 to the whitelist, connect, run SHOW PROCESSLIST; to get your real IP, add it to the whitelist, then remove 0.0.0.0/0.