PolarDB Supabase uses the Model Context Protocol (MCP) to provide AI-native Integrated Development Environments (IDEs), such as Qoder, Cursor, or Bolt.diy, with real-time database metadata, standard data operation interfaces, and out-of-the-box authentication capabilities. This enables AI to generate precise code that matches the backend data structure, significantly improving the development efficiency of full-stack applications.
Business scenario
VibeCoding is an AI-driven programming paradigm where developers describe requirements in natural language, and an AI automatically develops, debugs, deploys, and runs the code. VibeCoding significantly lowers the barrier to programming. It lets non-professional developers build websites and applications through natural language interaction. Although an AI can generate frontend and backend code, it is unaware of an application's actual backend environment. This includes the database table schema, field names, and relationships. As a result, the AI-generated code often contains factual errors that developers must manually check and correct. This process reduces the effectiveness of AI-assisted programming.
PolarDB Supabase, as a general-purpose Backend-as-a-Service (BaaS), effectively bridges the gap between the frontend and backend by providing an MCP Server. This server provides the AI with a complete, real-time backend context. This approach creates a more efficient paradigm for full-stack development and significantly boosts AI performance when creating integrated full-stack applications.
Solution architecture
The core of this solution is to use the Model Context Protocol (MCP) as a bridge to connect PolarDB Supabase, a BaaS, with an AI-native IDE, such as Qoder.

Core components
PolarDB Supabase: Provides enterprise-level backend services, including a PostgreSQL database, authentication, storage, and auto-generated APIs. It acts as the central hub for storing and managing all business data.
MCP Server: A middleware service that connects to the PolarDB Supabase database. It securely extracts and exposes database metadata, such as tables, columns, types, and constraints, without exposing any business data.
AI-native IDE (such as Qoder): The developer's primary work interface. Its integrated AI client connects to the MCP Server to retrieve real-time database schema context. The client then provides this context to a large language model to guide code generation.
Workflow
A developer issues a development instruction in natural language within an AI-native IDE, such as Qoder, for example, "Create a page to display a task list."
The AI-native IDE client sends a request to the MCP Server to retrieve the database schema.
The MCP Server queries the relevant table schema and metadata from the system catalog (
information_schema) of PolarDB Supabase. This process works even if no data tables exist when the project is initialized.The MCP Server returns the structured schema information to the AI-native IDE.
The AI-native IDE submits the developer's instruction and the retrieved schema context to the large language model.
Based on the precise context, the large language model generates corresponding Data Definition Language (DDL) statements and applies the changes to the database through Supabase. It also generates frontend and backend interaction code that matches the table schema, using the correct table name
todosand field namestaskandis_done.The generated code is rendered in the IDE for the developer to use or fine-tune.
Procedure
The following steps guide you through configuring an AI-native development environment and building a test application using natural language.
Step 1: Create a PolarDB Supabase application
Log on to the PolarDB console. In a PolarDB cluster, create a Supabase application and log on to its console. For more information, see Quickly get started with PolarDB Supabase.
Add the IP address of your business environment to the application whitelist.
After the application is created, click the application ID to open the application management page. Record the following key information:
Public endpoint: On the Topology tab, you can obtain the public endpoint. If you are creating an application for the first time, you must first request an endpoint. The format is
http://<Public IP>:8000.Key information: On the Configuration tab, record the values of the following keys:
secret.jwt.anonKey,secret.jwt.serviceKey,secret.dashboard.username, andsecret.dashboard.password.
Step 2: Download and install an AI-native IDE
This example uses Qoder. Download and install the client for your operating system.
Step 3: Obtain and build the MCP service
Download the PolarDB Supabase MCP Server code. Run the following commands in your business environment to clone and build the project.
NoteMake sure your business environment meets the requirements for the PolarDB Supabase MCP Server code.
# 1. Clone the project repository
git clone https://github.com/ApsaraDB/PolarDB-Supabase-MCP-Server.git

# 2. Go to the project directory
cd PolarDB-Supabase-MCP-Server

# 3. Package manager. We recommend pnpm.
npm install -g pnpm

# 4. Install dependencies
pnpm install

# 5. Build the project
pnpm build
Record the absolute path of the
stdio.jsfile:# After execution, the stdio.js file should be displayed. Record its absolute path for later configuration. ls packages/mcp-server-supabase/dist/transports/
Step 4: Configure the MCP service in the AI-native IDE
This example uses Qoder in a macOS environment. In the top navigation bar, choose . Click the Add button to create a new MCP service configuration. Complete the configuration fields as shown in the example below. Replace the <...> placeholders with your actual information.
{
    "mcpServers": {
        "polardb-supabase": {
          "command": "node",
          "args": [
            "<Absolute path to the stdio.js file built in Step 3>",
            "--api-url",
            "<Your Supabase public endpoint>",
            "--service-role-key",
            "<Your Supabase secret.jwt.serviceKey>",
            "--anon-key",
            "<Your Supabase secret.jwt.anonKey>",
            "--dashboard-username",
            "<Your Supabase secret.dashboard.username>",
            "--dashboard-password",
            "<Your Supabase secret.dashboard.password>",
            "--project-ref",
            "default"
          ]
        }
    }
}
Example
{
    "mcpServers": {
        "polardb-supabase": {
          "command": "node",
          "args": [
            "/your/path/to/PolarDB-Supabase-MCP-Server/packages/mcp-server-supabase/dist/transports/stdio.js",
            "--api-url",
            "http://8.xxx.xxx.xxx:8080",
            "--service-role-key",
            "eyJ0eXAiOiJKV1QiLCJxxx",
            "--anon-key",
            "eyJ0eXAiOiJKV1QiLCJxxx",
            "--dashboard-username",
            "supabasexxx",
            "--dashboard-password",
            "rMa1rc9rxxx",
            "--project-ref",
            "default"
          ]
        }
    }
}
Step 5: Start full-stack development
After you complete the configuration, start developing your application by interacting with the AI-native IDE in natural language. This example uses Qoder.
Open a new chat window in Qoder.
Enter your first prompt to describe the application you want to create. The AI uses the context from the MCP service to generate the complete code, including frontend and backend logic, and initializes the table schema.
Example: Help me build a to-do list application based on React and Supabase. No logon or access control is needed.
Based on the generated result, continue the interaction with additional prompts until all features and requirements are met.
Demonstration
Enter the prompt: "Help me build a to-do list application based on React and Supabase. No logon or access control is needed."
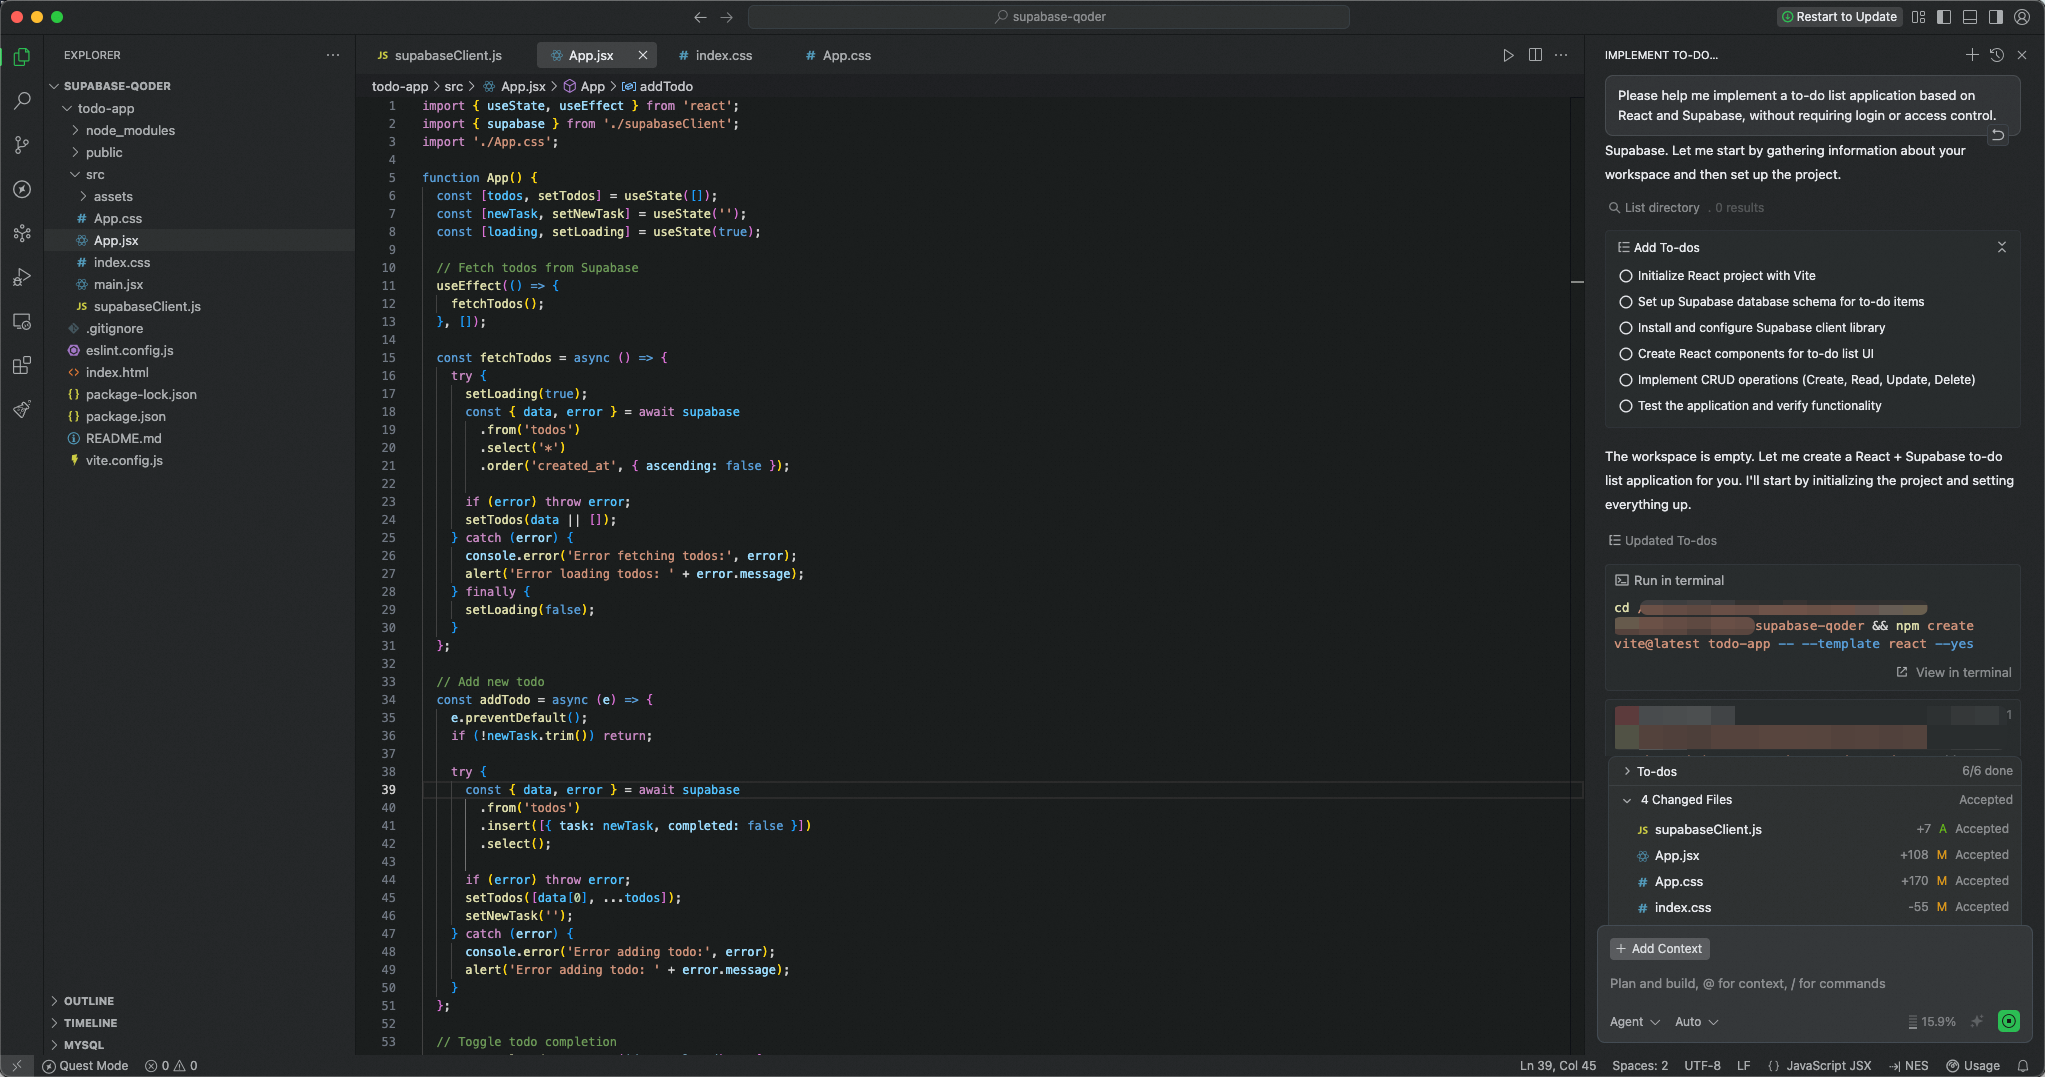
Wait for the code and table schema to be automatically generated. When complete, click Preview to see the result.

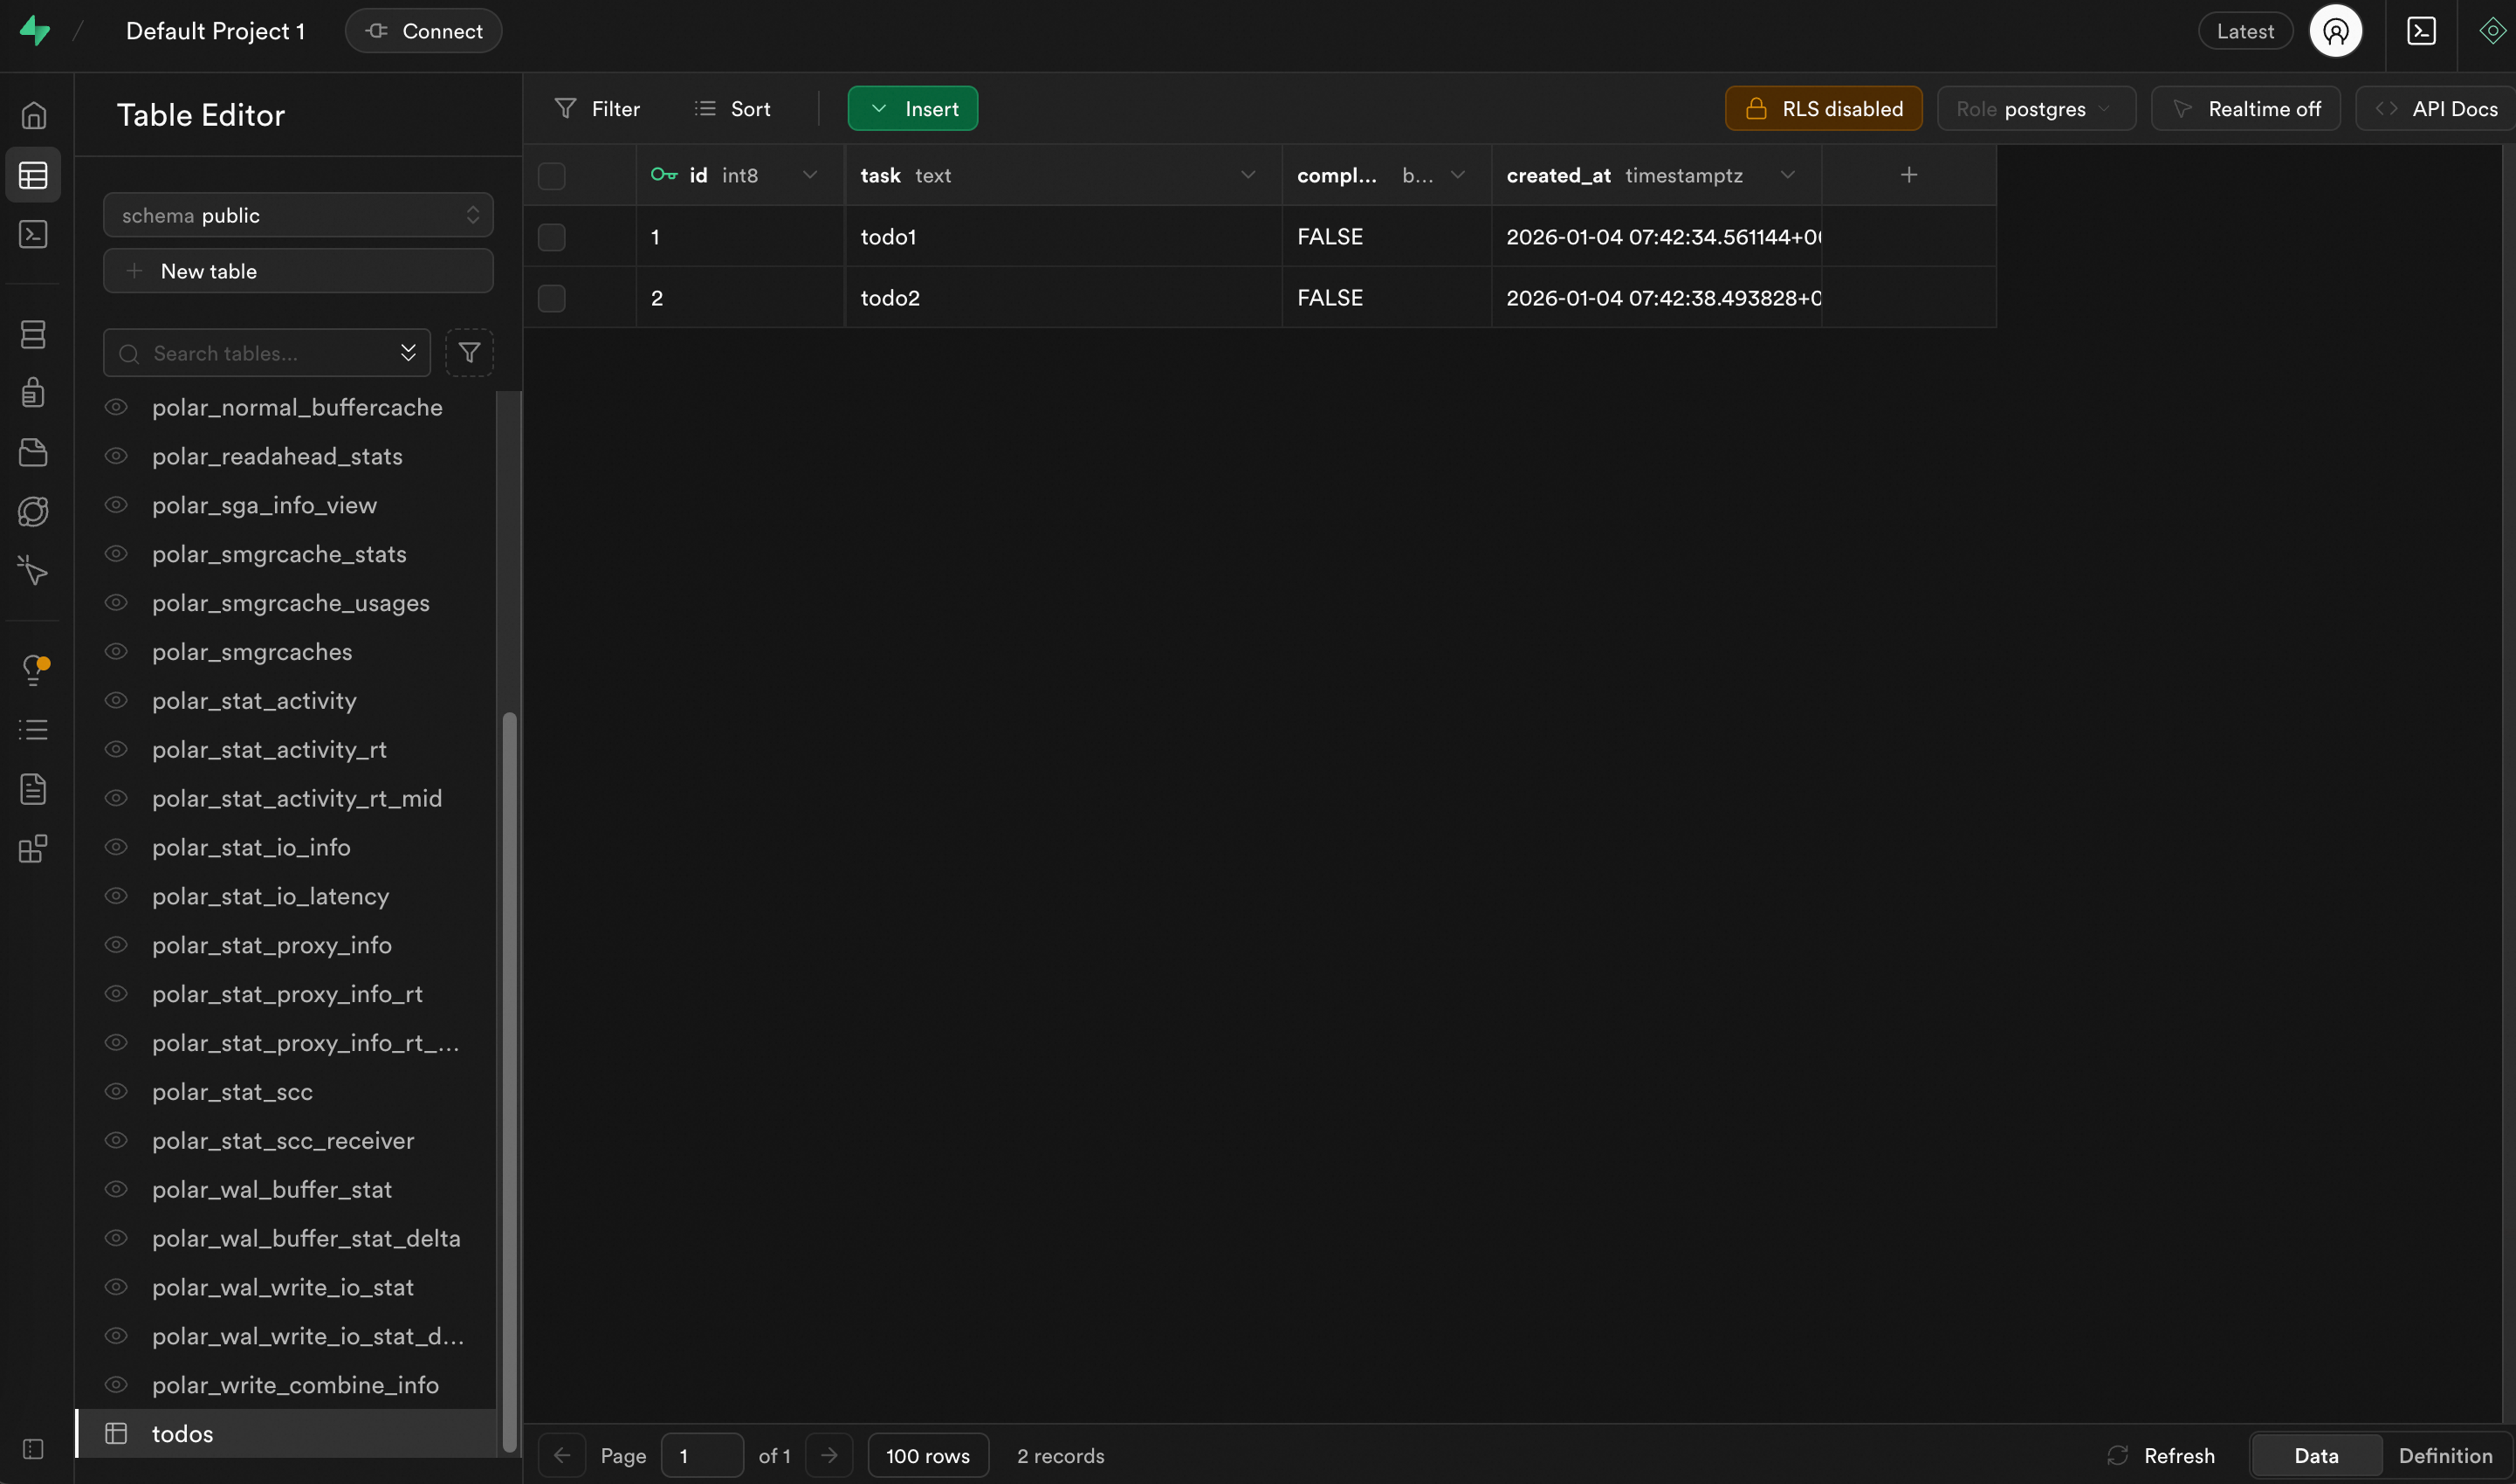
Log on to the Supabase application to verify the tables and data in the PolarDB cluster.
Conclusion
This solution integrates PolarDB Supabase with the MCP protocol to build a context-aware AI development workflow. It provides AI programming tools with the precise backend database structure. This allows them to automatically generate accurate, runnable application code and reduces the manual work of correcting AI-generated code.
Although this guide uses Qoder and React as examples, the architecture is based on the standard MCP protocol and can be extended to other compatible IDEs and development frameworks.