After you create a serverless cluster, configure a resource scaling policy to control how the cluster scales up and down. Use lifecycle policies to pre-provision resources before predictable peak periods—such as promotions or traffic spikes—and scale back during off-peak hours to release idle resources.
Limitations
The following features are not supported on serverless clusters:
-
Manually scaling up or down storage capacity (Enterprise Edition)
-
Manually scaling down storage capacity (Standard Edition)
Global Database Network (GDN) is supported, but with the following limits:
-
Automatic start and stop cannot be enabled on all serverless clusters in a GDN.
-
Each serverless cluster in the GDN must have at least one read-only node if the cluster runs:
-
PolarDB for MySQL 8.0.1 with revision version 8.0.1.1.42 or later
-
PolarDB for MySQL 8.0.2 with revision version 8.0.2.2.23 or later
-
The following operations are supported: add or remove read-only nodes, manually upgrade or downgrade a PolarDB cluster, perform a temporary cluster upgrade, and perform auto scaling for clusters that do not support serverless.
The In-Memory Column Index (IMCI) feature is supported for serverless clusters with at least one read-only node. Before adding read-only column store nodes, set Minimum Read-only Nodes to 1.
Usage notes
-
The maximum number of connections to a serverless cluster is 100,000, and the maximum IOPS is 84,000.
-
PolarDB Capacity Unit (PCU) is the billing and scaling unit for serverless clusters. One PCU equals approximately 1 CPU core and 2 GB of memory. Each node's PCU count scales dynamically within the configured range, with a minimum granularity of 0.5 PCUs.
How scaling works
PolarDB monitors the CPU utilization, memory usage, and other kernel metrics of the primary node and read-only nodes. Scale-up and scale-out are triggered when thresholds are exceeded; scale-down occurs when utilization drops below thresholds for a sustained period.
Scale-up and scale-out triggers
Scale-up (vertical scaling of a single node) is triggered during a monitoring cycle when any of the following conditions are met:
-
CPU utilization of a node exceeds the scale-up threshold (default: 80%, or a custom value).
-
Memory usage of a node exceeds 90%.
-
The read-only node's specifications are less than half the primary node's specifications. For example, if a read-only node is at 4 PCUs and the primary node is at 10 PCUs, the read-only node scales up to at least 5 PCUs.
Scale-out (adding read-only nodes) is triggered when a read-only node has already scaled up to its maximum specifications and CPU utilization still exceeds the scale-up threshold.
Scale-down triggers
Scale-down is triggered when CPU utilization drops below the scale-down threshold (default: 50%, or a custom value) and memory usage drops below 80%.
The metrics that trigger scaling vary based on cluster parameter configurations and serverless settings. You can customize CPU scaling thresholds; thresholds for other metrics are fixed.
When workloads spike suddenly, nodes scale up step by step rather than jumping to the target specifications in one step. The minimum step size is 0.5 PCUs; subsequent steps increase based on the current PCU count to catch up with demand.
Set alert rules in Performance Monitoring in the PolarDB console to receive notifications when scale-down is triggered. For details, see Create an alert rule.
Configure serverless parameters
-
Log on to the PolarDB console.
-
In the left-side navigation pane, click Clusters.
-
In the upper-left corner, select a region.
-
Click the cluster ID to go to the Basic Information page.
-
In the Database Nodes section, click Serverless Configuration.

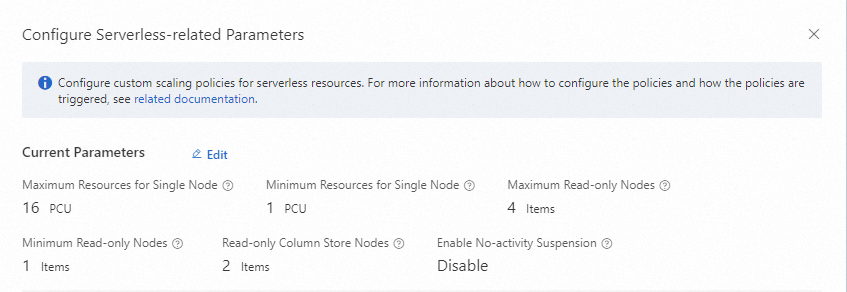
Configure current parameters
In the Configure Serverless-related Parameters dialog box, click Edit to the right of Current Parameters.
Node resource range
| Parameter | Description | Valid values |
|---|---|---|
| Minimum Resources for Single Node | The minimum PCUs per node. Each node scales down to this floor when idle. | 0.25–32 PCUs |
| Maximum Resources for Single Node | The maximum PCUs per node. Each node cannot exceed this ceiling under any workload. | 1–32 PCUs |
Choosing your minimum PCU value
A lower minimum reduces idle costs but can slow down scale-up when workloads spike suddenly, because PolarDB scales up proportionally from the current PCU count. Consider a higher minimum if:
-
Your workloads spike unpredictably and low latency at burst onset is critical.
-
Your application benefits from a warm buffer cache, which requires enough memory at all times.
If you are migrating from a fixed-spec instance, use the memory ratio as a reference: one PCU equals approximately 2 GB of memory. For example, if your previous instance had 8 GB of memory, start with a minimum of 4 PCUs.
Choosing your maximum PCU value
A higher maximum allows the cluster to handle larger workloads but increases the cost ceiling. Consider the following:
-
Review your historical peak CPU and memory utilization to estimate the upper bound.
-
If spikes consistently reach your current maximum, increase it.
-
Monitor usage after deployment using Performance Monitoring and adjust based on observed peaks.
If Minimum Resources for Single Node is 2 PCUs and Maximum Resources for Single Node is 16 PCUs, the node defaults to 2 PCUs (2 CPU cores, 4 GB memory) and can scale up to 16 PCUs (16 CPU cores, 32 GB memory) under load.
Read-only node range
| Parameter | Description | Valid values |
|---|---|---|
| Minimum Read-only Nodes | The minimum number of read-only nodes maintained at all times. | 0–15 |
| Maximum Read-only Nodes | The maximum number of read-only nodes that can be added by scale-out. | 0–15 |
| Read-only Column Store Nodes | The maximum number of read-only column store nodes that can be added (for IMCI). | 0–15 |
The number of read-only nodes scales automatically within the configured range. For trigger conditions, see Scale-up and scale-out triggers.
Set Minimum Read-only Nodes to 1 to maintain high availability.
Before adding read-only column store nodes, set Minimum Read-only Nodes to at least 1. For more information, see IMCIs.
No-activity suspension
When enabled, the cluster automatically suspends if no service connects within the detection period. Storage charges still apply during suspension; the cluster restarts immediately when a connection is made.
Automatic start and stop cannot be enabled on all serverless clusters in a GDN simultaneously. If your cluster belongs to a GDN, verify this constraint before enabling no-activity suspension.
| Parameter | Description | Valid values |
|---|---|---|
| Enable No-activity Suspension | Automatically suspends the cluster after the configured inactivity period. | Enabled / Disabled |
| Detection Period for No-activity Suspension | The inactivity duration before the cluster suspends. | A multiple of 5 minutes, from 5 minutes to 24 hours |
Advanced settings
| Parameter | Description | Valid values |
|---|---|---|
| Scan Interval | In Sensitive mode, the cluster detects and responds to workload changes faster, reducing the observation window and execution period. Use Sensitive for workloads with instantaneous load fluctuations such as CPU spikes. Sensitive mode triggers scaling more frequently. | Standard / Sensitive |
| Maximum CPU Resources for Elastic Upgrade | The CPU utilization threshold that triggers scale-up. | 40%–100% |
| Minimum CPU Resources for Elastic Upgrade | The CPU utilization threshold that triggers scale-down. | 10%–70% |
The maximum CPU threshold must be equal to or higher than the minimum CPU threshold, and the difference between them must be at least 30 PCUs.
Set a lifecycle policy
Create a lifecycle policy to automatically adjust serverless parameters at specified times—daily, weekly, or monthly. This lets you pre-provision resources before peak periods and scale back afterwards without manual intervention.
-
Deleting a recurring policy does not cancel the task currently running under that policy. Only tasks that have not yet started are removed.
-
If you disable the serverless feature, all recurring policies and scheduled tasks are deleted.
Create a lifecycle policy
-
In the Configure Serverless-related Parameters dialog box, click + Add Lifecycle Policy.
-
Set the following parameters:
| Parameter | Description | Valid values |
|---|---|---|
| Maximum Resources for Single Node | Maximum PCUs during the policy's active period. | 1–32 |
| Minimum Resources for Single Node | Minimum PCUs during the policy's active period. Must be less than or equal to Maximum Resources for Single Node. | 1–32 |
| Maximum Read-only Nodes | Maximum read-only nodes during the active period. | 0–15 |
| Minimum Read-Only Nodes | Minimum read-only nodes during the active period. Must be less than or equal to Maximum Read-only Nodes. | 0–15 |
| Read-only Column Store Nodes | Maximum read-only column store nodes during the active period. | 0–15 |
| Start/End Time | The validity period of the recurring policy. | — |
| Policy Scheduling | How often the policy runs. Options: Month, Weekly, or Daily. For Month, specify counting direction (Positive from the first day or Last from the last day) and the days (comma-separated, for example, 1,3,5). For Weekly, specify the day of the week and time. For Daily, specify the time. |
— |
After a lifecycle policy takes effect, the adjusted parameters remain in place—they are not automatically reverted when the policy period ends. Create a separate lifecycle policy to revert the parameters at the desired time. See the example below for details.
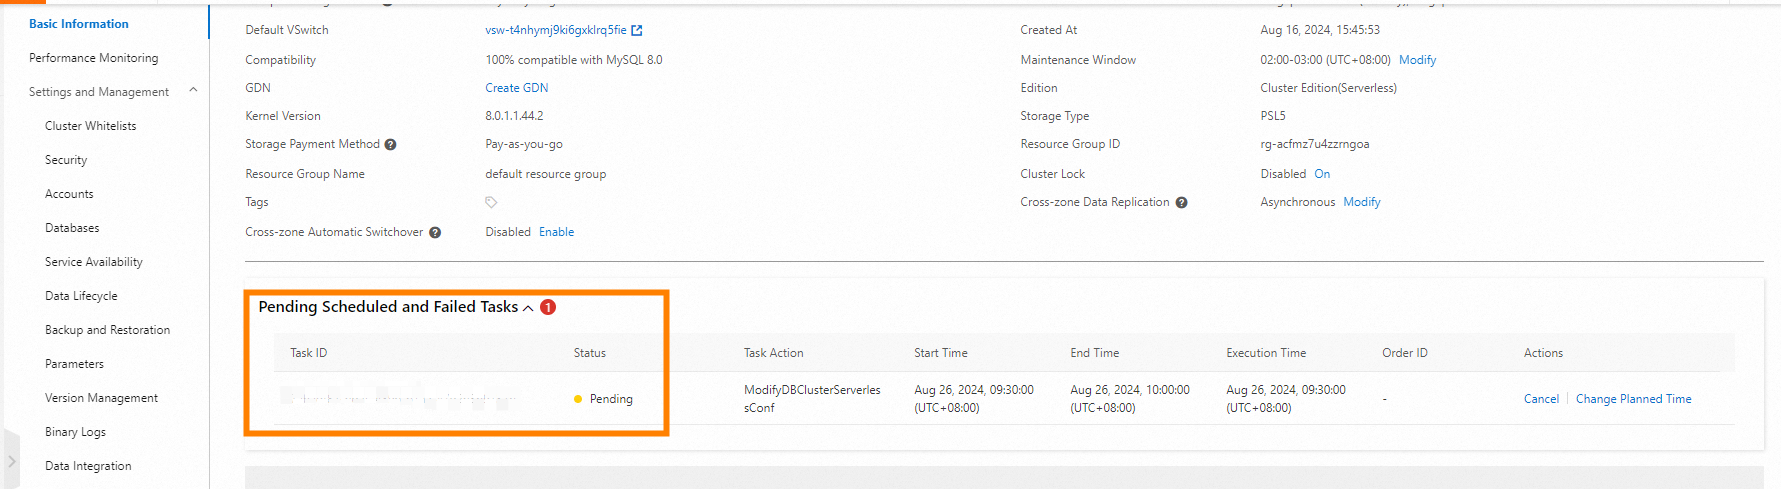
View scheduled tasks
After creating a recurring policy, scheduled tasks are generated automatically. View them using either of the following methods:
-
On the Basic Information page of the cluster, check the Pending Scheduled and Failed Tasks section.
-
In the PolarDB console, go to Task Management > Scheduled Tasks.

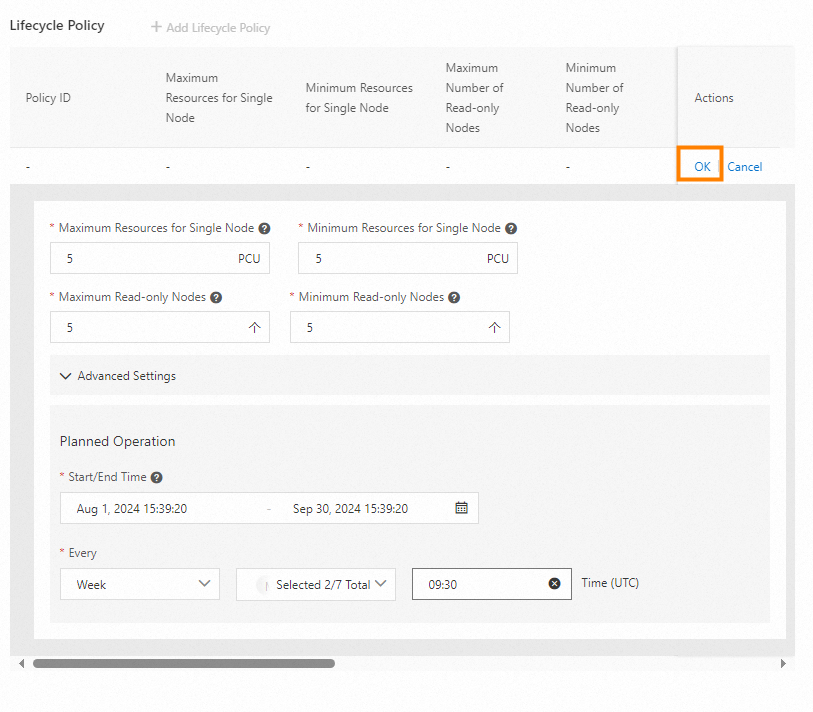
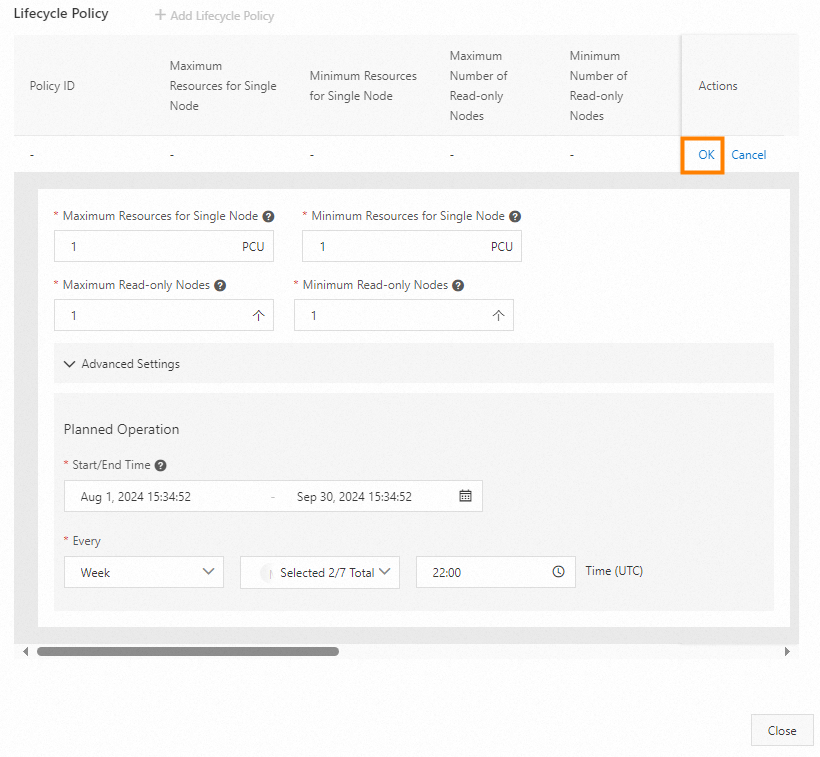
Example
To scale up 5 PCUs at 9:30 and scale down 1 PCU at 22:00 every business day (Monday through Friday) from August 1 to September 30, create two lifecycle policies as shown below.
 |
 |
|---|