The DMS data tracking feature lets you quickly find relevant updates within a specific time range, generate a rollback script, and execute it via a data change ticket to restore your data. This method is recommended for reversing accidental operations that affect fewer than 100,000 rows.
Prerequisites
-
The binary log feature is enabled for the cluster. For more information, see Enable the binary log.
-
If your cluster is in flexible management or stable change control mode in DMS, you must first log on to the target cluster through the DMS console.
Step 1: Find records and generate rollback script
Submit a data tracking ticket in the DMS console. Once approved, you can select the change records to roll back from the parsed logs and generate a rollback script.
-
Log on to the new DMS console.
-
In the top navigation bar, choose Database Development > Data Tracking > Data Tracking Ticket.
-
In the upper-right corner of the page, click +Data Tracking.
-
On the Data Tracking Tickets page, configure the following parameters.
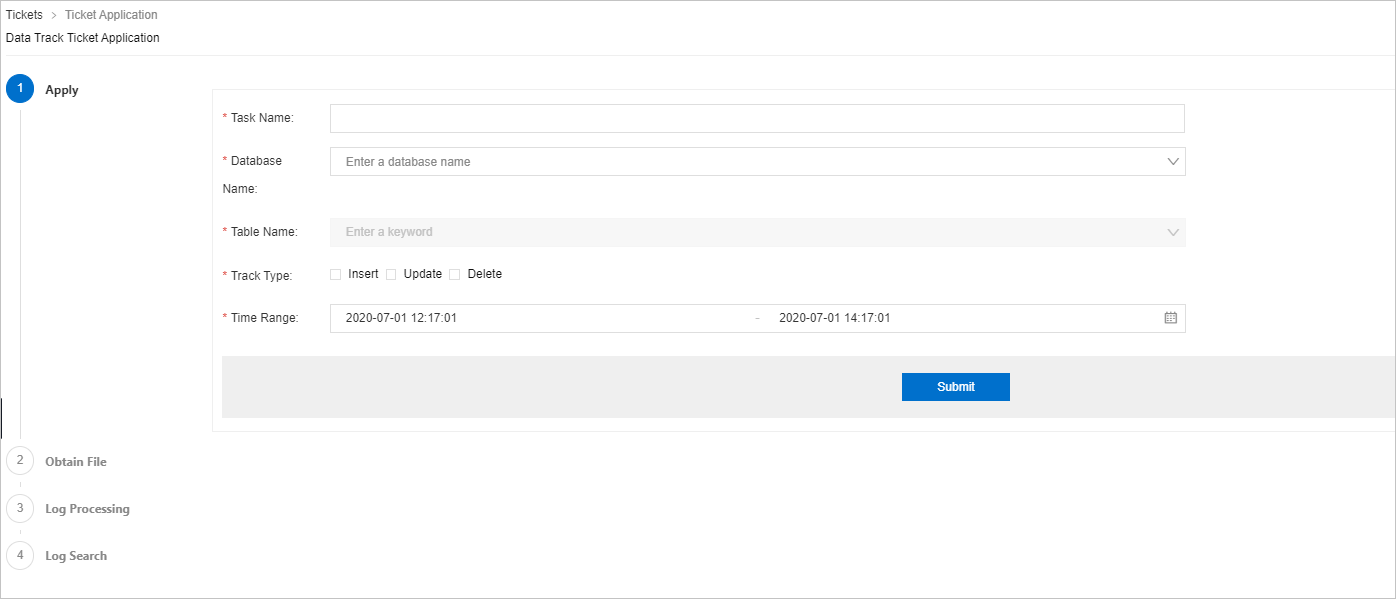
Parameter
Description
Task Name
A custom name for the task. This helps you find the ticket later and clarifies its purpose for approvers.
Database Name
The database where the accidental operation occurred.
Table Name
The table where the accidental operation occurred.
Track Type
The types of operations that you want to track. You can select multiple types.
Time Range
The default range is the last 2 hours. A single ticket can track a maximum duration of 6 hours. For longer periods, create multiple tickets. The earliest trackable time is limited by the oldest binary log file stored on the database server.
-
Click Submit. The system then retrieves the log files.
After the log files are retrieved, the ticket enters the approval process.
NoteIf the binary log is not enabled or you are not logged on to the database, the system cannot retrieve the log files.
-
Wait for the ticket to be approved.
NoteBy default, the database administrator (DBA) assigned to the database approves data tracking tickets.
-
After the ticket is approved, the system downloads and parses the logs.
-
When parsing is complete, select the records to roll back and click Export Rollback Script.
Step 2: Execute the rollback
After exporting the rollback script, submit a data change ticket. You can attach the script to the ticket for execution against the target database.
-
In the top navigation bar of the DMS console, choose Database Development > Data Change > Normal Data Modify.
-
Complete the Data Change Ticket Application as described in the table below, and then click Submit Application.
Table 1. Data change parameter descriptions
Parameter
Description
Database
The database to restore.
Affected Rows
The estimated number of affected rows. You can use a
countquery in SQLConsole to get an accurate number.Change SQL
Select Attachments and upload the rollback script generated in Step 1.
-
After the ticket is submitted, the system validates it.
-
After the validation passes, click Submit for approval. Once approved, an execution task is created.
NoteBy default, the corresponding DBA approves data change tickets.
-
Click Execute Change.