Drive and Photo Service (Developer Edition) provides the DingTalk QR code scanning logon method. If you want users to log on to the drive by scanning a DingTalk QR code, you need to configure DingTalk QR code logon. This topic describes how to configure DingTalk QR code logon in Drive and Photo Service (Developer Edition).
Requirements
You have the permissions to operate the PDS console. If you log on as a RAM user that has not been granted the relevant permissions (AliyunPDSFullAccess), you need to grant the permissions to the RAM user.
A PDS Developer Edition domain is created.
You must have permissions of an enterprise internal developer for DingTalk. If you are not a DingTalk developer yet, you need to become one first. For more information, see Become a DingTalk developer.
Procedure
Step 1: Create a DingTalk internal application
Visit the DingTalk Open Platform in a browser and log on to your developer account.
In the top navigation bar of the page, click Developer Console.
In the top navigation bar of the page, click Application Development to go to the DingTalk application list.
Click Create Application on the right, enter the application information, and click Save.

You are navigated to the details page of the DingTalk application.
Step 2: Configure the redirect URL and enable permissions
Configure the Redirect URL (Callback Domain).
In the left navigation pane of the DingTalk application details page, select Development Configuration > Security Settings, and add a Redirect URL.
ImportantWhen filling in, replace
domainIdwith your actual domainId.The format of the redirect URL is
https://domainId.api.aliyunpds.com/v2/oauth/callback.If you have activated and configured a logon authentication domain name, the format of the redirect URL is
https://www.example.com/v2/oauth/callback.If you have activated a logon authentication domain name but have not configured a domain name, the format of the redirect URL is
https://domainId.auth.aliyunpds.com/v2/oauth/callback.If you are using a domain created before March 2, 2023, the format of the redirect URL is
https://domainId.auth.aliyunpds.com/v2/oauth/callback.
Configure the required permissions.
In the left navigation pane of the DingTalk application details page, select Development Configuration > Permissions.
For Permission Scope, select All Employees or Part of Employees as needed.
Part of Employees: The number of authorized users is equal to the number of drive synchronization users.
There are two types of permissions required:
Address book personal information reading permission.
In the left list of the Permission Management page, select Personal permissions and select Address book personal information reading permission.

All permissions for address book management.
In the left list of the Permission Management page, select Address book management and select all permissions (remember to check all pages when selecting).

After selecting all permissions, click Batch Apply in the upper-right corner.
Step 3: Configure DingTalk logon
Obtain the DingTalk application Client ID and Client Secret.
In the left navigation pane of the DingTalk application details page, select Basic information > Voucher and basic information.
Save the Client ID and Client Secret under Application Credentials.

Configure DingTalk logon for PDS Developer Edition.
Go to the domain list of PDS Developer Edition.
Find the domain for which you want to configure DingTalk logon and click Details in the right column of the domain.

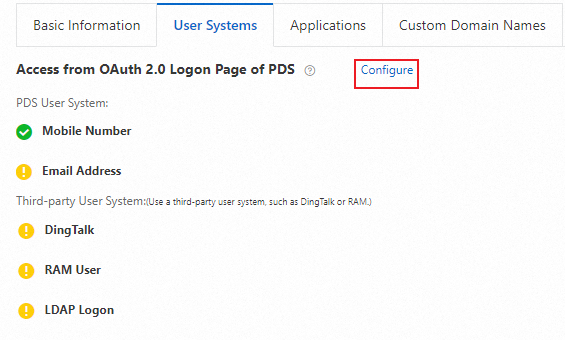
After entering the domain details page, select User Systems, click Configure, and open the Configure PDS Logon Page.
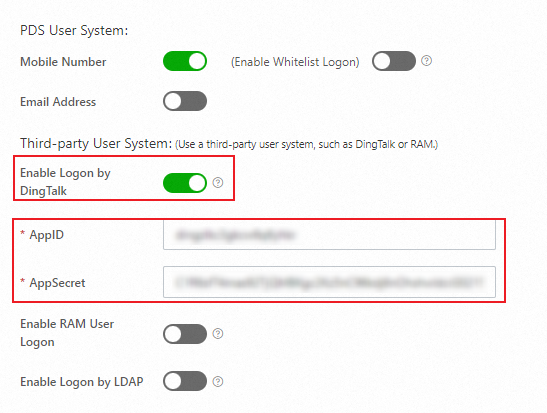
Turn on the Enable Logon by DingTalk switch, enter the DingTalk Client ID in AppID, enter the DingTalk Client Secret in AppSecret, and click OK.
Step 4: Configure DingTalk synchronization
DingTalk synchronization is disabled by default. If you need to use this feature, contact us to enable it.
Log on to Drive and Photo Service (Developer Edition) with an administrator account and go to the Management Console.
In the left navigation pane, select Exclusive Logon Configuration > DingTalk Configuration.
In the Synchronous Configuration section, click Edit.

Configure synchronization options.
If you do not need to enable DingTalk synchronization, skip this step. If you disable the DingTalk synchronization feature and enable only the DingTalk logon feature, DingTalk users in any hierarchy of the organization can log on to CDE, with accounts automatically created for them upon logon.
If you enable DingTalk synchronization, you can import users and organizational structures configured in DingTalk. Perform the following steps:
On the Synchronous Configuration page, turn on the Synchronous configuration switch and configure the synchronization information.
WarningExercise caution when you change the synchronization scope. After you change the synchronization scope, users who are not in the scope are banned, though they are not deleted. If you then include a banned user in the synchronization scope, the user is not automatically allowed. An administrator must manually set the status of the user to allowed.

Click Configuration Detection to check the number of departments and employees to be synchronized. If this step reports an error, check whether the authorization in the previous step was completed as required.
For Synchronization Time Setting, select Manual synchronization or Automatic synchronization.
Manual synchronization: Manually synchronize organizations or users to the drive. If you use manual synchronization, when the original data is updated, the changes are not synchronized to CDE. You must manually synchronize the data again. For example, in an enterprise personnel management scenario, if there are new employees, relevant changes may not be reflected in CDE in a timely manner. As a result, the new employees cannot log on to CDE.
Automatic synchronization: Synchronize organizations or users to the drive based on the specified synchronization frequency and time. Set the synchronization frequency to daily, weekly, or monthly, and specify any o'clock time of a day as the synchronization time.
Synchronize Phone Number/Email, enable as needed.
Enable Synchronizing phone numbers to synchronize employees' phone numbers in DingTalk. After successful synchronization, employees can log on using their phone numbers.
Enable Synchronous email to synchronize employees' email addresses in DingTalk.
View the import results.
Click Synchronize Now.
After the synchronization is complete, the Verification Results will be displayed. If the import fails, the reason for the failure will be shown in the Verification Results.

View the last synchronization information.
In the Last Synchronization Information area, view the Last Synchronization Time and Last Synchronization Status. To view the details of the last synchronization, click Details on the right.

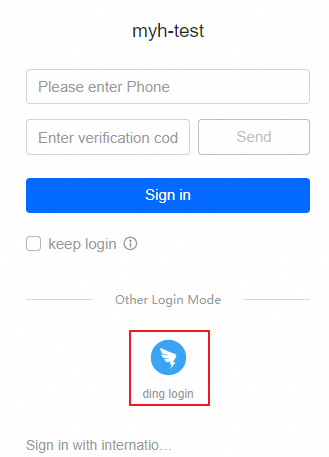
Step 5: Use DingTalk to log on to Drive and Photo Service
When you log on to Drive and Photo Service in a browser, the DingTalk logon option will appear below other logon methods.
FAQ
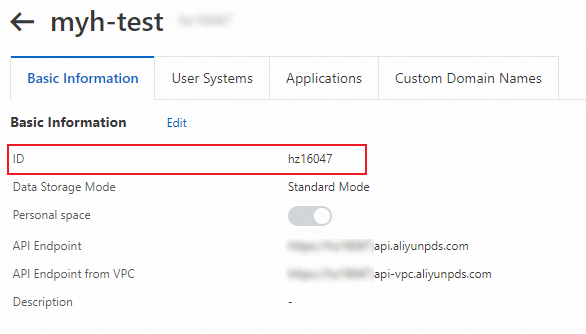
Go to the domain list of PDS Developer Edition.
Find the domain for which you want to view the domainId and click Details on the right of the list.
Under Basic Information, the ID is your domainId.