The PyAlink Script component lets you call any Alink algorithm by writing code. You can use this component to perform tasks such as classification, regression, and recommendation. PyAlink Script also integrates seamlessly with other components in Machine Learning Designer, so you can build and validate end-to-end business pipelines. This topic describes how to use the PyAlink Script component.
Background
The PyAlink Script component can be used in two ways: alone or combined with other Machine Learning Designer components. It provides access to hundreds of Alink components and supports reading from and writing to data types through code. You can also deploy a PipelineModel generated by the component as an EAS service. For more information, see Example: Deploy a model generated by a PyAlink Script as an EAS service.
Key concepts
Before you use the PyAlink Script component, familiarize yourself with the following key concepts.
|
Concept |
Description |
|
operator |
In Alink, an operator represents an algorithm function. Operators are categorized as batch or stream operators. For example, logistic regression includes the following operators:
Operators are connected by using the Each operator has parameters. For example, logistic regression includes the following parameters.
To configure a parameter, use the Data sources and sinks are special types of operators. After they are defined, you can connect them to algorithm components by using the  Alink includes common stream and batch data sources. The following code provides an example. |
|
pipeline |
You can also use Alink algorithms in a pipeline, combining data processing, feature generation, and model training into a single pipeline for training, prediction, and online services. The following code provides an example. |
|
vector |
A custom data type in Alink that supports two formats:
Note
In Alink, if a column is of the vector type, the parameter name is typically |
Alink components supported by PyAlink Script
You can use hundreds of Alink components in a PyAlink Script, including components for data processing, feature engineering, and model training.
The PyAlink Script component currently supports pipeline and batch components, but does not support stream components.
Method 1: Use PyAlink Script alone
This topic uses an example of scoring the movielens dataset with the ItemCf model to describe how to use the Machine Learning Designer platform and Alibaba Cloud resources to run a workflow implemented with a PyAlink Script. The procedure is as follows.
-
Go to the Machine Learning Designer page and create a blank pipeline. For more information, see Procedure.
-
In the pipeline list, select the blank pipeline that you created and click Open.
-
In the search box of the component list on the left, search for PyAlink Script and drag PyAlink Script to the canvas on the right. A pipeline node named PyAlink Script-1 is automatically generated on the canvas.
-
On the canvas, select the PyAlink Script-1 node. In the right-side pane, configure the parameters on the Parameter Settings and Execution tuning tabs.
-
On the Parameter Settings tab, write your code. The following code is an example.
from pyalink.alink import *
def main(sources, sinks, parameter):
    PATH = "http://alink-test.oss-cn-beijing.aliyuncs.com/yuhe/movielens/"
    RATING_FILE = "ratings.csv"
    PREDICT_FILE = "predict.csv"
    RATING_SCHEMA_STRING = "user_id long, item_id long, rating int, ts long"
    ratingsData = CsvSourceBatchOp() \
            .setFilePath(PATH + RATING_FILE) \
            .setFieldDelimiter("\t") \
            .setSchemaStr(RATING_SCHEMA_STRING)
    predictData = CsvSourceBatchOp() \
            .setFilePath(PATH + PREDICT_FILE) \
            .setFieldDelimiter("\t") \
            .setSchemaStr(RATING_SCHEMA_STRING)
    itemCFModel = ItemCfTrainBatchOp() \
            .setUserCol("user_id").setItemCol("item_id") \
            .setRateCol("rating").linkFrom(ratingsData);
    itemCF = ItemCfRateRecommender() \
            .setModelData(itemCFModel) \
            .setItemCol("item_id") \
            .setUserCol("user_id") \
            .setReservedCols(["user_id", "item_id"]) \
            .setRecommCol("prediction_score")
    result = itemCF.transform(predictData)
    result.link(sinks[0])
    BatchOperator.execute()
A PyAlink Script supports four output ports. In the script, use
result.link(sinks[0])to write data to the first output port. Downstream components can read the data from the script by connecting to this first output port. For more information, see Reading and writing different data types in a PyAlink Script. -
On the Execution tuning tab, set the running mode and node specifications.
Parameter
Description
Select job running mode
The following modes are supported:
-
DLC (Single-machine, multi-concurrency): Recommended for tasks with small datasets and for debugging and validation purposes.
-
MaxCompute (Distributed): Recommended for tasks with large datasets or for production tasks.
-
Fully-managed Flink: Executes the job on the Fully-managed Flink cluster bound to the workspace.
Number of workers
This parameter is required only when the job running mode is MaxCompute (Distributed) or Fully-managed Flink (Distributed). This parameter specifies the number of execution nodes. If you leave this parameter empty, the system automatically allocates nodes based on task data. By default, this parameter is empty.
Memory per worker (MB)
You need to configure this parameter only when the running mode of the job is set to MaxCompute (Distributed) or Fully-managed Flink (Distributed). The parameter specifies the memory size of a single node in MB. The value must be a positive integer, and the default is 8192.
CPU cores per worker
This parameter is required only when the Job running mode is set to MaxCompute (distributed) or Fully-managed Flink (distributed). This parameter specifies the number of CPU cores for a single node. The value must be a positive integer and is empty by default.
Select node specification to run script
The resource type of the DLC node. The default is 2 vCPU + 8 GB Mem-ecs.g6.large.
-
-
-
Above the canvas, click Save, and then click the Run icon
 to run the PyAlink Script.
 -
When the task completes, right-click the PyAlink Script-1 node on the canvas and select to see the results.
Column name
Description
user_id
The user ID.
item_id
The movie ID.
prediction_score
Indicates the user's preference for the movie. This score is used as a reference for recommendations.
Method 2: Combine PyAlink Script with other components
The input and output ports of a PyAlink Script component are identical to those of other algorithm components in Machine Learning Designer. You can connect them to create a combined pipeline, as shown in the following figure.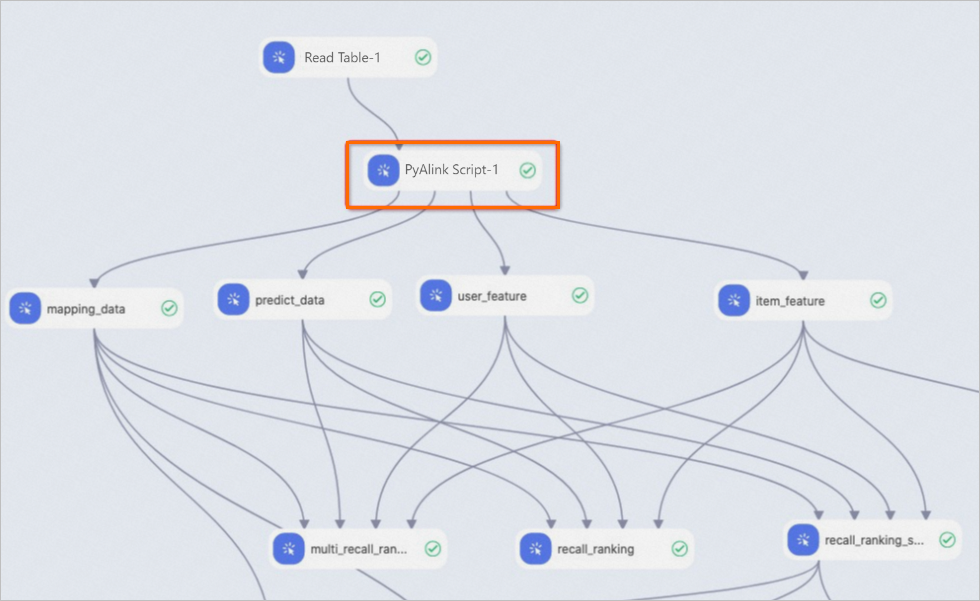
Read and write data in PyAlink Script
-
Read data.
-
Read from a MaxCompute table: The script reads data passed from an upstream component through an input port. The following code provides an example.
train_data = sources[0]
test_data = sources[1]
In the code,
sources[0]represents the MaxCompute table connected to the first input port, andsources[1]represents the table connected to the second input port. The component supports up to four input ports. -
Read from a network file system: The script reads data using Alink's source components, such as
CsvSourceBatchOpandAkSourceBatchOp, within the code. You can read the following types of files:-
Read a shared file from a network over HTTP. The following code provides an example:
ratingsData = CsvSourceBatchOp() \ .setFilePath(PATH + RATING_FILE) \ .setFieldDelimiter("\t") \ .setSchemaStr(RATING_SCHEMA_STRING) -
Read an OSS file. First, find the temporary data storage path for the pipeline on the pipeline properties tab. This path, formatted as
oss://<bucket-name>/<path>, is used for OSS read/write operations. The following code provides an example.model_data = AkSourceBatchOp().setFilePath("oss://xxxxxxxx/model_20220323.ak")
-
-
-
Write data.
-
Write to a MaxCompute table: The script writes data to a downstream component through an output port. The following code provides an example.
result0.link(sinks[0])
result1.link(sinks[1])
BatchOperator.execute()
The line
result0.link(sinks[0])writes data and makes it accessible through the first output port. You can write to a maximum of four result tables, corresponding to four output ports. -
Write to an OSS file. Use the OSS path defined in the pipeline's temporary data storage path field, found on the pipeline properties tab. The following code provides an example.
result.link(AkSinkBatchOp() \
            .setFilePath("oss://xxxxxxxx/model_20220323.ak") \
            .setOverwriteSink(True))
BatchOperator.execute()
-
Example: Deploy a model as an EAS service
-
Generate the model to deploy.
You can deploy a model as an EAS service only if it is a PipelineModel generated by the PyAlink Script component. Use the following code to generate a PipelineModel file. For instructions on how to run the script, see Method 1: Use the PyAlink Script component alone.
from pyalink.alink import *
def main(sources, sinks, parameter):
    PATH = "http://alink-test.oss-cn-beijing.aliyuncs.com/yuhe/movielens/"
    RATING_FILE = "ratings.csv"
    PREDICT_FILE = "predict.csv"
    RATING_SCHEMA_STRING = "user_id long, item_id long, rating int, ts long"
    ratingsData = CsvSourceBatchOp() \
            .setFilePath(PATH + RATING_FILE) \
            .setFieldDelimiter("\t") \
            .setSchemaStr(RATING_SCHEMA_STRING)
    predictData = CsvSourceBatchOp() \
            .setFilePath(PATH + PREDICT_FILE) \
            .setFieldDelimiter("\t") \
            .setSchemaStr(RATING_SCHEMA_STRING)
    itemCFModel = ItemCfTrainBatchOp() \
            .setUserCol("user_id").setItemCol("item_id") \
            .setRateCol("rating").linkFrom(ratingsData);
    itemCF = ItemCfRateRecommender() \
            .setModelData(itemCFModel) \
            .setItemCol("item_id") \
            .setUserCol("user_id") \
            .setReservedCols(["user_id", "item_id"]) \
            .setRecommCol("prediction_score")
    model = PipelineModel(itemCF)
    model.save().link(AkSinkBatchOp() \
            .setFilePath("oss://<your_bucket_name>/model.ak") \
            .setOverwriteSink(True))
    BatchOperator.execute()
Replace
<your_bucket_name>with the name of your OSS bucket.ImportantEnsure that you have read permissions for the dataset path configured in PATH. Otherwise, the component will fail to run.
-
Generate an EAS configuration file.
Run the following script to write the output to a
config.jsonfile.# EAS configuration file import json # Generate EAS model configuration model_config = {} # Schema of the data that EAS receives model_config['inputDataSchema'] = "id long, movieid long" model_config['modelVersion'] = "v0.2" eas_config = { "name": "recomm_demo", "model_path": "http://xxxxxxxx/model.ak", "processor": "alink_outer_processor", "metadata": { "instance": 1, "memory": 2048, "region":"China (Beijing)" }, "model_config": model_config } print(json.dumps(eas_config, indent=4))Key parameters in the
config.jsonfile:-
name: The name of the deployed model service. -
model_path: The OSS path where the PipelineModel file is stored. You must change this to the actual OSS path of your model file.
For an explanation of other parameters in the
config.jsonfile, see Command reference. -
-
Deploy the model as an EAS service.
Deploy the model using the eascmd client. For client setup instructions, see Download and configure the client. For example, on a 64-bit Windows system, run this command:
eascmdwin64.exe create config.json