Create parent and child quotas, scale them, and view quota lists and details.
When using Intelligent Computing Lingjun resources, ensure all nodes share the same HZ identifier to enable high-speed network connectivity.
Create parent-child quotas
On the Resource Quota page, create parent and child resource quotas. These quotas form a tree structure (QuotaTree) for flexible resource management and allocation. For a parent-child relationship diagram, see Features.
-
Create parent resource quota: Click Add Resource Quota to create a root resource quota. For more information, see Cloud-native resource quotas.
-
Create sub-level resource quota: Add a new resource quota, or click New Child-level Resource Quota in the Actions column of an existing resource quota.

Scale quotas
After creating a resource quota, adjust its size based on job requirements to manage costs effectively.
On the Resource Quota page, find the target resource quota and click Scale in the Actions column. Scale the resource quota by adjusting its Source or Nodes/Instance Type.
-
Scale up: Add new sources or specifications, or adjust existing ones, to increase available resources.
-
Scale down: Reduce node count for associated specifications or remove certain specifications to release idle resources.

View quota lists
On the Resource Quota page, switch to the Lingjun Intelligent Computing resources or General Computing Resources tab to view resource quotas.
The list displays basic information about each resource quota, including name, type, associated workspace, status, and resource amounts (GPU card count, CPU cores, and memory). Perform the following actions:
-
Filter resource quotas: Filter quotas by Name/ID or Status.
-
Sort by resource amount: Sort by total or allocated CPU, memory, or GPU resources to view resource distribution and usage.
View quota details
On the Resource Quota page, switch to the Lingjun Intelligent Computing resources or General Computing Resources tab, then click a resource quota name to view its details. View details and modify configuration on the following tabs:
Overview
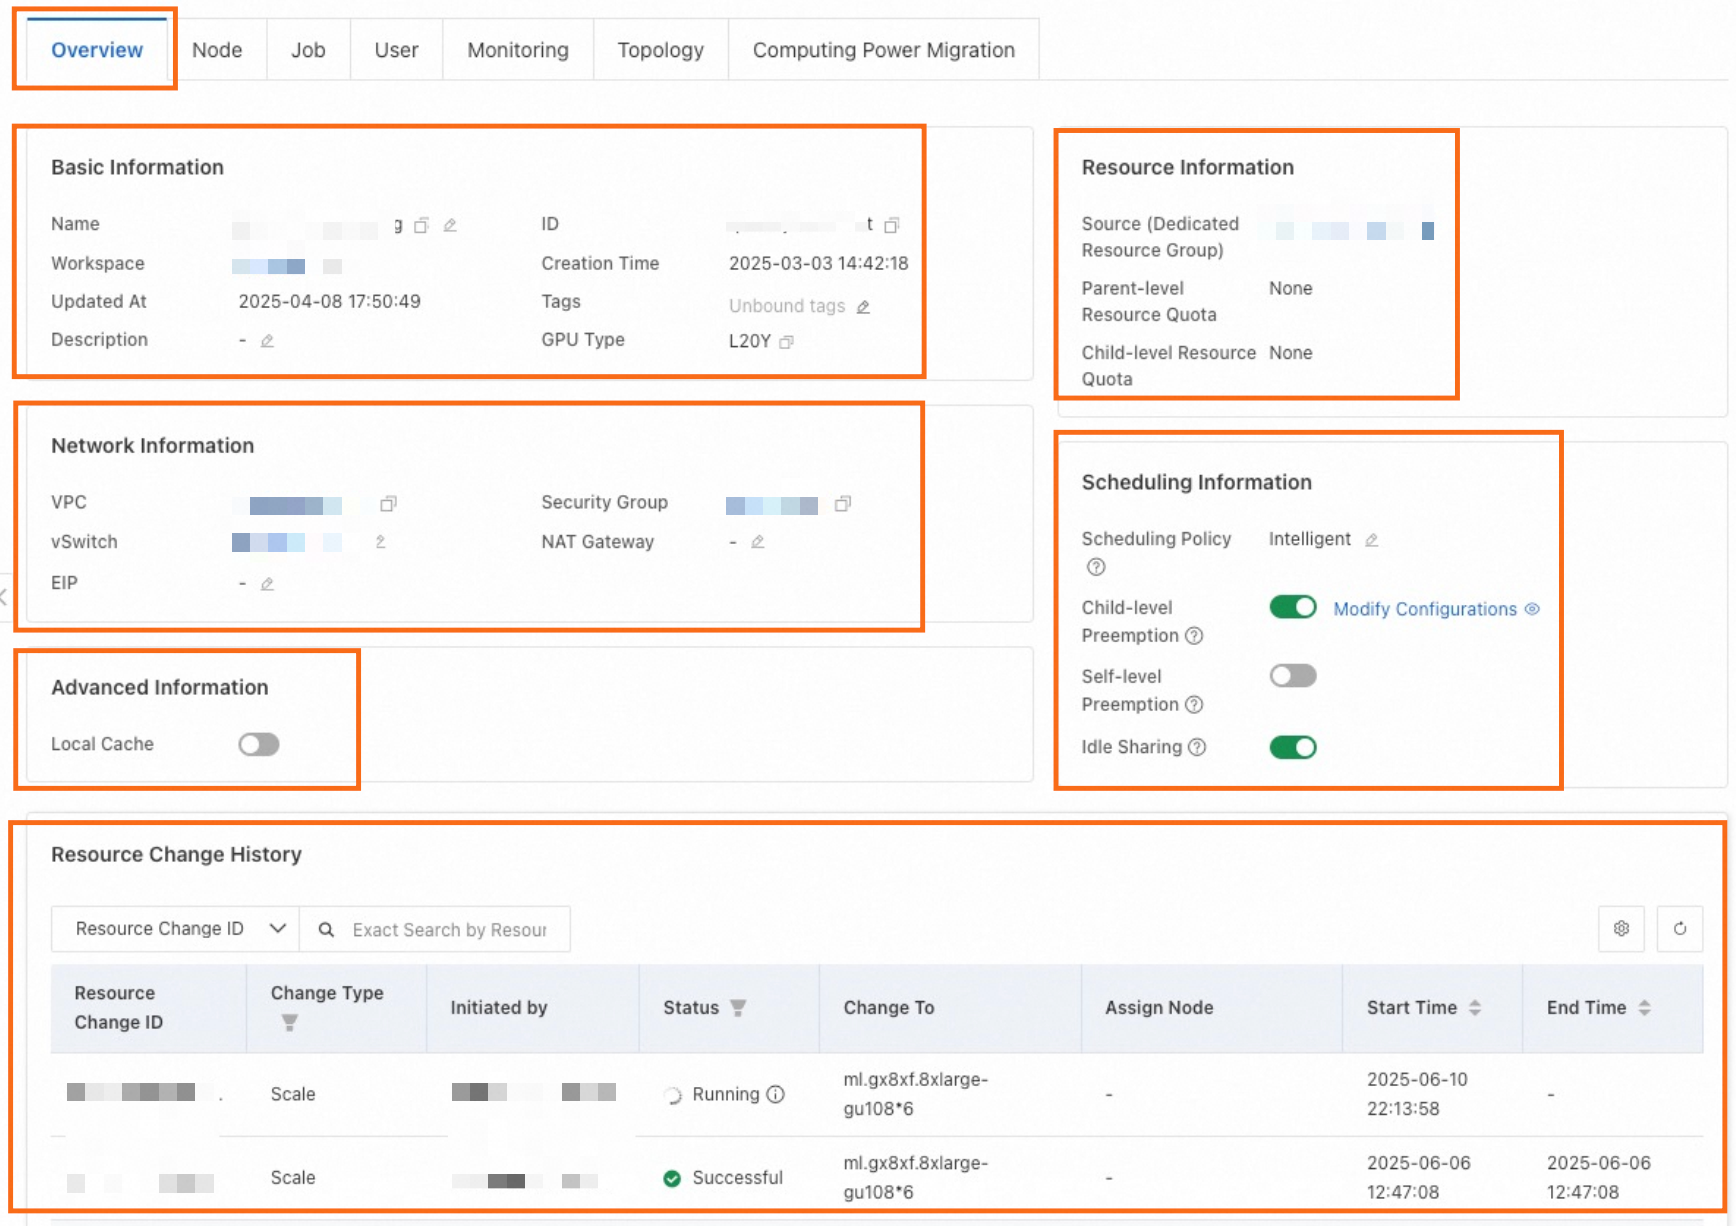
On the resource quota details page, go to the Overview tab to view and update configuration:
-
Basic Information: Includes resource quota name, ID, and associated workspace.
-
Click the edit icon
 to update Resource Quota Name, associated workspace, and Tag.
 -
After associating a workspace, click the workspace name to go to its details page. Then use the resource quota for AI development in that workspace.
-
-
Resource Information: Includes the resource group that the resource quota belongs to, and its parent and child quotas. For more information about parent-child quota relationships, see the diagram in Create parent-child quotas. Click a resource name to view its details.
-
Network Information: Displays quota limits related to network resources, including VPC, security group, and NAT Gateway. Configure this information to control the network scope of a resource quota and ensure secure resource allocation.
-
Scheduling Information: Displays the resource quota's scheduling information, which can be updated on this page.
-
Scheduling Policy: Select a scheduling policy to improve job dequeuing efficiency and resource utilization. For configuration details, see Scheduling policies.
-
Child-level Preemption&Self-level Preemption: When resources are scarce, allows queued jobs on the current resource quota to preempt running jobs on its child or self-level quotas. For more information about self-level and child-level resource quota relationships and preemption policy configuration, see Preemption policies.
-
Idle Sharing: Enabled by default. This allows idle jobs to use resources from the current quota and its child quotas.
-
-
Resource Change History: Displays a history of create, scale, and delete operations, including change type, initiator, status, and target specification.
-
Advanced Information:
-
Enable Local Cache: For an Intelligent Computing Lingjun resources quota, enable this feature to use the node's local cache. This reduces data transmission overhead for repeated data access. For more information, see Local cache acceleration for Intelligent Computing Lingjun resources.
-
Nodes

On the resource quota details page, go to the Nodes tab to view and manage the node information for the quota:
-
Node details: Includes Node Specification, the Dedicated Resource Group Name/ID, resource In Use and Total amounts (GPU Type, Number of GPUs, and CPU Cores), the zone (AZ), the high-speed network interconnect zone (HZ), and the Tasks and Instances created on the node.
-
Job and instance details: In the Tasks and Instances columns for a target node, click the corresponding number to view job and instance details.
-
Filter nodes: Filter nodes by node status or order status, or sort by resource amount.
-
HZ (high-speed network interconnect zone): For Intelligent Computing Lingjun resources, HZ indicates the high-speed network region where underlying compute resources are located. Resources with the same HZ identifier communicate over a high-speed network.
-
-
Node Status: Supported statuses:
-
Ready: Compute node is available.
-
Not Ready: Compute node is being initialized.
-
Scheduling Disabled: Node cannot be scheduled. Possible causes:
-
Stopped by User: A user manually disabled scheduling on the node.
-
Expired: Node subscription has expired.
-
Recovering: Node is in the recovery process. If jobs are running on this node, stop them promptly to avoid interrupting recovery.
-
Unknown: Cause is unknown. Contact your account manager for assistance.
-
-
-
Manage nodes:
-
Stop/Start scheduling on a node: In the Actions column for the target node, click Stop Scheduling or Start Scheduling to pause or resume resource scheduling on that node.
-
Clear a node: In the Actions column for the target node, click Clear Node to terminate all jobs (including DSW, DLC, or EAS jobs) on that node.
-
Jobs

On the resource quota details page, go to the Job tab to view job information. The page displays resource usage for Queuing and Dequeued jobs, including key metrics such as job status, resource quota, instance information, GPU card count, CPU cores, and memory size.
-
Filter jobs: Filter by Type or Job Status.
-
View details: Click a job name, resource quota name, or workspace name to go to the corresponding details page.
-
Filter jobs in the current quota: Enable the View Current Resource Quota switch to display only jobs created within this quota.
Users

On the resource quota details page, go to the User tab to view resource usage per user within the quota, including key metrics such as GPU card count, CPU cores, memory size, and number of jobs.
-
Filter users of current quota: Enable the View Current Resource Quota Users switch to display only users who submitted jobs directly to this quota, not its child quotas.
-
View job details: In the Number of Tasks column for a user, click Details to view the jobs submitted by that user. On the job list page, click a job name to view its details.
Monitoring
On the resource quota details page, go to the Monitoring tab to view monitoring information.
-
Displays a GPU computing power heat map (real-time utilization), resource levels, and job status distribution.

-
View monitoring information from two perspectives: quota and node. This includes metrics for CPU, memory, disk, network, and GPU. For details on the metrics and how to use CloudMonitor and ARMS to view data, configure alerts, and subscribe to metrics, see Resource quota monitoring and alerting.

Topology
On the resource quota details page, go to the Topology tab to view the quota's topology. Two views are available:
-
Resource View: Displays allocation of CPU, memory, and GPU resources for the current quota and its child quotas.

-
Job View: Displays the total number of jobs created in the current quota and its child quotas, with a breakdown by status.

Delete a quota
On the Resource Quota page, click Delete in the Actions column to remove an unused resource quota. Disassociate a resource quota from its workspace before deleting it. For more information, see Overview.
