Shared Gateways have fixed access policies and shared bandwidth, making them unsuitable for high-concurrency services that require strong isolation and elasticity. To address this, Elastic Algorithm Service (EAS) provides dedicated gateways. A dedicated gateway offers flexible access control for both public and private networks, supports custom domain names, and provides exclusive bandwidth to ensure service stability and reliability.
Overview and selection
EAS offers two types of dedicated gateways:
Application Load Balancer (ALB) dedicated gateway: This gateway is built on Application Load Balancer (ALB) to provide Layer 7 traffic management. It supports HTTP and HTTPS protocols and features Auto Scaling, high reliability, and smart routing.
ImportantWe strongly recommend using an Application Load Balancer (ALB) dedicated gateway in production environments for superior performance, stability, and scalability.
Fully-managed dedicated gateway: This is the original dedicated gateway offered by EAS. You can configure network settings, custom domain names, and other gateway features directly within the PAI console. The network architecture is shown in the following figure:

When a service uses a dedicated gateway, Auto Scaling cannot scale from zero. You must set the minimum number of instances to one or more.
Billing
Application Load Balancer (ALB) dedicated gateway: You are charged for the associated ALB instance. For more information, see ALB billing rules.
Fully-managed dedicated gateway:
The gateway itself supports both pay-as-you-go and subscription billing methods. For more information, see Billing of EAS.
If you access the service over a private network, additional PrivateLink fees are incurred, including instance fees and data processing fees. For more information, see Billing of PrivateLink.
If you access the service over the Internet, public network traffic fees are charged through Cloud Data Transfer (CDT). For more information, visit the CDT console.
Part I. Create and configure a dedicated gateway
[Recommended] Application Load Balancer (ALB) dedicated gateway
1.1 Create an ALB gateway
First, create a logical configuration for the gateway. This step does not create any actual cloud resources or incur costs.
Log on to the PAI console. Select a region on the top of the page. Then, select the desired workspace and click Elastic Algorithm Service (EAS).
On the Inference Gateway tab, click Create Dedicated Gateway and select Application Load Balancer.
The system checks your service-linked role permissions. If the role is not activated, follow the prompts to complete the authorization.
Enter a name for the gateway and click Submit.
1.2 Create and associate an ALB instance to enable network access
After creating the gateway, you need to enable internal or public network access for it. This action automatically creates and associates an ALB Instance under your account, and billing begins.
When enabling both public and private access for an ALB dedicated gateway, you must use the same VPC. Additionally, any EAS service using this gateway must also be deployed in that same VPC.
On the Inference Gateway tab, click the name of the ALB gateway you just created to open its details page.
In the Gateway Access Control section, you will see the VPC and Internet tabs.
Enable VPC (internal network) access
On the VPC tab, click Add VPC.
In the configuration panel that appears, select the appropriate VPC and vSwitches for your service. To ensure high availability (HA), select at least two vSwitches in different zones. You can select only one vSwitch per zone.
ImportantIf public network access is already enabled for this gateway, the VPC you select here must be the same.
Click OK. The system will begin creating the ALB Instance.
Enable public network access
Switch to the Internet tab and click Enable Public Network.
In the configuration panel that appears, select the appropriate VPC and vSwitches for your service. To ensure HA, select at least two vSwitches in different zones. You can select only one vSwitch per zone.
ImportantIf internal network access is already enabled for this gateway, the VPC you select here must be the same.
Click OK. The system will begin creating the ALB Instance.
Fully-managed dedicated gateway
A fully-managed dedicated gateway supports the following features:
Access control: Control public and internal network access through a whitelist.
Custom domain name access: Configure custom domain names and certificates to provide external services.
Cross-account VPC access: Allow servers within a VPC in a different account but the same region to access EAS services through an internal network address.
Authoritative DNS resolution: Use authoritative resolution for the gateway's domain name when calling EAS services from other clouds or on-premises data centers. This requires a network connection to be established with Alibaba Cloud.
1.1 Create a fully-managed dedicated gateway
Log on to the PAI console. Select a region on the top of the page. Then, select the desired workspace and click Elastic Algorithm Service (EAS).
On the Inference Gateway tab, click Create Dedicated Gateway and select Fully-managed Dedicated Gateway.
On the EAS dedicated gateway purchase page, configure the parameters. Refer to Appendix: Dedicated gateway capacity planning to select the gateway specification to ensure service stability.
After configuring the parameters, click Buy Now. Follow the on-screen instructions to confirm your order and complete the payment.
You can view your purchased fully-managed dedicated gateway in the Inference Gateway list. You can start using it when its Status is Running.
You can update the gateway specification and the number of gateway nodes after a fully-managed dedicated gateway is created. The changes take effect in about 3 to 5 minutes.
1.2 Configure access control
On the Inference Gateway tab, click the name of the target fully-managed dedicated gateway to go to its details page. Configure the settings in the Gateway Access Control section.
Public network access control
On the Internet tab, turn on the Access Entry switch. When the status is Enabled, the public access channel for the fully-managed dedicated gateway is open.
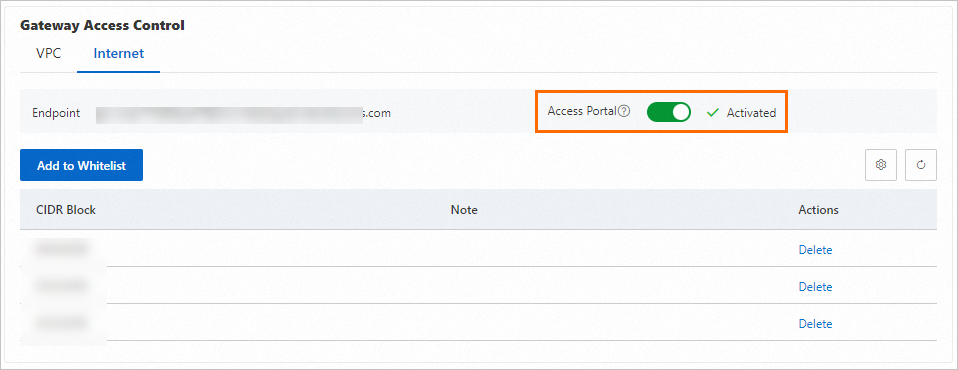
By default, the fully-managed dedicated gateway is not accessible from the public network. You must click Add To Whitelist and enter the public IP address ranges that are allowed access (for example, 192.0.2.0/24).
Separate entries with a comma (,) or a line break.
To allow access from any public IP address, add the
0.0.0.0/0address range. You can add up to 15 address ranges.
Verify the public network connectivity of the fully-managed dedicated gateway. For example, add the public IP address of your local machine to the whitelist.
On the Internet tab, find the Domain Name Address.
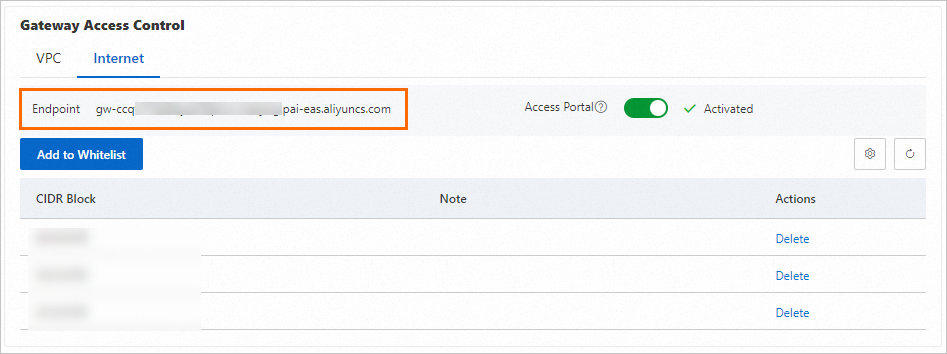
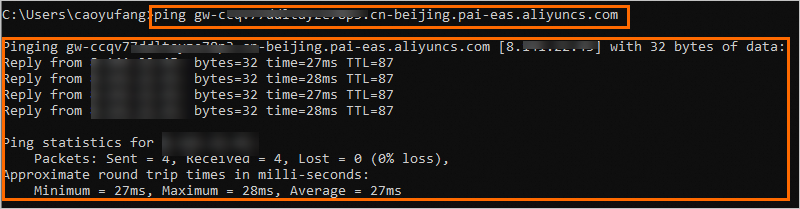
In your local terminal, access the domain name address. If the output is similar to the following, it indicates that the whitelisted address can access the dedicated gateway over the public network.
Disable public network access for the fully-managed dedicated gateway.
On the Internet tab, turn off the Access Entry switch to disable public network access for the gateway.
In your local terminal, access the domain name address. If the output is similar to the following, it confirms that public network access to the gateway is disabled.

Internal network access control
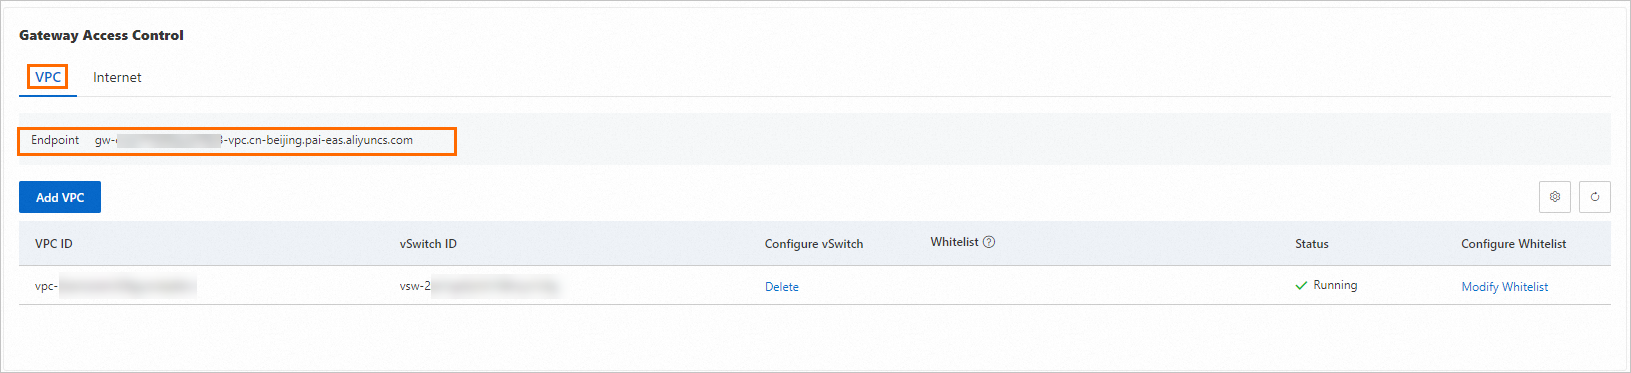
On the VPC tab, click Add VPC and select the VPC and vSwitches you want to connect.
You can add a VPC from a different account in the same region. After you add the VPC of Account B, servers in that VPC can access the EAS service that uses this dedicated gateway through the VPC address.
NoteThis is a whitelist feature. To use this feature, you must submit a ticket.

Authoritative DNS resolution is supported. This is used when calling EAS services from other clouds or on-premises data centers and requires a pre-established network connection with Alibaba Cloud. Currently, authoritative domain resolution can only be used in one VPC configuration.
When you add a VPC, the system adds a default whitelist entry of
0.0.0.0/0for that VPC, allowing access from all IP addresses within it. You can Modify Whitelist as needed.Verify the internal network connectivity of the dedicated gateway.
On the VPC tab, find the Domain Name Address.
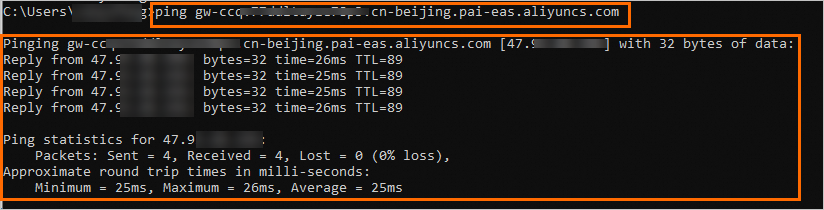
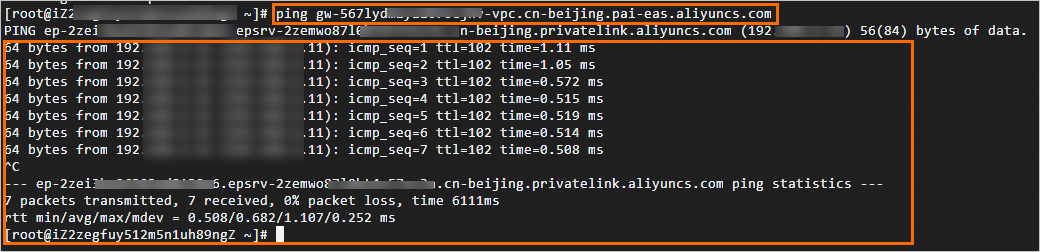
On a terminal machine within the VPC, access the domain name address. If the output is similar to the following, it indicates that whitelisted addresses can access the dedicated gateway over the internal network.
NoteWithin a VPC, any zone can access the dedicated gateway if it is on the whitelist, not just the zones of the vSwitches added to the gateway.
Close the VPC access channel for the dedicated gateway.
In the VPC list, click Delete in the VSwitch Operation column to disable VPC access to the dedicated gateway.
On a terminal machine within the VPC, access the domain name address. If the output is similar to the following, it confirms that internal network access to the gateway is disabled.


1.3 Configure a custom domain name
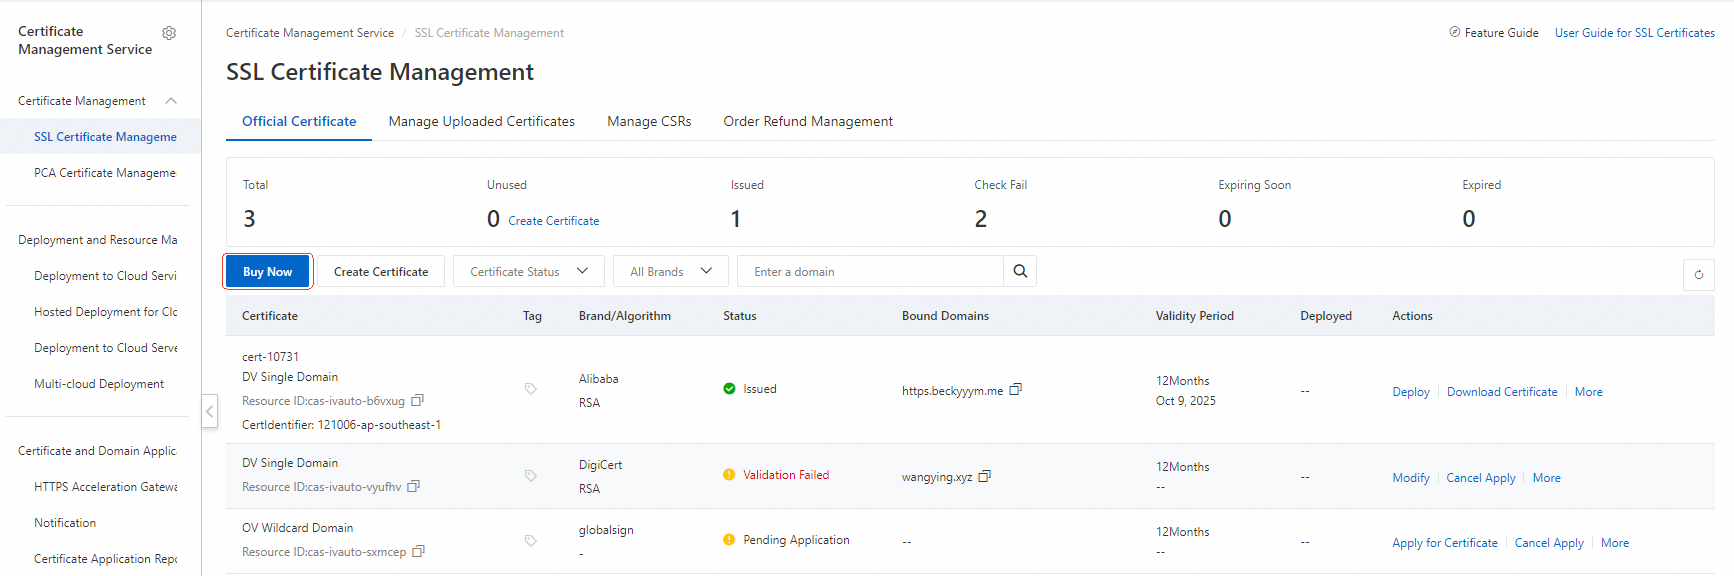
(Optional) Manage digital certificates. If you plan to use HTTPS, you must first upload or purchase an SSL Certificate for your custom domain in the Certificate Management Service. You can then configure this certificate in the dedicated gateway.
Log on to the Certificate Management Service console and choose SSL Certificate Management.
If your domain does not have a certificate, you can select Purchase Certificate or upload an existing one. For more information, see Purchase an SSL Certificate and Upload an SSL Certificate.
Configure public and internal custom domain names.
Configure a public custom domain name
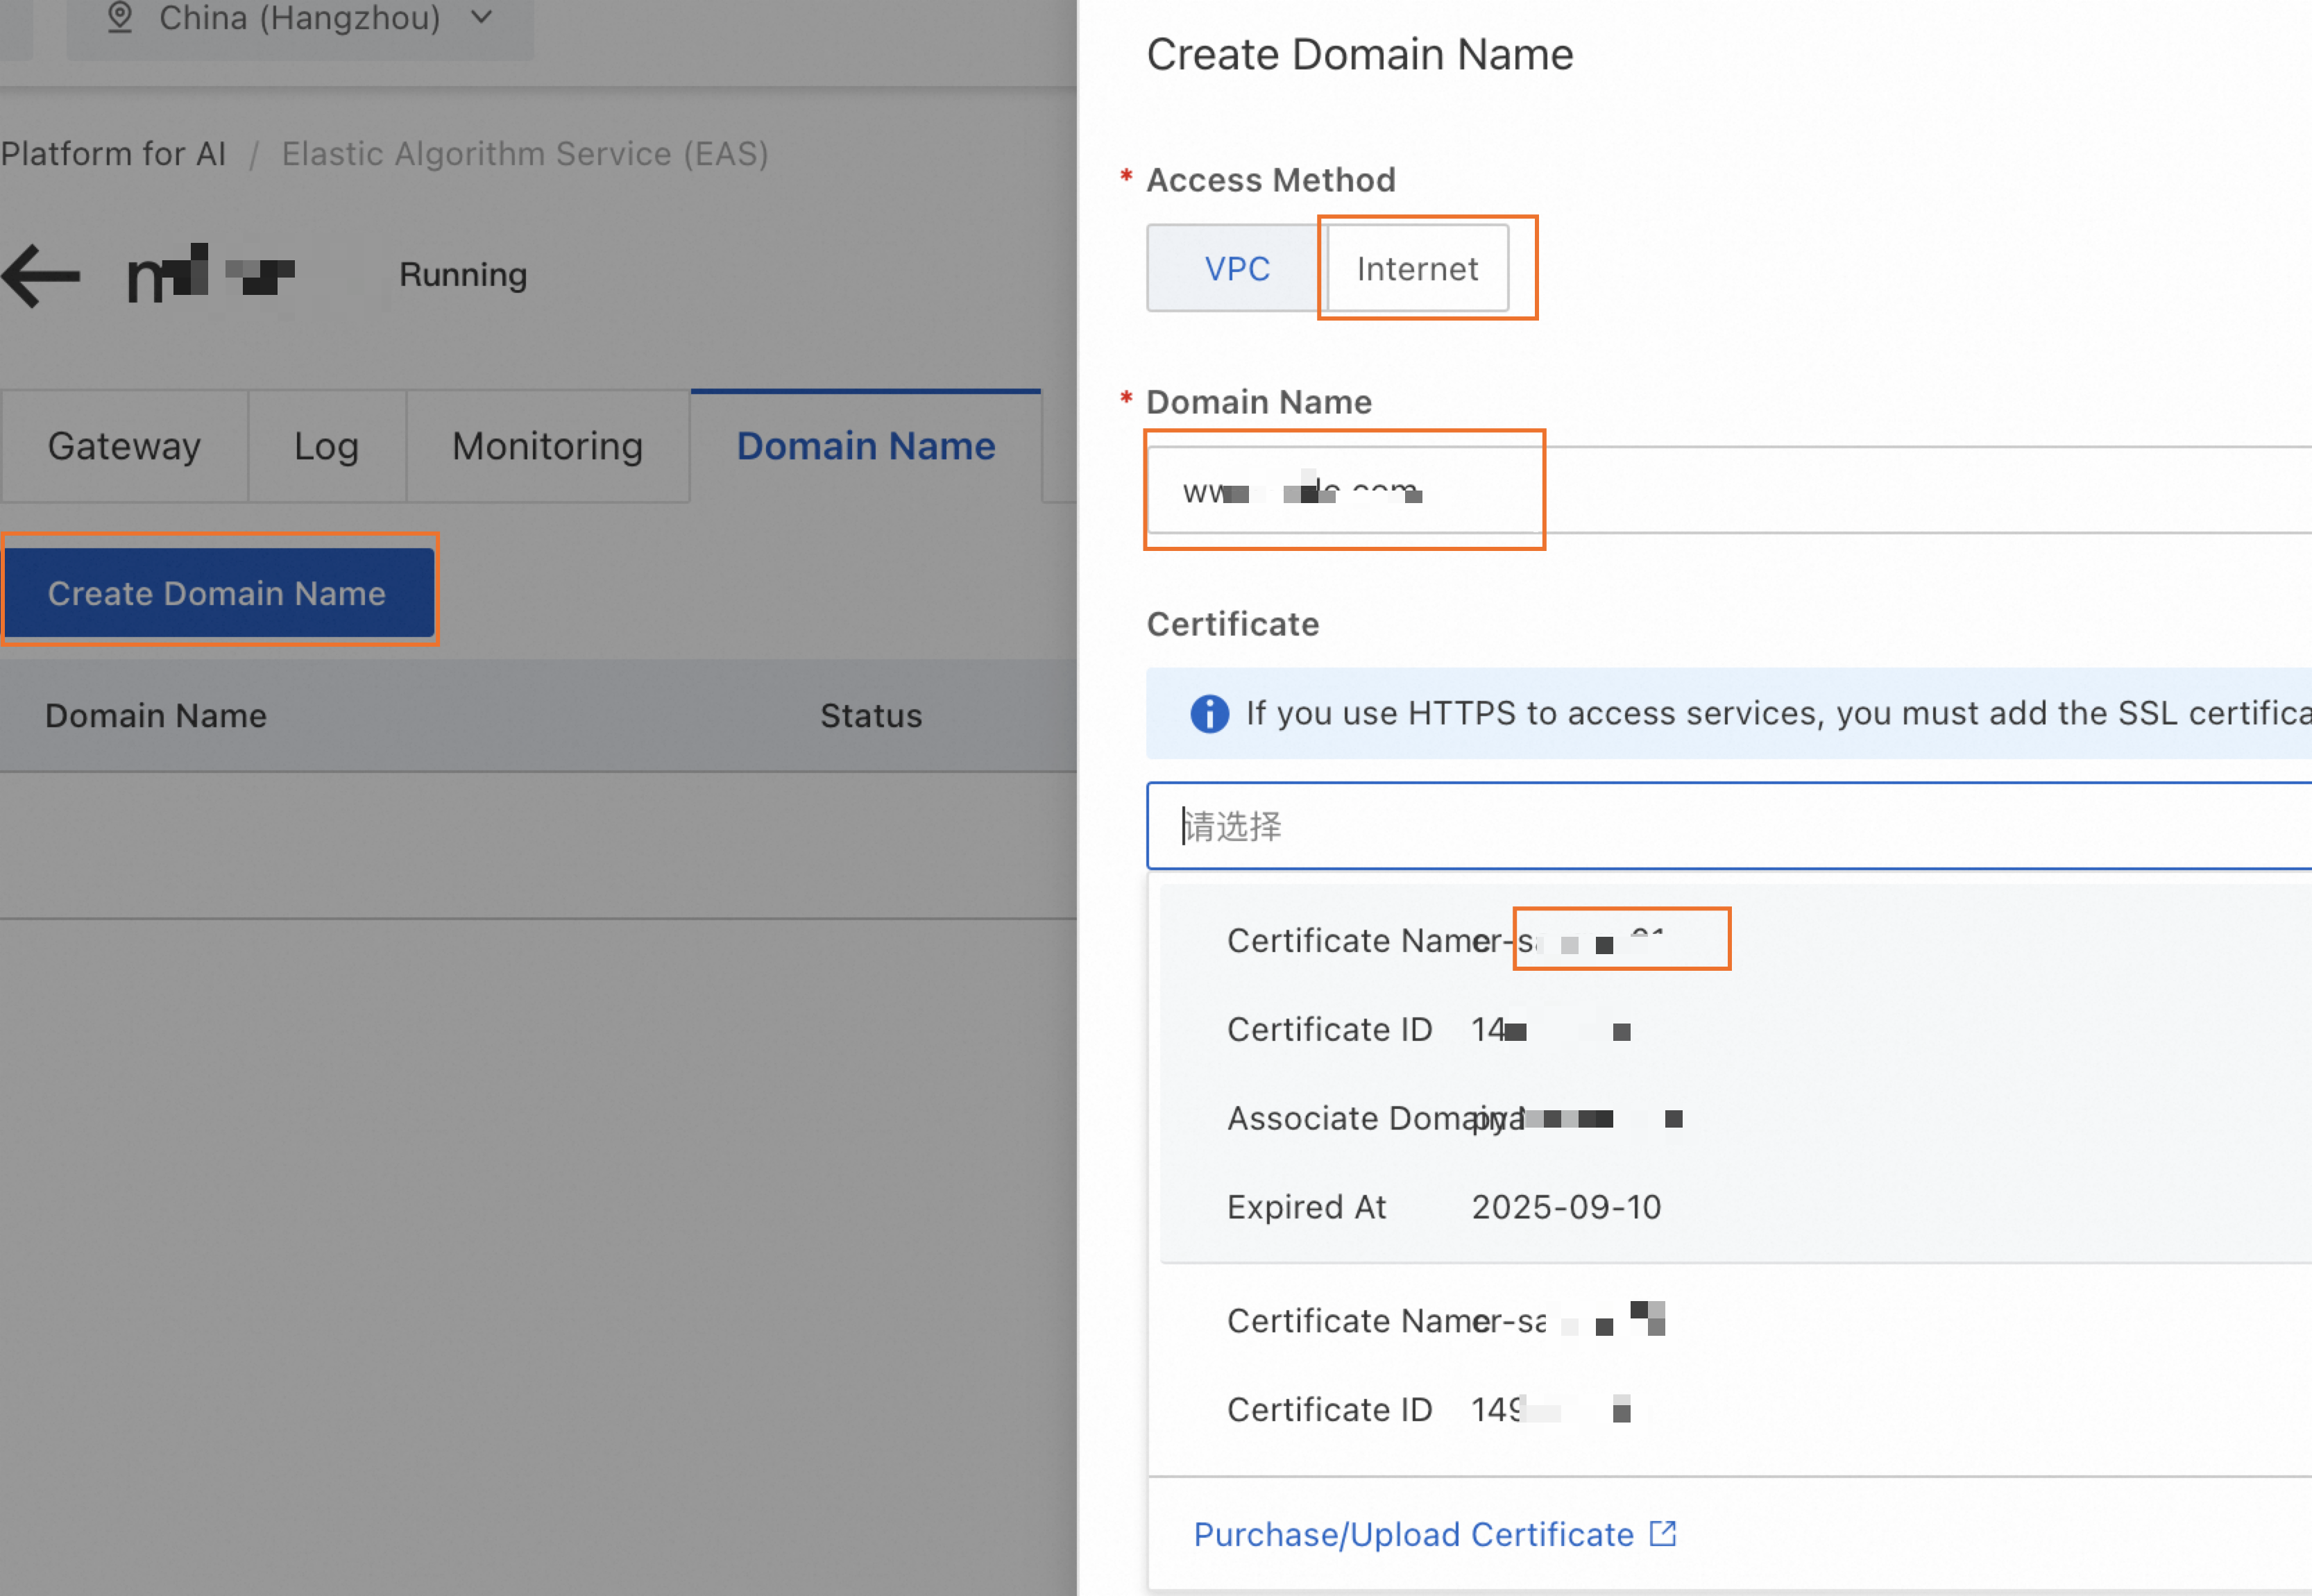
On the dedicated gateway details page, switch to the Domain Names tab, click Create Domain Name, and configure the parameters as shown in the following figure.
If a service is already deployed using this dedicated gateway, you must wait a short period (up to 5 minutes) for the public custom domain name to take effect after it is configured. Check the service invocation information. If the domain in the Public Endpoint is the public custom domain name you configured, the setting has taken effect.
Configure public domain name resolution. Add a CNAME record for the public custom domain name to point it to the gateway's public domain name.
On the Gateway Details tab of the dedicated gateway, find the gateway's public domain name address.
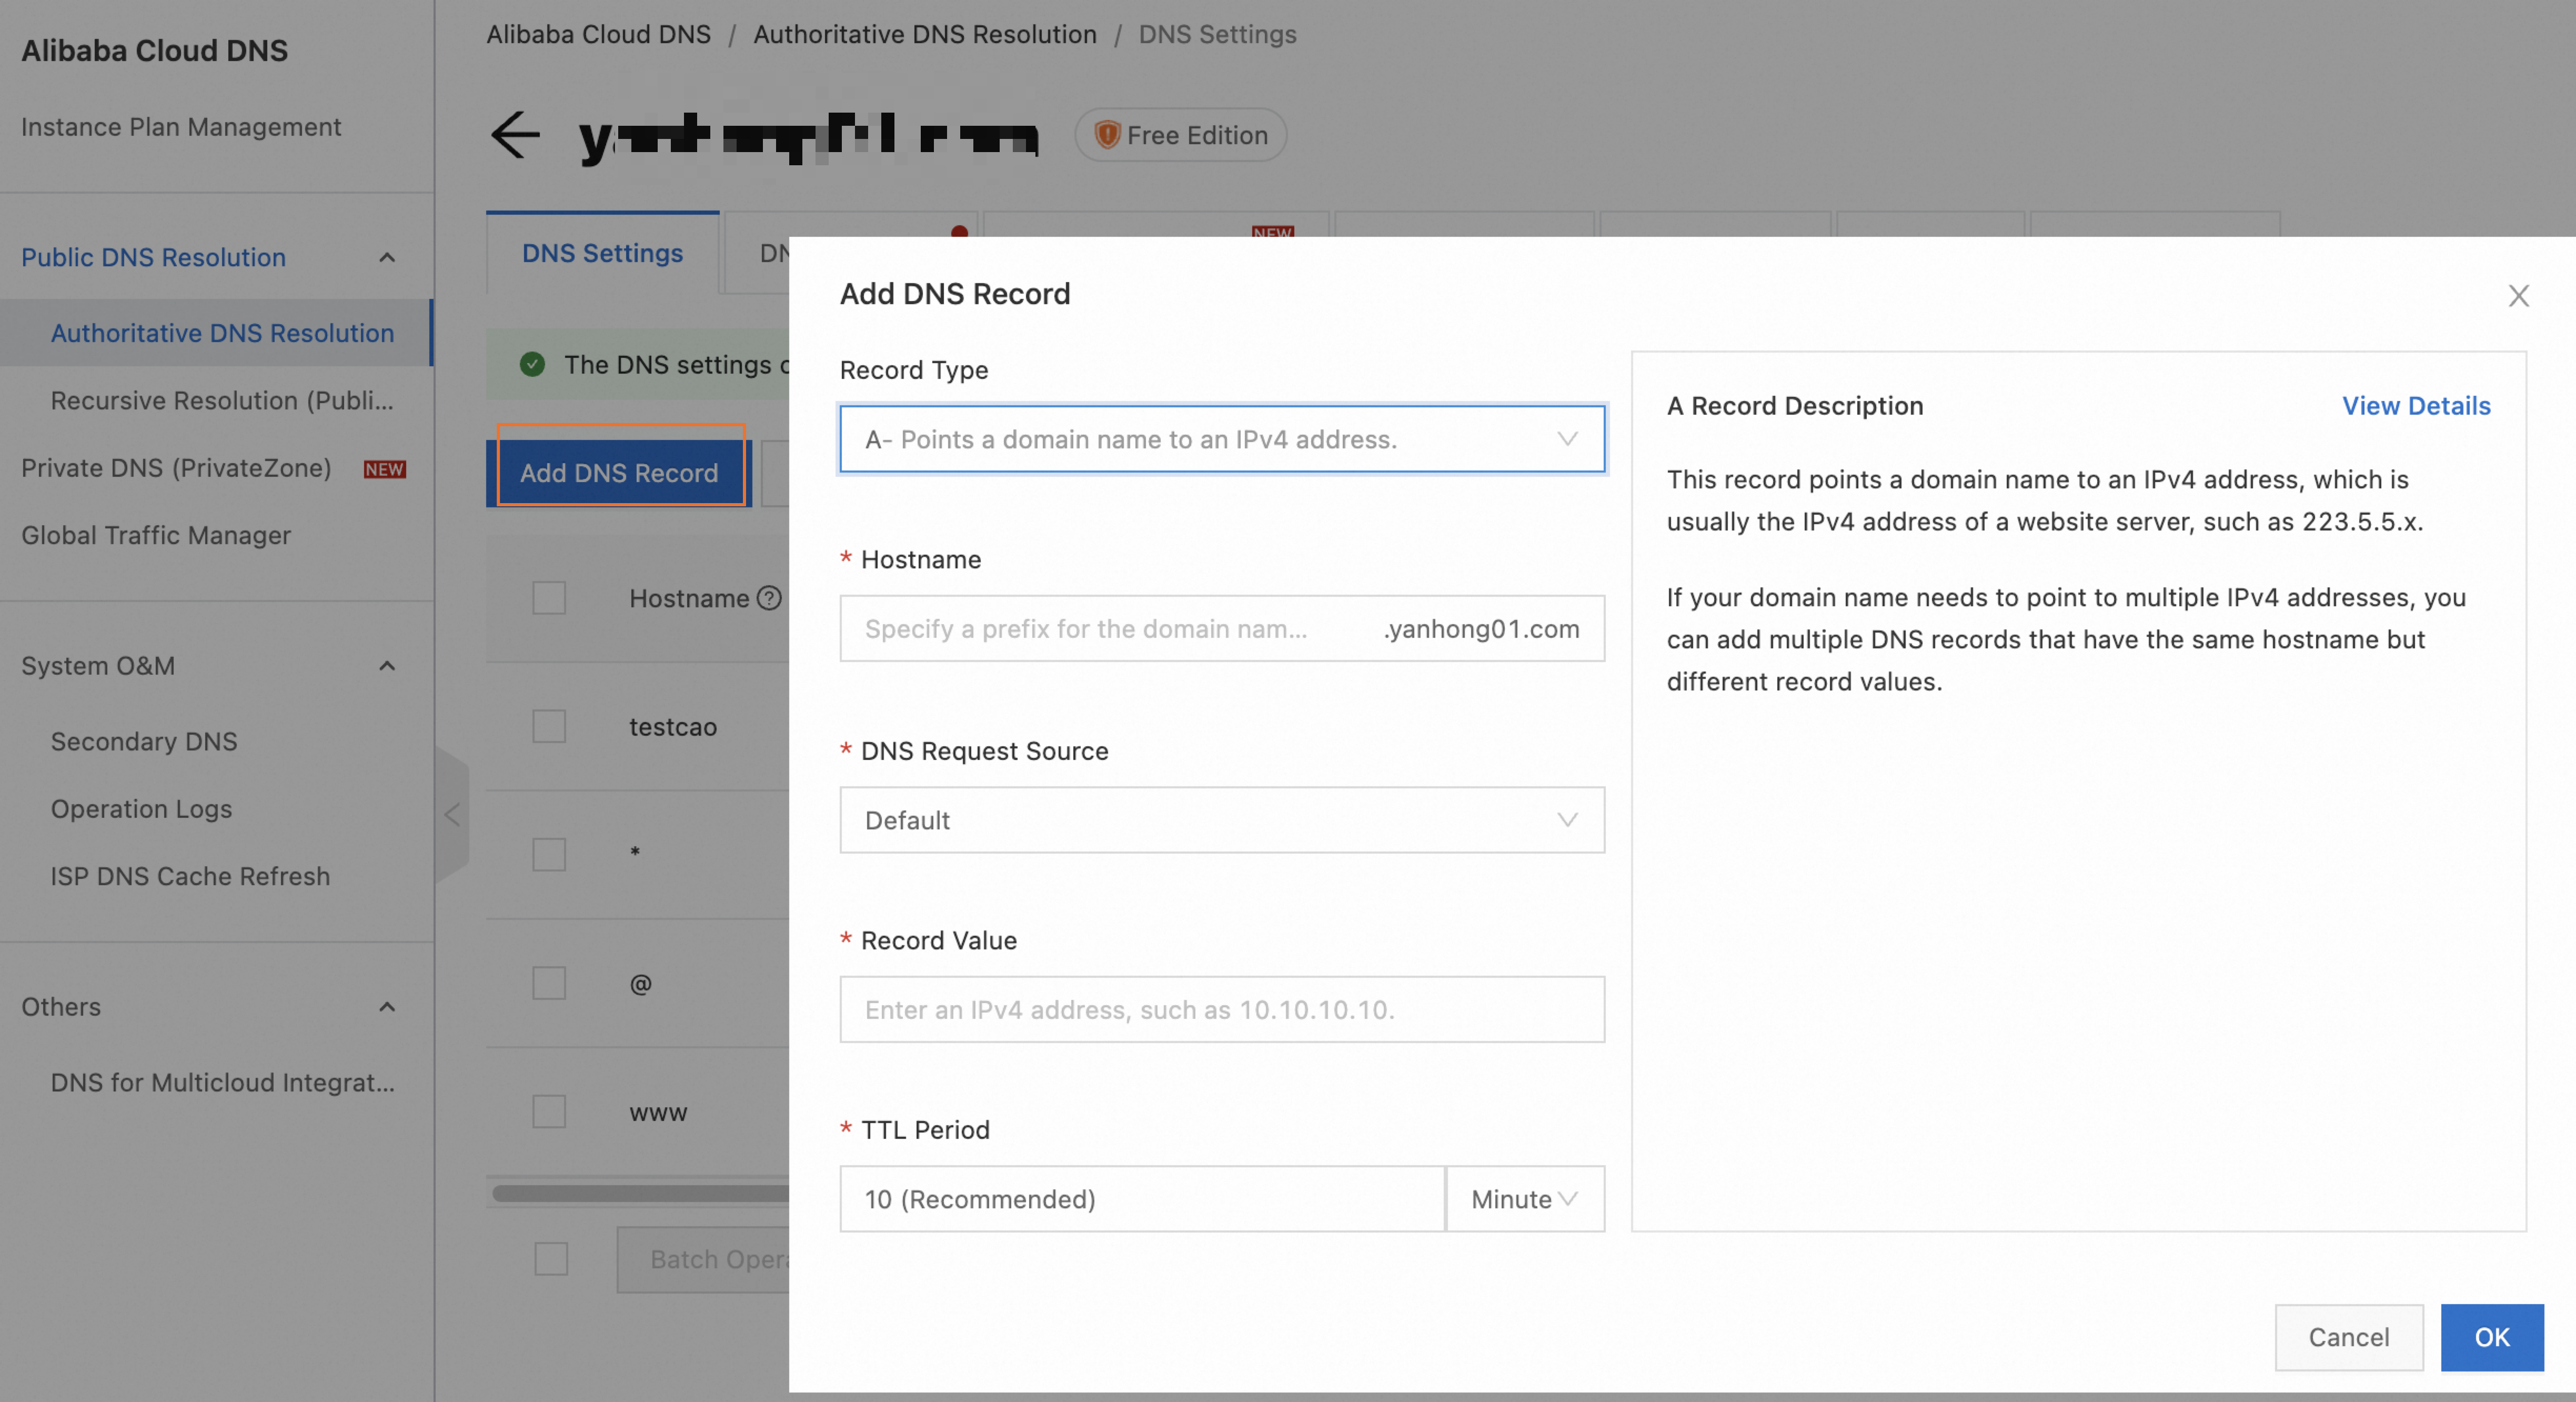
Take Alibaba Cloud DNS as an example. The process is similar for other cloud providers. Log on to the Alibaba Cloud DNS console. On the Authoritative Domain Names tab, find your custom domain name. If the domain name is not registered with Alibaba Cloud, you must add it manually. Click the domain name to go to the DNS Settings page and click Add Record. Set Record Type to CNAME. Set Host to your custom domain name. Set Value to the public domain name of the dedicated gateway from Step a. For more information, see Add a domain name and Add a DNS record.
Configure an internal custom domain name
On the dedicated gateway details page, switch to the Domain Names tab and click Create Domain Name. Refer to the following configuration.

If a service is already deployed using this dedicated gateway, you must wait a short period (up to 5 minutes) after the private custom domain name is configured. Check the service invocation information. If the domain in the VPC Endpoint is the private domain name you configured, the setting has taken effect.
You can set a dedicated gateway as the default gateway. The system will automatically select it for subsequent service deployments.
Part II. Bind a service to the dedicated gateway
The following steps describe how to deploy a new service and bind it to the gateway via the console. For existing services, you can modify the bound gateway by updating the service.
Log on to the PAI console. Select a region on the top of the page. Then, select the desired workspace and click Elastic Algorithm Service (EAS).
On the Inference Service tab, click Deploy Service. In the Custom Model Deployment section, click Custom Deployment.
In the Network Information section, select Dedicated Gateway and choose your created gateway from the dropdown list.
ImportantIf you use an Application Load Balancer (ALB) dedicated gateway, the service must be configured with the same VPC as the gateway.
Part III. Test the service invocation
On the Inference Service tab, click Invocation Method in the Service Type column for the target service. On the Dedicated Gateway tab, you can find the Internet Endpoint, VPC Endpoint, and Token.

Use a curl command to send a request and verify that the response is correct.
Public invocation: Can be executed from your local terminal.
Private invocation: You must execute this from a machine within the VPC.
curl <endpoint_URL> -H'Authorization:<token>'The following figure shows a test of a GET request with no parameters, which is expected to return True.

Advanced management and monitoring
ALB dedicated gateway: For advanced network configuration and monitoring, go to the Application Load Balancer (ALB) console to centrally manage the gateway with maximum flexibility.
Fully-managed dedicated gateway: Logging and monitoring are disabled by default. To use these features, go to the gateway details page. On the Log or Monitoring tab, click Enable Now. If the underlying service (such as Log Service) is not active, you will be prompted to activate it before you can enable gateway monitoring or logging.
Monitor and configure alerts
Application Load Balancer (ALB) dedicated gateway
Most advanced network configurations and monitoring functions should be managed in the Application Load Balancer (ALB) console for maximum flexibility.
Fully-managed dedicated gateway
To ensure the stability of your fully-managed gateway and promptly detect runtime exceptions, we recommend enabling logs, monitoring, and alerts for it.
Steps
Enable logs, monitoring, and alerts. On the gateway details page, go to the Logs, Monitoring, and Alert tabs and follow the on-screen instructions to enable them.
Create an alert policy: After you enable alerts, the Create EAS Dedicated Gateway Alert Policy button appears. Click this button. Refer to Manage alert rules to create alert rules for the gateway.
The {{$labels.envoy_clusterid}} variable used to identify the gateway in the alert content displays an internal ID and does not include your custom gateway name, making it difficult to identify the gateway from an alert notification. For easier identification, we strongly recommend that you manually modify the notification template when creating an alert rule to replace or supplement this variable with an easily recognizable gateway name.
Alert metrics explained
Metric | Definition and Formula | Recommended Threshold and Scenario |
EAS dedicated gateway CPU utilization | The CPU utilization percentage of the gateway instance (Pod). | Recommendation: |
EAS dedicated gateway memory utilization | The memory utilization percentage of the gateway instance (Pod). | Recommendation: |
EAS dedicated gateway overall success rate |
| Recommendation: |
EAS dedicated gateway certificate expiration | The number of remaining valid days for the HTTPS certificate configured on the gateway. | Recommendation: |
EAS dedicated gateway 4xx/5xx request ratio |
| 5xx Recommendation: |
EAS dedicated gateway average response time (RT) | The average response time of all requests during the statistical period, measured in milliseconds (ms). | Recommendation: Set based on your service baseline, for example, |
EAS dedicated gateway request volume vs. yesterday | The percentage change in request volume over an N-minute period compared to the same N-minute period on the previous day. | Recommendation: |
EAS dedicated gateway rate-limited requests | The total number of requests rejected by the gateway's rate-limiting policy during the statistical period. | Recommendation: |
FAQ
Why am I getting a "vSwitch ... is not supported" error when adding a VPC to a dedicated gateway?
You are seeing this error because a dedicated gateway requires its associated vSwitches to be in specific availability zones, and the vSwitch you selected is not in one of them.
To resolve this issue:
Check the error message for the list of
supported zones.When configuring network access for your gateway, choose a vSwitch that is located in one of the supported zones.
For example, with the error
vSwitch vsw-2zeqwh8hv0gb96zcd**** in zone cn-beijing-g is not supported, supported zones: [cn-beijing-i cn-beijing-l cn-beijing-k], you must select a vSwitch from zonescn-beijing-i,cn-beijing-l, orcn-beijing-kinstead ofcn-beijing-g.
Related documents
To learn more about service access methods, see Overview of invocation method.
Configuring gateway timeouts properly helps prevent resource exhaustion and request backlogs while improving the user experience. To learn how, see Best practices for dedicated gateway timeout settings.