LangStudio's code mode lets you build Agent applications using Python code, with end-to-end support for creating, debugging, and deploying in the cloud. This guide walks you through building an Agent that supports tool calling, skills, and streaming output in less than 5 minutes.
Prerequisites
Before you begin, make sure you have:
An Alibaba Cloud account with PAI activated
An API key from Alibaba Cloud Model Studio
Step 1: Create an application
Log on to the PAI console. In the top navigation bar, select a region, such as China (Hangzhou).
In the left navigation pane, choose Model Application > Application Development (LangStudio).
On the Applications tab, click Create Application and select Code Mode from the drop-down list.
On the Create Application page, configure the following parameters:
Parameter Description Creation method Select Create from Template, then select LLM Basic. Name Enter a name for your application, such as AI Chat Agent. Select runtime A runtime is the computing environment for executing and debugging your code. Select an existing runtime from the drop-down list. If none is available, click New Runtime to create one with default settings. Multiple applications can share the same runtime. Working path The OSS bucket path for storing workflow configurations, logs, and temporary files. Populated automatically after you select a runtime. Description (Optional) A short description of the application. Click Confirm. LangStudio takes you to the developer page.
Step 2: Configure environment variables
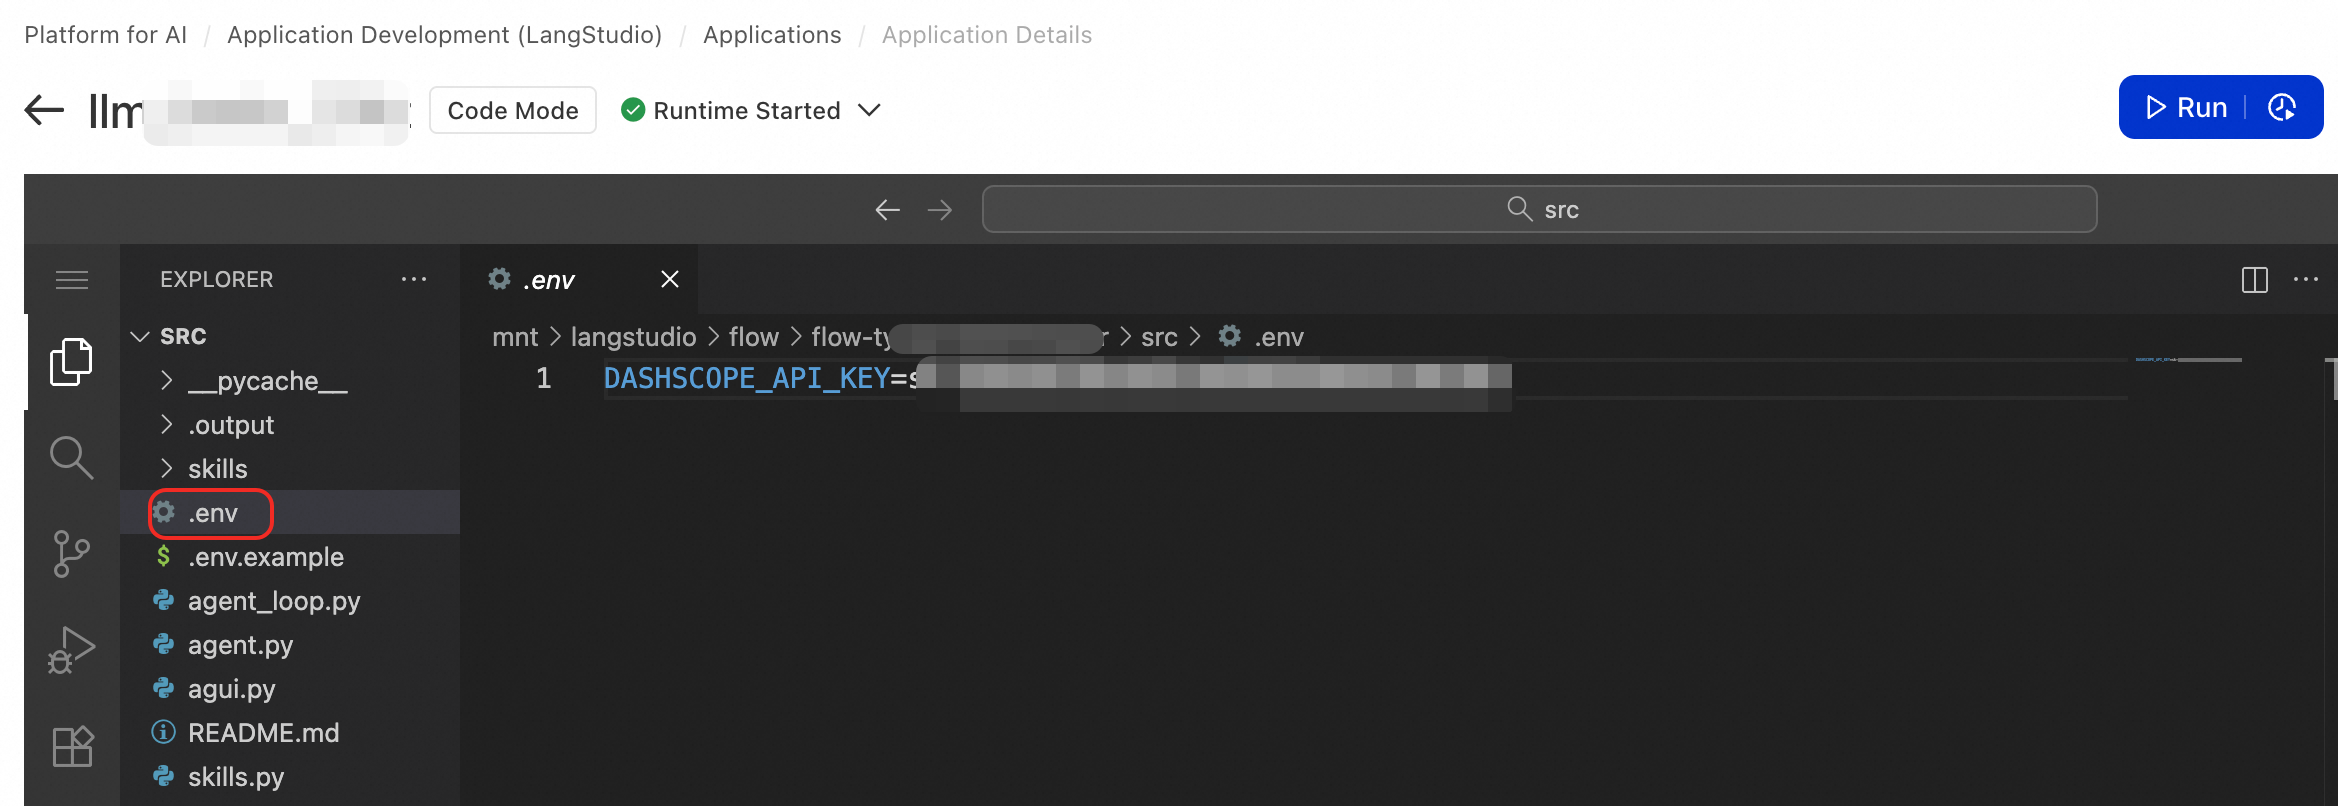
The LLM Basic template uses Alibaba Cloud Model Studio as the LLM provider. Create a .env file in the project root directory with your API key:
DASHSCOPE_API_KEY=your-api-key-hereThe runtime loads this file automatically at startup.
If you are using an international account, open agent_loop.py and update base_url at line 118:
# Change from:
base_url="https://dashscope.aliyuncs.com/compatible-mode/v1"

# To:
base_url="https://dashscope-intl.aliyuncs.com/compatible-mode/v1"
Using an international API key with the Chinese mainland endpoint causes connection failures.
Step 3: Understand the project structure
The LLM Basic template gives you a working Agent project out of the box:
project/
├── agent.py          # Entry file: defines the FastAPI app and API endpoints
├── agent_loop.py     # Core logic: handles LLM calls and the tool execution loop
├── agui.py           # AG-UI Protocol event stream transformation
├── skills.py         # Skill system: discovers, loads, and executes skills
├── skills/           # Skills directory
│   ├── get-current-time/
│   └── create-plan/
├── requirements.txt  # Python dependencies
├── .env              # Environment variable file (create this manually)
└── README.md         # Detailed documentation
agent.py is the default entry file and must expose a global FastAPI object named app. LangStudio detects and loads this object to start the service.
Read README.md for details on how to extend the template.
Step 4: Debug the Agent
Click Run in the upper-right corner of the developer page. LangStudio starts the runtime and loads your code. Once ready, the debugging panel appears on the right.
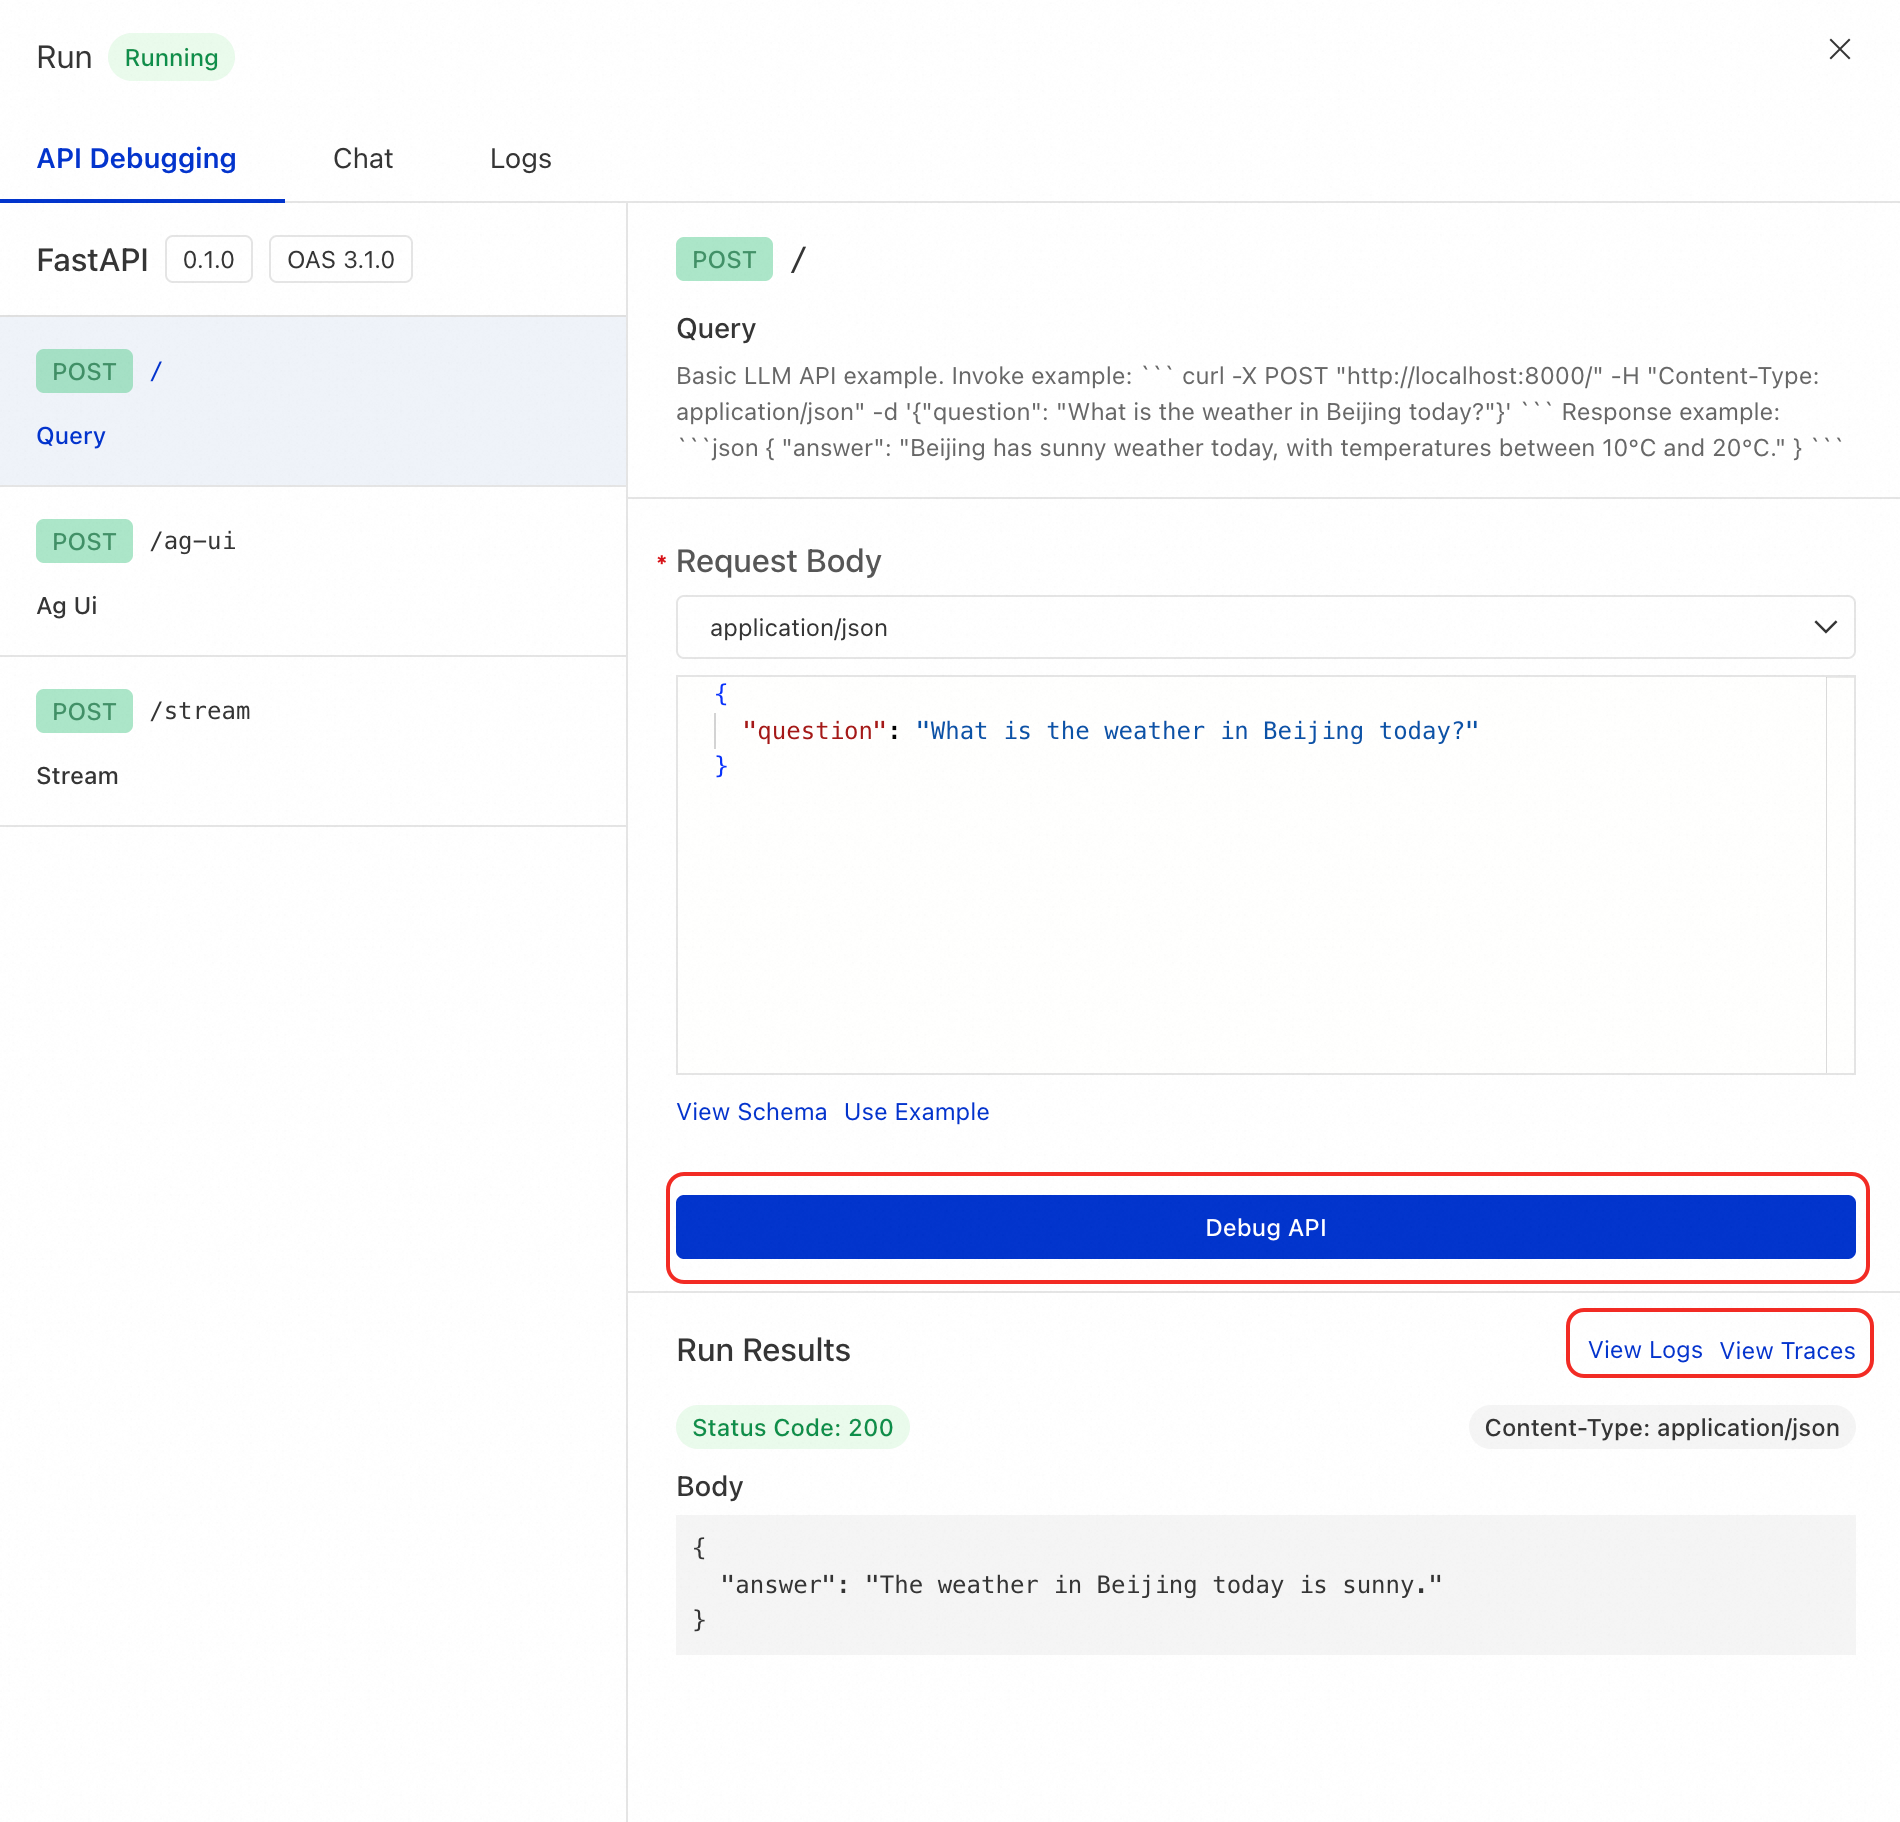
Test with API debugging
On the API Debugging tab, select the API endpoint to test (for example, POST /), enter request parameters, and send the request.
Sample request:
{
  "question": "What is the weather like in Beijing today?"
}
Expected response:
{
  "answer": "The weather in Beijing today is sunny, with temperatures between 10°C and 20°C."
}
Test with the chat panel
Go to the Chat page and send a message directly to start a multi-turn session.
The chat panel uses the AG-UI Protocol, which requires the service to support the /ag-ui endpoint.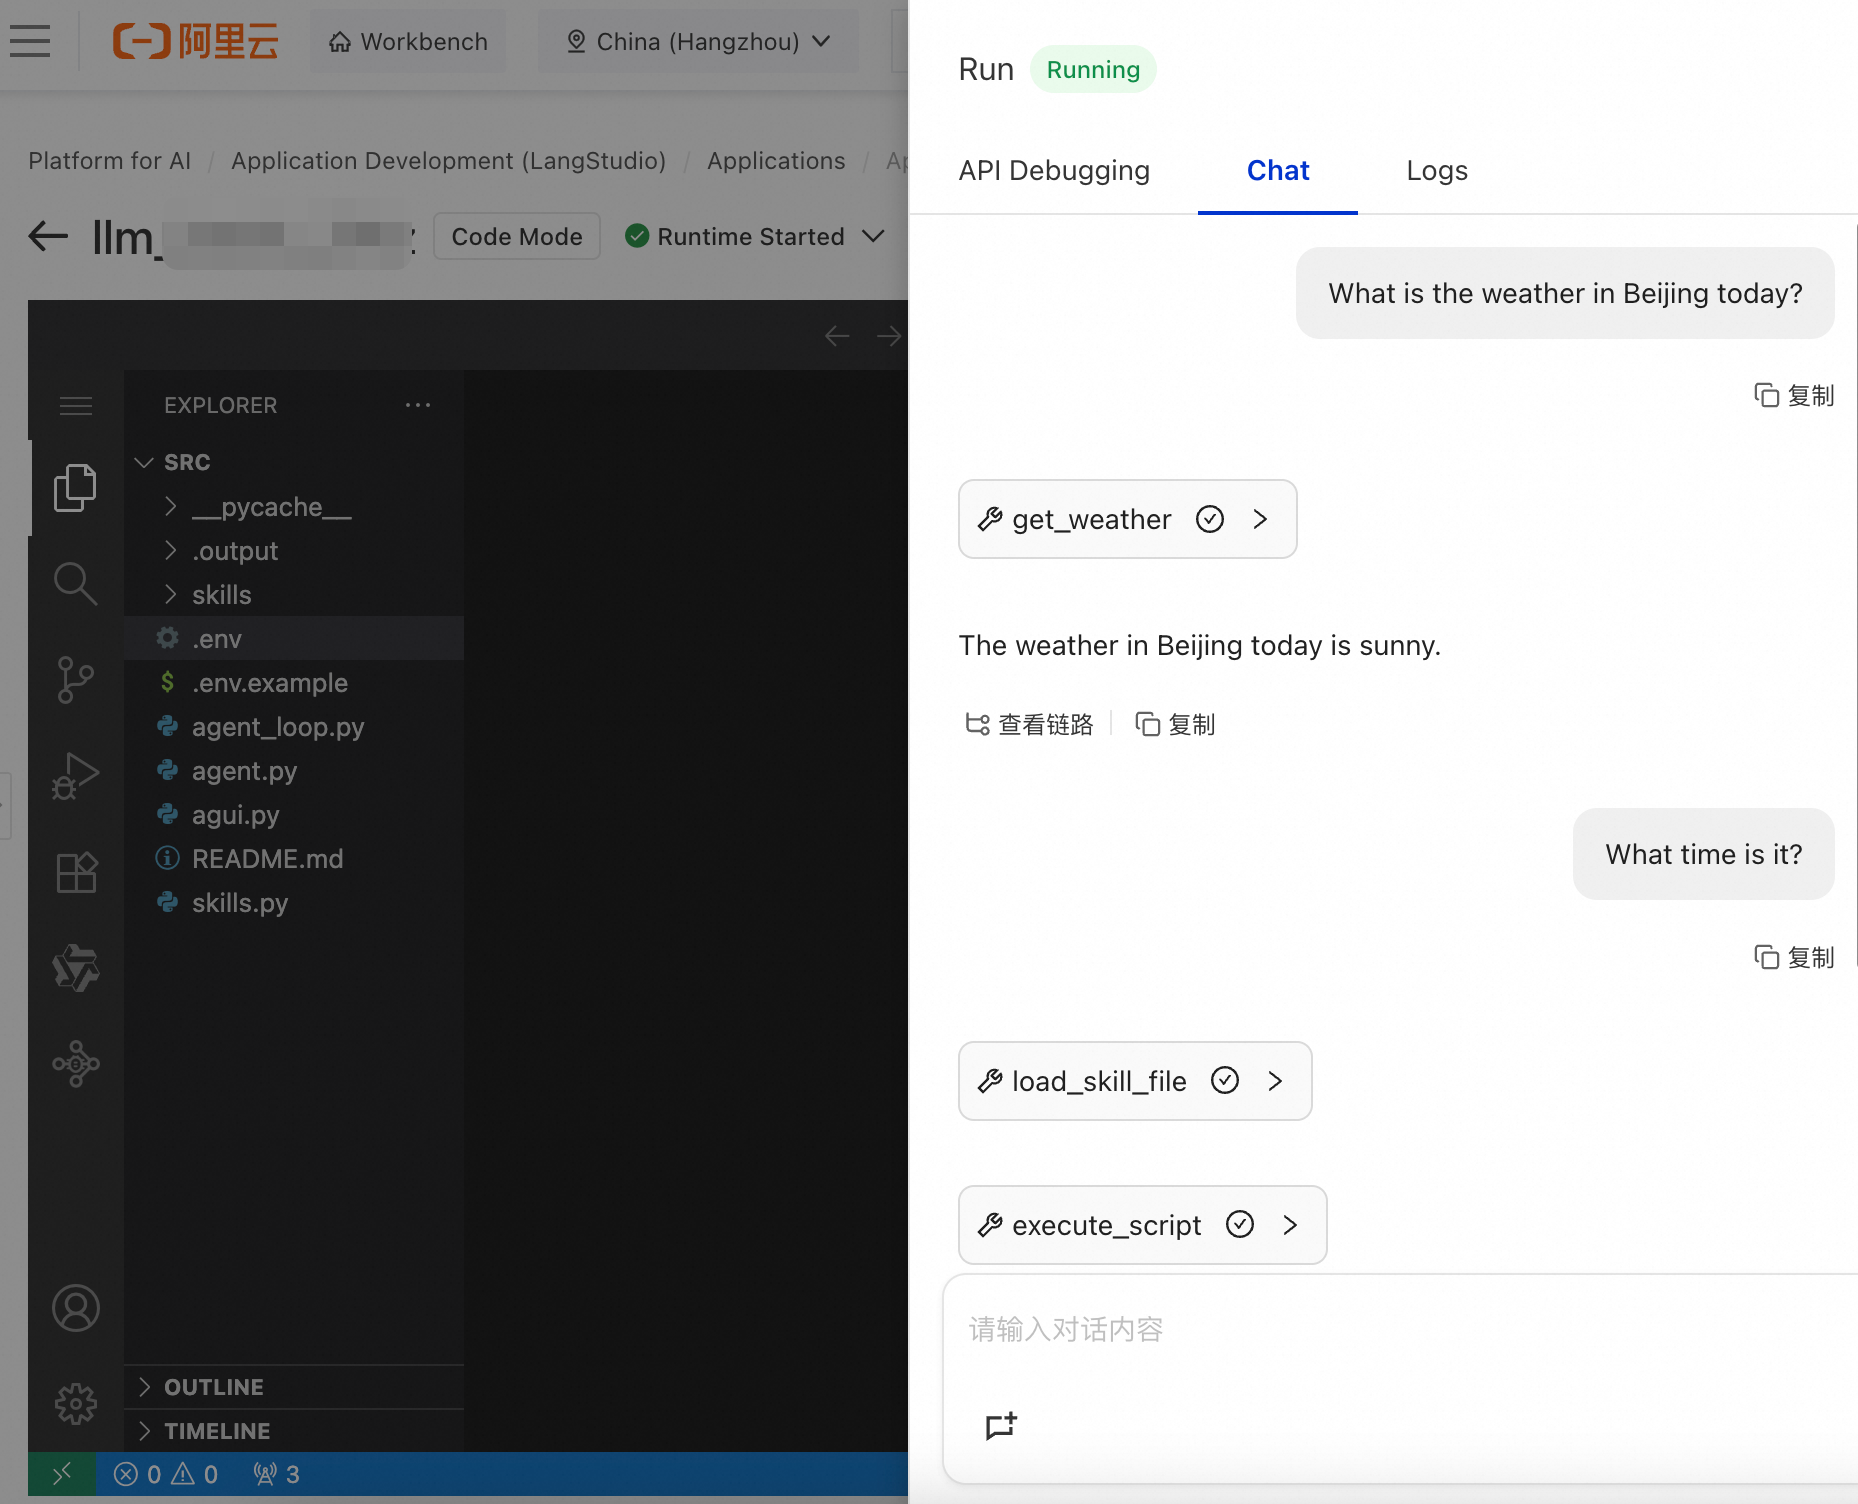
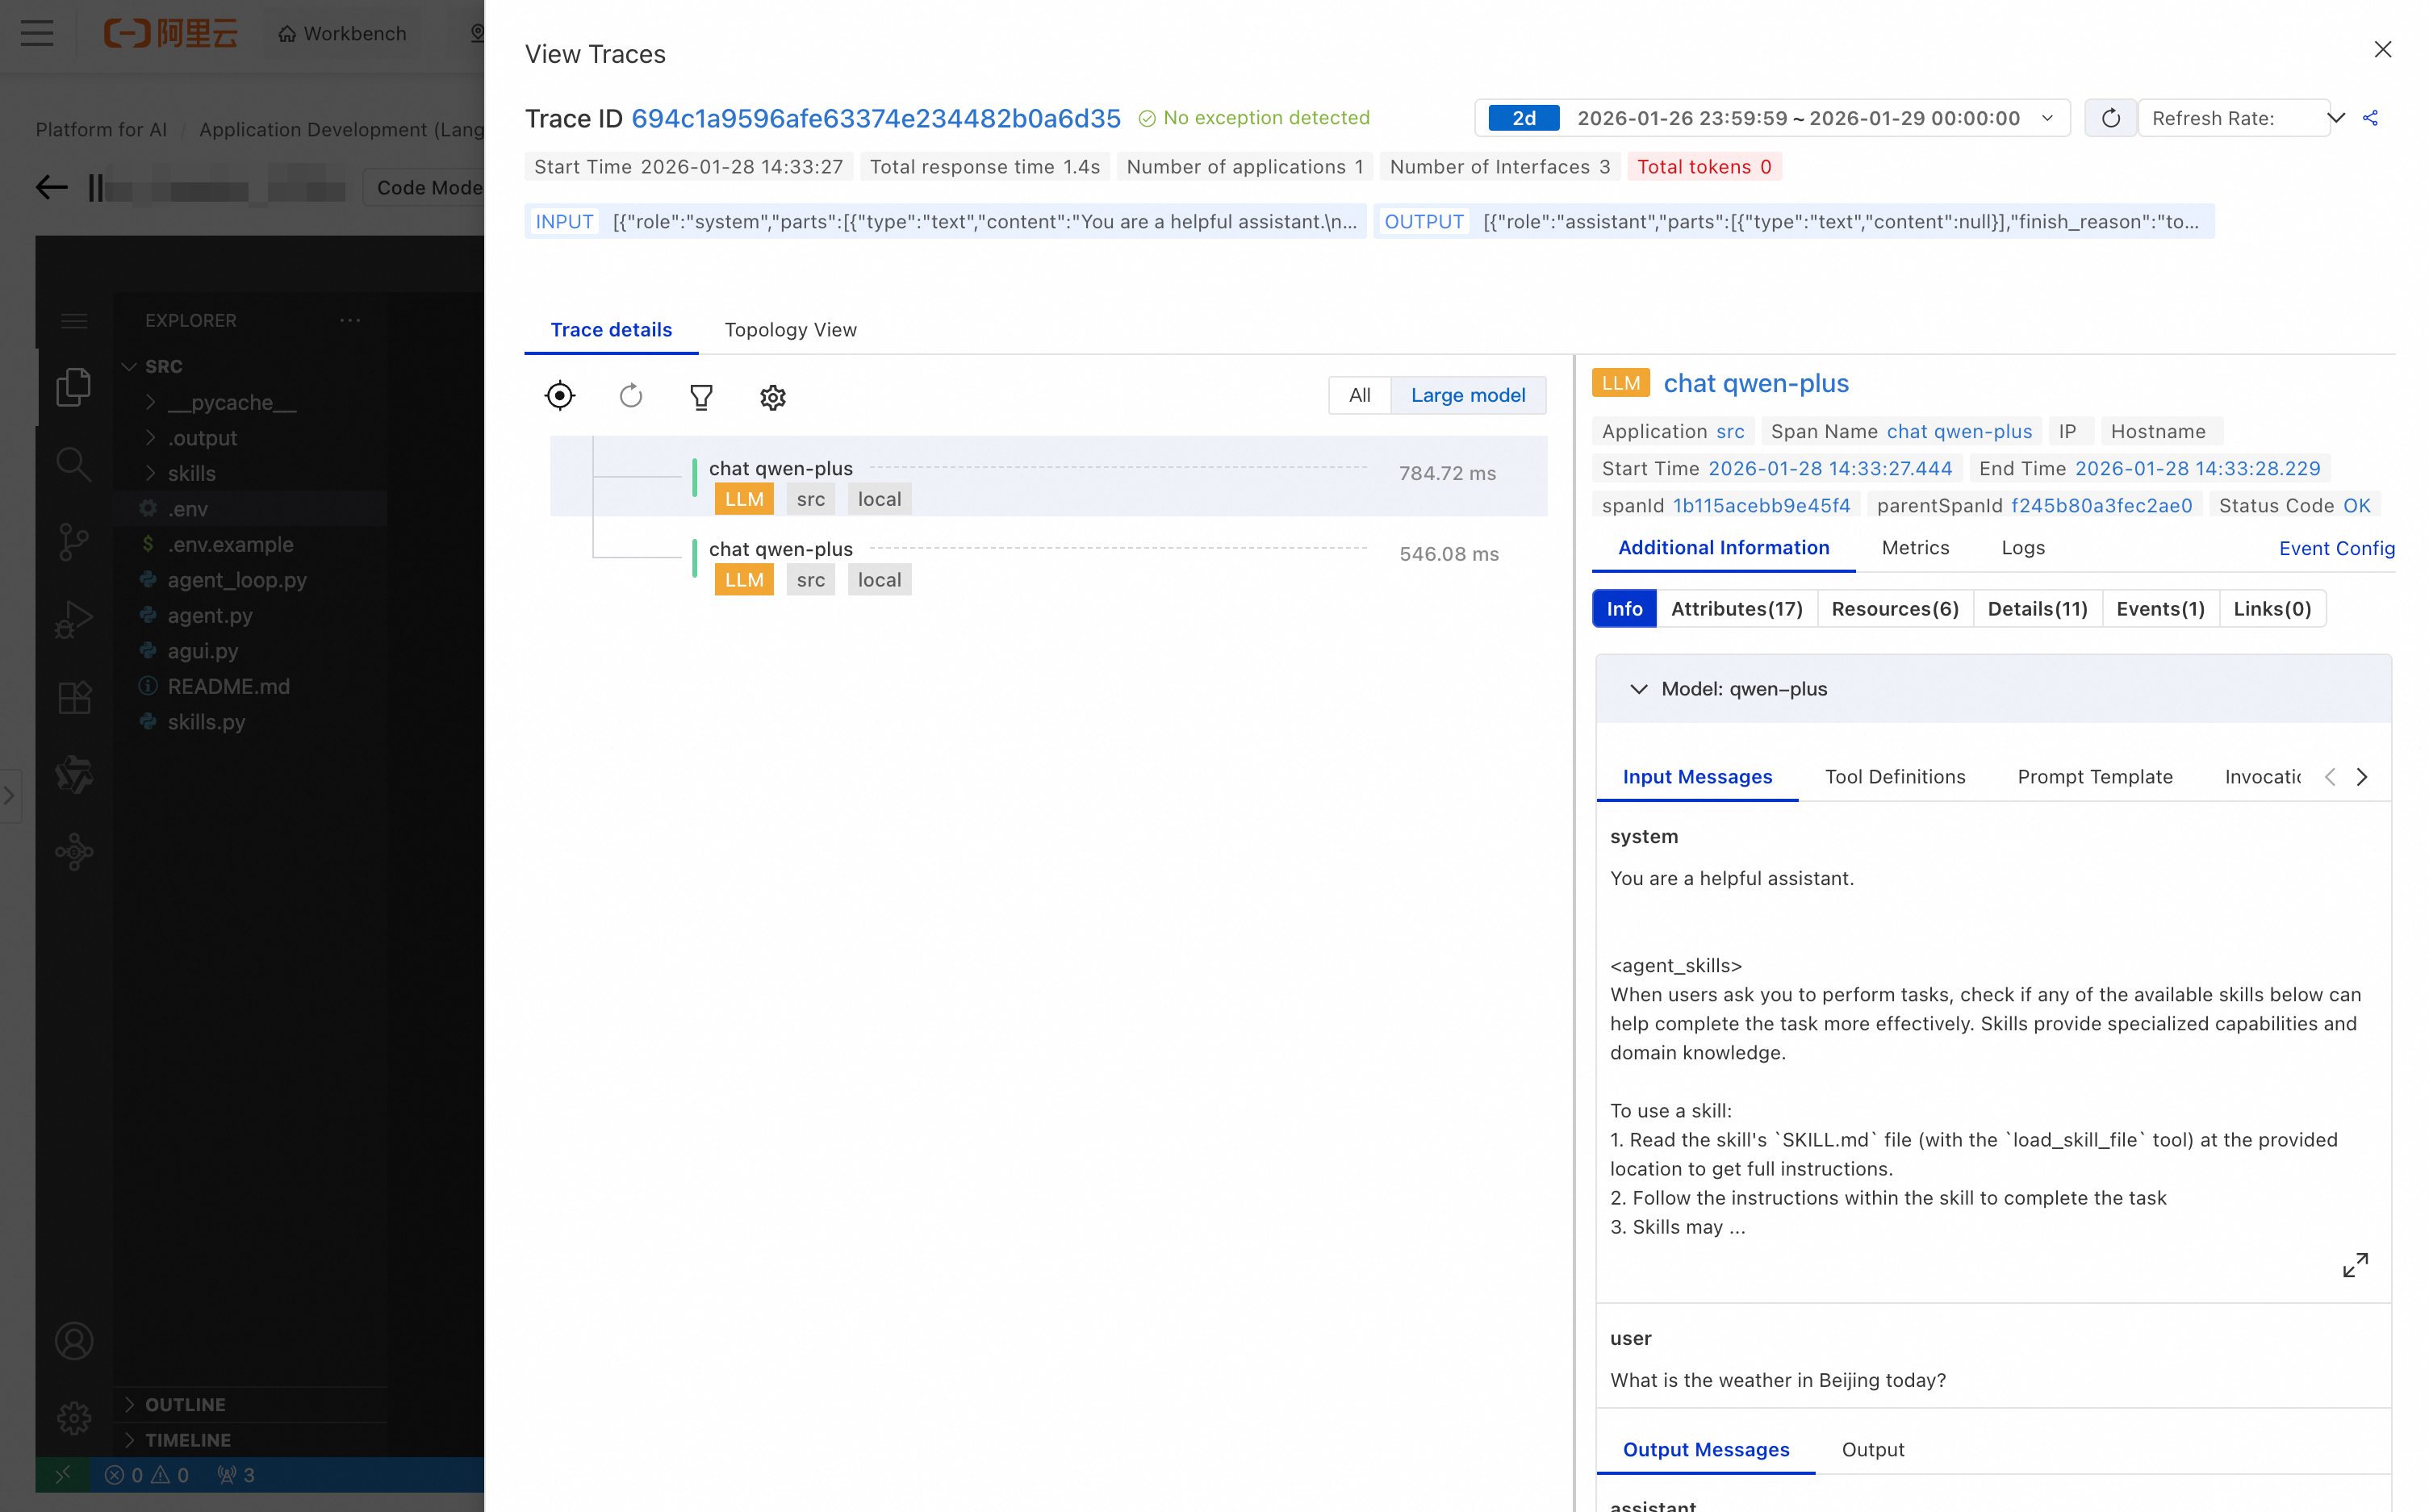
View tracing analysis
Every request is automatically traced, regardless of how you test. The trace includes:
Request duration: time taken for each stage
LLM call details: model parameters and token usage
Tool call records: tools called and their returned results
Error messages: detailed stack traces when errors occur
If your code throws an exception, check the worker log on the Run page.
Step 5: Deploy the service
After debugging, deploy the application as a scalable online service.
Click Confirm in the upper-right corner of the developer page.
In the dialog box, configure the deployment resources, service name, Virtual Private Cloud (VPC), and vSwitch. LangStudio packages your FastAPI app into a PAI-EAS service.
ImportantThe LLM service requires public internet access, but PAI-EAS services do not have outbound internet access by default. Associate a NAT Gateway with your VPC and vSwitch to enable it. Without this, all LLM calls fail. See Access public or private network resources from EAS for setup instructions.
On the Deployment Flow page, verify the deployment contents and click Submit deployment.
Deployment takes 5 to 10 minutes. When complete, click Go to EAS in the upper-right corner.
On the Overview tab, go to the Basic Information section and click View Endpoint Information to retrieve the endpoint URL and authentication token.
Test the deployed service:
# Replace <EAS_ENDPOINT> and <EAS_TOKEN> with your endpoint URL and authentication token.
curl -X POST '<EAS_ENDPOINT>' \
  -H 'Authorization: Bearer <EAS_TOKEN>' \
  -H "Content-Type: application/json" \
  -d '{"question": "What is the weather like in Beijing today?"}'
Use the monitoring and tracing features on the EAS service page to track performance metrics and inspect request traces in real time.
Step 6: Customize your Agent
The LLM Basic template is a starting point. Here are the most common ways to extend it.
Modify the system prompt
Edit the to_messages() method in agent.py to define the Agent's role and behavior:
def to_messages(self) -> list:
    return [
        {"role": "system", "content": "You are a professional travel planning assistant. Your answers should be concise, actionable, and presented as a checklist."},
        {"role": "user", "content": self.question},
    ]
Add a custom tool
Define a standard Python function in agent.py. The function name becomes the tool name, and type annotations generate the tool schema automatically. Both sync and async def functions are supported.
def geocode(city: str) -> str:
    """Get the geographical coordinates of a city."""
    # Replace with an actual API call
    return '{"lat": 39.9042, "lng": 116.4074}'
Pass the tool list to agent_loop in your API endpoint:
@app.post("/")
async def query(req: QueryRequest) -> QueryResponse:
    tools = [get_weather, geocode]
    async for chunk in agent_loop(req.to_messages(), tools=tools):
        # ...
Add a skill
Skills organize complex instructions and scripts for the Agent to use.
Create a subdirectory under
skills/for your skill, for examplemy-skill. The directory must include aSKILL.mdfile:skills/ └── my-skill/ ├── SKILL.md # Required: skill definition file └── scripts/ # Optional: scripts executed by this skill └── run.pyWrite the skill definition in
SKILL.md:--- name: my-skill description: Use this skill when the user needs to perform a specific task. --- # My Skill ## Goal Describe what the skill does in one sentence. ## Instructions Detailed operation instructions...
The Agent automatically discovers available skills through the system prompt and uses the built-in load_skill_file and execute_script tools to run them.