DSW includes a built-in AI coding toolset (AgentBox) that integrates Qwen Code, OpenCode, Hermes, and OpenClaw. With PAI Token Service, you can start coding immediately without managing an API key.
Highlights
-
Multiple tools in one place: Qwen Code, OpenCode, Hermes, and OpenClaw are built in. Claude Code and CodeX will be added soon.
-
One-click model setup: Configure model services through PAI Token Service — no API key management required.
-
Enhanced terminal: A new terminal with a file tree, file preview, Markdown rendering, and adjustable font size, tailored for AI coding workflows.
-
Zero setup: Open and start coding — no dependencies or environment configuration needed.
AI coding tools
DSW includes the following AI coding tools for code completion, Q&A, code generation, and agentic workflows.
-
Qwen Code
An AI coding assistant developed by Alibaba Cloud. It supports code completion, Q&A, code explanation, and unit test generation, optimized for the Qwen model family.
Best for: Day-to-day code writing and completion, code Q&A, and code review.
-
OpenCode
An open-source AI coding tool that supports multiple model backends and interactive programming. Ideal for developers who prefer flexible configurations.
Best for: Comparing models side by side, interactive code development, and rapid prototyping.
-
Claude Code
Claude Code is coming soon. You can install it manually now. For details, see Use Claude Code in DSW.
General-purpose agent tools
DSW also integrates the following general-purpose agent tools:
-
Hermes
An AI coding agent that plans and runs complex, multi-step development tasks autonomously.
Best for: Breaking down complex requirements, coordinating changes across multiple files, and end-to-end development tasks.
-
OpenClaw
An AI agent framework that controls the operating system, manages persistent memory and scheduled tasks, and supports Web UI and DingTalk interaction. It includes a built-in skills ecosystem.
Best for: Training job monitoring and alerting, automated experiment data archiving, and custom agent workflows.
Get started
Step 1: Create or restart a DSW instance
-
New instance: Log on to the PAI-DSW console and create an instance.
-
Existing instance (started before July 2026): In the instance list, click Restart next to your instance. The new AI development tools appear after the restart.
Step 2: Configure a model service
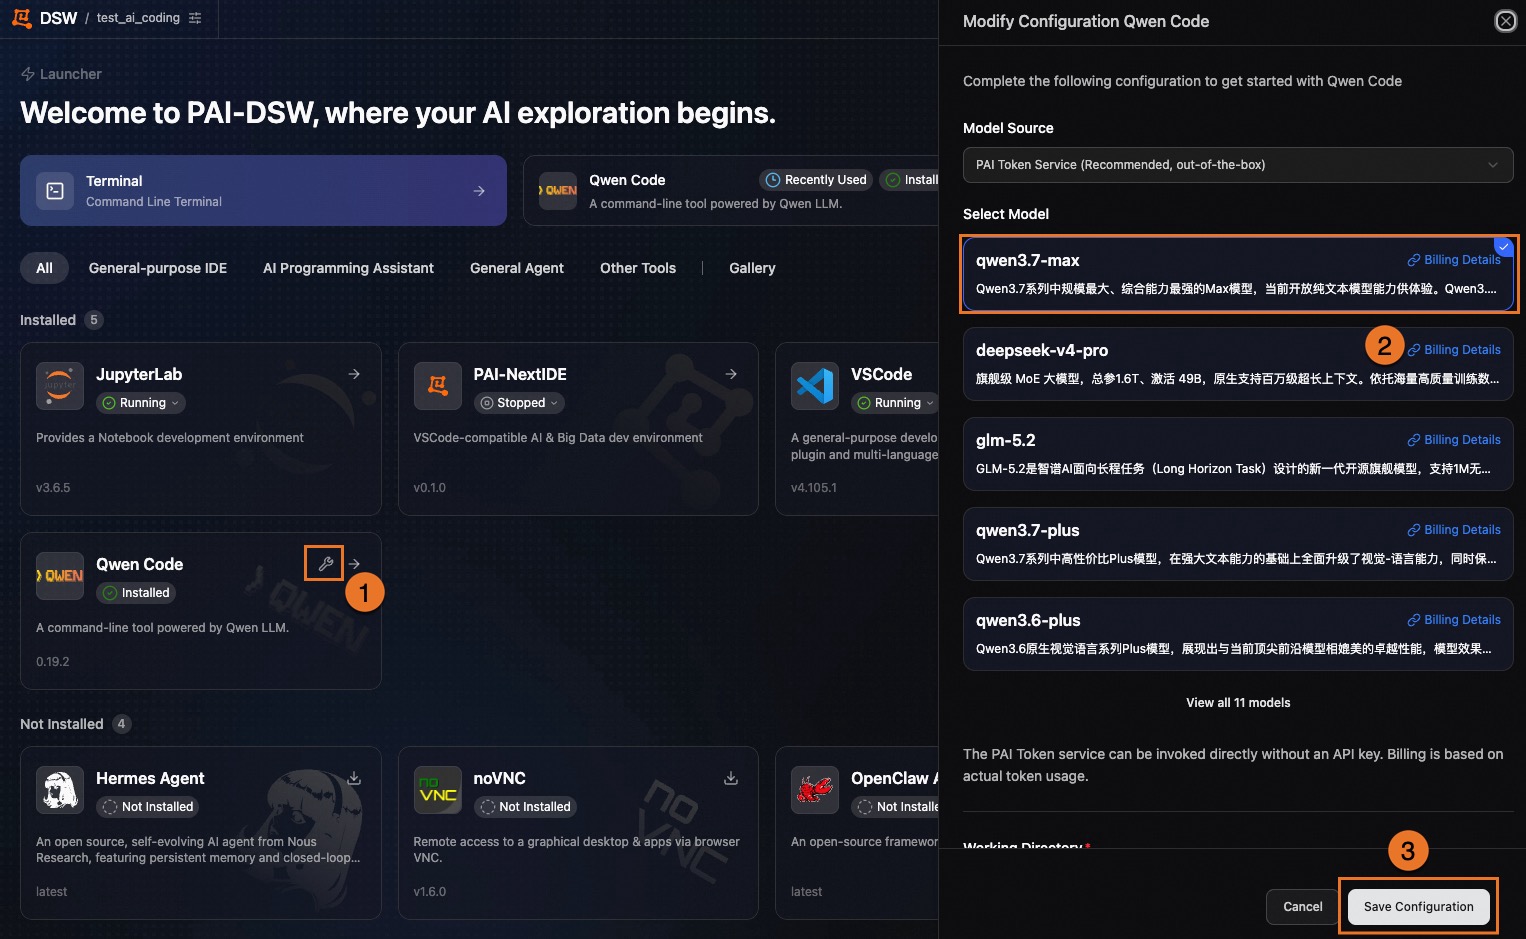
AI coding tools require a large language model (LLM) connection. PAI Token Service is the recommended option — activate it and start using it immediately without deploying a model or managing API keys.
You can also configure your own API key from Model Studio, Elastic Algorithm Service (EAS), or any other OpenAI-compatible model service.
Activate PAI Token Service
-
Go to the PAI Token Service console.
-
If PAI Token Service isn't activated, click Activate.
-
In DSW, select an AI coding tool, click the PAI Token Service option, and complete the setup.
Recommended models
The following table lists the available models and recommended use cases:
|
Use case |
Recommended model |
Description |
|
General coding and refactoring |
|
Flagship model with the best overall performance (default). |
|
Code-focused tasks |
|
Optimized for code generation with long-context support. |
|
Complex reasoning and large-scale refactoring |
|
Strong reasoning and planning capabilities for architecture-level tasks. |
|
Multimodal analysis |
|
Supports image understanding (screenshots, charts, and UI mockups). |
|
Ultra-fast response |
|
Lightweight and fast. Suitable for simple Q&A, renaming, and comment generation. |
|
Cost-effective daily use |
|
Covers common development tasks such as conversations and minor edits. |
|
GLM series |
|
Zhipu GLM model family. Choose based on your preference. |
Step 3: Start coding
Open your DSW instance, select an AI coding tool and a model (for example, Qwen Code with qwen3.7-max), and start coding.
Enhanced terminal
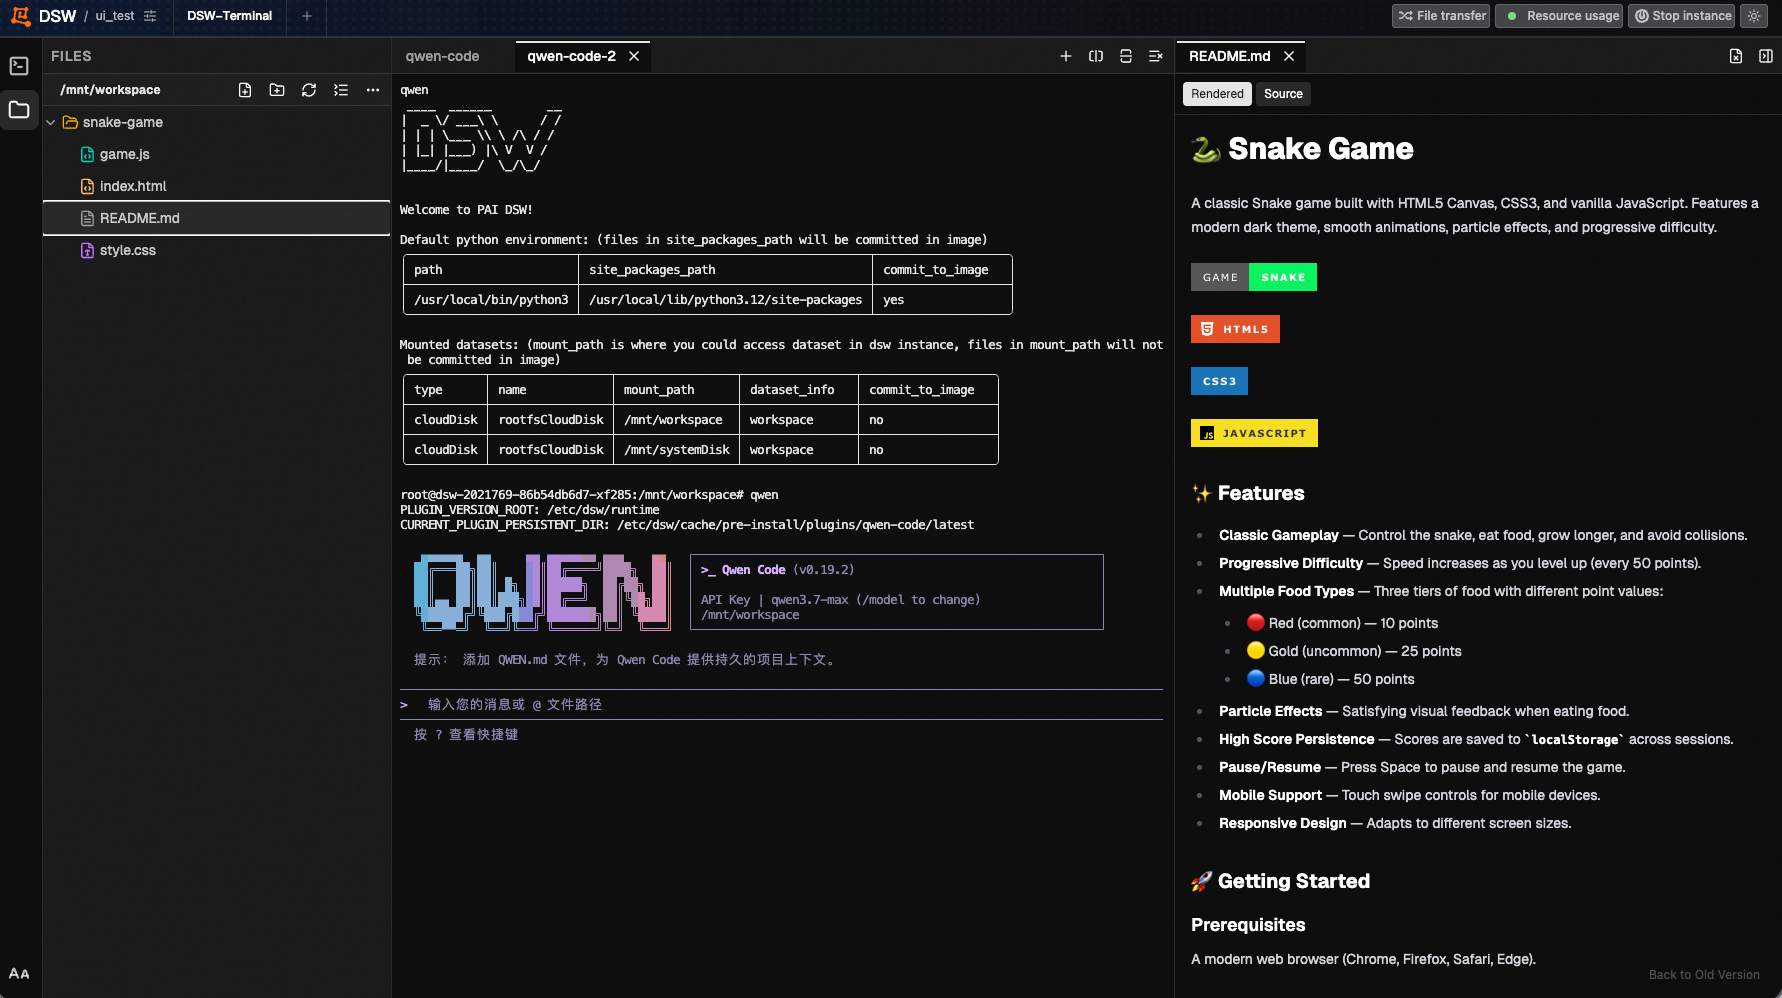
The DSW terminal includes several enhancements for AI coding workflows.
-
File tree and file management
A file tree panel on the left side of the terminal displays your working directory. Create, rename, and delete files without switching applications.
-
Text file preview
Click a text file in the file tree to preview it with syntax highlighting — no separate editor needed.
-
Markdown rendering
The terminal renders
.mdfiles as rich text so you can review formatting in place. -
Adjustable font size
Click AA in the lower-left corner of the terminal to change the font size.
UX improvements
-
Recently used apps pinned to the top
The DSW Launcher page automatically pins your most recently used apps to the top for quick access.
-
Light and dark mode
Click
 in the upper-right corner of DSW to switch between light mode and dark mode.
FAQ
The interface doesn't match the documentation and I can't find the AI tools
If you're using an existing instance, restart it and try again. If you still don't see the AI tools on a new instance, contact PAI technical support.
Does PAI Token Service cost extra?
PAI Token Service is billed based on actual token usage. Charges appear on your PAI Token Service bill.
Can I use my own API key?
Yes. You can configure your own API key from Model Studio, Elastic Algorithm Service (EAS), or any other OpenAI-compatible model service.
When will Claude Code and CodeX be available?
Both tools are coming soon. Follow PAI-DSW product updates for the latest announcements.
Are there instance type requirements for AI coding tools?
No specific instance type is required. We recommend at least 4 vCPUs for the best experience. If you need GPU-accelerated inference, select an instance type with a GPU.
Will restarting an existing instance cause data loss?
If your working directory is mounted to a cloud disk or cloud storage (such as NAS or CPFS), only the DSW components are updated during a restart. Your code, data, and existing configurations are not affected.