Deploy Stable Diffusion WebUI on EAS for AI-powered image generation with one-click templates and GPU auto-scaling.
Features and benefits
PAI-EAS advantages over self-built services:
-
One-click deployment: Pre-configured images include all dependencies.
-
GPU auto-scaling: Dynamically adjusts GPU resources based on demand.
-
Enterprise-grade features: Multi-user isolation, GPU sharing, cost allocation.
-
Integrated file management: Built-in FileBrowser extension simplifies model uploads.
Select a version
|
Version |
Scenarios |
Invocation Method |
Billing |
|
Standard edition |
Personal testing, prototype development |
WebUI, API invocation (sync) |
Billing based on deployment configuration. For details, see EAS Billing Overview. |
|
API edition |
Production environment API, high concurrency scenarios |
API invocation (sync & async) |
|
|
Clustered WebUI |
Team collaboration, design teams |
WebUI |
|
|
Serverless edition Note
Supported only in China (Shanghai) and China (Hangzhou) regions. |
Elastic load, cost optimization |
WebUI |
Service deployment is free. Billing based on image generation duration only. |
Quick start
-
Log on to the PAI console. Select a region on the top of the page. Then, select the desired workspace and click Elastic Algorithm Service (EAS).
-
On the Elastic Algorithm Service (EAS) page, click Deploy Service. In the Scenario-based Model Deployment area, click AI Painting - SD Web UI Deployment.
-
Configure key parameters:
-
Version: Select Standard edition.
-
Model Settings: Stores model files and inference-generated images. Select OSS and choose a bucket path.
-
Instance Type: Select GPU type. The recommended instance type is
ml.gu7i.c16m60.1-gu30(highest cost-performance ratio).
-
-
Click Deploy. Wait 5–10 minutes until service status changes to Running.
Call the service
WebUI
Access Standard edition, Clustered WebUI, and Serverless edition services through WebUI:
-
Click the target service name to open the Overview page, then click Web applications in the upper-right corner.
-
Verify model inference.
On the Stable Diffusion WebUI page, in the Text-to-Image tab, enter a positive prompt such as
cute dog. Click Generate to complete AI art generation. Result: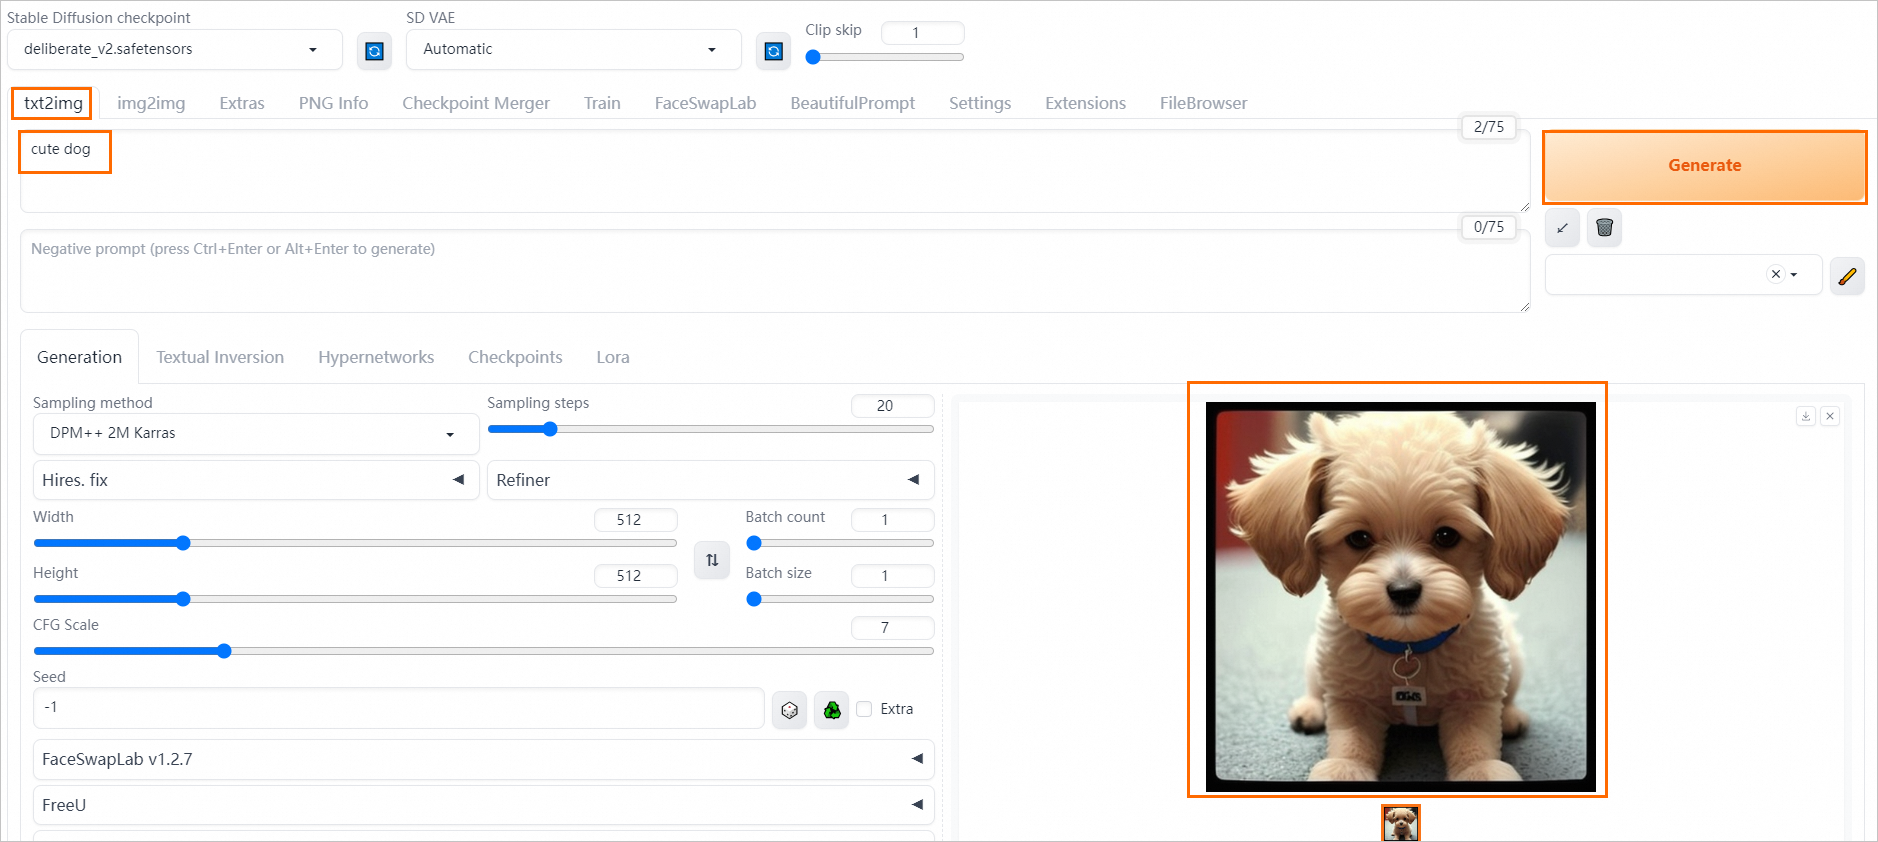
Synchronous API
After deploying Standard edition or API edition services, send synchronous API requests.
Obtain endpoint
-
After deploying the service, click the service name to enter Overview.
-
In Basic Information, click View Endpoint Information.
-
On Invocation Information, obtain the public service endpoint and Token.
Examples
Save images locally
import requests
import base64
from PIL import Image
import io

# Important: Remove the trailing / from the service URL.
SERVICE_URL = "<service_url>"
TOKEN = "<Token>"

def generate_image(prompt: str) -> Image.Image:
    """Generate an image from a text prompt."""
    payload = {
        "prompt": prompt,
        "negative_prompt": "blurry, low quality, deformed",
        "steps": 25,
        "width": 512,
        "height": 512,
        "cfg_scale": 7.5,
    }

    response = requests.post(
        f"{SERVICE_URL}/sdapi/v1/txt2img",
        json=payload,
        headers={"Authorization": TOKEN}
    )
    response.raise_for_status()

    # Decode the first image
    img_data = response.json()["images"][0]
    return Image.open(io.BytesIO(base64.b64decode(img_data)))

# Generate and save
image = generate_image("a serene mountain landscape at sunset")
image.save("output.png")
Save images to OSS
import requests

# Important: Remove the trailing / from the service URL.
SERVICE_URL = "<service_url>"
TOKEN = "<Token>"

payload = {
    "prompt": "professional portrait photography",
    "steps": 30,
    "alwayson_scripts": {
        "sd_model_checkpoint": "v1-5-pruned-emaonly.safetensors",
        "save_dir": "/code/stable-diffusion-webui/data/outputs"
    }
}

response = requests.post(
    f"{SERVICE_URL}/sdapi/v1/txt2img",
    json=payload,
    headers={"Authorization": TOKEN}
)

# Get the saved image paths
data = response.json()

# This corresponds to the mount_path of the OSS folder mounted when deploying as an EAS Service.
mount_path = "/code/stable-diffusion-webui/data"

# This corresponds to the OSS bucket URL selected when deploying as an EAS Service.
oss_url = "oss://examplebucket/data-oss"

for idx, img_path in enumerate(data['parameters']['image_url'].split(',')):
    # Get the actual OSS path of the generated image.
    img_oss_path = img_path.replace(mount_path, oss_url)
    print(img_oss_path)
For advanced features, use LoRA and ControlNet in API requests.
Use LoRA models in requests
Add <lora:yaeMikoRealistic_Genshin:1000> to the prompt field in the request body to apply a LoRA model. See LoRA.
Example request body:
{
  "prompt":"girls <lora:yaeMikoRealistic_Genshin:1>",
  "steps":20,
  "save_images":true
}
Use ControlNet in requests
Use ControlNet in API requests for image transformations, such as maintaining horizontal or vertical orientation. For configuration details, see txt2img using ControlNet data format.
Asynchronous API
After deploying API edition services, send asynchronous API requests. Clients submit requests and subscribe to a result queue for server-pushed responses.
Obtain endpoint
-
After deploying the service, click the service name to enter Overview.
-
In Basic Information, click View Endpoint Information.
-
On Invocation Information, switch to Asynchronous Invocation to obtain the public network input endpoint and Token.
Send requests
Send requests to the server through the asynchronous API.
import requests


SERVICE_URL = "<Public service URL>"
TOKEN = "<Token>"

response = requests.post(
    f"{SERVICE_URL}/sdapi/v1/txt2img?task_id=job_001",
    json={
        "prompt": "futuristic city skyline",
        "steps": 30,
        "alwayson_scripts": {
            "save_dir": "/code/stable-diffusion-webui/data/outputs"
        }
    },
    headers={"Authorization": TOKEN}
)
print(f"Job enqueued: {response.json()}")
-
The asynchronous queue has size limits for both input requests and output results (typically 8 KB). When sending requests:
-
If request data includes images, use URLs to pass image information. Stable Diffusion WebUI downloads and parses image data automatically.
-
To exclude original image data from results, use save_dir to specify the save path. For details, see Additional parameters supported by API operations.
-
Subscribe to results
Subscribe to a result queue to receive server-pushed results after processing.
from eas_prediction import QueueClient

# Adjust the service URL format to the example: 112231234124214.cn-hangzhou.pai-eas.aliyuncs.com
SERVICE_URL = "<service_url>"
TOKEN = "<Token>"
# Service name configured during service creation.
SERVICE_NAME = "<service_name>"

sink = QueueClient(SERVICE_URL, SERVICE_NAME + '/sink')
sink.set_token(TOKEN)
sink.init()

for result in sink.watch(0, 5, auto_commit=True).run():
    print(f"Task {result.tags.get('task_id')} completed")
    print(f"Image URL: {result.data}")
EAS extends the native Stable Diffusion WebUI API with additional parameters. See Additional parameters supported by API operations.
Advanced deployment options
Custom deployment
JSON standalone deployment
Install plugins
Extend Stable Diffusion WebUI with plugins. PAI pre-installs BeautifulPrompt, which expands and refines prompts.
Install plugin
View and install plugins on the Extensions tab of the WebUI page:
-
Click the target service name to open the Overview page, then click Web applications in the upper-right corner.
-
On the WebUI page, under the Extensions tab, check if BeautifulPrompt is selected. If not, select the plugin and click Apply changes and reload UI to reload BeautifulPrompt plugin.
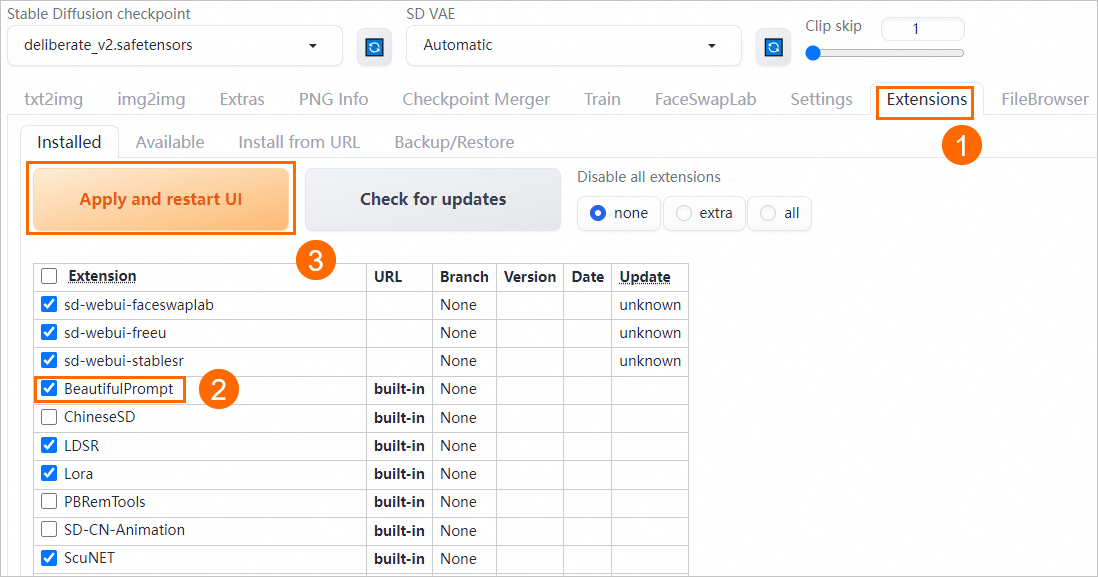
The WebUI page restarts automatically when a plugin is installed. After reloading, verify that inference works correctly.
Verify inference
-
Switch to the BeautifulPrompt tab. In the text box, enter a simple prompt. Click Generate to create a more detailed prompt.
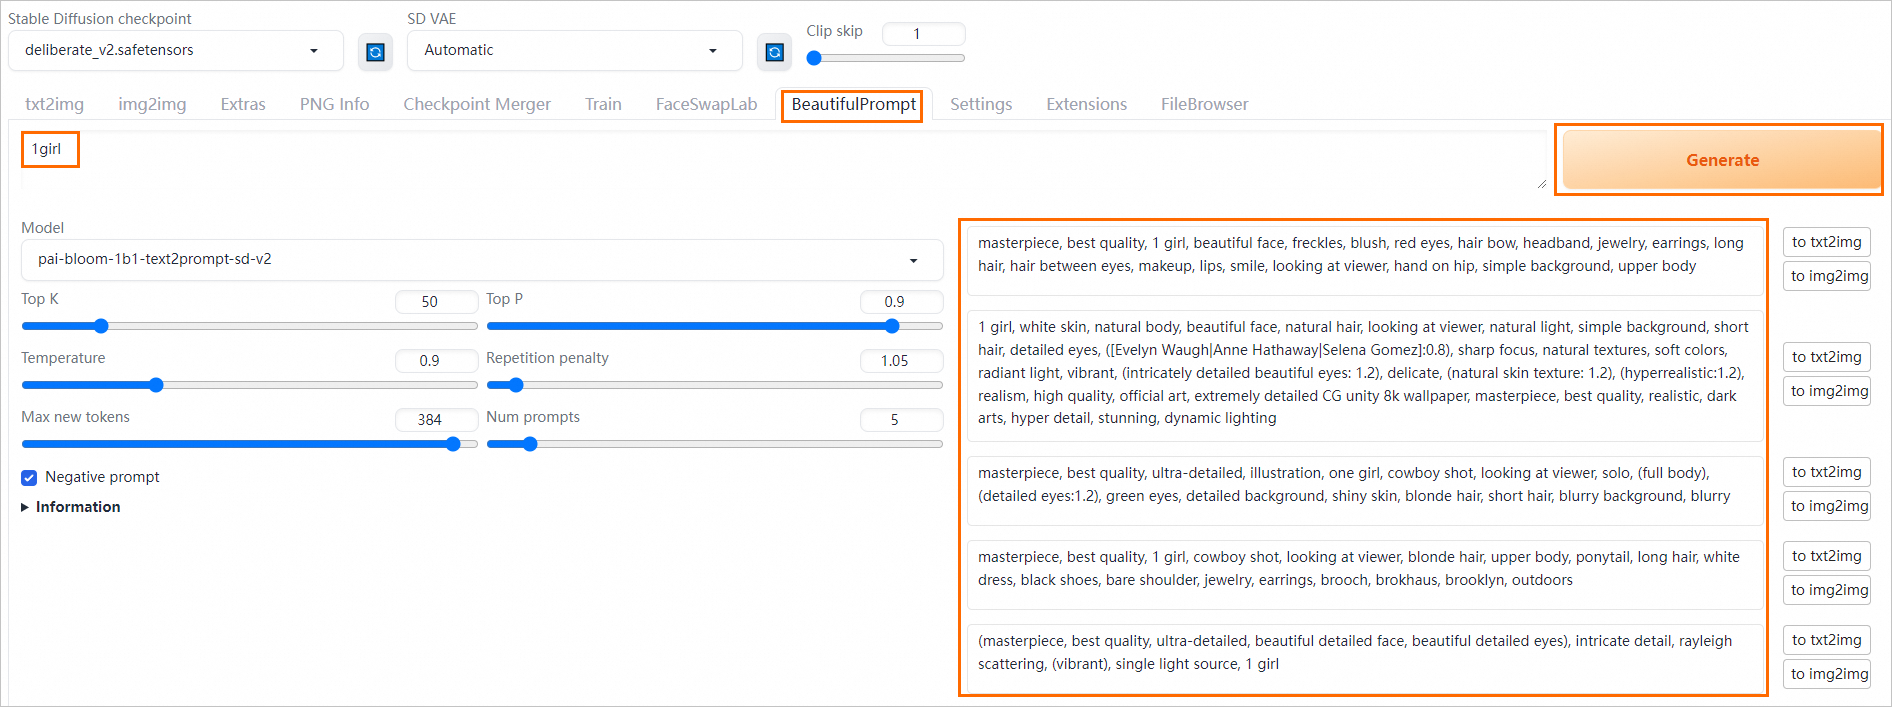
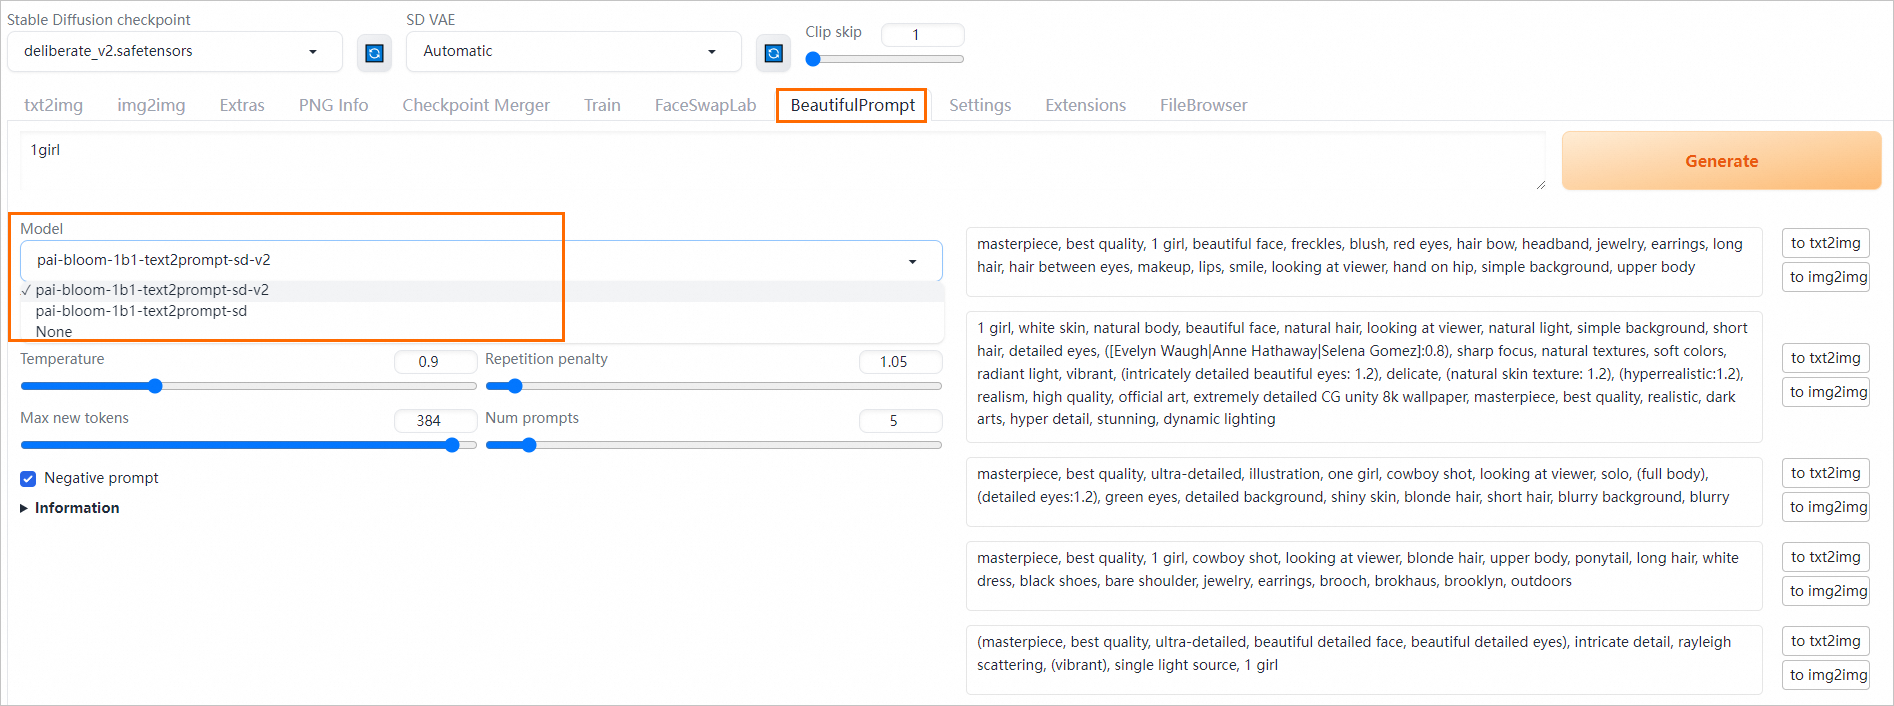
PAI provides multiple prompt generation models. Each model generates slightly different prompts:
-
pai-bloom-1b1-text2prompt-sd-v2: Excels at generating prompts for complex scenarios.
-
pai-bloom-1b1-text2prompt-sd: Generates prompts describing single objects.
Select the appropriate model to generate prompts as needed.
-
-
Select the prompt to use. Click to txt2img to the right of the prompt.
The page automatically redirects to the Text-to-Image tab and auto-fills the prompt area.

-
Click Generate to generate an image on the right side of the WebUI page.

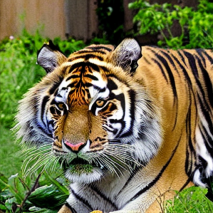
BeautifulPrompt enhances image aesthetics and adds more details compared to basic prompts:
Input Prompt
Effect Without BeautifulPrompt
Effect With BeautifulPrompt
a cat


a giant tiger

FAQs
Q: How do I mount my models and output directories?
After deployment, the system creates this directory structure in the mounted OSS or NAS storage: 
This includes:
-
models: This directory stores model files.
-
After initiating an inference request, the system automatically outputs result files to this directory according to the pre-configured settings in the API code.
To load custom or community-downloaded models, store them in the corresponding directories listed above:
-
Upload model files to the corresponding subdirectory under mounted storage's
modelsdirectory. For details, see Step 2: Upload files. -
On the Elastic Algorithm Service (EAS) page, click
 >Restart Service in the Actions column of the target service. Changes take effect after the service successfully restarts.
 -
On the Stable Diffusion WebUI page, switch models and verify model inference.

Q: Are downloaded plugins and uploaded files saved in the instance if the configuration remains unchanged?
Q: What if the service remains stuck for a long time?
-
First, try reopening the Stable Diffusion WebUI interface or restarting the EAS service to resolve the issue:
-
Click the target service to enter the Overview page. In the upper-right corner, click Web applications to reopen Stable Diffusion WebUI.
-
Click the Actions column of the target service, click the
 > Restart Service, and restart the EAS service.
-
-
If restarting does not resolve the issue, the service may need to download models or plugins from the public network. EAS does not enable public network access by default. Images can start offline, and mounted models do not require a network. However, some plugins require downloading content from the Internet. Check the logs for the download path, manually download the model, and upload it to OSS for mounting. For details, see Q: How do I mount my models and output directories?. If public network access is required, see Access public or internal network resources in EAS.
Q: How do I switch the default language of the WebUI page to English?
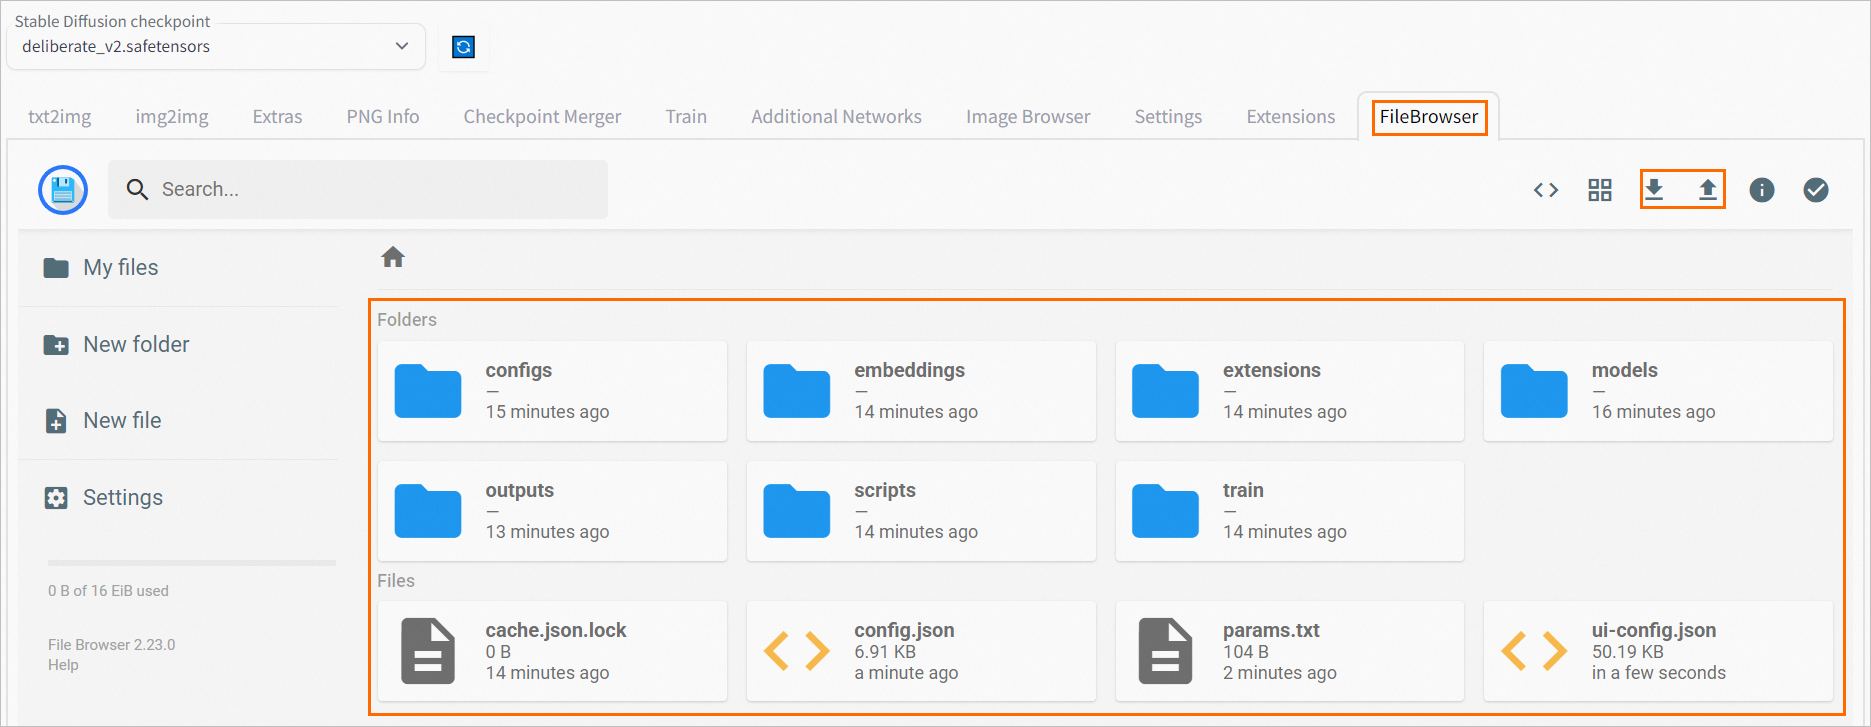
Q: How do I manage my file system?
For Standard edition and Clustered WebUI services, the system adds the --filebrowser parameter to the run command by default. Manage files directly through WebUI:
-
Click the target service name to open the Overview page, then click Web applications in the upper-right corner.
-
On the Stable Diffusion WebUI page, click the FileBrowser tab. View file system directly, or perform upload and download operations.
Q: Error: No such file or directory: 'data-oss/data-********.png'
-
Check the deployment version. If it is an API edition (image x.x-api) or Clustered WebUI (image x.x-cluster-webui), model configuration is required.
-
Check the mount path. Verify if the
--data-dirparameter is in the run command and ensure its path is consistent with the OSS mount path.
Q: Cannot access the WebUI page.
Appendix
Parameters supported during service startup
-
Common parameters
Parameter
Description
Recommendation
--bladeEnables PAI-Blade acceleration to improve image generation speed.
Recommended.
--filebrowserEnables file upload and download for models and images.
Enabled by default.
--data-dir /code/stable-diffusion-webui/data-ossPath for persistent storage mount.
Use when mounting persistent storage. Default starting path is
/code/stable-diffusion-webui/. Relative paths are also supported.--apiEnables WebUI API access.
Enabled by default.
--enable-nsfw-censorDisabled by default. Enable for NSFW content filtering if needed for compliance.
Adjust as needed.
--always-hide-tabsHides specified tabs from the WebUI.
Adjust as needed.
--min-ram-reserved 40 --sd-dynamic-cacheCaches the Stable Diffusion model in memory for faster model switching.
Optional.
-
Clustered edition parameters
NoteCheckpoint and ControlNet large models automatically load files from the public folder and custom files.
Parameter
Description
Recommendation
--lora-dirSpecify the public LoRA model directory, for example:
--lora-dir /code/stable-diffusion-webui/data-oss/models/Lora.Not configured by default. All user LoRA directories are isolated, and only LoRA models in user folders are loaded. When a specific directory is specified, all users simultaneously load LoRA models from both the public directory and their user folders.
--vae-dirSpecify the public VAE model directory, for example:
--vae-dir /code/stable-diffusion-webui/data-oss/models/VAE.Not configured by default. All user VAE directories are isolated, and only VAE models in user folders are loaded. When a specific directory is specified, all users load only VAE models from that public directory.
--gfpgan-dirSpecify the public GFPGAN model directory, for example:
--gfpgan-dir /code/stable-diffusion-webui/data-oss/models/GFPGAN.Not configured by default. All user GFPGAN directories are isolated, and only GFPGAN models in user folders are loaded. When a specific directory is specified, all users load only GFPGAN models from that public directory.
--embeddings-dirSpecify the public embeddings model directory, for example:
--embeddings-dir /code/stable-diffusion-webui/data-oss/embeddings.Not configured by default. All user embeddings directories are isolated, and only embeddings models in user folders are loaded. When a specific directory is specified, all users load only embeddings models from that public directory.
--hypernetwork-dirSpecify the public hypernetwork model directory, for example:
--hypernetwork-dir /code/stable-diffusion-webui/data-oss/models/hypernetworks.Not configured by default. All user hypernetwork directories are isolated, and only hypernetwork models in user folders are loaded. When a specific directory is specified, all users load only hypernetwork models from that public directory.
--root-extensionsPlugin directory uses a shared directory. After using this parameter, all users see identical plugins.
Use this parameter when centralizing plugin installation or management.
Additional parameters for API operations
EAS extends the native Stable Diffusion WebUI API with additional optional parameters:
-
Specify Stable Diffusion models, VAE models, and output directories.
-
Pass input parameters via URL and receive corresponding status codes.
-
Access generated images and ControlNet images via URL.
Examples:
txt2img request and response examples
Example request:
{
      "alwayson_scripts": {
          "sd_model_checkpoint": "deliberate_v2.safetensors",
          "save_dir": "/code/stable-diffusion-webui/data-oss/outputs",
          "sd_vae": "Automatic"
      },
      "steps": 20,
      "prompt": "girls",
      "batch_size": 1,
      "n_iter": 2,
      "width": 576,
      "height": 576,
      "negative_prompt": "ugly, out of frame"
  }
Key parameters:
-
sd_model_checkpoint: Specifies the Stable Diffusion model and enables automatic model switching.
-
sd_vae: Specifies the VAE model.
-
save_dir: Specifies the save path for generated images.
The synchronous API request example is as follows:
# Invoke the synchronous API to verify model effects.

curl --location --request POST '<service_url>/sdapi/v1/txt2img' \
--header 'Authorization: <token>' \
--header 'Content-Type: application/json' \
--data-raw '{
      "alwayson_scripts": {
          "sd_model_checkpoint": "deliberate_v2.safetensors",
          "save_dir": "/code/stable-diffusion-webui/data-oss/outputs",
          "sd_vae": "Automatic"
      },
      "prompt": "girls",
      "batch_size": 1,
      "n_iter": 2,
      "width": 576,
      "height": 576,
      "negative_prompt": "ugly, out of frame"
  }'
The response data format example is as follows:
{
  "images": [],
  "parameters": {
    "id_task": "14837",
    "status": 0,
    "image_url": "/code/stable-diffusion-webui/data-oss/outputs/txt2img-grids/2023-07-24/grid-29a67c1c-099a-4d00-8ff3-1ebe6e64931a.png,/code/stable-diffusion-webui/data-oss/outputs/txt2img-images/2023-07-24/74626268-6c81-45ff-90b7-faba579dc309-1146644551.png,/code/stable-diffusion-webui/data-oss/outputs/txt2img-images/2023-07-24/6a233060-e197-4169-86ab-1c18adf04e3f-1146644552.png",
    "seed": "1146644551,1146644552",
    "error_msg": "",
    "total_time": 32.22393465042114
  },
  "info": ""
}
The asynchronous API request example is as follows:
# Send data directly to the asynchronous queue.
curl --location --request POST '<service_url>/sdapi/v1/txt2img' \
--header 'Authorization: <token>' \
--header 'Content-Type: application/json' \
--data-raw '{
    "alwayson_scripts": {
        "sd_model_checkpoint": "deliberate_v2.safetensors",
        "id_task": "14837",
        "uid": "123",
        "save_dir": "tmp/outputs"
    },
    "prompt": "girls",
    "batch_size": 1,
    "n_iter": 2,
    "width": 576,
    "height": 576,
    "negative_prompt": "ugly, out of frame"
}'
img2img Request Data Format Example
Request data format example:
{
    "alwayson_scripts": {
        "image_link":"https://eas-cache-cn-hangzhou.oss-cn-hangzhou-internal.aliyuncs.com/stable-diffusion-cache/tests/boy.png",
        "sd_model_checkpoint": "deliberate_v2.safetensors",
        "sd_vae": "Automatic",
        "save_dir": "/code/stable-diffusion-webui/data-oss/outputs"
    },
    "prompt": "girl",
    "batch_size": 1,
    "n_iter": 2,
    "width": 576,
    "height": 576,
    "negative_prompt": "ugly, out of frame",
    "steps": 20, # Sampling steps
    "seed": 111,
    "subseed": 111, # Variation seed
    "subseed_strength": 0, # Variation strength
    "seed_resize_from_h": 0, # Resize seed from height
    "seed_resize_from_w": 0, # Resize seed from width
    "seed_enable_extras": false, # Extra
    "sampler_name": "DDIM", # Sampling method
    "cfg_scale": 7.5, # CFG Scale
    "restore_faces": true, # Restore faces
    "tiling": false, # Tiling
    "init_images": [], # image base64 str, default None
    "mask_blur": 4, # Mask blur
    "resize_mode": 1, # 0 just resize, 1 crop and resize, 2 resize and fill, 3 just resize
    "denoising_strength": 0.75, # Denoising strength
    "inpainting_mask_invert": 0, #int, index of ['Inpaint masked', 'Inpaint not masked'], Mask mode
    "inpainting_fill": 0, #index of ['fill', 'original', 'latent noise', 'latent nothing'], Masked content
    "inpaint_full_res": 0, # index of ["Whole picture", "Only masked"], Inpaint area
    "inpaint_full_res_padding": 32, #minimum=0, maximum=256, step=4, value=32, Only masked padding, pixels
    #"image_cfg_scale": 1, # resized by scale
    #"script_name": "Outpainting mk2", # The script name to use. Do not add this field if not used.
    #"script_args": ["Outpainting", 128, 8, ["left", "right", "up", "down"], 1, 0.05]  # The parameters corresponding to the script. Here, they correspond to: fixed field, pixels, mask_blur, direction, noise_q, color_variation
}
Response data format example:
{
    "images":[],
    "parameters":{
        "id_task":"14837",
        "status":0,
        "image_url":"/data/api_test/img2img-grids/2023-06-05/grid-0000.png,/data/api_test/img2img-images/2023-06-05/00000-1003.png,/data/api_test/img2img-images/2023-06-05/00001-1004.png",
        "seed":"1003,1004",
        "error_msg":""
    },
    "info":""
}
txt2img Using ControlNet Data Format
Request data format:
{
    "alwayson_scripts": {
        "sd_model_checkpoint": "deliberate_v2.safetensors", # Model name, required
        "save_dir": "/code/stable-diffusion-webui/data-oss/outputs",
        "controlnet":{
            "args":[
                {
                    "image_link": "https://pai-aigc-dataset.oss-cn-hangzhou.aliyuncs.com/pixabay_images/00008b87bf3ff6742b8cf81c358b9dbc.jpg",
                    "enabled": true,
                    "module": "canny",
                    "model": "control_v11p_sd15_canny",
                    "weight": 1,
                    "resize_mode": "Crop and Resize",
                    "low_vram": false,
                    "processor_res": 512,
                    "threshold_a": 100,
                    "threshold_b": 200,
                    "guidance_start": 0,
                    "guidance_end": 1,
                    "pixel_perfect": true,
                    "control_mode": "Balanced",
                    "input_mode": "simple",
                    "batch_images": "",
                    "output_dir": "",
                    "loopback": false
                }
            ]
        }
    },
    # Main parameters
    "prompt": "girls",
    "batch_size": 1,
    "n_iter": 2,
    "width": 576,
    "height": 576,
    "negative_prompt": "ugly, out of frame"
}
Response data format example:
{
    "images":[],
    "parameters":{
        "id_task":"14837",
        "status":0,
        "image_url":"/data/api_test/txt2img-grids/2023-06-05/grid-0007.png,/data/api_test/txt2img-images/2023-06-05/00014-1003.png,/data/api_test/txt2img-images/2023-06-05/00015-1004.png",
        "seed":"1003,1004",
        "error_msg":"",
        "image_mask_url":"/data/api_test/controlnet_mask/2023-06-05/00000.png,/data/api_test/controlnet_mask/2023-06-05/00001.png"
    },
    "info":""
}
References
-
For details about Elastic Algorithm Service billing, see Elastic Algorithm Service billing.