This guide explains how to fine-tune a LoRA model and find the optimal hyperparameter configuration by running a Hyperparameter Tuning experiment on DLC compute resources.
Prerequisites
-
The permissions that are required to use AutoML are granted to your account. This prerequisite must be met if you use AutoML for the first time. For more information, see Grant permissions for AutoML.
-
The permissions that are required to use DLC are granted to your account. For more information, see Grant permissions for DLC.
-
A workspace is created and associated with a public resource group for general computing resources. For more information, see Create and manage a workspace.
-
Object Storage Service (OSS) is activated and an OSS bucket is created. For more information, see Get started with the OSS console.
Step 1: Create a dataset
Create an OSS dataset. This dataset mounts an Object Storage Service (OSS) directory to a DLC path to store data files from the Hyperparameter Tuning experiment. Configure the following key parameters and use the default values for the others. For more information, see Create and manage datasets.
-
Dataset Name: Enter a custom name for the dataset.
-
Select Data Storage: Select the OSS directory where the script file is located.
-
Property: Select Folder.
Step 2: Create an experiment
Go to the New Experiment page and configure the key parameters. For details on other parameters, see New Experiment. After you configure the parameters, click Submit.
-
Configure the execution settings.
Parameter
Description
Job type
Select DLC.
Resource Group
Select Public Resource Group.
Framework
Select Tensorflow.
Datasets
Select the dataset that you created in Step 1.
Node Image
Select Image Address and enter
registry.cn-shanghai.aliyuncs.com/mybigpai/nni:diffusersin the text box.The following data is pre-configured in the runtime image:
-
Pre-trained foundation model: The image contains the Stable-Diffusion-V1-5 model at
/workspace/diffusers_model_data/model. -
LoRa training data: The image contains the pokemon dataset at
/workspace/diffusers_model_data/data. -
Training code: The image contains the diffusers library at
/workspace/diffusers.
Instace Type
Select GPU >
12vCPU+92GB Mem+1*NVIDIA V100 ecs.gn6e-c12g1.3xlarge.Nodes
Set to 1.
Startup Command
cd /workspace/diffusers/examples/text_to_image && accelerate launch --mixed_precision="fp16" train_text_to_image_lora_eval.py \
    --pretrained_model_name_or_path="/workspace/diffusers_model_data/model" \
    --dataset_name="/workspace/diffusers_model_data/data" \
    --caption_column="text" \
    --resolution=512 --random_flip \
    --train_batch_size=8 \
    --val_batch_size=8 \
    --num_train_epochs=100 --checkpointing_steps=100 \
    --learning_rate=${lr} --lr_scheduler=${lr_scheduler} --lr_warmup_steps=0 \
    --rank=${rank} --adam_beta1=${adam_beta1} --adam_beta2=${adam_beta2} --adam_weight_decay=${adam_weight_decay} \
    --max_grad_norm=${max_grad_norm} \
    --seed=42 \
    --output_dir="/mnt/data/diffusers/pokemon/sd-pokemon_${exp_id}_${trial_id}" \
    --validation_prompts "a cartoon pikachu pokemon with big eyes and big ears" \
    --validation_metrics ImageRewardPatched \
    --save_by_metric val_loss
Hyperparameters
Configure the constraint type and search space for each hyperparameter as follows:
-
lr:
-
Constraint Type: choice.
-
Search Space: Click
 and add three enumeration values: 1e-4, 1e-5, and 2e-5.
-
-
lr_scheduler:
-
Constraint Type: choice.
-
Search Space: Click
 and add three enumeration values: constant, cosine, and polynomial.
-
-
rank:
-
Constraint Type: choice.
-
Search Space: Click
 and add three enumeration values: 4, 32, and 64.
-
-
adam_beta1:
-
Constraint Type: choice.
-
Search Space: Click
 and add two enumeration values: 0.9 and 0.95.
-
-
adam_beta2:
-
Constraint Type: choice.
-
Search Space: Click
 and add two enumeration values: 0.99 and 0.999.
-
-
adam_weight_decay:
-
Constraint Type: choice.
-
Search Space: Click
 and add two enumeration values: 1e-2 and 1e-3.
-
-
max_grad_norm:
-
Constraint Type: choice.
-
Search Space: Click
 and add three enumeration values: 1, 5, and 10.
-
This configuration generates 648 hyperparameter combinations. The experiment will create a trial for each combination, running the script with that specific set of hyperparameters.
-
-
Configure trial settings.
Parameter
Description
Metric Type
Select stdout.
Calculation Method
Select best.
Metric Weight
-
Key:
val_loss=([0-9\\.]+). -
Value: 1.
Metric Source
Set to cmd1.
Optimization Direction
Select The larger the better.
-
-
Configure search settings.
Parameter
Description
Search Algorithm
Select TPE.
Maximum Number of Searches
Set to 5.
Maximum Concurrency
Set to 2.
Enable earlystop
Turn on the switch.
start step
5
Step 3: View implementation details and execution results
-
On the Experiment List page, click the experiment name to go to the Experiment Details page.

On this page, you can view the progress and status of your Trials. The experiment automatically creates five trials based on your Search Algorithm and Maximum Trials settings.
-
Click the Trials tab. On this page, you can view a list of all Trials generated for the experiment, along with each Trial's execution status, final metric, and Hyperparameter Combination.
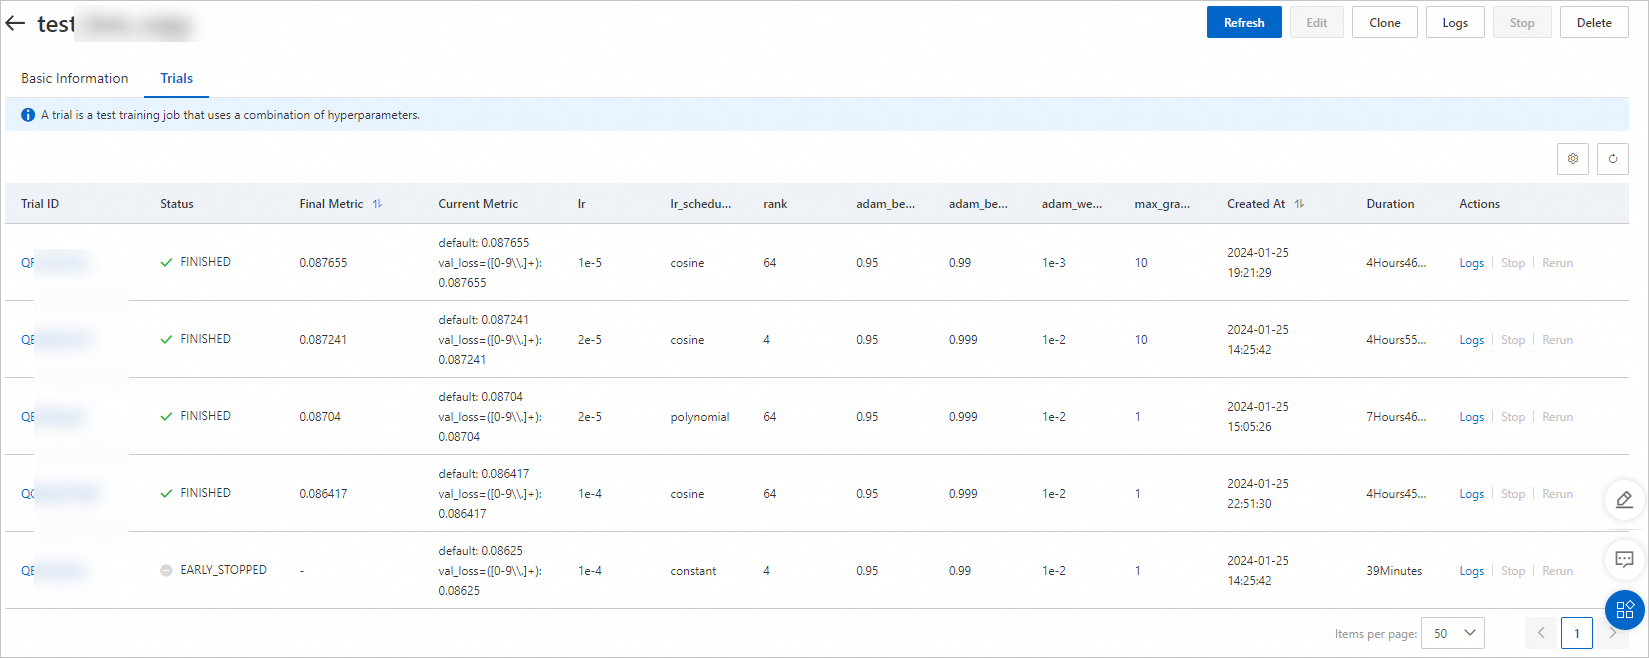
Each trial runs for approximately five hours. Based on the configured optimization direction (the larger the better), the hyperparameter combination corresponding to the final metric of 0.087655 is optimal.
Step 4: Deploy the model service and perform inference
-
Download the LoRA model and convert the model file format.
-
After the experiment completes successfully, a model file is generated in the
output_dirdirectory specified in the start command. Navigate to thecheckpoint-bestdirectory in the OSS path where the dataset for this experiment is mounted to view and download the model file. For more information, see Get started with the console.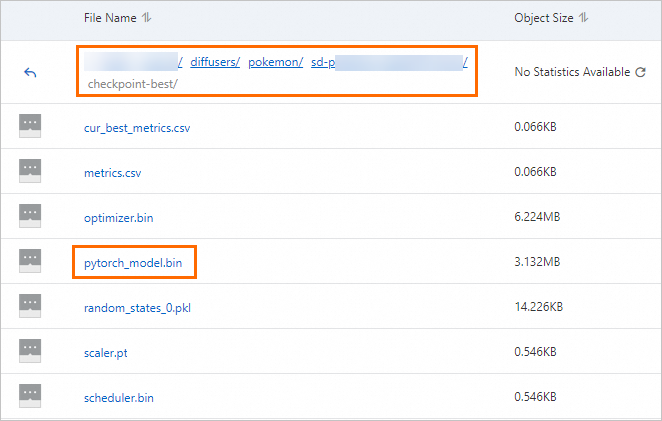
-
Run the following command to convert pytorch_model.bin to pytorch_model_converted.safetensors.
wget http://automl-nni.oss-cn-beijing.aliyuncs.com/aigc/convert.py
python convert.py --file pytorch_model.bin
-
-
Deploy the Stable Diffusion WebUI service.
-
Go to the Elastic Algorithm Service (EAS) page. For more information, see Custom Deployment.
-
On the Elastic Algorithm Service (EAS) page, click Deploy Service. In the Custom Model Deployment area, click Custom Deployment.
-
On the Create Service page, configure the following key parameters and then click Deploy.
Parameter
Description
Service Name
Enter a custom service name. In this example, the service name is sdwebui_demo.
Deployment Method
Select Deploy Web App by Using Image.
Select Image
In the PAI Image list, select stable-diffusion-webui. For Image Version, select 4.2-standard.
NoteBecause versions are updated frequently, select the latest image version for deployment.
Model Settings
Click Specify Model Settings to configure the model.
-
For Model Settings, select OSS. Set the OSS path to the path of the OSS bucket that you created in Step 1. For example:
oss://bucket-test/data-oss/. -
Mount Path: Mount the OSS file directory that you configured to the
/code/stable-diffusion-webuipath in the image. For example, set the path to/code/stable-diffusion-webui/data-oss. -
Enable Read-Only: Turn off the switch.
Command to Run
After the image is configured, the system automatically configures the run command. You must add
--data-dir <mount_directory>to the run command. The mount directory must be the same as the last-level directory of the Mount Path in the Model Settings section. In this example, add--data-dir data-ossto the end of the run command.Resource Configuration Mode
Select General.
Resource Configuration
Select a GPU type. For the best cost-effectiveness, set Instance Type to ml.gu7i.c16m60.1-gu30.
Extra System Storage
Set the extra system disk to 100 GB.
-
-
Click Deploy.
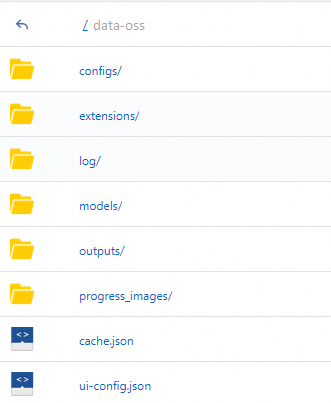
PAI automatically creates the following directory structure in the empty OSS directory you configured and copies the necessary data.
-
-
Upload the model files to their designated paths, then in the Actions column of the target service, click
 Restart Service. The changes take effect after the service restarts.
-
Upload the
pytorch_model_converted.safetensorsfile generated in the previous step to themodels/lora/directory in OSS. -
Upload the revAnimated_v122 foundation model to the
models/Stable-diffusion/directory in OSS.
-
-
In the Service Type column of the target service, click View Web App to open the WebUI and validate the model by running inference.