The image classification (Torch) component in Platform for AI (PAI) lets you train image classification models using PyTorch within a visual, no-code pipeline in Machine Learning Designer. The component supports popular backbone architectures and integrates with Object Storage Service (OSS) for data and model storage.
Prerequisites
Before you begin, ensure that you have:
-
An activated OSS bucket in the same region as your Designer workspace
-
Machine Learning Designer authorized to access OSS. See Activate OSS and Grant permissions
Limitations
-
This component is available only in Machine Learning Designer.
-
The only supported compute engine is Deep Learning Container (DLC).
How it works
The component supports two training approaches:
-
Transfer learning (recommended): The component starts with the default pre-trained ImageNet model and fine-tunes it on your labeled data. This approach requires less training data and converges faster. To use a custom pre-trained model instead, specify its OSS path in the oss path for pretrained model parameter.
-
Using the PAI default pre-trained model: If you leave the pre-trained model path blank, the component uses the default pre-trained model provided by PAI.
All training runs on DLC. After training, the model artifact is saved to the OSS directory you specify and can be passed directly to the General Image Prediction component for batch inference.
Prepare your data
The component accepts labeled training and evaluation data in two formats:
| Format | Description |
|---|---|
ClsSourceImageList |
A TXT annotation file where each line is <absolute-path/image-name.jpg> <label_id>, separated by a space |
ClsSourceItag |
Data labeled with iTAG, PAI's built-in data annotation tool |
Annotation file example (ClsSourceImageList):
oss://examplebucket/data/images/cat001.jpg 0
oss://examplebucket/data/images/dog001.jpg 1
oss://examplebucket/data/images/bird001.jpg 2Separate the image path and label_id with a single space. Do not use tabs or other delimiters. The label_id is a zero-based integer index corresponding to the class position in your class list file.
To prepare iTAG-labeled data, see iTAG overview.
Configure the component
Find the image classification (Torch) component in the component library under Video Algorithm > Offline Training. After adding it to your pipeline, configure the following tabs.
Input ports
Connect upstream Read OSS data components to the input ports to pass labeled data directly into the pipeline.
| Input port | Data type | Required |
|---|---|---|
| Data annotation path for training | OSS | No |
| Data annotation path for evaluation | OSS | No |
If you connect data through an input port and also set the corresponding annotation path parameter, the input port value takes precedence.
Fields Setting tab
| Parameter | Required | Description | Default |
|---|---|---|---|
| model type | Yes | The classification task type. Only classification is supported. |
Classification |
| oss dir to save model | Yes | The OSS directory where the trained model is saved. Example: oss://examplebucket/yunji.cjy/designer_test |
— |
| oss annotation path for training data | No | OSS path of the labeled training annotation file. Required if no training input port is connected. Example: oss://examplebucket/yunji.cjy/data/imagenet/meta/train_labeled.txt |
— |
| oss annotation path for evaluation data | No | OSS path of the labeled evaluation annotation file. Required if no evaluation input port is connected. Example: oss://examplebucket/yunji.cjy/data/imagenet/meta/val_labeled.txt |
— |
| class list file | Yes | Specifies image category names. Accepts three formats: a bracket-delimited list (e.g., [person, dog, cat]), an OSS path to a TXT file with category names separated by commas or line breaks, or leave blank to use numeric labels 0 through num_classes-1. |
— |
| Data Source Type | Yes | The annotation format of your input data. Valid values: ClsSourceImageList, ClsSourceItag. |
ClsSourceItag |
| oss path for pretrained model | No | OSS path of a custom pre-trained model. If left blank, the default pre-trained model provided by PAI is used. | — |
Parameters Setting tab
The three parameters with the greatest impact on training quality are backbone, initial learning rate, and optimizer. Set these deliberately; the remaining parameters are safe to leave at their defaults for initial runs.
| Parameter | Required | Description | Default |
|---|---|---|---|
| backbone | Yes | The backbone architecture for feature extraction. Valid values: resnet, resnext, hrnet, vit, swint, mobilenetv2, inceptionv4. |
resnet |
| num classes | Yes | The number of image categories in your dataset. | — |
| image size after resizing | Yes | The pixel dimension to which images are resized (square). | 224 |
| optimizer | Yes | The optimization algorithm. Valid values: SGD, Adam. |
SGD |
| initial learning rate | Yes | The starting learning rate. | 0.05 |
| learning rate policy | Yes | The strategy for adjusting the learning rate during training. Only step is supported. |
step |
| lr step | Yes | The epoch numbers at which the learning rate decays by 90%. Separate multiple values with commas. Example: 5,10 causes the learning rate to multiply by 0.1 at the start of epoch 6 and again at the start of epoch 11. |
[30,60,90] |
| train batch size | Yes | Number of samples per training iteration. | 2 |
| eval batch size | Yes | Number of samples per evaluation iteration. | 2 |
| total train epochs | Yes | Total number of training passes over the full dataset. | 1 |
| save checkpoint epoch | No | Interval (in epochs) at which a checkpoint is saved. Set to 1 to save a checkpoint after every epoch. |
1 |
| Exported model type | Yes | Format of the exported model. Valid values: raw, ONNX. |
raw |
Choosing a backbone:
Choose based on your dataset size, accuracy requirements, and available compute. Larger, more powerful backbones require more GPU memory and longer training time.
| Backbone | Best for |
|---|---|
| ResNet | General-purpose; strong baseline for most datasets |
| ResNeXt | Higher accuracy than ResNet, with moderate additional cost |
| HRNet | Tasks requiring fine spatial detail |
| ViT (Vision Transformer) | Large datasets; excellent accuracy but compute-intensive |
| Swin Transformer (SwinT) | Hierarchical features; good accuracy-efficiency trade-off |
| MobileNetV2 | Resource-constrained environments; fast inference |
| InceptionV4 | High accuracy on diverse classification tasks |
Tuning tab
| Parameter | Required | Description | Default |
|---|---|---|---|
| number process of reading data per gpu | No | Number of data-loading threads per GPU. | 4 |
| use fp 16 | No | Enables FP16 (half-precision) training to reduce GPU memory usage. | — |
| single worker or distributed on DLC | Yes | Compute mode. Use single_on_dlc for single-node training or distribute_on_dlc for multi-node distributed training. |
single_on_dlc |
| number of worker | No | Number of worker nodes. Required when using distribute_on_dlc. |
1 |
| cpu machine type | No | CPU instance type. Required when using distribute_on_dlc. |
16vCPU+64GB Mem-ecs.g6.4xlarge |
| gpu machine type | Yes | GPU instance type. | 8vCPU+60GB Mem+1xp100-ecs.gn5-c8g1.2xlarge |
Output port
| Output port | Data type | Downstream component |
|---|---|---|
| Output model | OSS path | General Image Prediction |
The output is the OSS directory path configured in the oss dir to save model parameter. Connect this port to the General Image Prediction component to run batch inference on your trained model.
Example: end-to-end image classification pipeline
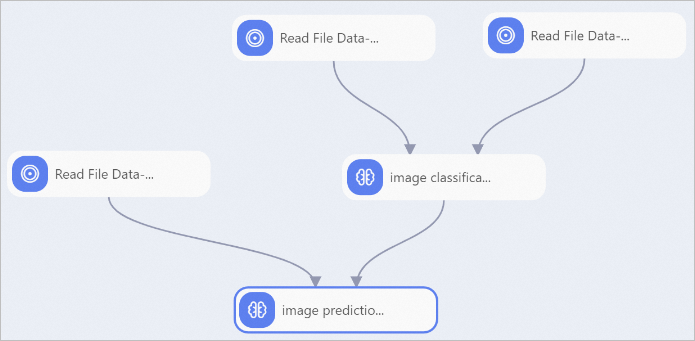
The following figure shows a sample pipeline that trains an image classifier and runs batch inference.
Steps:
-
Prepare and label data. Label your images using iTAG. For details, see iTAG overview.
-
Read training and evaluation data. Add two Read File Data components to the canvas. Set the OSS Data Path parameter of each component to the OSS path of your labeled training data and evaluation data, respectively.
ImportantSet Data Source Type to
ClsSourceItagwhen using iTAG-labeled data. -
Configure the image classification (Torch) component. Connect the two Read File Data components to the training and evaluation input ports of the image classification (Torch)-1 component. Configure the parameters as described in Configure the component.
-
Read prediction data. Add a third Read File Data component and set its OSS Data Path to the OSS path of the images you want to classify.
-
Run batch inference. Add an image prediction component and configure the following parameters: For full configuration details, see image prediction.
-
model type:
torch_classifier -
oss path for model: Set this to the same value as the oss dir to save model parameter from the image classification (Torch)-1 component.
-
What's next
-
General Image Prediction — Run batch inference on your trained model
-
Read OSS data — Load data into your Designer pipeline
-
iTAG overview — Label training data using PAI's annotation tool