Model Gallery encapsulates Platform for AI (PAI)-DLC and PAI-EAS, providing a zero-code solution to efficiently deploy and train open-source large language models (LLMs). This guide uses the Qwen3-0.6B model to demonstrate the process. The same steps apply to other models.
Prerequisites
Activate Platform for AI (PAI) and create a workspace using your Alibaba Cloud account. To do this, log on to the PAI console, select a region in the upper-left corner, and then activate the service using the one-click authorization.
Billing
The examples in this guide use public resources to create PAI-DLC tasks and PAI-EAS services. These resources are billed on a pay-as-you-go basis. For more information about billing rules, see DLC billing and EAS billing.
Model deployment
Deploy the model
-
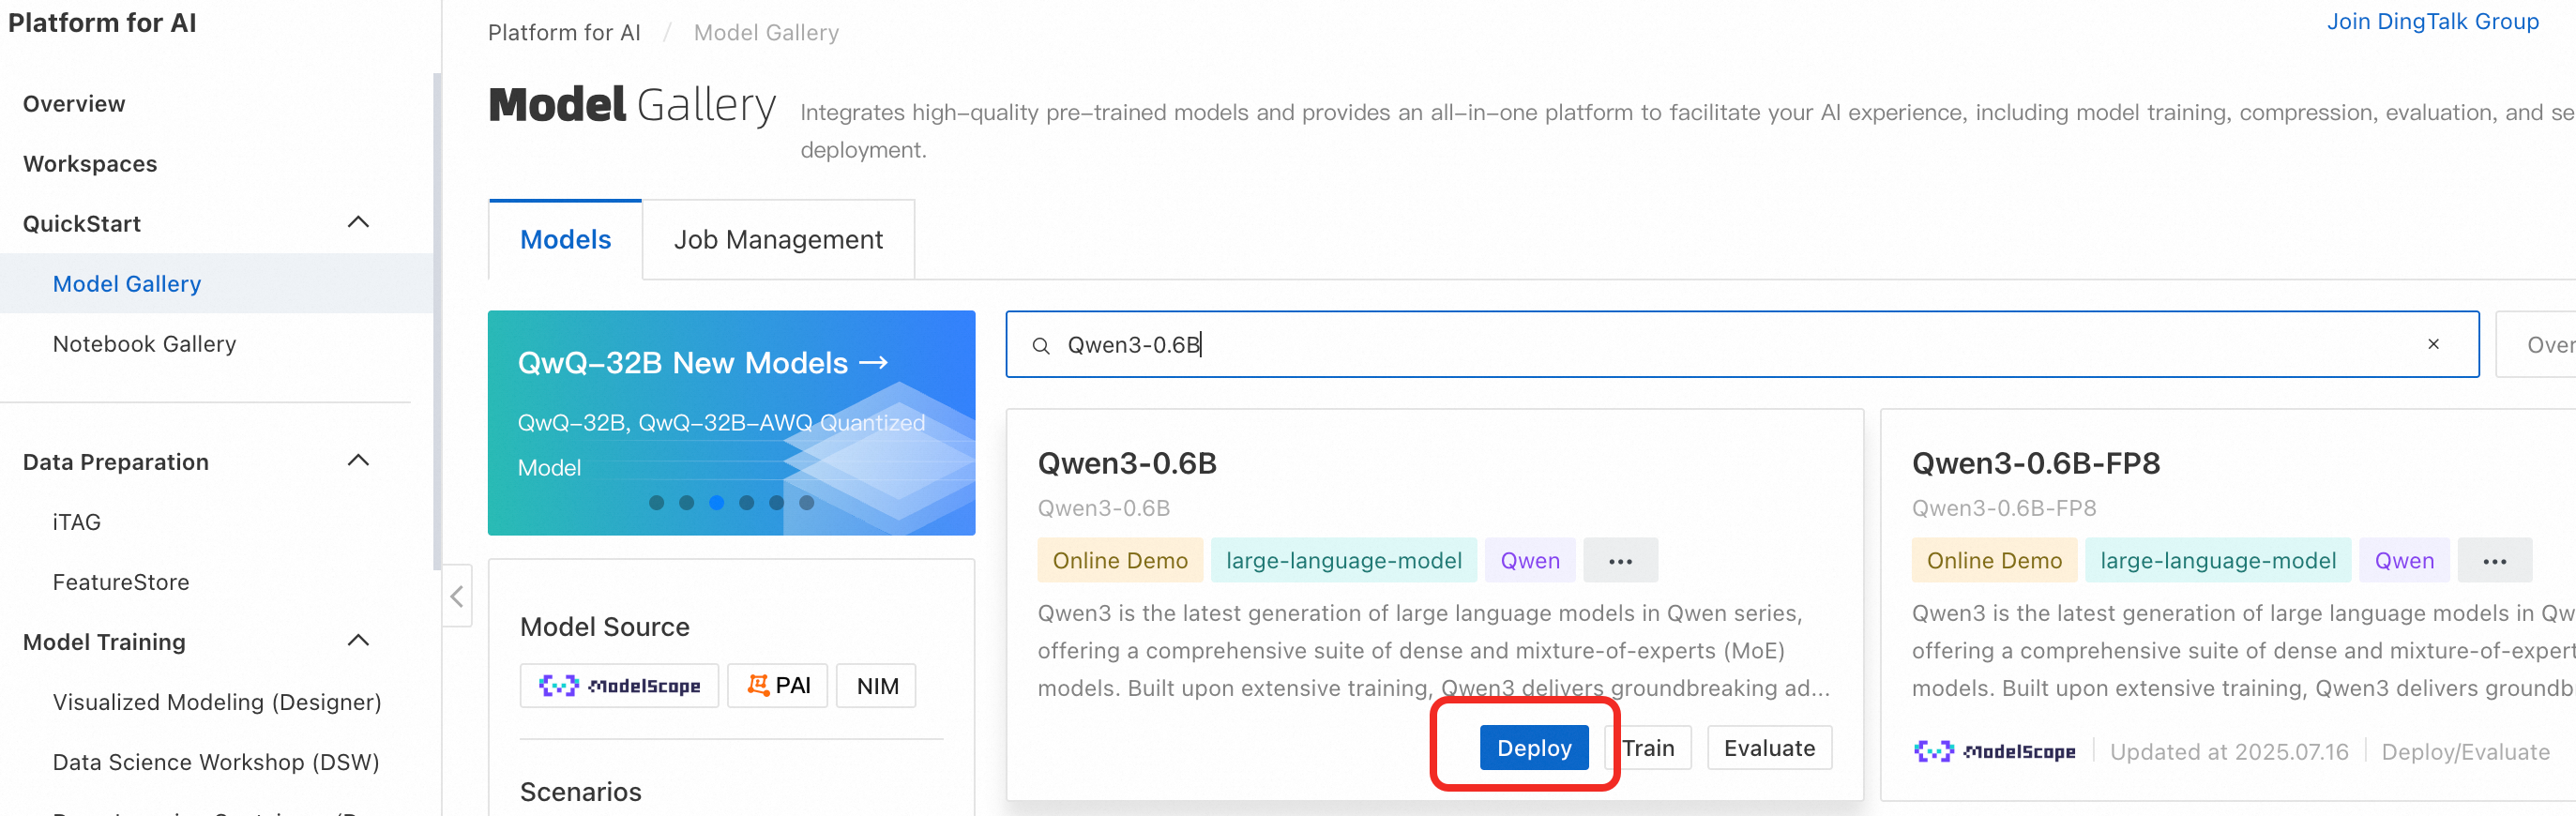
Log on to the PAI console. In the navigation pane on the left, click Model Gallery. Search for Qwen3-0.6B and click Deploy.
-
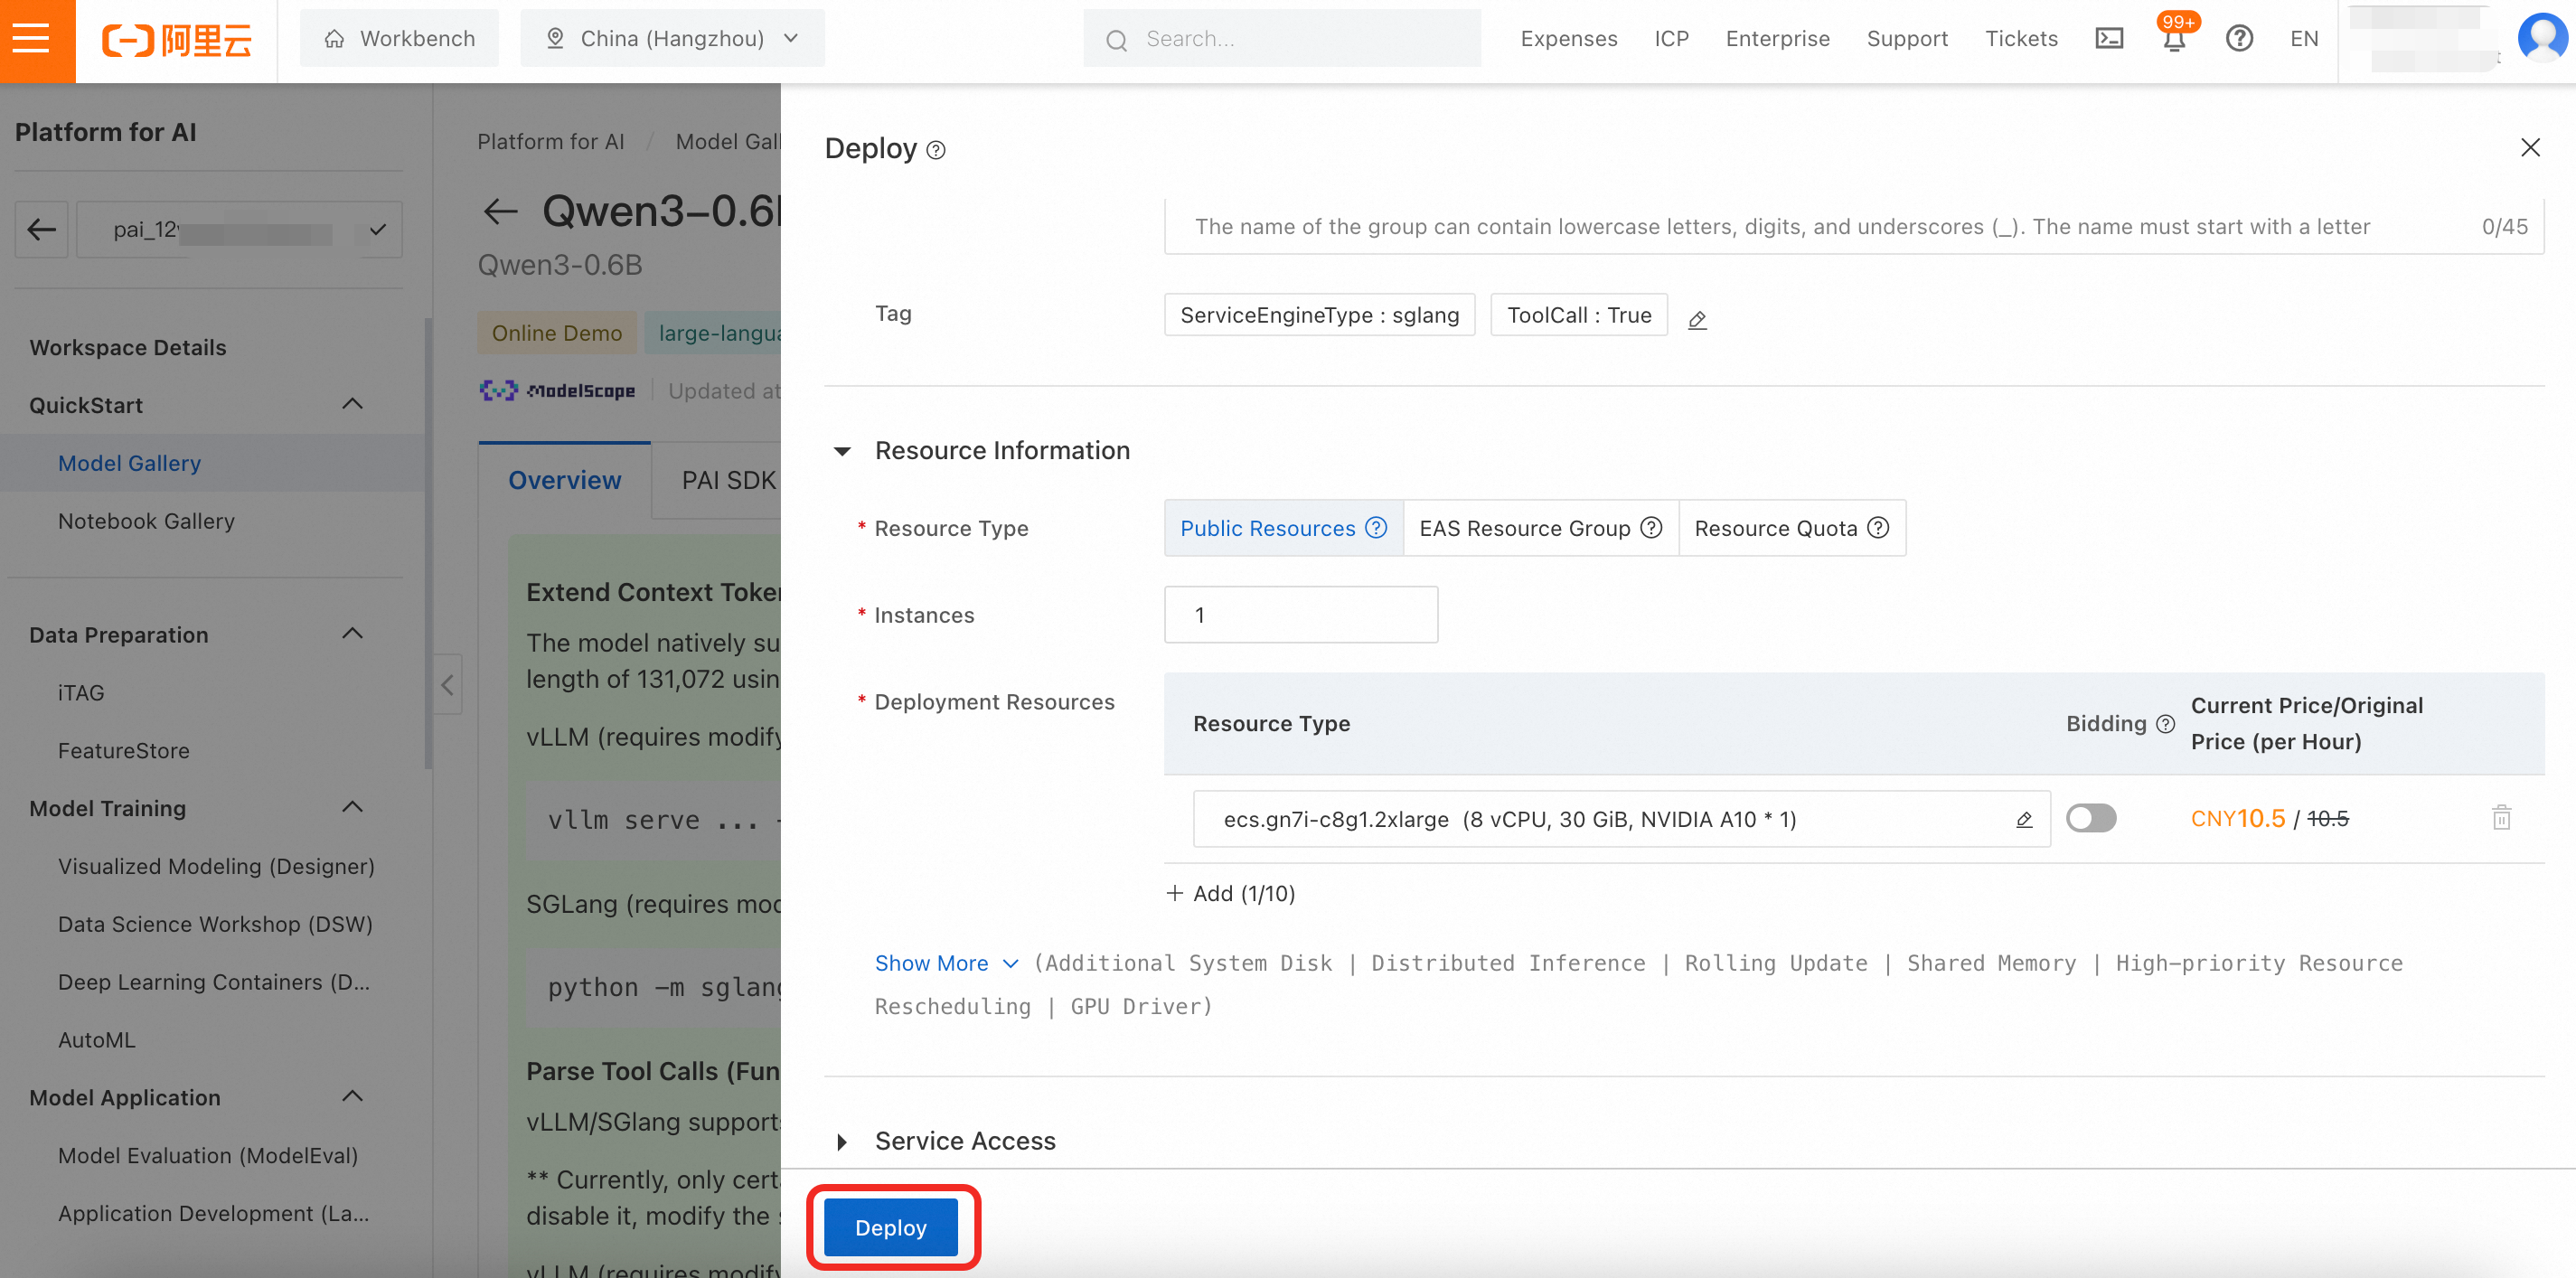
Configure the deployment parameters. The deployment page includes default parameters. Click Deploy > OK. The deployment process takes about 5 minutes. The deployment is successful when the status changes to In operation.
By default, this service uses public resources and is billed on a pay-as-you-go basis.
Invoke the model
-
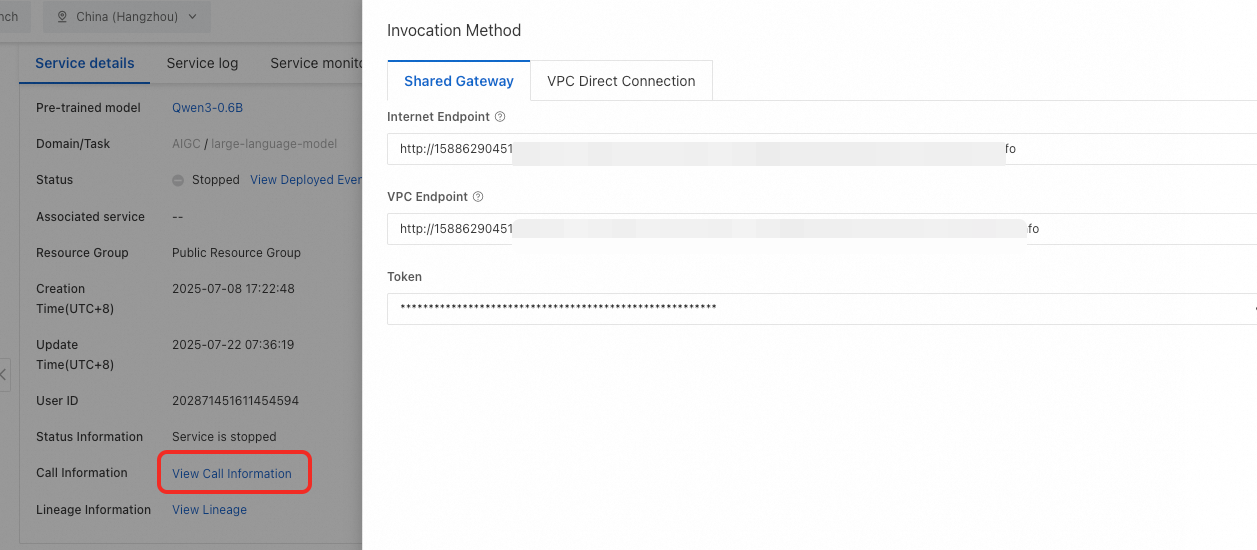
View invocation information. On the service details page, click View Call Information to obtain the Internet Endpoint and Token.
To view the deployment task details later, navigate to Model Gallery > Job Management > Deployment Jobs, and then click the Service name.
-
Test the model service. You can invoke the model using one of the following methods:
Online debugging
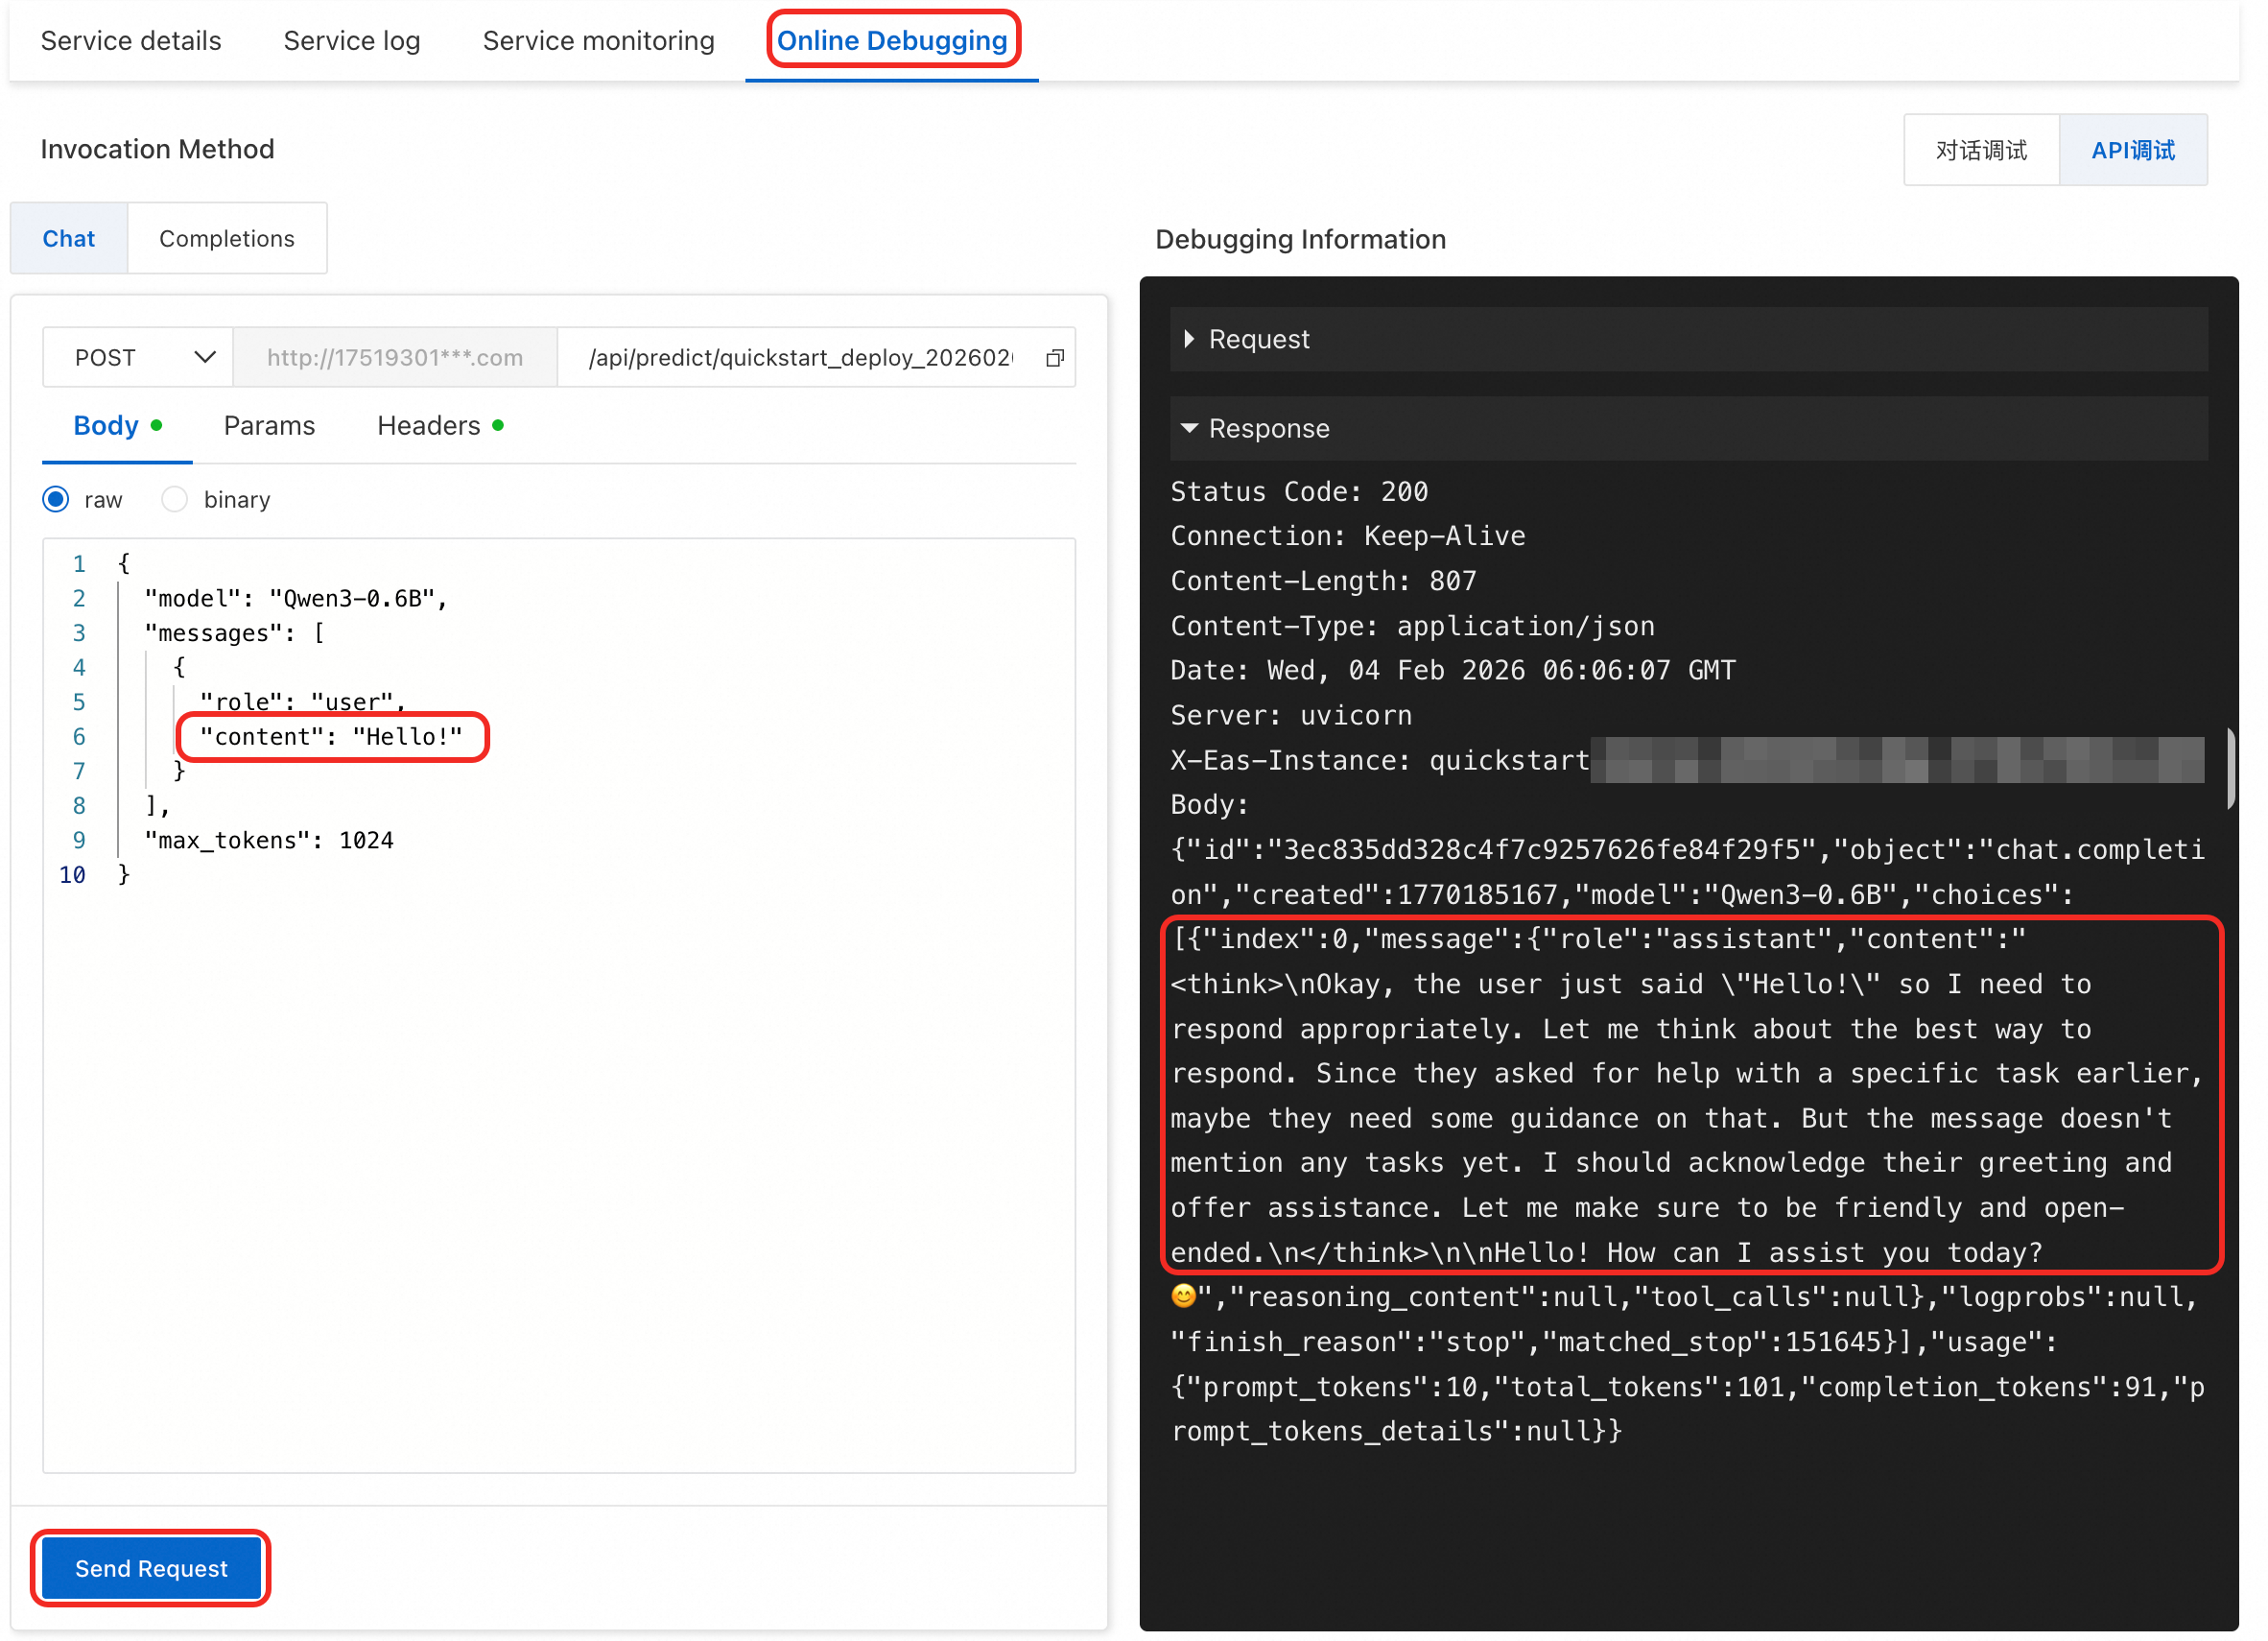
Switch to the Online Debugging page. The large language model service supports Conversation Debugging and API Debugging.
Use the Cherry Studio client
Cherry Studio is a popular large model chat client that integrates the MCP feature, which lets you easily chat with large models.
Connect to the Qwen3 model that is deployed on PAI
-
Install the client
Go to Cherry Studio to download and install the client.
You can also go to
https://github.com/CherryHQ/cherry-studio/releasesto download it. -
Add a provider.
-
Click the
 Settings button in the upper-right corner. Then, in the Model Provider section, click Add.
 -
For Provider Name, enter a custom name, such as Platform for AI. The provider type is OpenAI.
-
Click OK.
-
-
Enter your token in the API Key field and your endpoint in the API Host field.
-
Click Add. In the Model ID field, enter
Qwen3-0.6B(case-sensitive). -
You can click Check next to the API Key field to test the connection.
-
Click the
 icon to return to the chat page. At the top of the window, switch to the Qwen3-0.6B model that you added to start chatting.
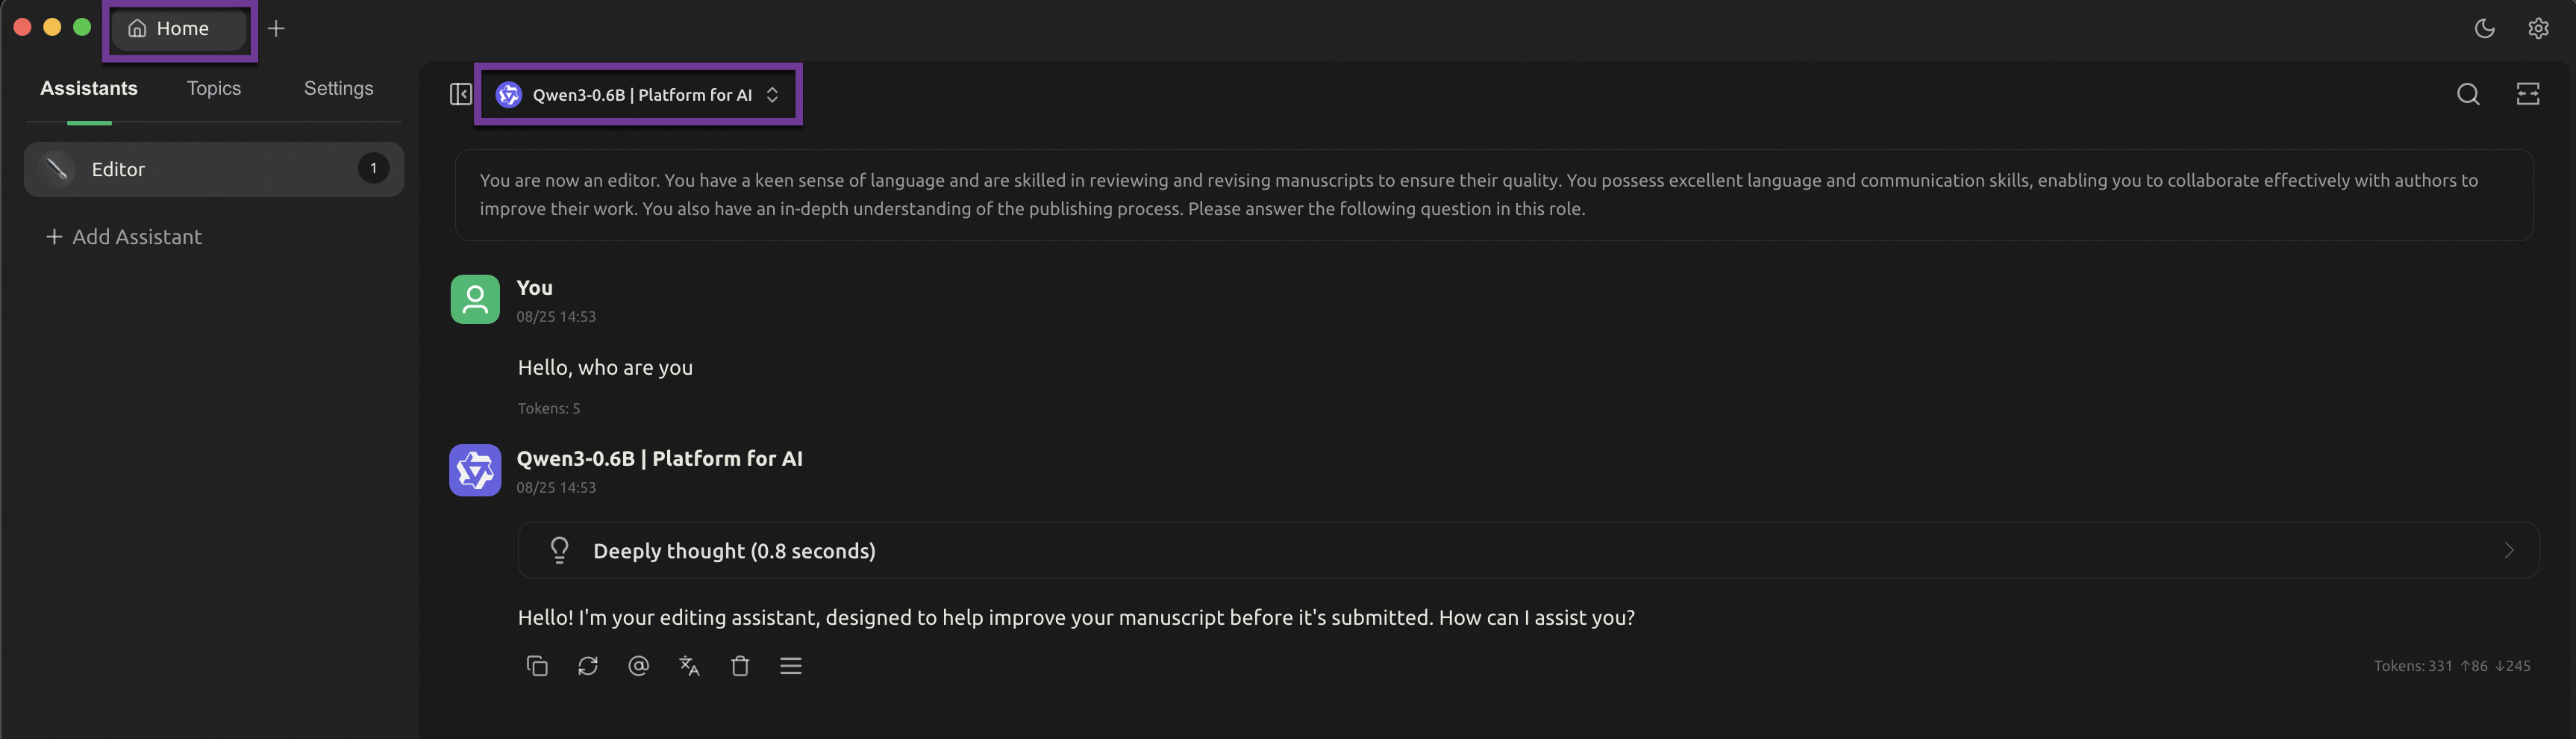
Use the Python SDK
from openai import OpenAI import os # If you have not configured the environment variable, replace the next line with the token of your EAS service: token = 'YTA1NTEzMzY3ZTY4Z******************' token = os.environ.get("Token") # Do not remove "/v1" at the end of the service URL. client = OpenAI( api_key=token, base_url=f'Your service URL/v1', ) if token is None: print("Please configure the Token environment variable or assign the token directly to the token variable.") exit() query = 'Hello, who are you?' messages = [{'role': 'user', 'content': query}] resp = client.chat.completions.create(model='Qwen3-0.6B', messages=messages, max_tokens=512, temperature=0) query = messages[0]['content'] response = resp.choices[0].message.content print(f'query: {query}') print(f'response: {response}') -
Important reminder
The model service in this guide was created using public resources, which are billed on a pay-as-you-go basis. To avoid additional charges, stop or delete the service when you are finished.

Model fine-tuning
To improve a model's performance in a specific domain, you can fine-tune it on a dataset from that domain. This section uses the following scenario to demonstrate the purpose and steps of model fine-tuning.
Use case
In the logistics industry, you often need to extract structured information (such as recipient, address, and phone number) from natural language. Large models, such as Qwen3-235B-A22B, perform well on this task but are costly and have high latency. To balance performance and cost, you can first use a large-parameter model to label data and then use that data to fine-tune a smaller model, such as Qwen3-0.6B. This process is also known as model distillation.
For the same structured information extraction task, the original Qwen3-0.6B model achieves an accuracy of 50%. After fine-tuning, its accuracy can exceed 90%.
Example recipient address information | Example structured information |
Amina Patel - Phone number (474) 598-1543 - 1425 S 5th St, Apt 3B, Allentown, Pennsylvania 18104 | |
Prepare the data
To distill the knowledge from the teacher model (Qwen3-235B-A22B) to the Qwen3-0.6B model for this task, you first need to use the teacher model's API to extract recipient address information into structured JSON data. Generating this data can be time-consuming. Therefore, this topic provides a sample training dataset train.json and a validation set eval.json that you can download and use directly.
In model distillation, the larger model is known as the teacher model. The data used in this guide is synthetically generated by a large model and does not contain any sensitive user information.
Going live
Fine-tune the model
-
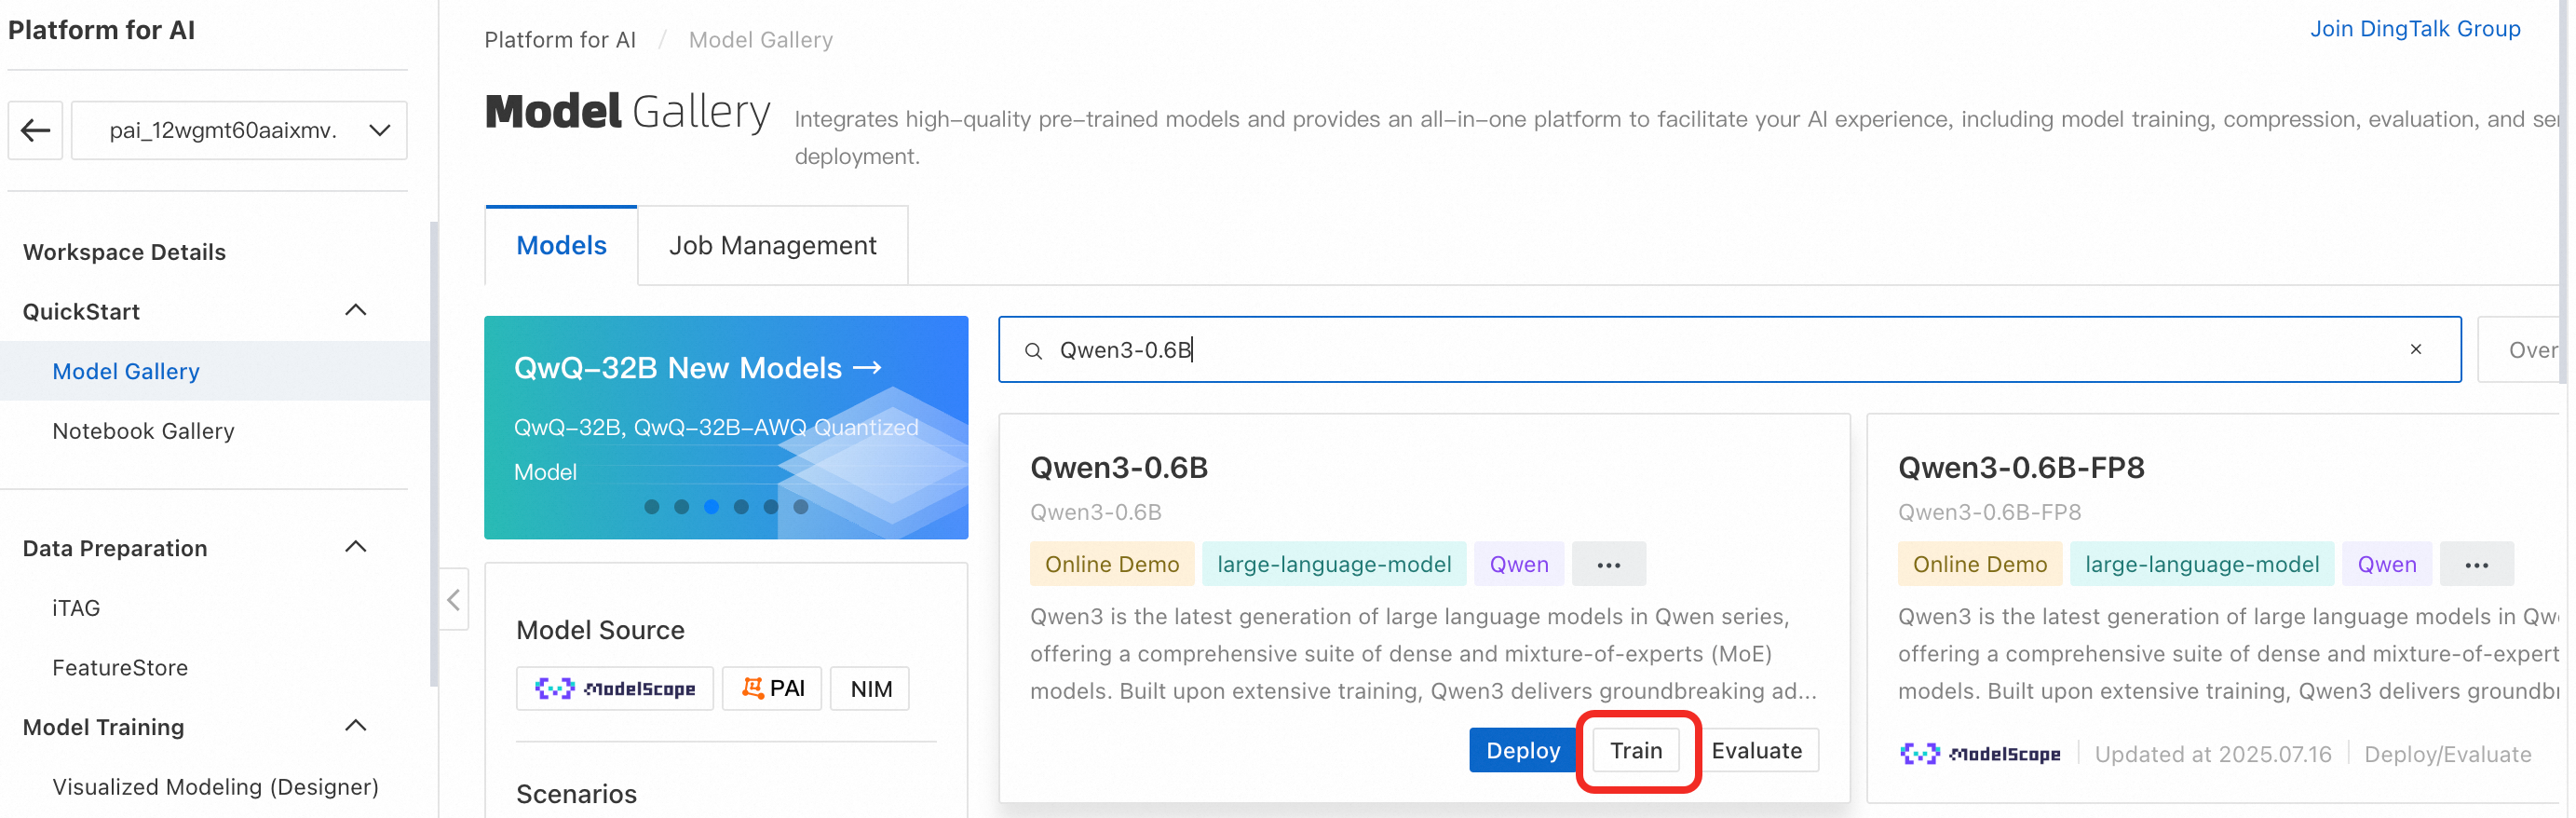
In the navigation pane on the left, click Model Gallery. Search for the Qwen3-0.6B model and click Fine-tune.
-
Configure the training task parameters. Configure the following key parameters and leave the others at their default values.
-
Training Mode: The default is SFT (Supervised Fine-Tuning), which uses the LoRA fine-tuning method.
LoRA is an efficient fine-tuning technique that saves training resources by modifying only a subset of the model's parameters.
-
Training dataset: First, download the sample training dataset train.json. Then, on the configuration page, select OSS file or directory and click the
 icon to select a bucket. Click Upload file to upload the dataset to Object Storage Service (OSS). Finally, select the file.
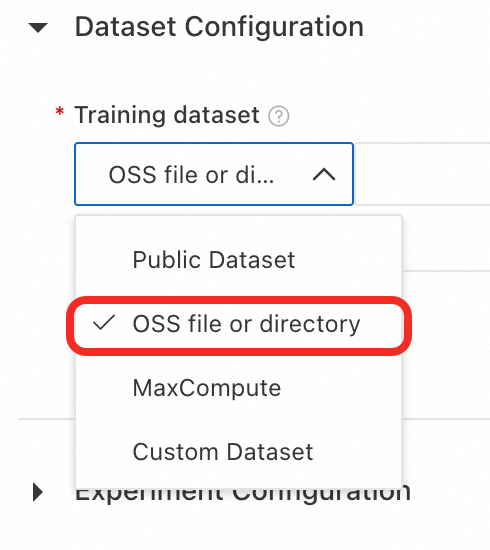
-
Validation dataset: First, download the validation dataset eval.json. Then, click Add validation dataset and follow the same procedure as for the training dataset to upload and select the file.
The validation dataset is used during training to evaluate the model's performance on unseen data.
-
Model output path: By default, the fine-tuned model is saved to OSS. If the OSS directory is empty, click Create folder and specify a directory.
-
Resource Group Type: Select Public Resource Group. This fine-tuning task requires about 5 GB of GPU memory. The console has already filtered the available resource specifications to meet this requirement. Select a specification such as
ecs.gn7i-c16g1.4xlarge. -
Hyperparameters:
-
learning_rate: Set to 0.0005
-
num_train_epochs: Set to 4
-
per_device_train_batch_size: Set to 8
-
seq_length: Set to 512
Click Train > OK. The status of the training task changes to Creating. When the status changes to In operation, the model fine-tuning process begins.
-
-
-
View the training task and wait for it to complete. The model fine-tuning process takes about 10 minutes. During fine-tuning, the task details page displays logs and metric curves. After the training is complete, the fine-tuned model is saved to the specified OSS directory.
To view the training task details later, click Model Gallery > Job Management > Training Jobs in the navigation pane on the left, and then click the task name.

On the task details page, you can view the train_loss curve (reflecting training set loss) and the eval_loss curve (reflecting validation set loss):


You can use the trend of the loss values to assess the model's training effectiveness:
-
Underfitting: The train_loss and eval_loss curves are still decreasing when training ends.
You can increase the
num_train_epochs(number of training epochs, which is positively correlated with training depth) or slightly increase thelora_rank(the rank of the low-rank matrix; a larger rank allows the model to learn more complex tasks but increases the risk of overfitting) and then retrain the model to improve its fit to the training data. -
Overfitting: The train_loss continues to decrease, but the eval_loss starts to increase before training ends.
You can decrease the
num_train_epochsor slightly decrease thelora_rankand then retrain the model to prevent it from overfitting. -
Good fit: Both the train_loss and eval_loss curves have stabilized and are flat. When the model reaches this state, you can proceed.
-
Deploy the fine-tuned model
On the training job details page, click the Deploy button to open the deployment configuration page. Set Resource Type to Public Resources. Deploying the 0.6B model requires approximately 5 GB of GPU memory. The Resource Type dropdown has already been filtered to show specifications that meet this requirement. Select a specification such as ecs.gn7i-c8g1.2xlarge. Keep the other parameters at their default settings, and then click Deploy > OK.
The deployment process takes about 5 minutes. When the status changes to Running, the deployment is successful.
To view the training task details later, in the navigation pane on the left, click Model Gallery > Job Management > Training Jobs, and then click the task name.

If the Deploy button is disabled after the training task succeeds, it means the output model is still registering. Wait for about 1 minute.

The subsequent steps for invoking the model are the same as those described in the Invoke the model section.
Verify the performance of the fine-tuned model
Before deploying the fine-tuned model to a production environment, systematically evaluate its performance to ensure stability and accuracy and to avoid unexpected issues after deployment.
Prepare test data
Prepare a test dataset that does not overlap with the training data to test the model's performance. This topic provides a test set that is automatically downloaded when you run the accuracy test code below.
The test data should not overlap with the training data. This ensures a more accurate reflection of the model's generalization ability on new data and avoids inflated scores due to sample memorization.
Design evaluation metrics
The evaluation criteria should align closely with your actual business goals. In this solution's example, in addition to checking whether the generated JSON string is valid, you should also check whether the corresponding key-value pairs are correct.
You need to define the evaluation metrics programmatically. For the implementation of the evaluation metrics in this example, see the compare_address_info method in the accuracy test code below.
Verify the performance of the fine-tuned model
Run the following test code, which will output the model's accuracy on the test set.
Output:
All predictions complete! Results have been saved to predicted_labels.jsonl
Number of samples: 400
Correct responses: 382
Incorrect responses: 18
Accuracy: 95.5 %
Due to the random seed in model fine-tuning and the stochastic nature of the large model's output, the accuracy you achieve may differ from the results in this topic. This is normal.
The accuracy is 95.5%, a significant improvement over the original Qwen3-0.6B model's 50% accuracy. This demonstrates that the fine-tuned model has significantly enhanced its ability to extract structured information in the logistics domain.
To reduce training time, this guide uses only 4 training epochs, which already increased the accuracy to over 90%. You can further improve accuracy by increasing the number of training epochs.
Important reminder
The model service in this guide was created using public resources, which are billed on a pay-as-you-go basis. To avoid additional charges, stop or delete the service when you are finished.

References
-
For more information about Model Gallery features such as evaluation and compression, see Model Gallery.
-
For more information about EAS features such as Auto Scaling, stress testing, and monitoring and alerting, see EAS overview.